Since the release of iOS 4, many amazing features like folders, single inbox, and more have been available to iOS developers. One of the most anticipated features for iOS is multitasking. Multitasking behaves very differently on iOS than on other mobile operating systems, and this post will guide you through how to set it up!
There are six major components of the multitasking feature. They are:
- Notifications
- Task Completion
- Background Location
- Background Audio
- Fast-App Switching
- Voice Over IP
In this four part series we will be covering these elements of multitasking with the exception of Fast-App Switching and Voice Over-IP. In this tutorial, part 1 of the series, we will be covering notifications, specifically local notification, because push notifications require external server configuration. With Local Notifications you will be able to build timers, alarms, and many other great applications. In this tutorial we will be creating a cooking timer to prevent over-cooking your food.
Step 1: Create the project
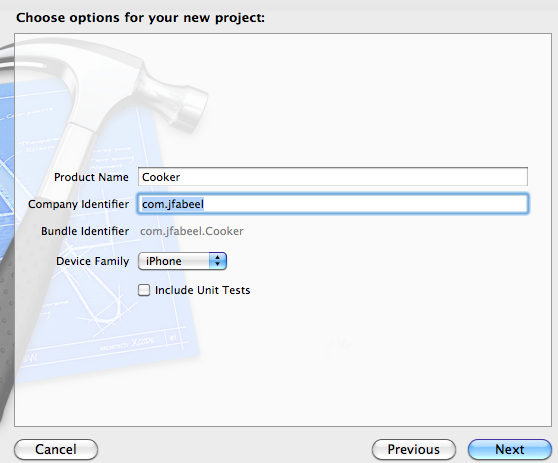
To start off building this project you will open Xcode. Next select New View Based Application. Name the project what you wish, I will be calling mine "Cooker". Once you've named your application enter the company identifier and set the device to iPhone. Be sure to check "Include Unit Tests" if you are inclined to. Then choose where to save the project and create the project.
Step 2: Setting up the interface code
In the "Cooker" directory in Xcode select CookerViewController.h to start building the class interface. Under the @interface declaration between the brackets add the following lines of code:
    IBOutlet UIDatePicker *datePicker; //The picker to tell how much time till the notification is called
	IBOutlet UITextField *alertBodyField; //The textfield that gives the text that will be displayed in the alert as the message.
	IBOutlet UILabel *alertNotification; //The Label that tells the user that the alert has been registered with the system.
Now under the closing bracket add the following code:
    @property(nonatomic, retain) IBOutlet UIDatePicker *datePicker;
	@property(nonatomic, retain) IBOutlet UITextField *alertBodyField;
	@property(nonatomic, retain) IBOutlet UILabel *alertNotification;

	- (IBAction)addNotification:(id)sender; //This will be called by a UIButton to register the notification with the system
	- (IBAction)dismissKeyboard:(id)sender; //This will be called by the alertBodyField to dismiss the keyboard when its action didEndOnExit is activated
Your CookerViewController.h file should look like.
#import <UIKit/UIKit.h>

	@interface CookerViewController : UIViewController {
		IBOutlet UIDatePicker *datePicker; //The picker to tell how much time till the notification is called
		IBOutlet UITextField *alertBodyField; //The textfield that gives the text that will be displayed in the alert as the message.
		IBOutlet UILabel *alertNotification; //The Label that tells the user that the alert has been registered with the system.
	}

	@property(nonatomic, retain) IBOutlet UIDatePicker *datePicker;
	@property(nonatomic, retain) IBOutlet UITextField *alertBodyField;
	@property(nonatomic, retain) IBOutlet UILabel *alertNotification;

	- (IBAction)addNotification:(id)sender; //This will be called by a UIButton to register the notification with the system
	- (IBAction)dismissKeyboard:(id)sender; //This will be called by the alertBodyField to dismiss the keyboard when its action didEndOnExit is activated

	@end
Step 3: Build the interface
In the "Cooker" directory in Xcode find and open CookerViewController.xib to start building the user interface. First drag out a UIDatePicker to the top of the view touching the status bar. In the Attributes Inspector select, in date picker mode, "Count Down Timer".
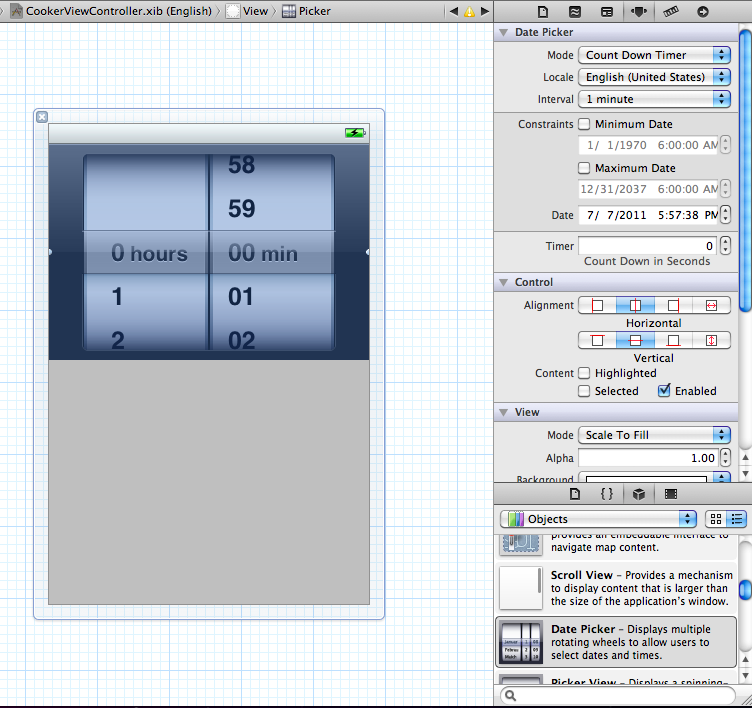
Go to the Connections Inspector and drag a referencing outlet to the files owner and connect it to the datePicker property.
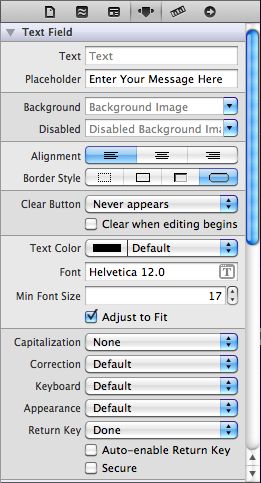
Next get a UITextField and drag it to the middle so it is touching the bottom of the UIDatePicker.
Go to the Attributes Inspector and set the Placeholder to "Enter your message here." and set the return key to "Done".
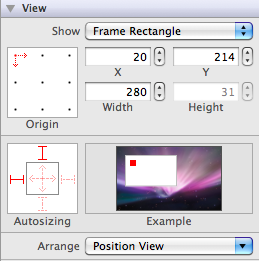
Now go to the Size Inspector and set the width to 280 pixels.
Go to the Connections Inspector and drag the referencing outlet to the files owner and connect it to the alertBodyField property. Once you've done that drag the didEndOnExit action onto the files owner and select dismissKeyboard:.
Now below the UITextField drag out a UILabel and set the UILabel's text to "Notification Registered" or what you want the alertNotificationLabel to say and set the label to be hidden in the Attributes Inspector.
Go to the Size Inspector and set the width to 280 pixels, the x position to 20, and the y position to 293. Then go to the Connections Inspector and drag a reference outlet to the files owner property alertNotification.
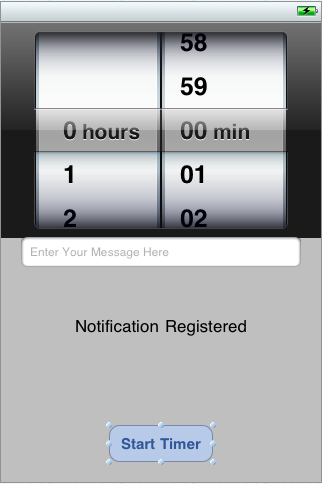
Once you've done that drag a UIButton below the UILabel and set the text inside the button to "Start Timer".
In the Size Inspector set the x position to 108 and the y position to 403. Now go to the Connections Inspector and drag a connection from the touchUpInside action to the addNotification method in the files owner. Here is the finished interface.
Step 4: Implement the Local Notifications
Go to CookerAppDelegate.m and add the following line to application:(UIApplication *)application didFinishLaunchingWithOptions:.
[[UIApplication sharedApplication] setApplicationIconBadgeNumber:0];
Now in applicationDidEnterBackground and applicationWillTerminate: add the following line
[viewController alertNotification] setHidden:YES];
Your app delegate should look like this
#import "CookerAppDelegate.h"

		#import "CookerViewController.h"

		@implementation CookerAppDelegate


		@synthesize window=_window;

		@synthesize viewController=_viewController;

		- (BOOL)application:(UIApplication *)application didFinishLaunchingWithOptions:(NSDictionary *)launchOptions {
		    self.window.rootViewController = self.viewController;
		    [self.window makeKeyAndVisible];

		    [[UIApplication sharedApplication] setApplicationIconBadgeNumber:0];
		    return YES;
		}

		- (void)applicationWillResignActive:(UIApplication *)application{}

		- (void)applicationDidEnterBackground:(UIApplication *)application {
		    [[_viewController alertNotification] setHidden:YES];
		}

		- (void)applicationWillEnterForeground:(UIApplication *)application {}

		- (void)applicationDidBecomeActive:(UIApplication *)application {}

		- (void)applicationWillTerminate:(UIApplication *)application {
		    [[_viewController alertNotification] setHidden:YES];
		}

		- (void)dealloc
		{
		    [_window release];
		    [_viewController release];
		    [super dealloc];
		}

		@end
Go to the CookerViewController.m and add the following code to dealloc
			self.datePicker = nil;
			self.alertBodyField = nil;
			self.alertNotification = nil;

			[datePicker release];
			[alertBodyField release];
			[alertNotification release];
Now add the following code below @implementation CookerViewController
				- (IBAction)dismissKeyboard:(id)sender {
				[self resignFirstResponder]; //Dismiss the keyboard
			}
Next add the following code above dismissKeyboard: and below @implementation CookerViewController
				- (IBAction)addNotification:(id)sender {
				UILocalNotification *localNotification = [[UILocalNotification alloc] init]; //Create the localNotification object
				[localNotification setFireDate:[NSDate dateWithTimeIntervalSinceNow:[datePicker countDownDuration]]]; //Set the date when the alert will be launched using the date adding the time the user selected on the timer
				[localNotification setAlertAction:@"Launch"]; //The button's text that launches the application and is shown in the alert
				[localNotification setAlertBody:[alertBodyField text]]; //Set the message in the notification from the textField's text
				[localNotification setHasAction: YES]; //Set that pushing the button will launch the application
				[localNotification setApplicationIconBadgeNumber:[[UIApplication sharedApplication] applicationIconBadgeNumber]+1]; //Set the Application Icon Badge Number of the application's icon to the current Application Icon Badge Number plus 1

				[[UIApplication sharedApplication] scheduleLocalNotification:localNotification]; //Schedule the notification with the system
				[localNotification release];

				[alertNotification setHidden:NO]; //Set the alertNotification to be shown showing the user that the application has registered the local notification
			}
Here is the completed CookerViewController.m
#import "CookerViewController.h"

			@implementation CookerViewController
			@synthesize datePicker;
			@synthesize alertBodyField;
			@synthesize alertNotification;

			- (void)dealloc
			{
			    [super dealloc];

			    self.datePicker = nil;
			    self.alertBodyField = nil;
			    self.alertNotification = nil;

			    [datePicker release];
			    [alertBodyField release];
			    [alertNotification release];
			}

			- (IBAction)dismissKeyboard:(id)sender {
			    [self resignFirstResponder]; //Dismiss the keyboard
			}

			- (IBAction)addNotification:(id)sender {
			    UILocalNotification *localNotification = [[UILocalNotification alloc] init]; //Create the localNotification object
			    [localNotification setFireDate:[NSDate dateWithTimeIntervalSinceNow:[datePicker countDownDuration]]]; //Set the date when the alert will be launched using the date adding the time the user selected on the timer
			    [localNotification setAlertAction:@"Launch"]; //The button's text that launches the application and is shown in the alert
			    [localNotification setAlertBody:[alertBodyField text]]; //Set the message in the notification from the textField's text
			    [localNotification setHasAction: YES]; //Set that pushing the button will launch the application
			    [localNotification setApplicationIconBadgeNumber:[[UIApplication sharedApplication] applicationIconBadgeNumber]+1]; //Set the Application Icon Badge Number of the application's icon to the current Application Icon Badge Number plus 1

			    [[UIApplication sharedApplication] scheduleLocalNotification:localNotification]; //Schedule the notification with the system
				[localNotification release];

			    [alertNotification setHidden:NO]; //Set the alertNotification to be shown showing the user that the application has registered the local notification
			}

			- (void)didReceiveMemoryWarning
			{
			    // Releases the view if it doesn't have a superview.
			    [super didReceiveMemoryWarning];

			    // Release any cached data, images, etc that aren't in use.
			}

			#pragma mark - View lifecycle

			/*
			// Implement viewDidLoad to do additional setup after loading the view, typically from a nib.
			- (void)viewDidLoad
			{
			    [super viewDidLoad];
			}
			*/

			- (void)viewDidUnload
			{
			    [super viewDidUnload];
			    // Release any retained subviews of the main view.
			    // e.g. self.myOutlet = nil;
			}

			- (BOOL)shouldAutorotateToInterfaceOrientation:(UIInterfaceOrientation)interfaceOrientation
			{
			    // Return YES for supported orientations
			    return (interfaceOrientation == UIInterfaceOrientationPortrait);
			}

			@end
Wrap-Up
If you build and run you should be able to make the timing perfect for all your cooking needs. Thanks for reading this tutorial, be on the look out for part 2 in the series, Background Audio. If you need any more help please comment.

Comments