Introduction
With iOS 7, we saw a shift in Apple's design paradigm for mobile devices. Not only did they adopt the so-called flat design, Apple also added a few elements to this pattern themselves. One of these additions is the use of blurred-translucent backgrounds to convey the notion of depth and context. Take Control Center for instance, it blurs the contents of the view behind it as it gets pulled up. This gives the user the sense that it is positioned above other content on the screen and deserves focus. It does so without making the user lose track of where she is in the app.
Even though blur and translucency are used throughout the operating system on iOS 7, the iOS SDK doesn't provide us with any APIs to achieve a similar effect. In this tutorial, I'll walk you through a few methods to create blurred views by creating the sample app shown below.
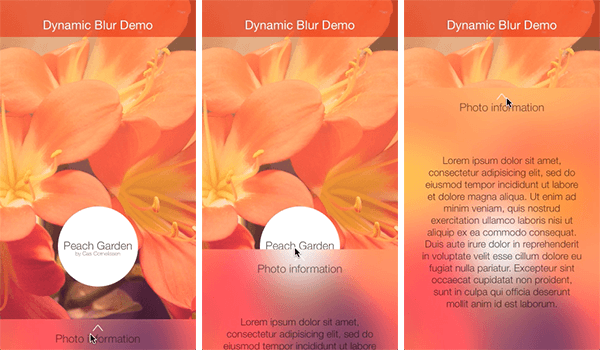
Our sample app will have a view at the bottom, which can be revealed by pulling it up. The view is translucent and blurs the content that's below it in the view hierarchy, similar to Control Center on iOS 7.
1. Project Setup
Overview
The app that we're going to build will display a photo along with the photo's name and author, displayed in a white circle. There will also be a small rectangular view at the bottom of the screen that blurs the photo and that can be pulled up to display additional information about the photo.
I'm going to assume that you already know how to work with basic user interface elements, such as views, image views, and scroll views. In this tutorial, we'll focus on the view hierarchy and the views that we need to create the blur effect.
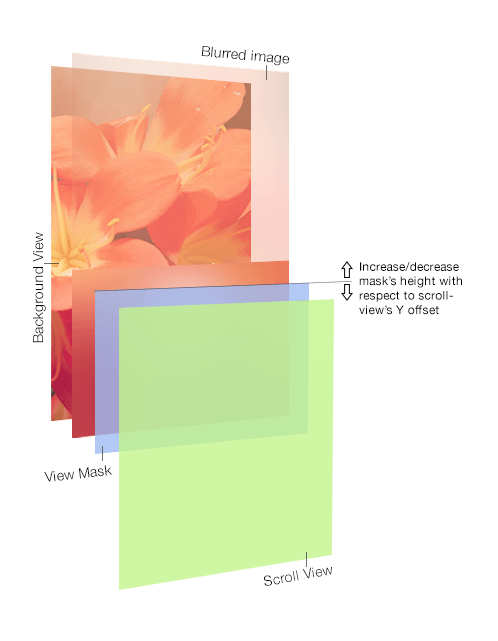
Take a look at the above image. It pulls apart the view hierarchy for creating the blur effect we're after. The key components are:
- Background View: This view displays the photo and credits. This is the view that we're going to blur.
- Blurred Image: This view contains a blurred version of the contents of the background view.
- View Mask: The view mask is an opaque view that we'll use to mask the blurred image.
- Scroll View: The scroll view is the view that contains additional information about the photo. The scroll view's offset is used to increase or decrease the mask view's height. This will result in the blurred image to reveal itself in response to scrolling of the scroll view.
Resources
All the images, frameworks and other files necessary for this tutorial are included in the source files of this tutorial. Clone the repository from GitHub or download the source files to follow along.
2. Creating the User Interface
1. Overview
Open RootViewController.m in Xcode and take a look at its loadView method. You can get a bird's-eye view of how the user interface is laid out by looking at the implementation of this method. There are three main subviews in our application:
- Header View: Shows the application's name
- Content View: Displays the photo and credits
- Scroll View: Includes additional information on a scrollable blurred view
Instead of crowding the loadView method with initializing and configuring the subviews, helper methods are used to do the heavy lifting:
// content view
[self.view addSubview:[self createContentView]];

// header view
[self.view addSubview:[self createHeaderView]];

// scroll view
[self.view addSubview:[self createScrollView]];
2. Creating the Header View
The header view contains a translucent rectangle and a text label with the application's name.
- (UIView *)createHeaderView
{
    UIView *headerView = [[UIView alloc] initWithFrame:CGRectMake(0, 0, self.view.frame.size.width, 60)];
    headerView.backgroundColor = [UIColor colorWithRed:229/255.0 green:39/255.0 blue:34/255.0 alpha:0.6];

    UILabel *title = [[UILabel alloc] initWithFrame:CGRectMake(0, 20, self.view.frame.size.width, 40)];
    title.text = @"Dynamic Blur Demo";
    ...
    [headerView addSubview:title];

    return headerView;
}
3. Creating the Content View
The content view displays the photo and it also includes the photo credits in a white circle.
- (UIView *)createContentView
{
    UIView *contentView = [[UIView alloc] initWithFrame:self.view.frame];

    // Background image
    UIImageView *contentImage = [[UIImageView alloc] initWithFrame:contentView.frame];
    contentImage.image = [UIImage imageNamed:@"demo-bg"];
    [contentView addSubview:contentImage];

    // Photo credits
    UIView *creditsViewContainer = [[UIView alloc] initWithFrame:CGRectMake(self.view.frame.size.width/2 - 65, 335, 130, 130)];
    metaViewContainer.backgroundColor = [UIColor whiteColor];
    metaViewContainer.layer.cornerRadius = 65;
    [contentView addSubview:creditsViewContainer];

    UILabel *photoTitle = [[UILabel alloc] initWithFrame:CGRectMake(0, 54, 130, 18)];
    photoTitle.text = @"Peach Garden";
    ...
    [metaViewContainer addSubview:photoTitle];

    UILabel *photographer = [[UILabel alloc] initWithFrame:CGRectMake(0, 72, 130, 9)];
    photographer.text = @"by Cas Cornelissen";
    ...
    [metaViewContainer addSubview:photographer];

    return contentView;
}
4. Creating the Scroll View
The scroll view contains additional information about the photo and a blurred version of the photo. The scroll view is about twice the length of the screen, with the bottom half containing the text view and image view. By enabling paging on the scroll view, the scroll view's contents will snap to the top or the bottom of the view, depending on the scroll view's offset.
- (UIView *)createScrollView
{
    UIView *containerView = [[UIView alloc] initWithFrame:self.view.frame];

    blurredBgImage = [[UIImageView  alloc] initWithFrame:CGRectMake(0, 0, self.view.frame.size.width, 568)];
    [blurredBgImage setContentMode:UIViewContentModeScaleToFill];
    [containerView addSubview:blurredBgImage];

    UIScrollView *scrollView = [[UIScrollView alloc] initWithFrame:self.view.frame];
    scrollView.contentSize = CGSizeMake(self.view.frame.size.width, self.view.frame.size.height*2 - 110);
    scrollView.pagingEnabled = YES;
    ...
    [containerView addSubview:scrollView];

    UIView *slideContentView = [[UIView alloc] initWithFrame:CGRectMake(0, 518, self.view.frame.size.width, 508)];
    slideContentView.backgroundColor = [UIColor clearColor];
    [scrollView addSubview:slideContentView];

    UILabel *slideUpLabel = [[UILabel alloc] initWithFrame:CGRectMake(0, 6, self.view.frame.size.width, 50)];
    slideUpLabel.text = @"Photo information";
    ...
    [slideContentView addSubview:slideUpLabel];

    UIImageView *slideUpImage = [[UIImageView alloc] initWithFrame:CGRectMake(self.view.frame.size.width/2 - 12, 4, 24, 22.5)];
    slideUpImage.image = [UIImage imageNamed:@"up-arrow.png"];
    [slideContentView addSubview:slideUpImage];

    UITextView *detailsText = [[UITextView alloc] initWithFrame:CGRectMake(25, 100, 270, 350)];
    detailsText.text = @"Lorem ipsum ... laborum";
    ...
    [slideContentView addSubview:detailsText];

    return containerView;
}
3. Taking a Snapshot
To blur a view, we first need to take a snapshot of its contents and have it ready in the form of an image. we can then blur the image and use it as the background of another view. Let's first see how we can take a snapshot of the contents of a UIView object.
In iOS 7, Apple added a new method to UIView for taking snapshots of a view's contents, drawViewHierarchyInRect:afterScreenUpdates:. This method takes a snapshot of the view's contents, including any subviews it contains.
Let's define a method in the ViewController class that accepts a UIView object and returns a UIImage, a snapshot of the view's contents.
- (UIImage *)takeSnapshotOfView:(UIView *)view
{
    UIGraphicsBeginImageContext(CGSizeMake(view.frame.size.width, view.frame.size.height));
    [view drawViewHierarchyInRect:CGRectMake(0, 0, view.frame.size.width, view.frame.size.height) afterScreenUpdates:YES];
    UIImage *image = UIGraphicsGetImageFromCurrentImageContext();
    UIGraphicsEndImageContext();

    return image;
}
Step 1: Begin a New Image Context
An image context is a bitmap-based graphics context that you can use to draw and manipulate images. UIView's new method drawViewHierarchyInRect:afterScreenUpdates: rasterizes the UIView and draws its contents into the current image context.
This means that before we call this method, we first need to create a new image context by invoking UIGraphicsBeginImageContext, passing in the required size for the image context.
Step 2: Take Snapshot
With the image context set up, we can call the view's drawViewHierarchyInRect:afterScreenUpdates: method. The second argument specifies whether the snapshot should include the view's current contents or must include any recent changes before taking the snapshot.
Step 3: Create Image from Image Context
We can get the contents of the image context, the snapshot of the view, by invoking UIGraphicsGetImageFromCurrentImageContext. This function returns a UIImage object.
Step 4: End Image Context
After creating the snapshot, we remove the graphics context from the stack by invoking UIGraphicsEndImageContext.
4. Blurring the Snapshot
Once you have the snapshot, we can blur it using a number of techniques. In this tutorial, I will cover three techniques:
- blurring with the Core Image framework
- blurring using Brad Larson's GPUImage framework
- blurring using Apple's
UIImage+ImageEffectscategory
Option 1: Core Image
Core Image is an image processing framework developed and maintained by Apple. It uses a GPU or CPU rendering path to process images in near real-time.
Core Image provides us with a variety of filters that can be used to perform operations ranging from modifying an image's hue or saturation to face detection.
CIGaussianBlur is one of the filters included in the Core Image framework and can be used to blur images. Blurring an image with Core Image is fairly easy as you can see below.
- (UIImage *)blurWithCoreImage:(UIImage *)sourceImage
{
    CIImage *inputImage = [CIImage imageWithCGImage:sourceImage.CGImage];

    // Apply Affine-Clamp filter to stretch the image so that it does not
    // look shrunken when gaussian blur is applied
    CGAffineTransform transform = CGAffineTransformIdentity;
    CIFilter *clampFilter = [CIFilter filterWithName:@"CIAffineClamp"];
    [clampFilter setValue:inputImage forKey:@"inputImage"];
    [clampFilter setValue:[NSValue valueWithBytes:&transform objCType:@encode(CGAffineTransform)] forKey:@"inputTransform"];

    // Apply gaussian blur filter with radius of 30
    CIFilter *gaussianBlurFilter = [CIFilter filterWithName: @"CIGaussianBlur"];
    [gaussianBlurFilter setValue:clampFilter.outputImage forKey: @"inputImage"];
    [gaussianBlurFilter setValue:@30 forKey:@"inputRadius"];

    CIContext *context = [CIContext contextWithOptions:nil];
    CGImageRef cgImage = [context createCGImage:gaussianBlurFilter.outputImage fromRect:[inputImage extent]];

    // Set up output context.
    UIGraphicsBeginImageContext(self.view.frame.size);
    CGContextRef outputContext = UIGraphicsGetCurrentContext();

    // Invert image coordinates
    CGContextScaleCTM(outputContext, 1.0, -1.0);
    CGContextTranslateCTM(outputContext, 0, -self.view.frame.size.height);

    // Draw base image.
    CGContextDrawImage(outputContext, self.view.frame, cgImage);

    // Apply white tint
    CGContextSaveGState(outputContext);
    CGContextSetFillColorWithColor(outputContext, [UIColor colorWithWhite:1 alpha:0.2].CGColor);
    CGContextFillRect(outputContext, self.view.frame);
    CGContextRestoreGState(outputContext);

    // Output image is ready.
    UIImage *outputImage = UIGraphicsGetImageFromCurrentImageContext();
    UIGraphicsEndImageContext();

    return outputImage;
}
Let's break the above code block down:
- We first create a
CIImageobject from theUIImageobject. When working with the Core Image framework, images are represented byCIImageobjects. - Depending on the blur radius, applying a gaussian blur to an image will slightly shrink the image. To work around this issue, we stretch the image a little bit by applying another filter,
CIAffineClamp, before applying the gaussian blur filter. - We then take the output and pass it to the
CIGaussianBlurfilter along with a blur radius of30. - We could take the output, convert it to a
CGImage, and use it in our application. However, we will add a white tint to the image to ensure that the photo's description is clearly legible. To add a white tint, we add a semi-transparent white fill over the image. To do this, we create a new image context and fill it with a white color with an alpha value of0.2. - As we saw earlier, we then get a
UIImageobject from the image context and dispose of the image context.
Option 2: GPUImage
GPUImage is an open-source iOS framework for image and video processing, created and maintained by Brad Larson. It includes a collection of GPU-accelerated filters that can be applied to images, live camera video, and movies.
The GPUImage framework is included in the source files of this tutorial, but adding the framework to your own projects is very easy:
- Start by downloading the framework or cloning the repository from GitHub.
- Open a terminal window, navigate to the GPUImage folder, and run the build script build.sh to compile the framework.
- Copy the GPUImage.framework from the build folder to your project's folder and then drag-and-drop it into the Project Navigator.
- You can then use the GPUImage framework in your project by importing the frameworks headers,
#import <GPUImage/GPUImage.h>.
The GPUImage framework includes filters similar to those in the Core Image framework. For our sample application, we are interested in two filters, , GPUImageGaussianBlurFilter and GPUImageiOSBlurFilter.
- (UIImage *)blurWithGPUImage:(UIImage *)sourceImage
{
    // Gaussian Blur
    GPUImageGaussianBlurFilter *blurFilter = [[GPUImageGaussianBlurFilter alloc] init];
    blurFilter.blurRadiusInPixels = 30.0;

    return [blurFilter imageByFilteringImage: sourceImage];
}
As you can see, GPUImage filters are easier to use than those of the Core Image framework. After initializing the filter object, all you have to do is configure the filter and supply it with an image to which the filter needs to be applied. The imageByFilteringImage: method returns a UIImage object.
Instead of the GPUImageGaussianblur class, you could also use the GPUImageiOSblur class like so:
    // iOS Blur
    GPUImageiOSBlurFilter *blurFilter = [[GPUImageiOSBlurFilter alloc] init];
    blurFilter.blurRadiusInPixels = 30.0;
The GPUImageiOSblur class replicates the blur effect you can see in Control Center on iOS 7. So, unlike the Core Image approach, you won't have to write additional code to tint the blurred image.
Option 3: UIImage+ImageEffects
During last year's WWDC, Apple gave a talk on Core Image effects and techniques in which they introduced a category on UIImage called ImageEffects. The ImageEffects category uses Apple's high performance vImage image processing framework, part of the Accelerate framework, to perform the necessary computations. This makes it a fast and easy way to perform blur on iOS.
The category adds the following methods the UIImage class:
applyLightEffectapplyExtraLightEffectapplyDarkEffectapplyTintEffectWithColor:applyBlurWithRadius:tintColor:saturationDeltaFactor:maskImage:
These methods can be called directly on an image to achieve the desired blur effect. The applyBlurWithRadius:tintColor:saturationDeltaFactor:maskImage: method accepts a number of arguments that let you fine-tune the blurring operation.
You can download Apple's ImageEffects sample project from Apple's developer website and use it in your projects.
#import "UIImage+ImageEffects.h"

...

- (UIImage *)blurWithImageEffects:(UIImage *)image
{
    return [image applyBlurWithRadius:30 tintColor:[UIColor colorWithWhite:1 alpha:0.2] saturationDeltaFactor:1.5 maskImage:nil];
}
5. Masking the Blurred Image
In the sample app, it appears as if we are dynamically blurring the photograph, but that is not the case. We use a little trick called masking. Instead of continuously taking snapshots and blurring them to create the desired effect, we take only one snapshot, blur it, and use it in combination with a mask.
As shown in the figure at the beginning of this tutorial, we align the blurred view with the background view below it. We then create another view with a height of 50 points and an opaque background, and place it at the bottom of the screen. We use this view to mask the blurred image.
blurredBgImage.layer.mask = bgMask.layer;
We then update the frame of the mask view as the scroll view is being scrolled. To do so, we implement one of the delegate methods of the UIScrollViewDelegate protocol, scrollViewDidScroll:, and update the mask’s frame with respect to the scroll view’s vertical content offset.
-(void)scrollViewDidScroll:(UIScrollView *)scrollView
{
    bgMask.frame = CGRectMake(bgMask.frame.origin.x,
                              self.view.frame.size.height - 50 - scrollView.contentOffset.y,
                              bgMask.frame.size.width,
                              bgMask.frame.size.height + scrollView.contentOffset.y);
}
By updating the mask, it appears as if we are dynamically blurring the photograph below the scroll view. That's it. You now have a beautiful, blur effect, similar to the one you see in the Control Center on iOS.
6. Performance
With the above techniques in mind, you may be wondering which one is the best in terms of performance. To help you decide, I have ran some tests on an iPhone 5S and 5C. Take a look at the following graphs.
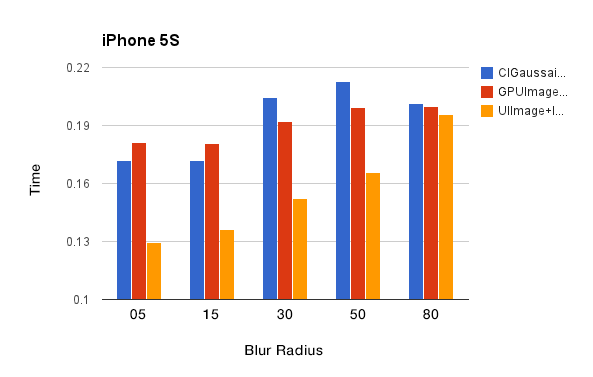
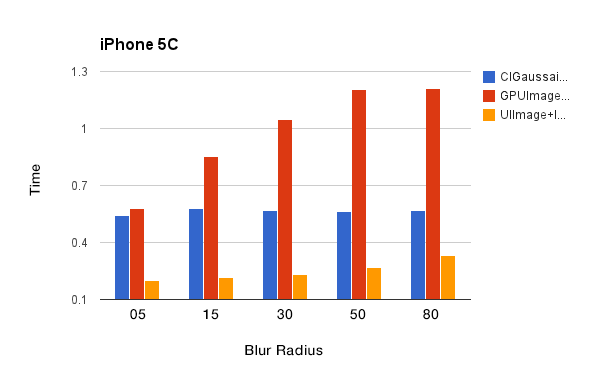
These graphs tell us the following:
- The GPUImage framework performs the slowest on the iPhone 5C due to its slower GPU. This isn't surprising since the framework relies heavily on the GPU.
- The ImageEffects category performs best on both devices. It's also interesting to see that the time needed for blurring an image increases with the blur radius.
While blurring images never took longer than 220ms on the iPhone 5S, the iPhone 5C needed up to 1.3s to perform the same task. This clearly shows that blur effects should be used wisely and sparsely.
To reduce the time required for blurring an image, we can reduce the size of the snapshot that we apply the blur filter on. Since we are performing a blur and the finer details of the image won't be visible anyway, we can downsample the image without running into problems. To take a smaller snapshot, we update the implementation of the takeSnapshotOfView: method as follows:
- (UIImage *)takeSnapshotOfView:(UIView *)view
{
    CGFloat reductionFactor = 1.25;
    UIGraphicsBeginImageContext(CGSizeMake(view.frame.size.width/reductionFactor, view.frame.size.height/reductionFactor));
    [view drawViewHierarchyInRect:CGRectMake(0, 0, view.frame.size.width/reductionFactor, view.frame.size.height/reductionFactor) afterScreenUpdates:YES];
    ...
    return image;
}
To further reduce the time required to blur the snapshot, we can use alternative blurring techniques, such as a box blur. Even though the result will be different than that of a gaussian blur, it takes less time to blur an image using a box blur.
Conclusion
Blur is definitely a great addition to user interface design on iOS. However, no matter how gorgeous your application's user interface looks, if it doesn't perform well, blur effects won't enhance your application.
Based on the above performance metrics, we see that blurring is indeed a costly effect. But by optimizing the parameters, such as the blur radius and image size, choosing the right blurring technique, and using a few tricks, we can achieve very interesting effects without compromising the application's performance.
In iOS 8, Apple has introduced UIVisualEffectView, which allows developers to very easily apply blur and vibrancy effects to views. If you can't wait until iOS 8 is officially released, you can test these effects by downloading the beta of Xcode 6.

Comments