As you probably already know, WordPress has a mechanism that detects plugins, themes and the WordPress core updates, makes a notification when they are available, pulls information about these updates and enables you to automatically install these updates. This third (and final) part of the WordPress HTTP API series will teach you how to create your own plugin repository to distribute automatic updates for your users.
A Glimpse at Auto-Updates
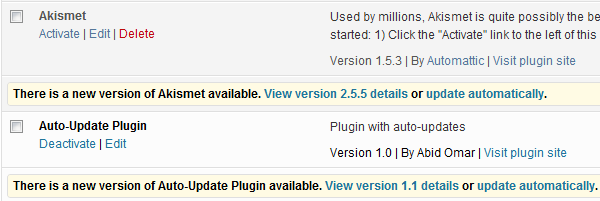
WordPress has a magnificent auto-update system that notifies you when new versions of the WordPress core, installed plugins or themes are available. The notifications are displayed in the Admin Bar and also on the plugins page where you can get more details about the new version.
To install the new version, you simply hit the "Update automatically" button. WordPress will automatically download the new package, extract it and replace the old files. No FTP, removing old files, and uploading is required.
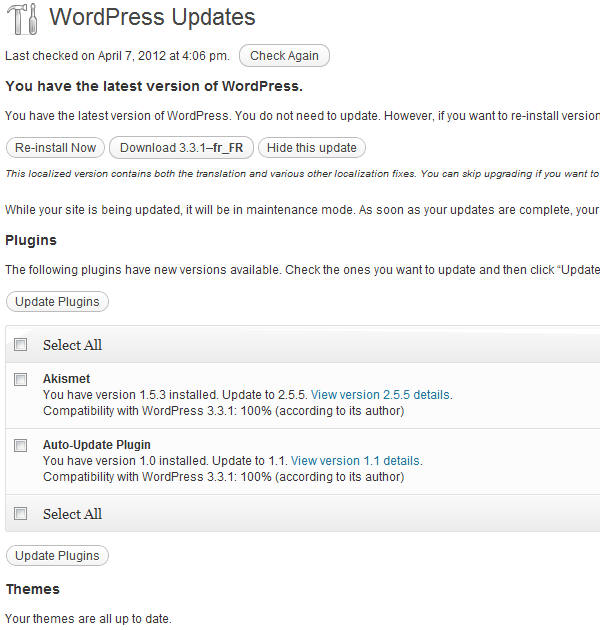
There is also a dedicated page for updates which can be reached from the dashboard menu. It's helpful when you want to do bulk updates of multiple plugins instead of updating each one separately. It also has a "Check Again" button which checks for new updates. By default, WordPress does this check every 12 hours.
Under the Hood
Auto-updates are like magic; you are just a click away from getting the latest version. The good news is that the process itself is not complicated or at least understanding it and customizing it for your own use isn't. There can be many reasons why you want to run your own server to distribute updates for your plugins; the only one I'm thinking of is premium plugins. If your plugin is free and open to the public, you should publish it on the WordPress plugins repository.
Every 12 hours, your WordPress blog will check for new plugin versions and store the request sent and response received in a site transient called 'update_plugins'. The following code will display the content of this transient:
add_filter ('pre_set_site_transient_update_plugins', 'display_transient_update_plugins');
function display_transient_update_plugins ($transient)
{
	var_dump($transient);
}
After 12 hours or so, refresh your blog plugins page and you should get a similar output to the following:
object(stdClass)[18]
  public 'last_checked' => int 1333808132
  public 'checked' =>
    array
      'access/access.php' => string '1.0' (length=3)
      'adpress/wp-adpress.php' => string '3.1' (length=3)
          ...
      'wp-paypal/plug.php' => string '1.0' (length=3)
  public 'response' =>
    array
      'akismet/akismet.php' =>
        object(stdClass)[13]
          public 'id' => string '15' (length=2)
          public 'slug' => string 'akismet' (length=7)
          public 'new_version' => string '2.5.5' (length=5)
          public 'url' => string 'http://wordpress.org/extend/plugins/akismet/' (length=44)
          public 'package' => string 'http://downloads.wordpress.org/plugin/akismet.2.5.5.zip' (length=55)
      'update.tmp/plugin.php' =>
        object(stdClass)[12]
          public 'slug' => string 'plugin' (length=6)
          public 'new_version' => string '1.1' (length=3)
          public 'url' => string 'http://localhost/update.php' (length=27)
          public 'package' => string 'http://localhost/update.php' (length=27)
The output will certainly differ from one blog to another, but the contained information is essentially the same:
-
last_checked(int) – The last time the auto-updates check was run (in seconds) -
checked(array) – The list of checked plugins and their version -
response(array) – The returned response from the API server
Disabling the 12 Hours Latency
If you are like me, you probably won't enjoy waiting 12 hours for WordPress to check for new updates when you are doing related debugging and development. For this, you can simply press the "Check Again" button in the updates page. The 12 hour waiting period is defined in WordPress core on Line 147 of the wp-includes/update.php file, it's the $timeout variable.
Hooking to the "update_plugins" Transient
Since your plugin is not hosted in the WordPress plugin repository, there will be no response from the traditional API. The solution is to build your own API, check for updates; and when a new update is available add the response to the "update_plugins" transient. WordPress will download the new version from a 'download_url' that you specify in the response.
To check for new versions, we need an API server. It's not really required that your server has PHP or even a server side language, but it'll help for finer control of the update process. This tutorial assumes you have a remote PHP server but you can convert the code (which is pretty basic) to your favorite language.
To get a better understanding of how the filter works, pick up any plugin from the "checked" list that gets displayed on your blog. For example, the 'access/access.php' plugin, and put the following code in a new or already running WordPress plugin.
add_filter ('pre_set_site_transient_update_plugins', 'display_transient_update_plugins');
function display_transient_update_plugins ($transient)
{
	$obj = new stdClass();
	$obj->slug = 'access.php';
	$obj->new_version = '2.0';
	$obj->url = 'http://anyurl.com';
	$obj->package = 'http://anyurl.com';
	$transient[plugin_directory/plugin_file.php] => $obj;
	return $transient;
}
Now when you refresh your plugins page, you should see a notification that a new version of the plugin is available (version 2.0) and you can get more information or install it. None of that will work yet, obviously, but you get the idea. WordPress relies on this transient to know about the new updates.
In summary, our solution needs to do the following:
- Check for new updates from your server.
- When a new update exists, add it to the response property of the '
update_plugins' transient. - Hook with the "
plugins_api" in a similar fashion to provide the new version information. - An API Server which provide the version, details and package of the latest release.
The Auto-Update Class
To standardize and streamline things, I have built a PHP class which can work with any plugin. It's quite simple to use, you just need to provide 3 parameters: the plugin's current version, the update path, and the plugin's slug. I'll explain in detail later what each one does.
Our class will be able to perform 3 HTTP requests, 2 required and a third optional:
- The first request will check for the latest version on the remote server. To make things simpler and faster the API server will only return the latest version as a string (e.g. "1.0" or "1.1")
- The second request will return the latest version information as a serialized PHP object.
The class has 3 public functions which you can use in your plugin:
-
getRemote_version– Returns the latest remote version as a string. -
getRemote_description– Returns the latest remote version details as a PHP object. -
getRemote_license– Returns the license status of the plugin. It is optional, and there is no implementation of licensing in this tutorial.
Using the Class
The class can be initiated in the "init" action. It has 3 parameters:
- Current version – A string with the current installed version of the plugin.
- Update path – The path of the update server. In our case, it's a PHP file in my localhost root directory.
- Plugin slug – This is required to get the plugin slug and name. For that, the class should be initiated in the same file that has the WordPress plugin header.
add_action('init', 'wptuts_activate_au');
function wptuts_activate_au()
{
	require_once ('wp_autoupdate.php');
	$wptuts_plugin_current_version = '1.0';
	$wptuts_plugin_remote_path = 'http://localhost/update.php';
	$wptuts_plugin_slug = plugin_basename(__FILE__);
	new wp_auto_update ($wptuts_plugin_current_version, $wptuts_plugin_remote_path, $wptuts_plugin_slug);
}
That's all! Now your plugin is ready for getting updates from the specified remote path.
The Class Code
Step 1 The Class, Properties, and Methods
We start off with a class skeleton defining the properties, the constructor and the different methods. Each property and method is preceded with a comment section that has a description, the accepted parameters and the returned variable. The comments follow the PhpDoc guidelines.
class wp_auto_update
{
    /**
     * The plugin current version
     * @var string
     */
    public $current_version;

    /**
     * The plugin remote update path
     * @var string
     */
    public $update_path;

    /**
     * Plugin Slug (plugin_directory/plugin_file.php)
     * @var string
     */
    public $plugin_slug;

    /**
     * Plugin name (plugin_file)
     * @var string
     */
    public $slug;

    /**
     * Initialize a new instance of the WordPress Auto-Update class
     * @param string $current_version
     * @param string $update_path
     * @param string $plugin_slug
     */
    function __construct($current_version, $update_path, $plugin_slug)
    {
    }

    /**
     * Add our self-hosted autoupdate plugin to the filter transient
     *
     * @param $transient
     * @return object $ transient
     */
    public function check_update($transient)
    {
    }

    /**
     * Add our self-hosted description to the filter
     *
     * @param boolean $false
     * @param array $action
     * @param object $arg
     * @return bool|object
     */
    public function check_info($false, $action, $arg)
    {
    }

    /**
     * Return the remote version
     * @return string $remote_version
     */
    public function getRemote_version()
    {
    }

    /**
     * Get information about the remote version
     * @return bool|object
     */
    public function getRemote_information()
    {
    }

    /**
     * Return the status of the plugin licensing
     * @return boolean $remote_license
     */
    public function getRemote_license()
    {
    }
}
Step 2 The Constructor
The constructor initiates a new instance of our class. It accepts three parameters which we already defined in the previous section. The constructor sets the "current_version", "update_path", "plugin_slug" and "slug" (which it extracts from the "plugin_slug") public properties. It also hooks to the "pre_set_site_transient_update_plugins" and "plugins_api" filters.
/**
 * Initialize a new instance of the WordPress Auto-Update class
 * @param string $current_version
 * @param string $update_path
 * @param string $plugin_slug
 */
function __construct($current_version, $update_path, $plugin_slug)
{
	// Set the class public variables
	$this->current_version = $current_version;
	$this->update_path = $update_path;
	$this->plugin_slug = $plugin_slug;
	list ($t1, $t2) = explode('/', $plugin_slug);
	$this->slug = str_replace('.php', '', $t2);

	// define the alternative API for updating checking
	add_filter('pre_set_site_transient_update_plugins', array(&$this, 'check_update'));

	// Define the alternative response for information checking
	add_filter('plugins_api', array(&$this, 'check_info'), 10, 3);
}
Step 3 Remote Call Functions
There are 3 functions which make remote requests to our self-hosted repository. They are public functions which can be used independently and each of them either return the response value or false.
getRemote_version – Returns the latest plugin version from our self-hosted repository as a string.
/**
 * Return the remote version
 * @return bool|string $remote_version
 */
public function getRemote_version()
{
	$request = wp_remote_post($this->update_path, array('body' => array('action' => 'version')));
	if (!is_wp_error($request) || wp_remote_retrieve_response_code($request) === 200) {
		return $request['body'];
	}
	return false;
}
getRemote_information – Returns information on the plugin's latest version from our self-hosted repository as a PHP object.
/**
 * Get information about the remote version
 * @return bool|object
 */
public function getRemote_information()
{
	$request = wp_remote_post($this->update_path, array('body' => array('action' => 'info')));
	if (!is_wp_error($request) || wp_remote_retrieve_response_code($request) === 200) {
		return unserialize($request['body']);
	}
	return false;
}
getRemote_license – Returns the licensing status. This function is optional and there is no licensing implementation in this tutorial.
/**
 * Return the status of the plugin licensing
 * @return bool|string $remote_license
 */
public function getRemote_license()
{
	$request = wp_remote_post($this->update_path, array('body' => array('action' => 'license')));
	if (!is_wp_error($request) || wp_remote_retrieve_response_code($request) === 200) {
		return $request['body'];
	}
	return false;
}
Step 4 Filter Hooks
The class hooks to the "pre_set_site_transient_update_plugins" and "plugins_api" filters. A deeper explanation of each filter and the hook is available in the first section in case you skipped it.
/**
 * Add our self-hosted autoupdate plugin to the filter transient
 *
 * @param $transient
 * @return object $ transient
 */
public function check_update($transient)
{
	if (empty($transient->checked)) {
		return $transient;
	}

	// Get the remote version
	$remote_version = $this->getRemote_version();

	// If a newer version is available, add the update
	if (version_compare($this->current_version, $remote_version, '<')) {
		$obj = new stdClass();
		$obj->slug = $this->slug;
		$obj->new_version = $remote_version;
		$obj->url = $this->update_path;
		$obj->package = $this->update_path;
		$transient->response[$this->plugin_slug] = $obj;
	}
	return $transient;
}

/**
 * Add our self-hosted description to the filter
 *
 * @param boolean $false
 * @param array $action
 * @param object $arg
 * @return bool|object
 */
public function check_info($false, $action, $arg)
{
	if ($arg->slug === $this->slug) {
		$information = $this->getRemote_information();
		return $information;
	}
	return false;
}
The Full Class Code
class wp_auto_update
{
    /**
     * The plugin current version
     * @var string
     */
    public $current_version;

    /**
     * The plugin remote update path
     * @var string
     */
    public $update_path;

    /**
     * Plugin Slug (plugin_directory/plugin_file.php)
     * @var string
     */
    public $plugin_slug;

    /**
     * Plugin name (plugin_file)
     * @var string
     */
    public $slug;

    /**
     * Initialize a new instance of the WordPress Auto-Update class
     * @param string $current_version
     * @param string $update_path
     * @param string $plugin_slug
     */
    function __construct($current_version, $update_path, $plugin_slug)
    {
        // Set the class public variables
        $this->current_version = $current_version;
        $this->update_path = $update_path;
        $this->plugin_slug = $plugin_slug;
        list ($t1, $t2) = explode('/', $plugin_slug);
        $this->slug = str_replace('.php', '', $t2);

        // define the alternative API for updating checking
        add_filter('pre_set_site_transient_update_plugins', array(&$this, 'check_update'));

        // Define the alternative response for information checking
        add_filter('plugins_api', array(&$this, 'check_info'), 10, 3);
    }

    /**
     * Add our self-hosted autoupdate plugin to the filter transient
     *
     * @param $transient
     * @return object $ transient
     */
    public function check_update($transient)
    {
        if (empty($transient->checked)) {
            return $transient;
        }

        // Get the remote version
        $remote_version = $this->getRemote_version();

        // If a newer version is available, add the update
        if (version_compare($this->current_version, $remote_version, '<')) {
            $obj = new stdClass();
            $obj->slug = $this->slug;
            $obj->new_version = $remote_version;
            $obj->url = $this->update_path;
            $obj->package = $this->update_path;
            $transient->response[$this->plugin_slug] = $obj;
        }
        var_dump($transient);
        return $transient;
    }

    /**
     * Add our self-hosted description to the filter
     *
     * @param boolean $false
     * @param array $action
     * @param object $arg
     * @return bool|object
     */
    public function check_info($false, $action, $arg)
    {
        if ($arg->slug === $this->slug) {
            $information = $this->getRemote_information();
            return $information;
        }
        return false;
    }

    /**
     * Return the remote version
     * @return string $remote_version
     */
    public function getRemote_version()
    {
        $request = wp_remote_post($this->update_path, array('body' => array('action' => 'version')));
        if (!is_wp_error($request) || wp_remote_retrieve_response_code($request) === 200) {
            return $request['body'];
        }
        return false;
    }

    /**
     * Get information about the remote version
     * @return bool|object
     */
    public function getRemote_information()
    {
        $request = wp_remote_post($this->update_path, array('body' => array('action' => 'info')));
        if (!is_wp_error($request) || wp_remote_retrieve_response_code($request) === 200) {
            return unserialize($request['body']);
        }
        return false;
    }

    /**
     * Return the status of the plugin licensing
     * @return boolean $remote_license
     */
    public function getRemote_license()
    {
        $request = wp_remote_post($this->update_path, array('body' => array('action' => 'license')));
        if (!is_wp_error($request) || wp_remote_retrieve_response_code($request) === 200) {
            return $request['body'];
        }
        return false;
    }
}
Setting Up Your Server
Now that we have made our plugin ready for self-hosted auto-updates, it's time to setup the server which will serve the notification, the description and the update package. In our case, we are using PHP with a single file called "update.php" in my local server root directory. The plugin update is "update.zip" in the same directory.
If you did read the auto-update class code, you'll find that it does 3 requests which should be handled by our API server.
-
Plugin Version
- Request Type: POST
- Parameter/value: "action"/"version"
- Return value: String ("1.0", "1.5", "2.0"...)
-
Plugin Details
- Request Type: POST
- Parameter/value: "action"/"info"
- Return value: String. A serialized PHP objected
-
Plugin License
- Request Type: POST
- Parameter/value: "action"/"license"
- Return value: Feel free to implement it :)
-
Plugin Package
- Request Type: GET
- Parameter/value: none
- Return value: Zip Package
Code for the update.php File
if (isset($_POST['action'])) {
  switch ($_POST['action']) {
    case 'version':
      echo '1.1';
      break;
    case 'info':
      $obj = new stdClass();
      $obj->slug = 'plugin.php';
      $obj->plugin_name = 'plugin.php';
      $obj->new_version = '1.1';
      $obj->requires = '3.0';
      $obj->tested = '3.3.1';
      $obj->downloaded = 12540;
      $obj->last_updated = '2012-01-12';
      $obj->sections = array(
        'description' => 'The new version of the Auto-Update plugin',
        'another_section' => 'This is another section',
        'changelog' => 'Some new features'
      );
      $obj->download_link = 'http://localhost/update.php';
      echo serialize($obj);
    case 'license':
      echo 'false';
      break;
  }
} else {
    header('Cache-Control: public');
    header('Content-Description: File Transfer');
    header('Content-Type: application/zip');
    readfile('update.zip');
}
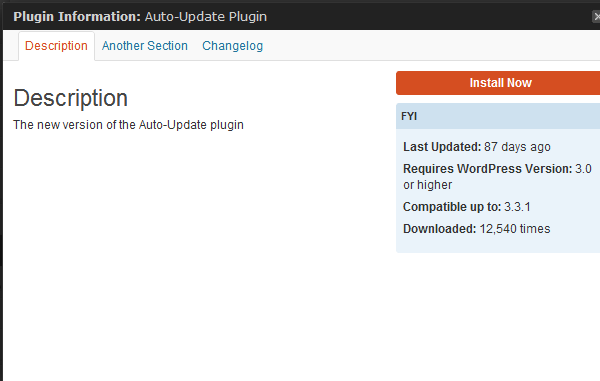
Customizing the Plugin Information Box
It's possible to customize the plugin information box. The box has:
- Information about the plugin (description, last update, downloads count)
- Sections which will add tabs to the information box
Sections can be added to the sections array property. The description tab is itself a section.
$obj->sections = array(
  'description' => 'The new version of the Auto-Update plugin',
  'another_section' => 'This is another section',
  'changelog' => 'Some new features'
);
Summary
I have tried to cover most of the update process in this tutorial. The source code for the Auto-update class can be found in this GitHub repository. Feel free to fork and push your improvements. Suggestions, questions and critiques are certainly welcome.

Comments