This is the third article of the series and so far, I have discussed the importance and features of Titan Framework along with the basic setup. In the very first article, I discussed the three-step setup of Titan Framework which goes like this:
- Set up your project.
- Create options.
- Get values.
I explained the first step in the previous article, in which we learned that Titan Framework is a plug and play framework, i.e. it comes as a plugin, although it can also be integrated by embedding it within your web development project. So, let's continue from where I left off and get on with the next two steps.
Here, I'll explain how and in what capacity Titan Framework works in your web development project. Then I'll jump to the concept of creating Instances and Options from which I will get the saved Values at the front-end. So, let's begin!
1. Set Up Your Project
First of all, let's find out what you'll need to implement today's tutorial. We are going to create a simple WordPress theme with which we will use Titan Framework to explore the different set of options it can create. You'll need:
- Local WordPress setup, e.g. I use DesktopServer (believe me, it's amazing!).
- A base WordPress theme—I am going to use Neat for that purpose. I have created a new branch called Neat: TitanFramework for this tutorial.
My Setup
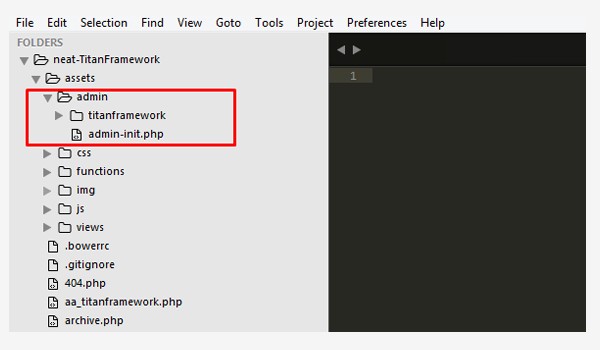
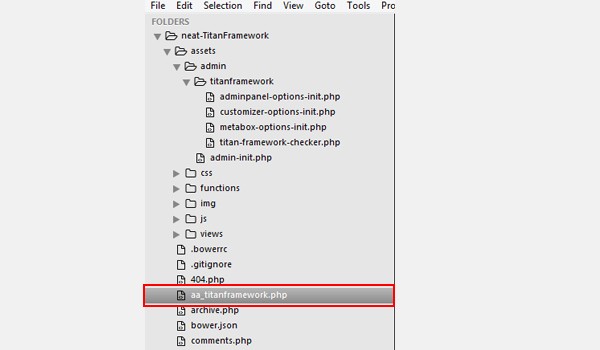
As I am going to use Neat WordPress theme, it's important that I explain its structure first. Open the theme folder in your text editor where inside the assets directory I've created a new folder named admin. Its purpose is to handle all the relevant code for admin options. Within it is another directory, titanframework, and a PHP file, admin-init.php.
admin-init.php File
This PHP file will handle all the admin-related activity. If you scroll through its code you'll find out that I've used the get_template_directory() function to include four files from the titanframework directory. The following code is pretty self-explanatory, but I will explain the purpose of each of these files in a short while.
Here is the code for admin-init.php:
<?php

/**
 * Admin related initializations
 */

/**
 * Titan Framework Required to be installed
 *
 * It adds Titan Framework as a plugin
 *
 * http://www.titanframework.net/get-started/
 */

if ( file_exists( get_template_directory() .'/assets/admin/titanframework/titan-framework-checker.php') ) {

    require_once( get_template_directory() .'/assets/admin/titanframework/titan-framework-checker.php' );

}

/**
 * Create an options via Titan Framework
 *
 * http://www.titanframework.net/get-started/
 */

// Admin panel options.
if ( file_exists( get_template_directory() .'/assets/admin/titanframework/adminpanel-options-init.php') ) {

    require_once( get_template_directory() .'/assets/admin/titanframework/adminpanel-options-init.php' );

}

// Metabox options.
if ( file_exists( get_template_directory() .'/assets/admin/titanframework/metabox-options-init.php') ) {

    require_once( get_template_directory() .'/assets/admin/titanframework/metabox-options-init.php' );

}

// Customizer options.
if ( file_exists( get_template_directory() .'/assets/admin/titanframework/customizer-options-init.php') ) {

    require_once( get_template_directory() .'/assets/admin/titanframework/customizer-options-init.php' );

}
Directory Called titanframework
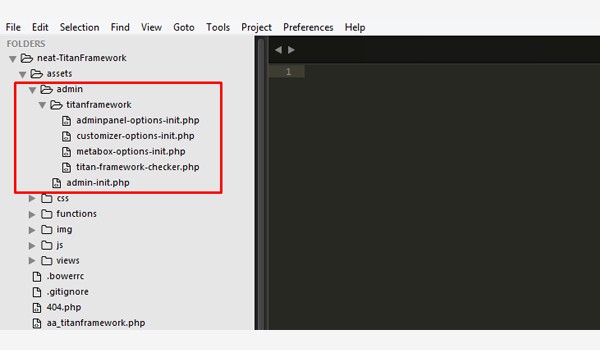
I have discussed previously that Titan Framework helps you to create Admin Panels and Tabs, Metaboxes and Theme Customizer sections and panels. So I have created separate files for each one of them. Obviously they can be created with separate lines of code. I'll be discussing each of these in my upcoming articles, but for now all you need to understand is what are these files for.
-
titan-framework-checker.php: is responsible for including Titan Framework in your theme. -
adminpanel-options-init.php: contains the code for creating admin panel and tabs with a set of options. -
metabox-options-init.php: contains the code for creating metaboxes for post types with a set of options in them. -
customizer-options-init.php: contains the code for creating theme customizer panels and sections with a set of options.
Including the admin-init.php File
Up to now you must be wondering why I've created so many new files. Why didn't I just add all the code in the functions.php file? Well, I don't consider it to be a good architecture design approach. To build a maintainable product, you need to define a good design pattern.
What's the point of messing up your functions.php file with so many lines of code? I have experienced this myself: towards the end of any development project, the code becomes so massive that it gets difficult to handle all of it in a single file, especially when it comes to debugging and fixing any errors. It's always better to create separate files, so think of these files as modules.
Let's include admin-init.php in our functions.php file.
<?php

/**
 * Include admin-init.php
 *
 * File responsible for all admin relevant activity E.g. Settings & Metaboxes etc.
 */

if ( file_exists( get_template_directory() .'/assets/admin/admin-init.php') ) {

    require_once( get_template_directory() .'/assets/admin/admin-init.php' );

}
Here I have added the admin-init.php file via the same get_template_directory() and require_once() functions.
At this point, we've taken a look at the basic setup of a theme which I am going to use to explain how Titan Framework works. We've completed the setup and embedded Titan Framework in our WordPress theme. Let's create an admin panel with options and get the values for the front end.
Working with Titan Framework
To work with Titan Framework you need to follow a certain workflow which is:
- Create a Titan Framework Instance per file.
- Create Admin Panel/Tabs, Metaboxes or Theme Customizer Sections/Panels.
- Create Options in them.
- Get the Values.
Let me first write the piece of code which I am going to use for this very purpose. This is the code for the adminpanels-options-init.php file which is present inside the assets/admin/titanframwork/ directory.
<?php

/**
 * Creating admin panel options via Titan Framework.
 *
 * Getting started: http://www.titanframework.net/get-started/
 * Admin Panel: http://www.titanframework.net/admin-panels/
 * Admin Tabs: http://www.titanframework.net/admin-tabs/
 * Options: http://www.titanframework.net/docs/
 * Getting Option Values: http://www.titanframework.net/getting-option-values/
 */

/**
 * `tf_create_options` is the hook used to create options.
 */

add_action( 'tf_create_options', 'aa_options_creating_function' );

function aa_options_creating_function() {

    // Initialize Titan with your theme name.
    $titan = TitanFramework::getInstance( 'neat' );

    /**
     * First Admin panel.
     */

    /**
     * Create admin panel options page called `$aa_panel`.
     *
     * This is a first admin panel and is called by its name i.e. `$aa_panel`.
     */
    $aa_panel = $titan->createAdminPanel( array(
        'name' => 'Neat Options' // Name the options menu
    ) );

    /**
     * Create the options.
     *
     * Now we will create options for our panel that we just created called `$aa_panel`.
     */
    $aa_panel->createOption( array(
        'id' => 'aa_txt', // The ID which will be used to get the value of this option.
        'type' => 'text', // Type of option we are creating.
        'name' => 'My Text Option', // Name of the option which will be displayed in the admin panel.
        'desc' => 'This is our option' // Description of the option which will be displayed in the admin panel.
    ) );

    /**
     * Save button for options.
     *
     * When creating admin panel options, use this code to add an option "Save" button
     * since there is no other way for user to save the options.Your users can now save
     * (and reset) the options we just created.
     */
    $aa_panel->createOption( array(
        'type' => 'save'
    ) );

}
At the very beginning I have added a few helping links from the documentation of Titan Framework. Now I am going to explain this code line by line.
Line 17
Here we have a hook called tf_create_options, which is used to create options via Titan Framework using the aa_options_creating_function() function.
Lines 19
We have created a function called aa_options_creating_function(), which will be responsible for creating these options.
Line 22
At line 22, I have created an instance for Titan Framework. Creating an instance is an integral part of this framework, and it must be created in each file wherever we need to interact with Titan Framework. To make your instance unique, you can add your product's name in it. For example, I have added 'neat' as a parameter.
Get an Instance of Titan Framework
Creating an instance of Titan Framework is pretty simple. We get a unique instance to avoid any confusion just in case another plugin is using Titan Framework to create options. The author states that:
The getInstance function creates/gets a unique instance of Titan Framework specific to “mytheme”. This is the namespace we’re going to use to ensure that our settings won’t conflict with other plugins that use Titan Framework. Be sure to change it to your theme or plugin name.
Here is a code example of getting an instance with Titan.
$titan = TitanFramework::getInstance( 'my-theme' );
In the case of my Neat theme I will use the parameter of neat instead of my-theme to make my code unique, i.e.
$titan = TitanFramework::getInstance( 'neat' );
Creating an Admin Panel; Lines 33–35
These lines will create an admin panel which I have named as "$aa_panel". Titan Framework helps to create sections like admin panel, admin tabs, metaboxes and theme customizer panels within your project. But for now I will only create an admin panel as an example to explain things.
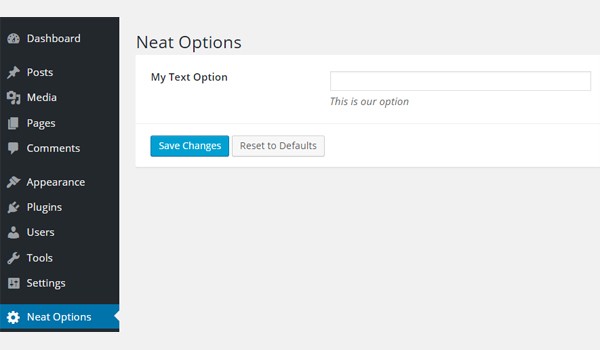
These lines of code are calling our createAdminPanel() function in Titan Framework which forms an array. This function will add a new section in your WordPress dashboard named Neat Options.

The above image is a screenshot of the WordPress dashboard where you can find a new section being added in the Admin Panel.
Just to summarize what I have done so far: I have set up my web developmental project, and then I added an instance to it, after which I created an Admin Panel.
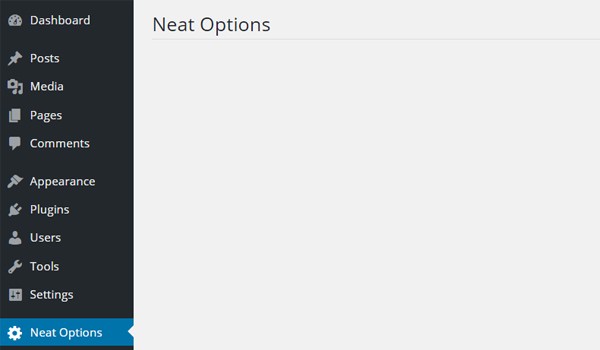
Right at this point, if I click the Neat Options button, then this section is empty. So, now I will create options within this newly created Admin Panel.
Creating Options in Titan Framework
Customizable WordPress themes are preferred because the end users mostly want to configure themes without writing a single line of code. This is made possible by adding flexible options during theme development.
We can add such options in a separate admin panel, or in form of metaboxes or else options panels inside theme customizer. Options serve the purpose of storing the values which are later retrieved at the front-end.
Lines 42–47
Now take a look at these lines of code. These will be used to create options within an admin panel or tab. Line 42 defines the createOption() function for the $aa_panel. This function is once again an array which bears certain parameters like id, type, name, description, etc. According to these lines I have created an option which is a text field and is named My Text Option.
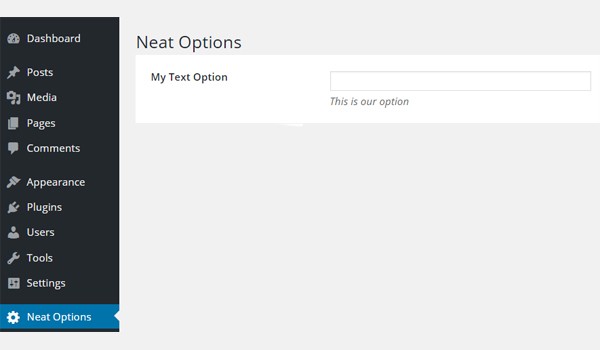
This is the screenshot which displays the option created within the Neat Options panel.
Lines 56–58
The last two lines of the code create another option within this panel. But its purpose is to save the settings. For example, in the My Text Option field, the user fills it with John Doe. This means that the user wants to change the default setting, which is only possible if the user saves the custom settings.
So, I again used the createOption() function and assigned the value of parameter "type = save".
This is the final screenshot of the development which I have done so far.
At this point, you have Titan Framework all set up, you have created a few options to get dynamic results, and now all that's left to do is get the values from the options you set up in the first place. Out of the three-step tagline, I've discussed the first two in the previous two articles. So, let's now get to the last and indeed the most important part of how Titan Framework works.
Getting Values
Creating options is done at the back-end, and now we need to retrieve the values against those options, set by an end user, to use them at the front-end. We can retrieve values set against the options via a simple function, i.e. getOption().
The following is the basic structure of code to retrieve the saved values:
<?php

function myFunction() {

    $titan = TitanFramework::getInstance( 'my-theme' );
    $myTextOption = $titan->getOption( 'my_text_option' );

    // Do stuff here.

}
So, I created a function called myFunction where I first registered an instance of Titan. Registering an instance is an important step, because it gets the object created by Titan Framework for your settings registered in a variable, i.e. $titan. You can see that our instance is specific to our theme, i.e. my-theme, which is supposed to be our theme name or anything unique.
Retrieving Values at the Front-End
Let's use the values set against the options at the front-end. I have created a blank custom page template. If you refer to the Neat theme folder, you will find a file called aa_titanframework.php in the root. You can do the same with your theme as well.
Create a new file in your text editor and copy and paste the following lines of code.
<?php

/* Template Name: Titan Framework */

get_header();

/**
 * First Admin panel.
 */

// We will initialize $titan only once for every file where we use it.
$titan = TitanFramework::getInstance( 'neat' );

$aa_txt_val = $titan->getOption( 'aa_txt' );

?>

<div class="aa_wrap">
    <h1><?php the_title( ); ?></h1>
    <div class="aa_content">

        <?php

        /**
         * First Admin panel options.
         */

        // Print the value saved in `aa_txt` option.
        echo $aa_txt_val;

        // Let's use this value in HTML.

        ?>

        <h3><?php echo $aa_txt_val; ?></h3>
    </div>
</div>

<?php

//get_sidebar();
get_footer();

?>
Before I explain the above-mentioned code, do refer to the code of my previous article where I created an Admin Panel and its options, because I am using the same names, IDs, etc., here as well.
The first four lines of the code are for WordPress to register this custom page template, which is pretty standard—no rocket science there.
Getting Option Values
I will get the values of the options which I created in the adminpanel-options-init.php file (refer for its code to my previous article) here. Two steps are needed to achieve this:
- Get a unique Titan Framework instance and save it to a variable.
- Get the value via ID using the
getOption()function.
Line 12
Following the first step, I initialized a unique instance against the variable $titan, only once for every file in which I use it. My instance is unique since I have named it neat, i.e. the package name for my theme—you can name it anything unique. It is necessary so that if a plugin is using Titan and your theme is also using it, then there should be a way to differentiate between options set by that plugin and your theme.
$titan = TitanFramework::getInstance( 'neat' );
Line 14
The second step is to make use of the ID and get the saved value for that option. The code for this line is:
$aa_txt_val = $titan->getOption( 'aa_txt' );
I retrieved the value for aa_txt which is saved against the variable $aa_txt_val. The aa_txt parameter refers to the ID of the option which I created within my first Admin Panel (refer to my previous article).
So, far I've set up the basic structure to get the saved values. Now let's use the saved values at the front-end.
Lines 22–35
These lines of code are used to display the saved values on the front-end. Take a look at line 29 where I used the echo command to get the output. The same is done on line 35, but this time I'm displaying the output for $aa_txt_val in an H3 (heading 3) format. So now whatever value the end user sets for this option, it will be displayed at the front-end.
Results
In order to display the results for the code which I have explained above, follow these steps:
- Go to your WordPress dashboard
- Create a New Page via Pages > Add New.
- Name the page Titan Framework (optional, you'd know that)
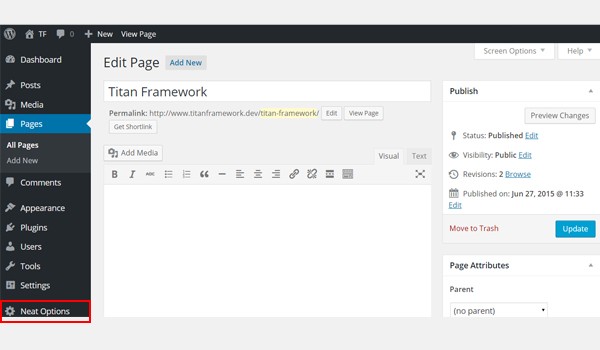
The above screenshot shows the page which I have created. At the same time, you can also find the new Admin Panel Menu, i.e. Neat Options, where we created the options.
Next choose the Page Template, i.e. Titan Framework, for this page before you publish it.
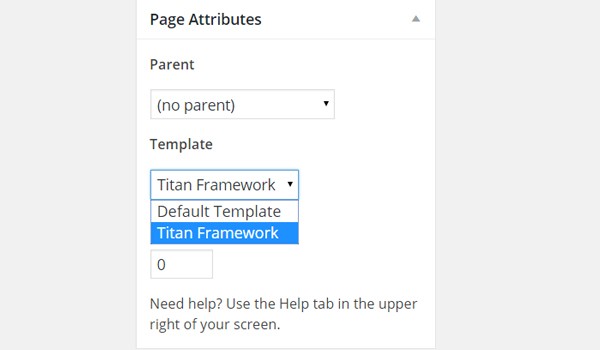
The aa_titanframework.php file adds a new page Template called the "Titan Framework" which appears in the drop-down list. Choose that template.
- Publish the page.
- Next go to the Neat Options menu and add some value against the option named My Text Option.
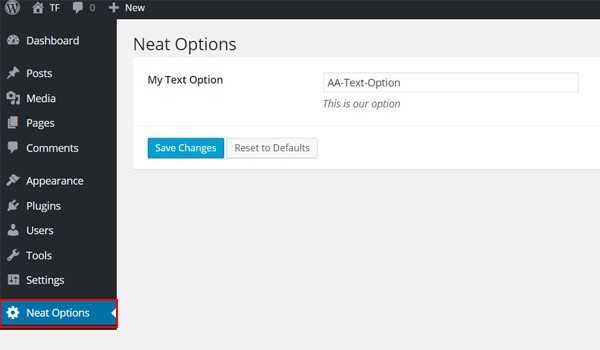
The image shows that I have filled this field with AA-Text-Option and then I clicked Save Changes.
- Go back to the Titan Framework page and view the page.
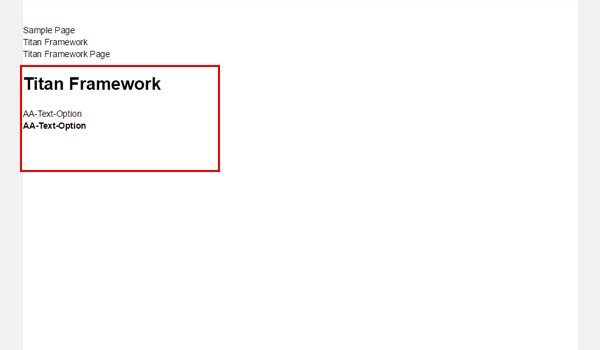
The above image displays the final result. This is the Titan Framework page. The saved option value (i.e. AA-Text-Option) for aa_txt is being displayed in two different forms. The first one is in paragraph format while the second is in h3 format.
Conclusion
By now you must have some understanding of Titan Framework and its working. This is the basic setup which is to be followed each time you develop something with Titan Framework.
Now that you know how to set it up, create a few options and get the saved values; try it out and let me know in case of any queries via comments or reach out to me at Twitter.
Next in this series we will explore the set of options we can create with Titan Framework and how to use them.

Comments