The WordPress admin panel is pretty open for modifications and web developers have made the most out of it. These modifications are more common in themes due to the extended level of functionality, but you can find a complete set of option frameworks in some prominent plugins as well. Let's review what can we do inside the admin panel when it comes to creating options with Titan Framework.
Titan, being an options framework, helps add admin panels for your development project by writing only a few lines of code. Today, I will explain how you can create admin panels in Titan Framework. Not only this, I will also retrieve the saved values at the front-end. So, let's begin!
At this point, I assume that you have set up the following:
- a demo WordPress installed on a local machine for testing
- Titan Framework plugin installed and activated or embedded in your theme
-
titan-framework-checker.phpfile included in your project, be it a plugin or a theme
Creating an Admin Panel
First of all I am going create a simple admin panel, add options to it and get their values at the front end. Here is the code for it.
<?php

add_action( 'tf_create_options', 'aa_options_creating_function' );

function aa_options_creating_function() {

    // Initialize Titan with your theme name.
    $titan = TitanFramework::getInstance( 'neat' );

    /**
     * First Admin panel.
     */

    $aa_panel = $titan->createAdminPanel( array(
        'name' => 'Neat Options' // Name the options menu.
    ) );

    /**
     * Create the options.
     */

    $aa_panel->createOption( array(
        'id'   => 'aa_txt', // The ID which will be used to get the value of this option.
        'type' => 'text', // Type of option we are creating.
        'name' => 'My Text Option', // Name of the option which will be displayed in the admin panel.
        'desc' => 'This is our option' // Description of the option which will be displayed in the admin panel.
    ) );

    /**
     * Save button for options.
     */

    $aa_panel->createOption( array(
        'type' => 'save'
    ) );

}
Lines 3–9
This is the basic setup of Titan which I have already covered in my previous articles, so you should definitely read them. Here in the code I have added my function as an action to a hook called tf_create_options. Then I've registered an instance via the getInstance() function which initializes a unique Titan instance with your theme/plugin/package name. In my case I am giving it a unique parameter 'neat'. A unique instance in the start of our function is needed to create a context of where the options are going to be created.
Lines 15–17
This code adds a new admin panel in the WordPress dashboard. The createAdminPanel() function creates a new panel in Titan Framework. So, I created an admin panel, i.e. $aa_panel. It will appear against the name 'Neat Options' in the dashboard.
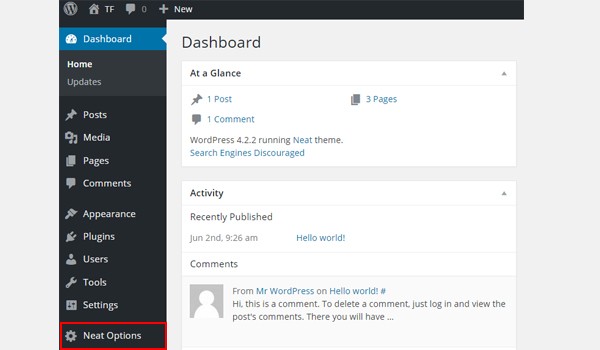
The above screenshot displays the result of this code.
Lines 23–28
Now I added options within the admin panel $aa_panel. Line 23 has the createOption() function which is used to create options within the admin panel $aa_panel. For now, I'm adding only a single option which is a text field named 'My Text Option'. The createOption() function is an array and carries several parameters like name, ID, type, etc.
The most import parameter is the 'id' , which is basically the name of our option and our only way to reference it when we need to use it. Make sure all the ids you add are unique since no two IDs can be same, which can lead to a PHP Fatal Error.
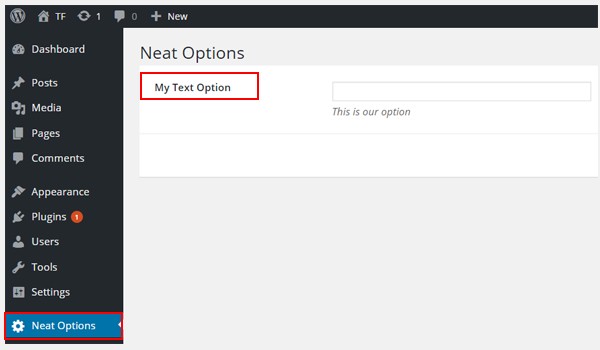
The screenshot above displays the 'My Text Option' field which I have created. That's easy—a few lines of code, so no messing around with HMTL.
Lines 34–36
Now it is within this text field that I am going to enter my value. So, I will need a "Save" button here since there is no other way for me to save the options. Hence, these lines of code will add a Save and a Reset button in my admin panel options.
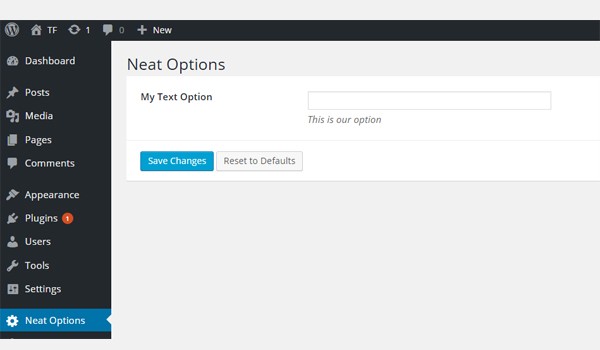
This is the final look of my development so far, where you can find an admin panel Neat Options and My Text Option in it.
Getting Saved Values From the Neat Options Panel
I have discussed this process of getting the saved option values previously in detail. Make sure you read the series. Hence, I am directly writing the lines of code which will retrieve the values. You can add these lines in any file of your web development project.
I will recommend that you create a new page template and add the code within it, so that you can see for a fact if everything is working as it should.
<?php

// Initialize Titan with your theme name.
$titan = TitanFramework::getInstance( 'neat' );

// Get the value.
$aa_txt_val = $titan->getOption( 'aa_txt' );

// Print the value of our text option.
echo $aa_txt_val;
First of all, we get a specific instance of Titan. Then I've used the getOption() function which will get the saved value from the aa_txt, where aa_txt is the ID of the option which I created within my admin panel.
Note again that you need to give a unique ID for every option because it is not the 'name' but the 'id' which distinguishes one option from another. In the end I used the echo command to print the saved value in the aa_txt option.
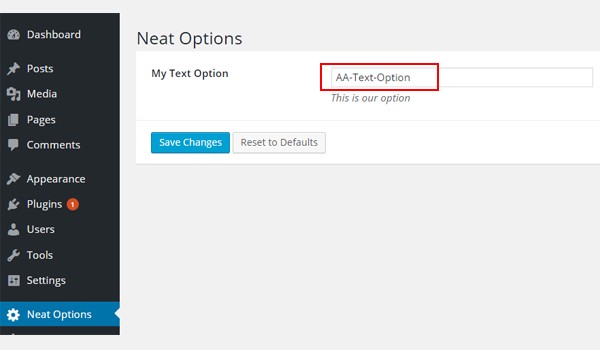
For example, I entered AA-Text-Option and saved the result. Let's find out what appears on the front-end.
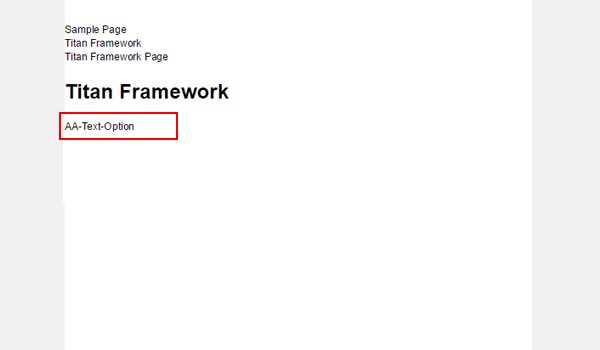
The above screenshot displays the result. You can find AA-Text-Option being displayed in the red highlighted area.
Creating an Admin Panel
Now, what about a more complex case? In this section, I will create a new admin panel within which there will be admin tabs and options. Excited? Let's start!
First of all I created an admin panel. Previously, I created a panel named 'Neat Options', so I'm naming this new panel 'Neat Options 2'. Here's its code:
<?php

// Initialize Titan with your theme name.
$titan = TitanFramework::getInstance( 'neat' );

$aa_panel2 = $titan->createAdminPanel( array(
    'name' => 'Neat Options 2' // Name the options menu.
) );
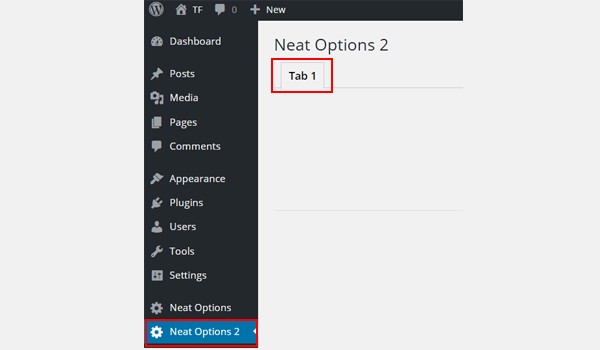
First of all, I registered a unique instance of Titan and then I created an admin panel $aa_panel2 via the createAdminPanel() function. It will appear against the name Neat Options 2 in the WordPress dashboard.

The screenshot above displays the result. It also shows the first admin panel (i.e. Neat Options) which I created in the previous article.
When you click Neat Options 2, it will be empty. Now there are two approaches: either you create options directly in it, or you create admin tabs for extended functionality and then create options inside the tabs. The former has been already discussed. So, let's look at the latter case.
Creating Admin Tabs
Tabs are one of the best ways to organize your admin panel settings or options. For WordPress themes which contain a lot of options, tabs greatly facilitate to ease the user experience. Therefore, Titan being an options framework helps to create tabbed settings in WordPress. Let's find out how.
<?php

$aa_tab1 = $aa_panel2->createTab( array(
    'name' => 'Tab 1' // Name the tab. Don't use anything else but alpha numeric name with no characters expect space.
) );
I made use of the createTab() function in Titan Framework for creating admin tabs. In the above-mentioned code, I created an admin tab named $aa_tab1. If you look at line 1 of this code, you can see that a new tab is being created inside the $aa_panel2 panel. This tab is named 'Tab 1'. When you are creating a tab via createTab(), it is very important to point out in which panel you are creating it. You can see Tab 1 in the screenshot below.
Creating Options Within 'Tab 1'
Let's now create an option within Tab 1.
<?php

$aa_tab1->createOption( array(
    'id'   => 'aa_txt_in_tab1_panel2',
    'type' => 'text', // Type of option we are creating.
    'name' => 'My Text Option', // Name of the option which will be displayed in the admin panel.
    'desc' => 'This is our option' // Description of the option which will be displayed in the admin panel.
) );

/**
 * Save button for options.
 */

$aa_panel2->createOption( array(
    'type' => 'save'
) );
The createOption() function adds a new option inside $aa_tab1. Again keep in mind that the IDs should always be unique. The ID will be used to get the value of this option. In this case the ID of the option we created is $aa_txt_in_tab1_panel2. The last few lines of the code create a Save button (we have seen that before).

The screenshot displays a text field, i.e. 'My Text Option', which is added inside Tab 1. You can also find the Save and the Reset button.
I'm sure that the things explained so far are quite clear. How about creating another tab?
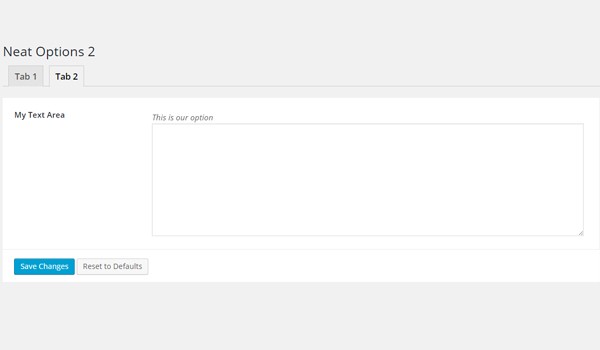
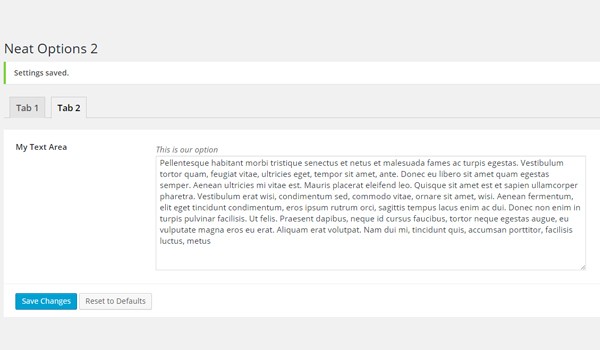
Within the same admin panel, I am creating yet another tab named 'Tab 2' in the same manner. But this time I will add a text area option in it.
<?php

/**
 *
 * Create second tab.
 *
 */
$aa_tab2 = $aa_panel2->createTab( array(
    'name' => 'Tab 2' // Name the tab.
) );

// Create options inside tab2.
$aa_tab2->createOption( array(
    'id'   => 'aa_txtarea_in_tab2_panel2', // Ids should always be unique. This id will be used to get the value of this option.
    'type' => 'textarea', // Type of option we are creating.
    'name' => 'My Text Area', // Name of the option which will be displayed in the admin panel.
    'desc' => 'This is our option' // Description of the option which will be displayed in the admin panel.
) );

/**
 * Save button for options.
 */
$aa_panel2->createOption( array(
    'type' => 'save'
) );
In lines 1-12 of the code written above, I've created a new tab, i.e. Tab 2, which is saved in the variable $aa_tab2 inside the admin panel $aa_panel2 using the same createTab() function. Then I created a textarea type option within Tab 2 with ID aa_txtarea_in_tab2_panel2 (lines 12-17). And finally a Save and a Reset button in the end.
Here is the result:
To sum up, I created a new admin panel Neat Options 2, and then added two tabs in them called Tab 1 and Tab 2. Then I placed type text options in Tab 1 and a type textarea option in Tab 2.
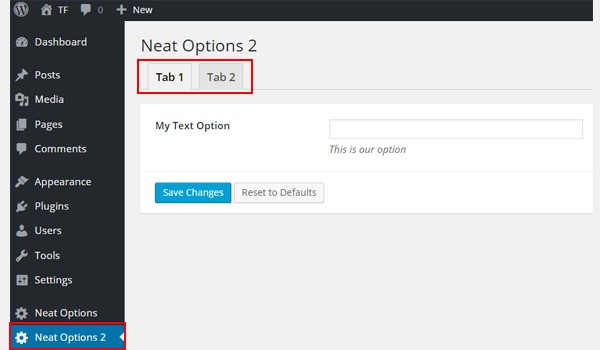
The above image displays the results so far. Now let's jump to the actual thing, i.e. getting the saved options' values.
Getting the Saved Options' Values
The following lines of code will be used to retrieve the saved values from the two options we created. The getOption() function is used on lines 11 and 14, which is retrieving the values for $aa_txt_in_tab1_panel2 and $aa_txt_in_tab2_panel2 options in the new admin panel. I saved the values in two variables, i.e. $aa_txt_in_tab1_panel2_val and $aa_txt_in_tab2_panel2_val.
Then I created two paragraphs (lines 23 and 24), one for each tab, and then by using the echo command I'll print the output at the front-end.
All this code goes in a new custom page template (for the detailed procedure of getting saved values, refer to my previous articles).
<?php

/* Template Name: Titan Framework */

get_header();

// Initialize Titan with your theme name.
$titan = TitanFramework::getInstance( 'neat' );

// Value of first tab text box.
$aa_txt_in_tab1_panel2_val = $titan->getOption( 'aa_txt_in_tab1_panel2' );

// Value of second tab textarea.
$aa_txtarea_in_tab2_panel2_val = $titan->getOption( 'aa_txtarea_in_tab2_panel2' );

/**
 * Second Admin panel options.
 */

// Let's use this value in HTML
?>

<p>Value of first tab text box is : <?php echo $aa_txt_in_tab1_panel2_val; ?></p>
<p>Value of second tab textarea is : <?php echo $aa_txtarea_in_tab2_panel2_val; ?></p>
Now let's suppose I entered AA-Text-Option in the text field of Tab 1 and some dummy text in the text area of Tab 2.
I saved the final settings and previewed the result after publishing a page with my custom page template.
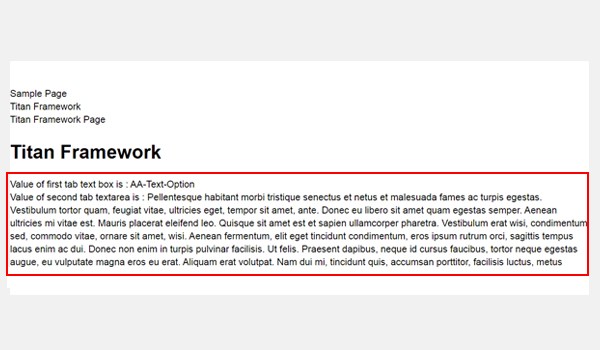
The output of the saved values can be clearly observed.
Conclusion
That's all there is about creating admin panels with Titan Framework. I'm sure you find the entire process quite simple, and now you can make admin panels with tabs pretty easily.
I want you to try it out since in the articles about options I'll be assuming the fact that you know how to create admin panels. A vital step for you to understand what's next.
In the next article, I will discuss how to create a meta box with Titan Framework. Till then in case of any queries, comment below or reach out to me at Twitter.

Comments