The Theme Customization API, added in WordPress 3.4, allows developers to customize and add controls to the Appearance > Customize admin screen. Titan Framework allows you to extend and use a good number of fields/settings to build a theme based on Live Theme Customizer.
Titan Framework being an options framework helps to create multiple types of options by writing only a few lines of code. Let's see how we can leverage Theme Customizer options via Titan Framework.
Basic Setup
- A demo website with WordPress installed
- Any theme installed and activated
- Titan Framework plugin installed and activated
-
titan-framework-checker.phpfile included in your project
The code which I'm going to use belongs to my custom theme Neat. Neat contains a file named customizer-options-init.php which is present in assets/admin/titanframework/customizer-options-init.php. This is where I have implemented Titan Framework to register all the settings, panels and sections for this tutorial.
Creating a Theme Customizer Section
Here is the code to add a customizer section in your WP theme.
<?php
/**
 *
 * Creating customizer options via Titan Framework
 *
 * Getting started      : http://www.titanframework.net/get-started/
 * Customizer           : http://www.titanframework.net/theme-customizer-section/
 * Options              : http://www.titanframework.net/docs/
 * Getting Option Values: http://www.titanframework.net/getting-option-values/
 * Live preview         : http://www.titanframework.net/livepreview-parameter/
 */


add_action( 'tf_create_options', 'aa_customizer_options' );

function aa_customizer_options() {

    // Initialize Titan with your theme name
    $titan = TitanFramework::getInstance( 'neat' );

    /**
        First section
     */


    $aa_section1 = $titan->createThemeCustomizerSection( array(

        // Name the options menu
        'name' => 'My Section',

        // Name of the panel where all sections will be present
        'panel' => 'My Panel'

    ) );
}
I have placed a few helpful links to Titan Framework's documentation at the top of this file. I recommend that you go through these links.
Next (line #14) is an add_action() function which carries a tf_create_options hook and an aa_customizer_options function as its parameters. This hook helps to create options inside the customizer section.
aa_customizer_options is a custom function for registering settings, sections or panels. If you've read my previous articles, there I've discussed a rule for working with Titan Framework:
Call the getInstance() function whenever you need to interact with Titan Framework.
Just like on line #19 of the code above. This means an instance is called that is associated with the variable $titan and it takes on a unique parameter, preferably your theme name. I'm using neat, which is my theme's name.
After calling an instance, add a section within customizer using the createThemeCustomizerSection() function. Lines #26 through #34 create a section in $titan called $aa_section1. The createThemeCustomizerSection() takes up an array of parameters like name, panel, desc, etc.
I'm using two of these parameters (i.e. name and panel) to create the theme customizer panel and then a section inside it. A panel is a group of sections, whereas a section contains settings inside it.
I created a panel called ‘My Panel’ and a section called 'My Section' menu inside the panel.

The above screenshot displays the newly modified theme customizer. Here you can find the new panel, i.e. My Panel.
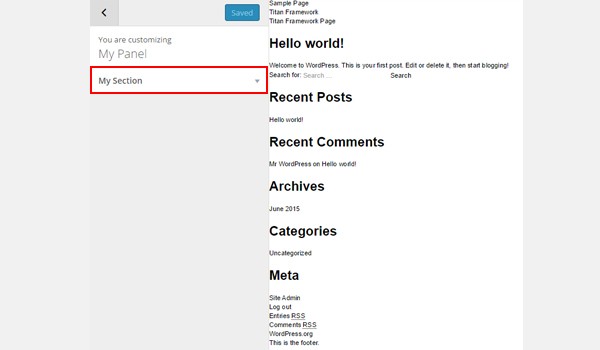
Inside My Panel there is a section named My Section.
In the previous article, I covered how to create a custom section inside a custom panel of the theme customizer with Titan Framework. Let's create a few options/settings inside the section we created and implement our theme at the front‑end.
Creating Options Inside a Theme Customizer Section
Paste the following lines right below the code written in the previous article inside the customizer-options-init.php file. This file is included in the functions.php of our theme via the admin-init.php file.
<?php

/**
 * Create the options
 *
 */

// Body bg color
$aa_section1->createOption( array(

    'id'      => 'aa_sec_body_bg_clr', // The ID which will be used to get the value of this option
    'type'    => 'color', // Type of option we are creating
    'name'    => 'Site Background Color',// Name of the option which will be displayed in the admin panel
    'default' => '#fff' // Default value of our option

) );

// Body text color
$aa_section1->createOption( array(

    'id'      => 'aa_sec_body_txt_clr', // The ID which will be used to get the value of this option
    'type'    => 'color', // Type of option we are creating
    'name'    => 'Site Text Color',// Name of the option which will be displayed in the admin panel
    'default' => '#000' // Default value of our option

) );
I am using the createOption() function of Titan Framework to create options. Since I need to create this option inside the custom section called $aa_section1, I've called the create options function through the section variable in line #8.
I have registered two settings. Both are color type options where the first option helps to configure the body background color (line #10 to #13).
I've set several parameters for this color setting, ID and name being the most important ones. The ID, which should be unique, is used to get the value of this option, whereas the name is what shows up inside the customizer.
Next I created another option for the body text color (line #18 to #25). Since it is the same option type, it is similar to the previous one with different values in the parameters. Let's see what happens in the customizer.
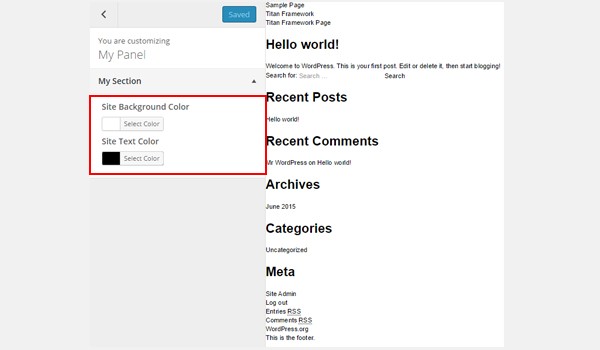
The body background color and body text color settings are being displayed against the names Site Background Color and Site Text Color inside our section called My Section.
So far, I've added options in the theme customizer. Let me now show you how to retrieve values from these.
Getting the Values
First of all, I will retrieve the saved values of both options and save them in two different variables. Then I will use those two variables inside an in-file CSS to change the values of colors in our theme. To do that, paste the following lines of code at the top of the header.php file.
<?php
/**
 * The header for our theme.
 *
 */

/**
 * Customizer options
 *
 * Getting option values at this step
 *
 */

// 1. Get the titan framework instance and save it to a variable
$titan = TitanFramework::getInstance( 'neat' ); // we will initialize $titan only once for every file where we use it.

// Body bg color
$aa_sec_body_bg_clr_val = $titan->getOption( 'aa_sec_body_bg_clr' );

// Body txt color
$aa_sec_body_txt_clr_val = $titan->getOption( 'aa_sec_body_txt_clr' );

?>
Using this code, I'll get the values of options which were created in the customizer-options-init.php file. Two steps are needed to achieve this:
- Get the titan framework instance and save it to a variable.
- Get the value via ID using the
getOption()function.
Line #17 is where I registered the instance. Lines #20 and #23 are where I retrieved the values of these options, which was the second step. The getOption() function in these two lines gets the values from aa_sec_body_bg_clr and aa_sec_body_txt_clr, which are the unique IDs for the Site Background Color and Site Text Color options.
The retrieved color values are saved in the variables $aa_sec_body_bg_clr_val and $aa_sec_body_txt_clr_val.
Let's use these two variables, which contain the color values selected by the user, at the front-end:
<?php wp_head(); ?>

<style>
/* ----------------------------------------------------------------------------
 * CSS values from customizer
 * ------------------------------------------------------------------------- */
    body{
		background: <?php echo $aa_sec_body_bg_clr_val; ?> !important;
		color     : <?php echo $aa_sec_body_txt_clr_val; ?> !important;
	}
	h1,
	h2,
	h3,
	h4,
	h5,
	h6,
	a,
	p{
		color     : <?php echo $aa_sec_body_txt_clr_val; ?> !important;
	}
</style>
Paste this code below the wp-head() function so that our styles are included after the original stylesheet of our theme. Look through line #7 and #20 for each of these tags—the echo command is used to print the output for background color and text color.
Note that the CSS properties have been marked as !important, which ensures the CSS priority.
Displaying the Output
Follow these steps to live preview the changes.
- Go to your WordPress dashboard.
- Then follow this path: Appearance > Customizer > My Panel > My Section.
- Click Select Color both for the Site Background Color and Site Text Color.
- A color palette will open.
- Choose any color of your choice.
Once you've set the colors, you can see a live preview of these changes on your site.
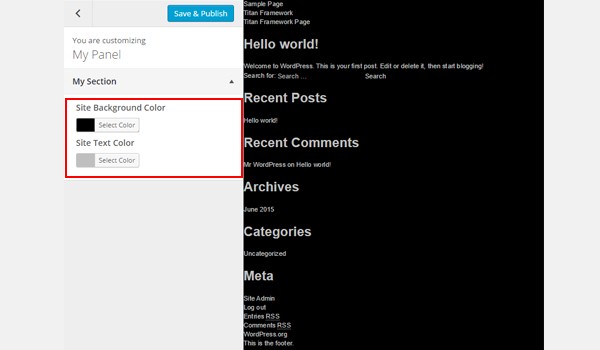
I chose #000000 as my Site Background Color and #bfbfbf as the Site Text Color—you can check out the preview screenshot above.
Once you are done, click the Save & Publish button.
Conclusion
So, that's about it. Now you can easily create options inside Theme Customizer with Titan Framework. Was it easy? Don't hesitate to reach out at Twitter or comment below if you have any queries.
By now you know how to create any kind of container with Titan Framework. I can't emphasize enough the importance of the last few articles. If you don't know how to create these containers, it will be hard for you to understand any of the next articles. So, head back and revise your concepts of how to create different types of containers with Titan Framework. You should know how to create:
- a custom admin panel with tabs inside it
- a meta box for any post type
- a theme customizer section and panel
From the next article onwards, I'll discuss every possible type of option which can be added with Titan Framework. So stay tuned!

Comments