The checkbox, radio, and select type options allow users to make a single choice out of a set of predefined choices. How about when you need to provide an end user with the ability to make more than one choice?
That's exactly what the multicheck type option does in Titan Framework. Today, I intend to show how you can add a multicheck type option via Titan Framework in a custom admin panel, a meta box or inside the theme customizer.
The Multicheck Type Option in Titan Framework
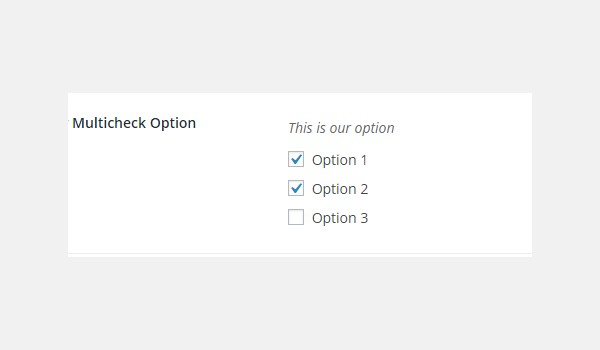
A multicheck type option in Titan Framework allows you to create multiple checkboxes which can all be enabled or disabled at the same time. This is how it looks:
The setting parameters which this option supports are:
-
name: This parameter assigns the display name of a
multichecktype option. - id: It is a unique name which retrieves the saved options values.
- desc: It adds a brief description with the option name.
- default: (Optional) This parameter has an array of values which are enabled by default.
- options: (Optional) This is an associative array containing the value-label pair of options which appear as checkboxes.
The last two parameters, default and options, are array, while the rest are string by type.
Available Containers for the Multicheck Type Option
The containers in which you can add this option are:
- Admin Panel
- Admin Tabs
- Metabox
- Theme Customizer Section
The multicheck type option is added by following a general format:
- Get an instance via the
getInstance()function. - Create an option via the
createOption()function. - Get the saved values via the
getOption()function.
Want to learn how these containers are created with Titan Framework? Read the previous articles of this series.
Creating a Multicheck Type Option Inside an Admin Panel
Example Declaration
Let's create this option inside an admin panel first.
<?php
    /**
     *
     * Create multicheck type option in an Admin Panel
     *
     */
    $aa_panel->createOption( array(

        'id'      => 'aa_multicheck_opt', // The ID which will be used to get the value of this option
        'type'    => 'multicheck', // Type of option we are creating
        'name'    => 'My Multicheck Option', // Name of the option which will be displayed in the admin panel
        'desc'    => 'This is our option', // Description of the option which will be displayed in the admin panel
        'options' => array(             // Associative array of value-label pairs containing options

                    'aa_hdr_logo' => 'Show Header Logo',
                    'aa_hdr_bg_img' => 'Show Header Background Image',
                    'aa_hdr_clr_overlay' => 'Allow Header Color Overlay'

                ),

        'default' => array( 'aa_hdr_logo', 'aa_hdr_bg_img' )

) );
I used the createOption() function in line #8 to add a multicheck type option in a custom admin panel $aa_panel. There is a list of parameters which I've mentioned, i.e. name, id, type, options, desc and default. The ID of my option is aa_multicheck_opt; make sure that every ID you add is unique.
The 'options' parameter in line #14 takes up an associative array. It contains value-label pairs. Each pair indicates a separate option which appears as a checkbox. So, I've defined three value-label pairs, which means three options.
The label of each option is unique. Therefore, the labels aa_hdr_logo, aa_hdr_bg_img and aa_hdr_clr_overlay create options named 'Show Header Logo', 'Show Header Background Image' and 'Allow Header Color Overlay' respectively.
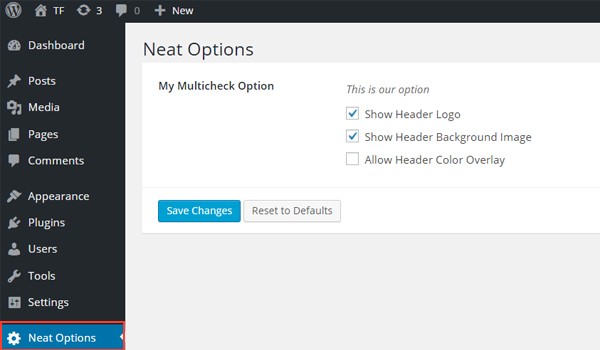
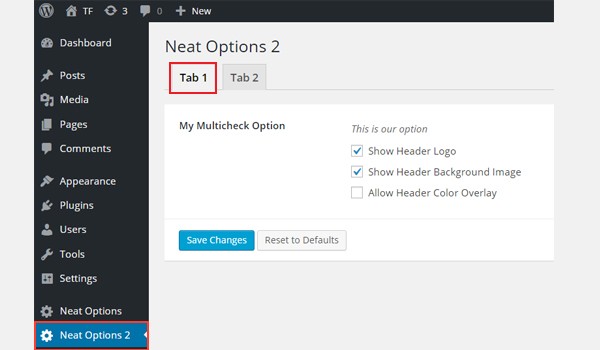
In the above screenshot, there is an admin panel Neat Options which contains a multicheck option named My Multicheck Option. Note that the first two options are enabled due to default settings (which I set at line #16).
Example Usage
Let's get the saved options values.
<?php
// 1. Get the titan framework instance and save it to a variable
$titan = TitanFramework::getInstance( 'neat' ); // we will initialize $titan only once for every file where we use it.

// 2. Get the value via ID using getOption function
$aa_multicheck_opt_val = $titan->getOption( 'aa_multicheck_opt' );

/**
 *
 * Printing saved values for an Admin Panel
 *
 */

var_dump($aa_multicheck_opt_val);
In line #3, I added a unique instance via the getInstance() function. It's recommended to use your theme name as a parameter here. Then in line #6, I used the getOption() function—which retrieves the saved values—by registering the option ID aa_multicheck_opt as a parameter. After that, I saved its result into a variable $aa_multicheck_opt_val. Till this point, the user input settings are saved in this variable.
Now we'll print the saved results at the front-end. As this option takes up an associative array, I'll use the most basic method to print array contents, i.e. the var_dump() command (line #15).
If you preview the front-end, it looks like this:
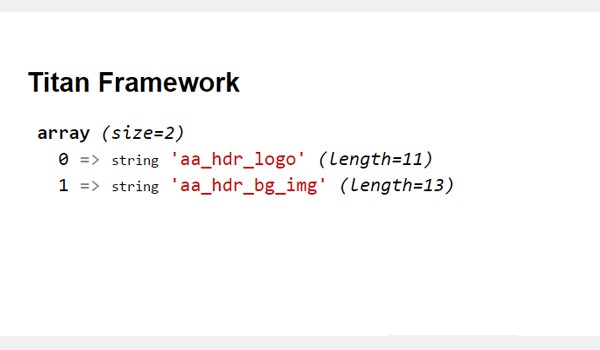
The default settings were printed absolutely correctly. You get the idea about what you can do with this option.
Let's add some lines of code which print an output if the settings are changed dynamically. I replaced line #15 of the code above with these lines.
<?php
    if ( in_array( 'aa_hdr_logo', $aa_multicheck_opt_val )  ) {
        echo "Show Header Logo was enabled.</br>";
    } else {
        echo "Show Header Logo was not enabled.</br>";
    }


    if ( in_array( 'aa_hdr_bg_img', $aa_multicheck_opt_val ) ) {
        echo "Show Header Background Image was enabled.</br>";
    } else {
        echo "Show Header Background Image was not enabled.</br>";
    }


    if ( in_array( 'aa_hdr_clr_overlay', $aa_multicheck_opt_val ) ) {
        echo "Allow Header Color Overlay was enabled.</br>";
    } else {
        echo "Allow Header Color Overlay was not enabled.</br>";
    }

?>
Here I'm using the in_array() function inside if-else check statements. Three different checks are being performed here for the output.
Lines 2 to 6:
- If the label
aa_hdr_logoexists inside the array$aa_multicheck_opt_val, print 'Show Header Logo was enabled.' - Otherwise, print 'Show Header Logo was not enabled.'
Lines 7 to 11:
- If the label
aa_hdr_bg_imgexists inside the array$aa_multicheck_opt_val, print 'Allow Header Color Overlay was enabled.' - Otherwise, print 'Allow Header Color Overlay was not enabled.'
Lines 13 to 17:
- If the label
aa_hdr_clr_overlayexists inside the array$aa_multicheck_opt_val, print 'Show Header Background Image was enabled.' - Otherwise, print 'Show Header Background Image was not enabled.'
Displaying the Result at the Front-End
Let's go with the default settings first, i.e. the first two checkboxes are enabled.
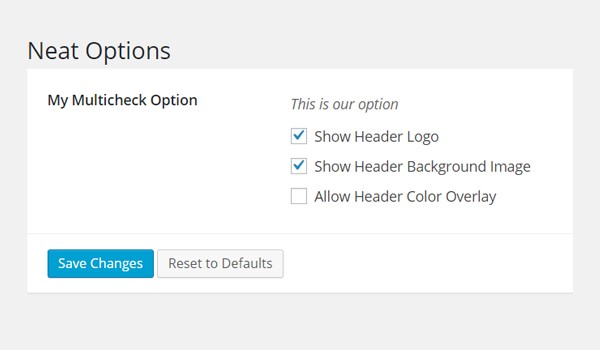
The front-end must print the following lines like this:

Creating a Multicheck Type Option Inside an Admin Tab
Example Declaration
Next I'll add this option in an admin tab.
<?php
    /**
     *
     * Create multicheck type option in an Admin Tab
     *
     */
    $aa_tab1->createOption( array(

        'id'      => 'aa_multicheck_opt_in_tab', // The ID which will be used to get the value of this option
        'type'    => 'multicheck', // Type of option we are creating
        'name'    => 'My Multicheck Option', // Name of the option which will be displayed in the admin panel
        'desc'    => 'This is our option', // Description of the option which will be displayed in the admin panel
        'options' => array(             // Associative array of value-label pairs containing options

                        'aa_hdr_logo' => 'Show Header Logo',
                        'aa_hdr_bg_img' => 'Show Header Background Image',
                        'aa_hdr_clr_overlay' => 'Allow Header Color Overlay'

                    ),

        'default' => array( 'aa_hdr_logo', 'aa_hdr_bg_img' )

    ) );
Here I added the same multicheck type option inside an admin tab $aa_tab1. The unique ID of the option is aa_multicheck_opt_in_tab. The rest of the parameter settings are the same.
A multicheck type option exists inside Tab 1 of admin panel Neat Options 2.
Example Usage
Now I'll get the saved values from an admin tab.
<?php
// 1. Get the titan framework instance and save it to a variable
$titan = TitanFramework::getInstance( 'neat' ); // we will initialize $titan only once for every file where we use it.

// 2. Get the value via ID using getOption function
$aa_multicheck_opt_in_tab_val = $titan->getOption( 'aa_multicheck_opt_in_tab' );


    /**
     *
     * Printing saved values for an Admin Tab
     *
     */

    if ( in_array( 'aa_hdr_logo' , $aa_multicheck_opt_in_tab_val )  ) {
        echo "Show Header Logo was enabled.</br>";
    } else {
        echo "Show Header Logo was not enabled.</br>";
    }


    if ( in_array( 'aa_hdr_bg_img' , $aa_multicheck_opt_in_tab_val ) ) {
        echo "Show Header Background Image was enabled.</br>";
    } else {
        echo "Show Header Background Image was not enabled.</br>";
    }


    if ( in_array( 'aa_hdr_clr_overlay' , $aa_multicheck_opt_in_tab_val ) ) {
        echo "Allow Header Color Overlay was enabled.</br>";
    } else {
        echo "Allow Header Color Overlay was not enabled.</br>";
    }
This code is quite similar to what I wrote in the case of an admin panel. You can try it on your own. Let me summarize the steps:
- First of all, get an instance in line #3 via the
getInstance()function. - Then use the
getOption()function to get the saved values in line #6. - Register the option ID and save the results inside the variable
$aa_multicheck_opt_in_tab_val. - Finally, use this variable inside the
in_array()function (lines 15 to 30) to print the desired results.
Displaying the Result at the Front-End
Let's enable all the checkboxes as my demo settings. The front-end looks like this:

Creating a Multicheck Type Option Inside a Metabox
Example Declaration
Now I'll create a multicheck type option in a metabox.
<?php
    /**
     *
     * Create multicheck type option in a Metabox
     *
     */
    $aa_metbox->createOption( array(

        'id'      => 'aa_multicheck_opt_in_metabox', // The ID which will be used to get the value of this option
        'type'    => 'multicheck', // Type of option we are creating
        'name'    => 'My Multicheck Option', // Name of the option which will be displayed
        'desc'    => 'This is our option', // Description of the option which will be displayed
        'options' => array(             // Associative array of value-label pairs containing options

                    'aa_hdr_logo' => 'Show Header Logo',
                    'aa_hdr_bg_img' => 'Show Header Background Image',
                    'aa_hdr_clr_overlay' => 'Allow Header Color Overlay'

                ),

        'default' => array( 'aa_hdr_logo', 'aa_hdr_bg_img' )

    ) );
I added this option with a unique ID aa_multicheck_opt_in_metabox inside a metabox $aa_metbox.
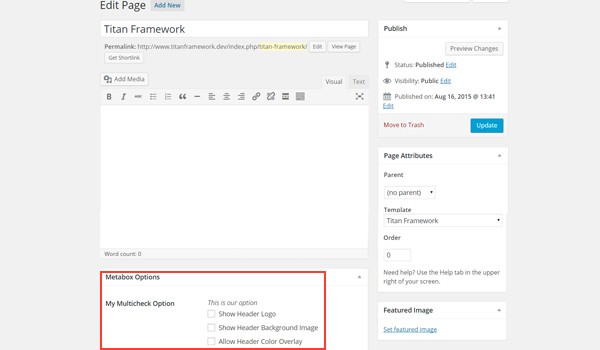
In the above image, there is a page editing screen and right at the end you can spot a multicheck option named My Multicheck Option in a metabox.
Example Usage
Use the following code to retrieve the saved values.
<?php
// 1. Get the titan framework instance and save it to a variable
$titan = TitanFramework::getInstance( 'neat' ); // we will initialize $titan only once for every file where we use it.

// 2. Get the value via ID using getOption function
$aa_multicheck_opt_in_metabox_val = $titan->getOption( 'aa_multicheck_opt_in_metabox', get_the_ID() );

    /**
     *
     * Printing saved values for a Metabox
     *
     */

    if ( in_array( 'aa_hdr_logo', $aa_multicheck_opt_in_metabox_val )  ) {
        echo "Show Header Logo was enabled.</br>";
    } else {
        echo "Show Header Logo was not enabled.</br>";
    }


    if ( in_array( 'aa_hdr_bg_img', $aa_multicheck_opt_in_metabox_val ) ) {
        echo "Show Header Background Image was enabled.</br>";
    } else {
        echo "Show Header Background Image was not enabled.</br>";
    }


    if ( in_array( 'aa_hdr_clr_overlay', $aa_multicheck_opt_in_metabox_val ) ) {
        echo "Allow Header Color Overlay was enabled.</br>";
    } else {
        echo "Allow Header Color Overlay was not enabled.</br>";
    }

?>
The code again uses the functions for getting an instance and saved values. But in line #6, there is an additional parameter, the get_the_ID() function, which gets values from any page's or post's ID. In the end, I used the same if-else check statements.
Displaying the Result at the Front-End
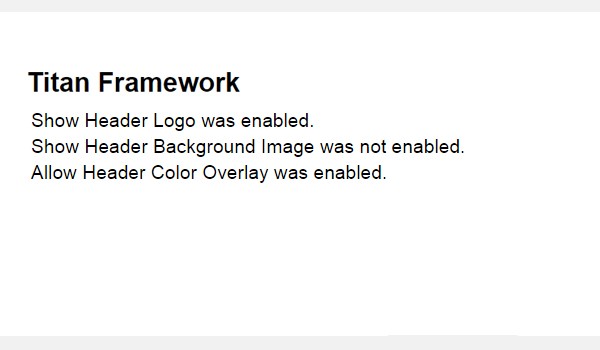
This time, let's enable the first and the last option. Here is the screenshot of the front-end.
Creating a Multicheck Type Option Inside a Theme Customizer Section
Example Declaration
Finally, I'm going to add this option in a theme customizer section.
<?php
    /**
     *
     * Create multicheck type option in a Theme Customizer Section
     *
     */
    $aa_section1->createOption( array(

        'id'      => 'aa_multicheck_opt_in_sec', // The ID which will be used to get the value of this option
        'type'    => 'multicheck', // Type of option we are creating
        'name'    => 'My Multicheck Option', // Name of the option which will be displayed
        'desc'    => 'This is our option', // Description of the option which will be displayed
        'options' => array(             // Associative array of value-label pairs containing options

                    'aa_hdr_logo' => 'Show Header Logo',
                    'aa_hdr_bg_img' => 'Show Header Background Image',
                    'aa_hdr_clr_overlay' => 'Allow Header Color Overlay'

                ),

        'default' => array( 'aa_hdr_logo', 'aa_hdr_bg_img' )

    ) );
I added a multicheck type option inside a theme customizer section $aa_section1. Its ID is aa_multicheck_opt_in_sec.
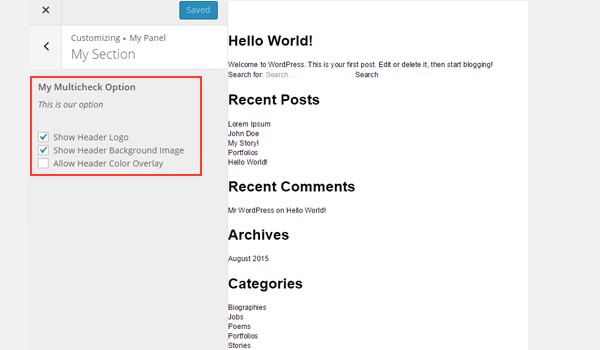
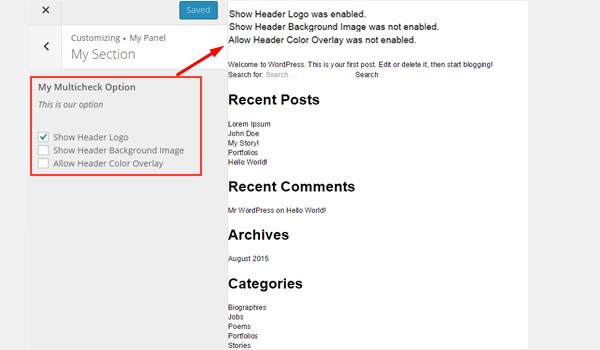
In the image, there is a customizer section named My Section, in which there is a list of checkbox options.
Example Usage
Use this code to get the values from a customizer section.
<?php
// 1. Get the titan framework instance and save it to a variable
$titan = TitanFramework::getInstance( 'neat' ); // we will initialize $titan only once for every file where we use it.

// 2. Get the value via ID using getOption function
$aa_multicheck_opt_in_sec_val = $titan->getOption( 'aa_multicheck_opt_in_sec' );

    /**
     *
     * Printing saved values for a Customizer Section
     *
     */

    if ( in_array( 'aa_hdr_logo' , $aa_multicheck_opt_in_sec_val )  ) {
        echo "Show Header Logo was enabled.</br>";
    } else {
        echo "Show Header Logo was not enabled.</br>";
    }


    if ( in_array( 'aa_hdr_bg_img' , $aa_multicheck_opt_in_sec_val ) ) {
        echo "Show Header Background Image was enabled.</br>";
    } else {
        echo "Show Header Background Image was not enabled.</br>";
    }


    if ( in_array( 'aa_hdr_clr_overlay' , $aa_multicheck_opt_in_sec_val ) ) {
        echo "Allow Header Color Overlay was enabled.</br>";
    } else {
        echo "Allow Header Color Overlay was not enabled.</br>";
    }

?>
This code is again quite similar to what I used for other container types. Only the ID and variable names are different.
Displaying the Result at the Front-End
I enabled only the first option. The changes can be observed in live preview mode:
Conclusion
So that's about it. You can integrate the multicheck type option in your web development project to allow users to enable multiple theme features in a few clicks.
Remember I gave you an example in the checkbox type option's tutorial, that you can allow an end user to enable/disable any part of single.php. That same example can be applied here, with bit of a context. So if you are providing user options related to particular area like the header, then you should use multicheck to avoid extra options.
There are some other option types which can be called the derivatives of this type. I'll be discussing them in my upcoming articles. Till then try this tutorial and let me know your views about it in the comments or on Twitter.

Comments