Allowing an end user to change the font of your theme can be an intimidating task, especially when you want to provide this option inside a custom admin panel, a metabox, or even the theme customizer. Today, I'll discuss how to add a custom font type option via Titan Framework.
The Font Type Option in Titan Framework
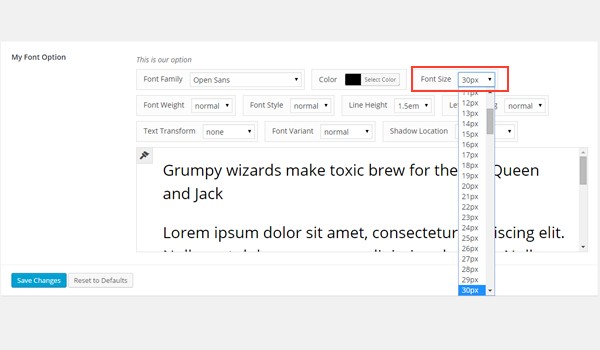
The font type option is one of the most versatile options in terms of functionality in Titan Framework. It not only lets you change the font, but is also a full font style selector. With a complete range of functionality-rich options, you can choose both web-safe fonts and Google WebFonts inside it. Apply as many styles you want, e.g. colors, letter spacing, shadows, line-height, etc. An end user can also look at the preview of how the font and its styles look. Here is how this option looks:
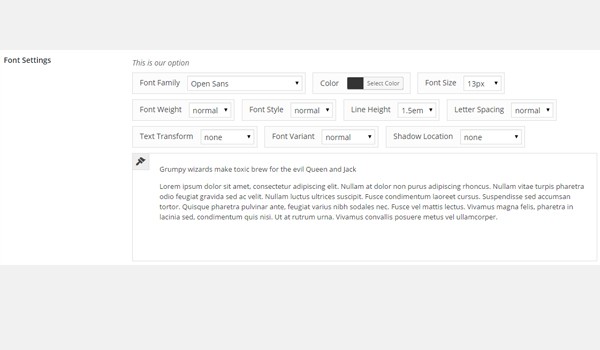
You can see in the above image how detailed the font settings are. This is possible via a whole bunch of setting parameters which this option supports. There are some compulsory and optional parameters. First, let's take a look at the compulsory ones:
-
name: (string) It defines the display name of the
fonttype option. - id: (string) This parameter assigns a unique name which helps in getting the values.
- desc: (string) It displays a brief description.
Now some of the optional parameters which you should use are:
-
default: (boolean) In the
fonttype option, this parameter behaves somewhat differently. It takes up an array which contains some default fonts and styles you want to use (more on this later). - css: (string) When you add this option inside an admin page and/or theme customizer section, this parameter automatically generates CSS (more on this later).
Finally, there is a long list of certain check-based parameters, whose default values are set to true. Let's name them and find out how they'll behave if set to false.
-
show_font_family: (boolean) The font-family section disappears if this parameter is set to
false. -
show_color: (boolean) The color palette is not shown if this parameter is set to
false. -
show_font_size: (boolean) The font-size option disappears if this parameter is set to
false. -
show_font_weight: (boolean) The font-weight option disappears if this parameter is set to
false. -
show_font_style: (boolean) The font-style setting disappears if this parameter is set to
false. -
show_line_height: (boolean) You cannot change the line-height if this parameter is set to
false. -
show_letter_spacing: (boolean) You cannot edit the letter_spacing if this parameter is set to
false. -
show_text_transform: (boolean) The text-transform option disappears if this parameter is set to
false. -
show_font_variant: (boolean) The font-variant field will not appear if this parameter is set to
false. -
show_preview: (boolean) You will not see the live preview of the font if this parameter is set to
false. -
show_websafe_fonts: (boolean) The list of websafe fonts disappears if this parameter is set to
false. -
show_google_fonts: (boolean) Google fonts are not shown if this parameter is set to
false. - include_fonts: (mixed) This is a regex string which specifies the fonts you want to add.
-
enqueue: (boolean) If set to
falsethen the Google Font (if used) will not be enqueued automatically.
Available Containers for the Font Type Option
You can add the font type option inside:
- Admin Panel
- Admin Tabs
- Metabox
- Theme Customizer Section
The scope of this article is not about the creation of these containers. You can refer to my previous articles if you want to learn about that.
The overall process of adding this option type remains the same:
- First get a unique instance via the
getInstance()function. - Then add an option via the
createOption()function. - In the end, get saved values via the
getOption()function.
Let's create this option inside an admin panel.
Creating a Font Type Option Inside an Admin Panel
Example Declaration
Here is the code:
<?php
    /**
     *
     * Create font type option in an admin panel
     *
     */
    $aa_panel->createOption( array(

        'id'    => 'aa_font', // The ID which will be used to get the value of this option
        'type'  => 'font', // Type of option we are creating
        'name'  => 'My Font Option', // Name of the option which will be displayed in the admin panel
        'desc'  => 'Choose your font settings' // Description of the option which will be displayed in the admin panel

    ) );
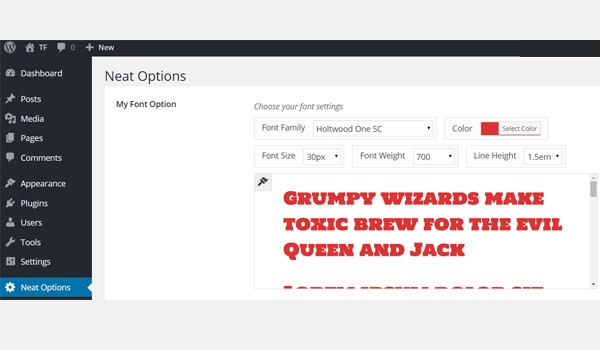
I've used the createOption() function (line #7) to add a font type option in an admin panel $aa_panel. This function takes up an array of parameters. That's why parameters like name, id, type and desc are used here. The value of ID (i.e. aa_font) should be unique because it gets the saved options values.
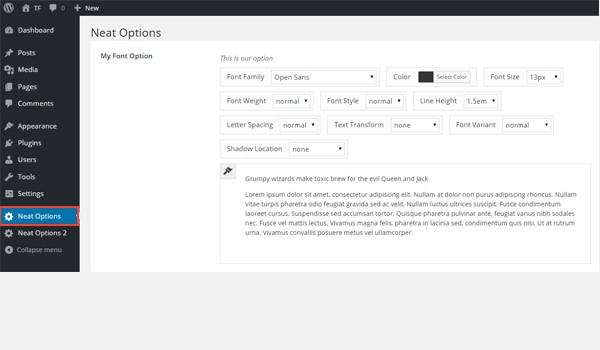
In the above screenshot, there is a font type option named My Font Option inside an admin panel Neat Options. There are several setting options which can be set to configure the font settings of your web development project.
Example Usage
Now I'll retrieve the saved options values.
<?php
// 1. Get the titan framework instance and save it to a variable
$titan = TitanFramework::getInstance( 'neat' ); // we will initialize $titan only once for every file where we use it.

// 2. Get the value via ID using getOption function
$aa_font_array = $titan->getOption( 'aa_font' );


/**
 *
 * Printing font array values
 *
 */

var_dump( $aa_font_array );

?>
The process of getting the saved values is pretty much the same one that has been discussed in previous articles. In line #3, the getInstance() function is used, which takes up a unique parameter, preferably your theme name (i.e. neat in this case). Next, I used the getOption() function (line #6), which gets the value via the ID aa_font, and then I saved it in a new variable $aa_font_array.
Previously, we established that the font type option takes up an array of parameter settings even if we don't define them in reality because their default value is set to true. So, before I display the retrieved values at the front-end, let me print this complete array of parameters.
For it I've used the var_dump() function (at line #16) for the variable $aa_font_array. Let's find out how this array is printed:
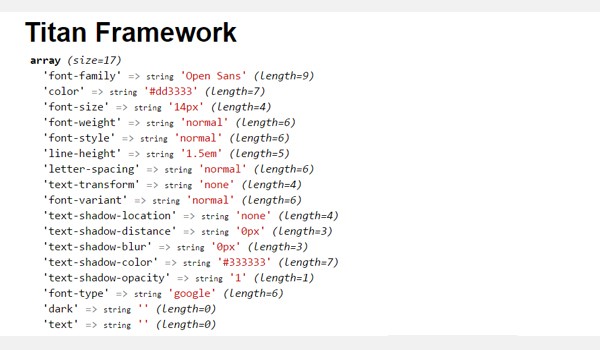
In the above screenshot, a detailed description of every element of an array is listed. It clearly explains how the font type option in Titan Framework is set.
Now this part was just an additional thing—our main goal is to change the default font settings and print it at the front-end.
Replace line #16 with the following lines of code:
<?php
/**
 *
 * Replace this code on line #16
 *
 */
?>

<h3 style="font-size: <?php echo $aa_font_array['font-size']; ?>;">Pellentesque habitant morbi tristique.</h3>
In line #7, I've used inline CSS styling inside an H3 (heading 3) tag. The value corresponding to the style attribute, i.e. font-size, gets printed at the front-end.
For this purpose, I embedded the echo command, which prints only a specific part of the array, i.e. echo $aa_font_array['font_size'], in the inline CSS. At this stage, the front-end appears like this:
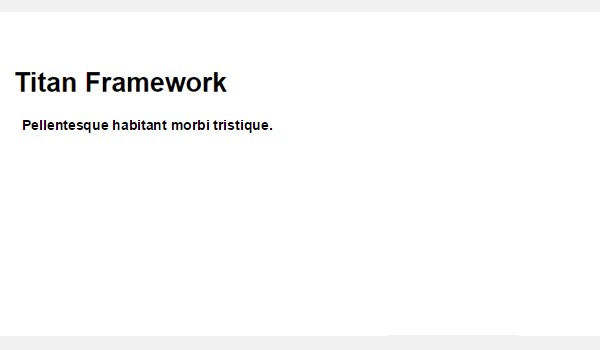
The printed text is currently 14px in size. Let's change this value from our dashboard and preview the result.
Displaying the Result at the Front-End
Suppose I set the demo value to 30px.
Save this setting and find out the changes. Here is the screenshot:

An increased font-size of the text is seen clearly. This way you can enter any array element in line #16 of code and preview the results.
Creating a Font Type Option Inside a Metabox
Example Declaration
Let’s create a font type option in a metabox which has all the style fields in it.
<?php
    /**
     *
     * Create font type option in a metabox
     *
     */
    $aa_metbox->createOption( array(

        'id'   => 'aa_mb_font', // The ID which will be used to get the value of this option
        'type' => 'font', // Type of option we are creating
        'name' => 'My Font Option', // Name of the option which will be displayed
        'desc' => 'Choose your font settings' // Description of the option which will be displayed

    ) );
I added a font type option with ID aa_mb_font in a metabox $aa_metbox via the createOption() function (line #8). It appears against the name 'My Font Option'.
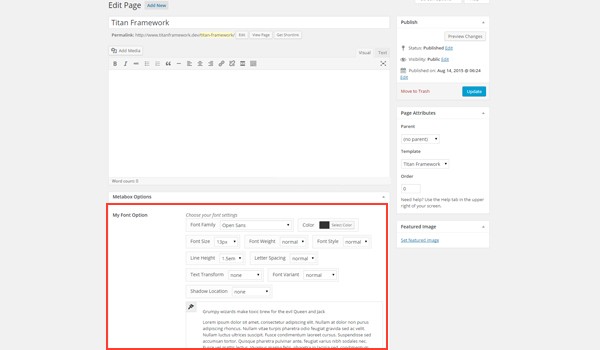
Here is the screenshot, where you can find My Font Option inside a metabox displayed at the end of a page editing screen.
This is a custom metabox which I've created with Titan Framework. Refer to my previous articles to learn how.
Example Usage
Now I'll retrieve the saved options values.
<?php
// 1. Get the titan framework instance and save it to a variable
$titan = TitanFramework::getInstance( 'neat' ); // we will initialize $titan only once for every file where we use it.

/**
 *
 * Get Option Value of metabox.
 *
 *
 */
$aa_mb_font1_array = $titan->getOption( 'aa_mb_font', get_the_ID() );

// Check if value was set / Validation
$aa_mb_font1_val = ( is_array( $aa_mb_font1_array ) && !empty( $aa_mb_font1_array ) ? TRUE : FALSE );

/////////////////////////////////////////////////////////////
// Get all the values you need Abstraction of PHP and HTML //
/////////////////////////////////////////////////////////////

// Get color value
$aa_mb_font1_clr_val = ( $aa_mb_font1_val == TRUE ? $aa_mb_font1_array['color'] : 'red' );

// Get font-family value
$aa_mb_font1_ffm_val = ( $aa_mb_font1_val == TRUE ? $aa_mb_font1_array['font-family'] : 'Arial' );

// Get font-size value
$aa_mb_font1_fsz_val = ( $aa_mb_font1_val == TRUE ? $aa_mb_font1_array['font-size'] : '14px' );

/**
 *
 * Print values at front-end
 *
 */
?>

    <div
        style="

                color:<?php echo $aa_mb_font1_clr_val; ?>;
                font-family: <?php echo $aa_mb_font1_ffm_val; ?>;
                font-size: <?php echo $aa_mb_font1_fsz_val; ?>;

        "
    >

        Printed value of font type option in metabox.

    </div>
The process of getting the values which I'm using here is somewhat complex. First get a unique instance via the getInstance() function in line #3. Next, retrieve the saved value via registering the ID aa_mb_font inside the getOption() function as a parameter (line #11).
Now, aa_mb_font is not an ordinary ID—instead it holds a complete associative array of our font options. I saved this associative array in a new variable $aa_mb_font1_array.
Line #14 validates the presence of an array inside variable $aa_mb_font1_array and checks that it is not empty. This step is important because we don't want to end up with fatal PHP errors by outputting an element of a variable which is not even an array in the first place.
Sometimes when the user has not saved any value from the dashboard and you have not set any defaults, this getOption function gets NULL. For this purpose, a check-based statement is used. If it is an array and is not empty, then it puts a TRUE value, or else if it is not an array and is empty then it sets FALSE as the value of $aa_mb_font1_val.
If TRUE, then it means:
-
$aa_mb_font1_arrayis an array. -
$aa_mb_font1_arrayis not an empty array, but instead it has elements in it. - The net result is that line #11 has successfully retrieved its contents.
If FALSE, then it means:
-
$aa_mb_font1_arrayis not array, or$aa_mb_font1_arrayis an empty array and has no elements in it. - The net result is that line #11 has failed to retrieve its contents.
This was an overall validation of the font array. Now I'll extend this process to individual array elements. Lines #21 to #27 get the values of individual keys in the associative array and define a default if no value exists.
For example, line #21 explains that if the defined condition holds TRUE, which means a value exists, then fetch the color of an array and save it in a variable $aa_mb_font1_clr_val. If no such value exists then set the value to red, which is default in this case. There are a number of ways to work around this, so it is just one of the ways I like.
In short, if a user has saved any new font color from his or her dashboard then the selected font color appears; otherwise red is shown. I'd recommend setting the default options while setting the font to avoid any such problems.
The same explanation applies on lines #24 and #27, except for the fact that these lines validate the values for font-family and font-size.
In the end, I've just written the code which prints the result at the front-end. In lines #38 to #48, a div is created in HTML. Then I echoed the values of all the desired variables via inline CSS styling.
Displaying the Result at the Front-End
Suppose I set the following demo font settings:
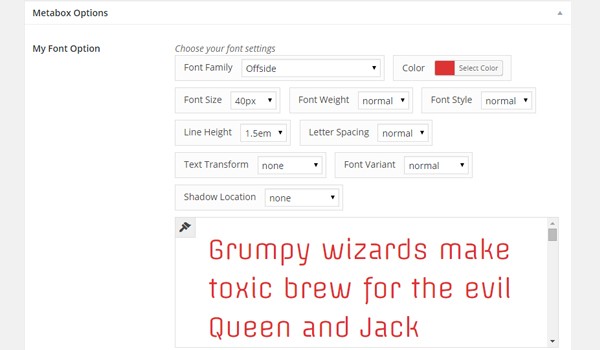
This is how it appears at the front-end:
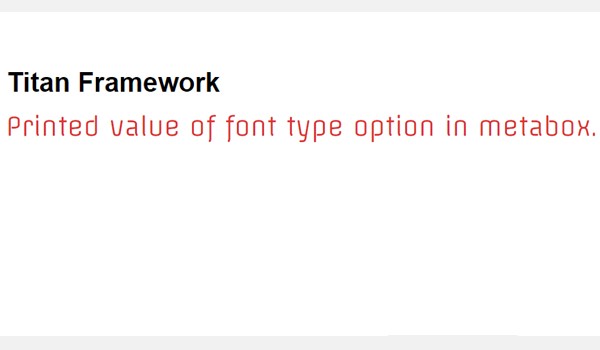
You can now try out some new settings yourself.
Creating a Font Type Option Inside an Admin Tab
Example Declaration
Let's create this option inside an admin tab, but with a different approach.
<?php
    /**
     *
     * Create font type option in an admin tab
     *
     */
    $aa_tab1->createOption( array(

        'id'   => 'aa_font_in_tab1_panel2', // The ID which will be used to get the value of this option
        'type' => 'font', // Type of option we are creating
        'name' => 'My Font Option', // Name of the option which will be displayed in the admin panel
        'desc' => 'Choose font settings', // Description of the option which will be displayed in the admin panel
        'show_font_weight'    => false,  //Font-weight field is not shown
        'show_font_style'     => false,  //Font-style field is not shown
        'show_line_height'    => false,  //Line-height field is not shown
        'show_letter_spacing' => false,  //Letter-spacing field is not shown
        'show_text_transform' => false,  //Text-transform field is not shown
        'show_font_variant'   => false,  //Font-variant field is not shown
        'show_text_shadow'    => false,  //Text-shadow field is not shown
        'default'             => array(
                                    'font-family' => 'Arial', //Default value of font-family
                                    'color'       => 'red', //Default value of font color
                                    'line-height' => '2em', //Default value of line-height
                                    'font-weight' => '500' //Default value of font-weight
        )

    ) );
This time I am adding a font type option but allowing only a few style fields to appear. The unique ID of this option is aa_font_in_tab1_panel2. Look at the parameter list and you'll find out what makes this code different from the previous one.
I've changed the default values of several check-based parameters to false. This means that all style fields of lines #13 to #19 will not appear. Also note the presence of default values for the styling options like font-family, color, line-height and font-weight.
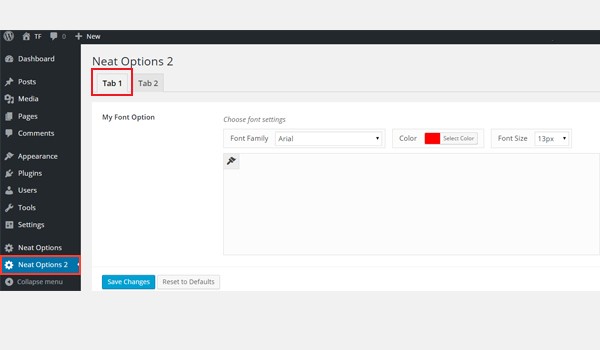
A font type option named My Font Option exists in Tab 1 of admin panel Neat Options 2. If you want to learn how this admin tab was made via Titan Framework, then skim through the previous articles of this series.
In the above screenshot, the font menu appears less detailed in terms of styling fields. The reason is quite obvious, i.e. the false status of a number of parameters in my code. Notice one other thing: the default values of options are set automatically, i.e. 'font-family' => 'Arial' and color => 'red'.
Did I skip any detail? Yes! I'm sure you must be wondering where the default values of line-height and font-weight went. Look again at the parameters list and you'll find the values of show_line_height and show_font_weight are set to false.
This means that no matter in what capacity you define a parameter, it will only work once set to true. The sole purpose of adding these two parameters was to explain this concept. For now, you can omit these as well.
Example Usage
Let's get the saved options values:
<?php
// 1. Get the titan framework instance and save it to a variable
$titan = TitanFramework::getInstance( 'neat' ); // we will initialize $titan only once for every file where we use it.
/**
*
* Get Option Value of metabox.
*
*
*/
$aa_font2_array = $titan->getOption( 'aa_font_in_tab1_panel2' );
// Check if value was set / Validation
$aa_font2_val = ( is_array( $aa_font2_array ) || !empty( $aa_font2_array ) ? TRUE : FALSE );
/////////////////////////////////////////////////////////////
// Get all the values you need Abstraction of PHP and HTML //
/////////////////////////////////////////////////////////////
// Get color value
$aa_font2_clr_val = ( $aa_font2_val == TRUE ? $aa_font2_array['color'] : 'red' );
// Get font family value
$aa_font2_ffm_val = ( $aa_font2_val == TRUE ? $aa_font2_array['font-family'] : 'Arial' );
// Get font size value
$aa_font2_fsz_val = ( $aa_font2_val == TRUE ? $aa_font2_array['font-size'] : '14px' );
/**
*
* Print values at front-end
*
*/
?>
<div style="
color:<?php echo $aa_font2_clr_val; ?>;
font-family: <?php echo $aa_font2_ffm_val; ?>;
font-size: <?php echo $aa_font2_fsz_val; ?>;
"
>
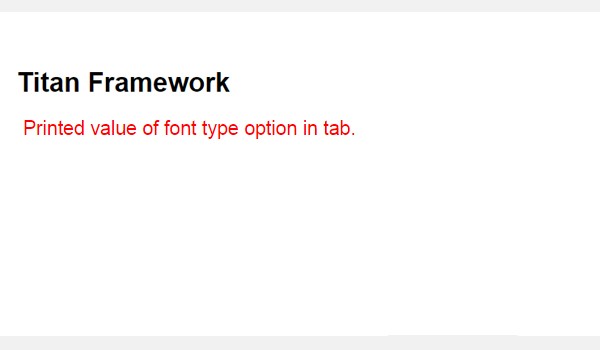
Printed value of font type option in tab.
</div>
The lines written to retrieve the saved options values are pretty much the same which I wrote previously for a metabox. Only the variable names and IDs are different. So, I'm just summarizing the steps written above:
- Getting a unique instance. (line #3)
- Getting the associative font array. (line #11)
- Validating the presence of font array and checking its status, i.e. it's empty or not. (line #14)
- Getting the values of any key in the associative array and defining a default if there is no value. Double-check. (line #21 to #27)
- Printing the array elements. (lines #38 to #48)
Displaying the Result at the Front-End
At this stage, if I preview the front-end it'll display only the default settings like this:
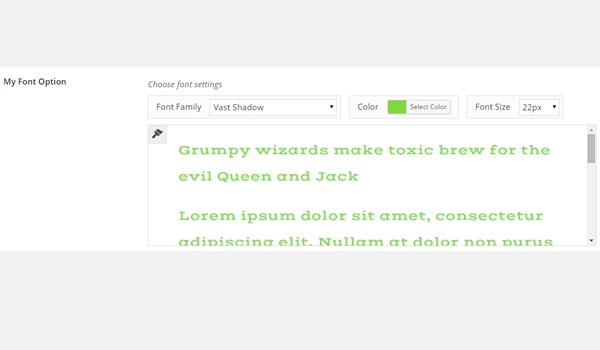
Suppose these are our new font settings:
Here is the screenshot of this new configuration:
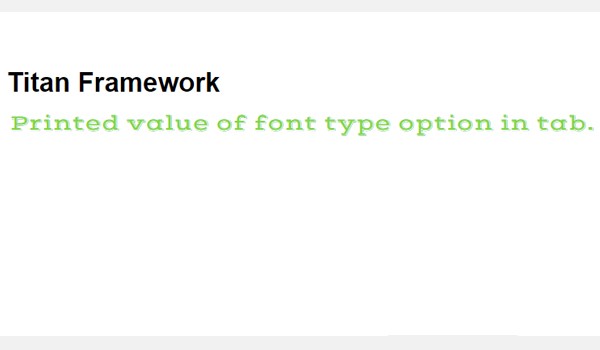
The difference between the two settings is quite obvious.
Creating a Font Type Option Inside a Theme Customizer Section
Example Declaration
In the end, let's create this option inside the customizer.
<?php

    /**
     *
     * Create font type option in a customizer
     *
     */
     $aa_section1->createOption( array(

        'id'   => 'aa_sec_font', // The ID which will be used to get the value of this option
        'type' => 'font', // Type of option we are creating
        'name' => 'My Font Option', // Name of the option which will be displayed
        'desc' => 'Choose your font settings' // Description of the option which will be displayed

    ) );
A font type option with ID aa_sec_font exists inside a theme customizer section $aa_section1. It appears with the name 'My Font Option'. The rest of the parameters are same.
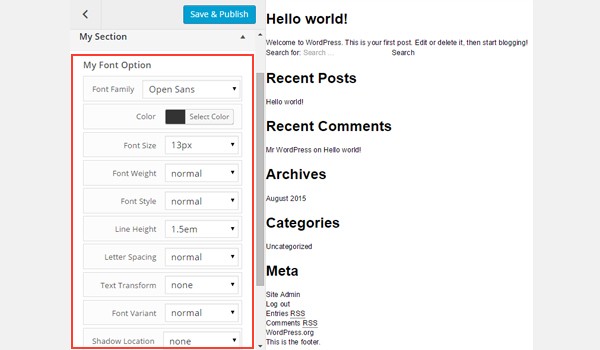
You can find this option in the theme customizer section named My Section.
Example Usage
Let's get its saved values.
<?php
// 1. Get the titan framework instance and save it to a variable
$titan = TitanFramework::getInstance( 'neat' ); // we will initialize $titan only once for every file where we use it.

// Body bg color
$aa_sec_font3_array = $titan->getOption( 'aa_sec_font' );

// Check if value was set / Validation
$aa_sec_font3_val = ( is_array( $aa_sec_font3_array ) || !empty( $aa_sec_font3_array ) ? TRUE : FALSE );

/////////////////////////////////////////////////////////////
// Get all the values you need Abstraction of PHP and HTML //
/////////////////////////////////////////////////////////////

// Get color value
$aa_sec_font3_clr_val = ( $aa_sec_font3_val == TRUE ? $aa_sec_font3_array['color'] : 'red' );

// Get font family value
$aa_sec_font3_ffm_val = ( $aa_sec_font3_val == TRUE ? $aa_sec_font3_array['font-family'] : 'Arial' );

// Get font size value
$aa_sec_font3_fsz_val = ( $aa_sec_font3_val == TRUE ? $aa_sec_font3_array['font-size'] : '14px' );

/**
 *
 * Print values at front-end
 *
 */

?>
    <div
        style="

                color:<?php echo $aa_sec_font3_clr_val; ?>;
                font-family: <?php echo $aa_sec_font3_ffm_val; ?>;
                font-size: <?php echo $aa_sec_font3_fsz_val; ?>;

              "
    >

        Printed value of font type option in customizer.

    </div>
Once again this code is exactly the same which I wrote in the case of an admin tab and a metabox. Only the variable names and IDs are different. So, refer to the detail written above.
Displaying the Result at the Front-End
Let's take a look at the live preview of the changes which I made.
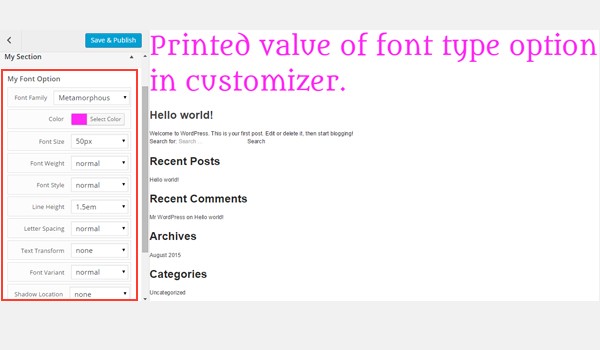
In our discussion on the font type option in Titan Framework, we learned that its CSS parameter behaves somewhat differently as compared to other options. Today, in this article, I'll show you how you can automagically generate CSS of your font type option in a custom admin panel or even in a theme customizer section.
The CSS Parameter in the Font Type Option
Generally speaking, css is a string type parameter, so if you set it, it can automatically generate CSS each time a Titan Framework option is created inside an admin panel and/or theme customizer section.
We know that a font type option in Titan Framework is basically an associative array which carries a range of style fields, e.g.color, font-family, font-size, etc. Likewise, it may happen that you use the same styling properties in some other place in your theme or plugin. Writing this many options in the css parameter can be a repetitive and time-wasting task. When you are not using some of the properties, what then?
To make things simpler, Titan Framework allows you to assign all the styles to your CSS selectors via the font's css parameter. Simply use the term value inside this parameter and your job is done. Let me show you how:
<?php
/**
 *
 * 'css' parameter in 'font' type option
 *
 */

'css' => 'h1.site-header {

    value

}'
Since we know that the css parameter generates all the necessary CSS rules, let's discuss when it is inside the following containers:
- Admin Panel
- Theme Customizer Section
Note: The scope of this article deals only with the usage and behavior of the css parameter with the font type option in Titan Framework. If you want to learn how these containers are made or how to add a font type option in Titan Framework then refer to my previous articles.
Using the CSS Parameter Inside an Admin Panel
Example Declaration
Let's write its code.
<?php
/**
 *
 * Using 'css' parameter inside an admin panel option
 *
 */
$aa_panel->createOption( array(

    'id'                  => 'aa_font', // The ID which will be used to get the value of this option
    'type'                => 'font', // Type of option we are creating
    'name'                => 'My Font Option', // Name of the option which will be displayed
    'desc'                => 'Choose your font settings', // Description of the option which will be displayed
    'show_font_style'     => false,
    'show_letter_spacing' => false,
    'show_text_transform' => false,
    'show_font_variant'   => false,
    'show_text_shadow'    => false,
    'default'             => array(
                                'font-family'         => 'Exo 2',
                                'color'               => '#888888',
                                'line-height'         => '2em',
                                'font-weight'         => '500',
                            ),
    'css'                 => '.aa_site_font1 { value }'

) );
This code creates a font type option in an admin panel $aa_panel with limited styling fields. The ID of this option is aa_font. All the parameters (lines #13 to #17) where the values are set to false won't appear. I've also added default values for the font-family, color, line-height and font-weight settings.
Line #24 defines a css parameter for a class named .aa_site_font1. Note that within this class definition, I've only written value. This means that all the CSS which this field will generate will be placed where value is written. So, wherever this class is used, it loads the CSS properties automatically.
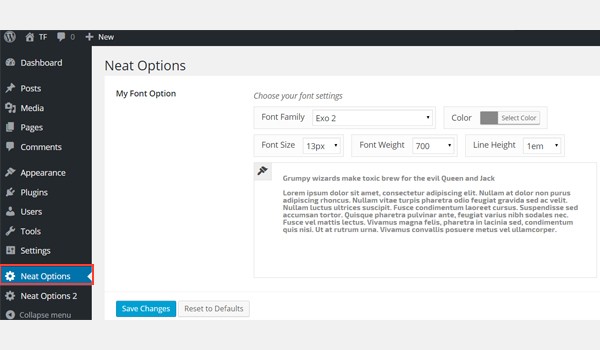
The above screenshot shows the current font settings and makes it clear that this option is created inside my first admin panel, i.e. Neat Options.
Example Usage
Let's create a div tag with aa_site_font1 class and see the result at the front-end.
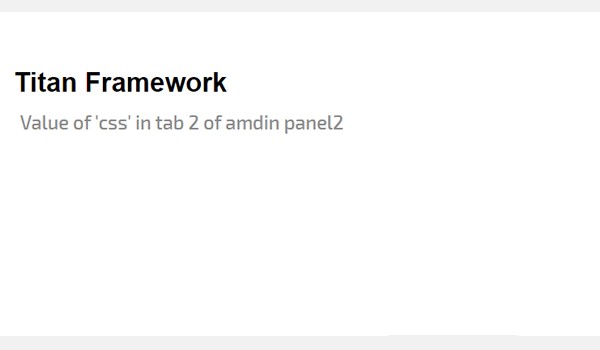
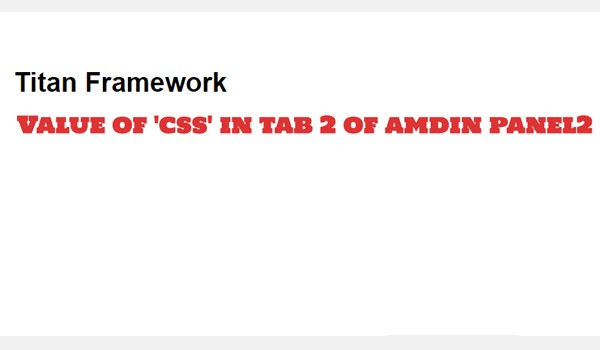
<!-- A div tag with class aa_site_font1 to prview the font properties-->
<div class="aa_site_font1">
	Value of 'css' in tab 2 of amdin panel2
</div>
If you look at the code above, we provided the css parameter of the font field a class where it should output the CSS results, and that class was aa_site_font1. So, I went ahead and created a div with class aa_site_font1, to display the results at the front-end.
Displaying the Result at the Front-End
At this stage, if you look at the front-end then it will look like this:
Now let's change our default settings and make this font bigger and red in color.
The new changes appear at the front-end like this. Remember it is just a div at the front-end with the CSS class aa_site_font1 in it, which we used inside the css parameter.
This is how you can add a css parameter inside a font type option. Titan Framework will automatically generate the CSS for it in your theme.
Using the CSS Parameter Inside a Theme Customizer Section
Example Declaration
Look at its code.
<?php
/**
 *
 * Use 'css' parameter in a theme customizer
 *
 */
 $aa_section1->createOption( array(

    'id'   => 'aa_sec_font', // The ID which will be used to get the value of this option
    'type' => 'font', // Type of option we are creating
    'name' => 'My Font Option', // Name of the option which will be displayed
    'desc' => 'Choose your font settings', // Description of the option which will be displayed
    'css'  => '.aa_site_font2 { value }'

) );
This time, I added the css parameter with class .aa_site_font2. It is defined inside a font type option which has all the style fields inside it.
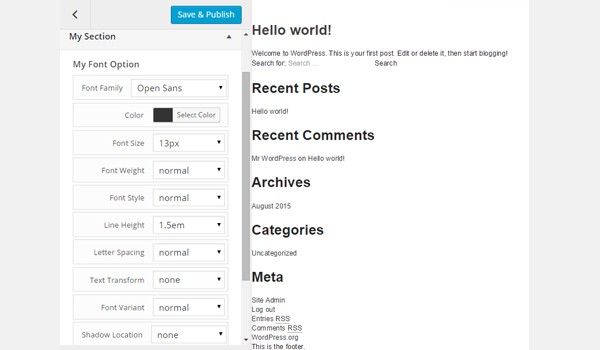
The above screenshot shows this option in a theme customizer section $aa_section1. Also, look at the settings which are currently set.
Example Usage
Once again I'll show the use of styling properties of class aa_site_font2 in some other place, e.g. in a metabox which appears on all post and page editing screens.
<!-- A div tag with class aa_site_font2 to prview the font properties-->
<div class="aa_site_font2">
    Value of 'css' in a metabox
</div>
Again I have a div with the class aa_site_font2. There is some dummy text inside it, but ignore the text and look at how it is automatically getting styled.
Displaying the Result at the Front-End
Let's set any demo font settings from our theme customizer section like this:
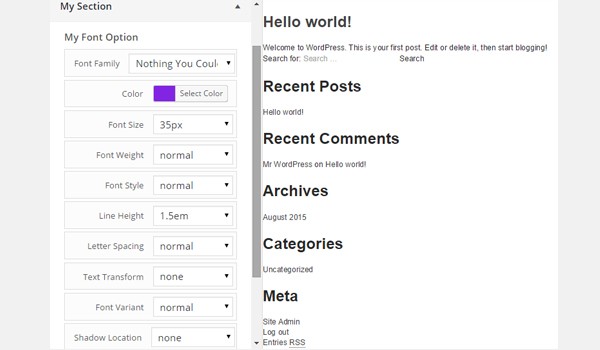
Here is how it looks at the front-end:
Conclusion
That's all about using the font type option with Titan Framework. I've explained almost every aspect of this option in detail.
Titan Framework is definitely an intuitive script that allows you to build a cool set of options by still being lean and mean. Don't overuse these options—remember the "decisions not options" philosophy.
Try out this option and post your queries in the comment box below or reach out to me on Twitter.

Comments