When you need to display a lot of options in the form of a dropdown, you can use a select type option with Titan Framework. Today, we are going to create a select type option in a custom admin panel, a metabox, and the theme customizer.
The Select Type Option in Titan Framework
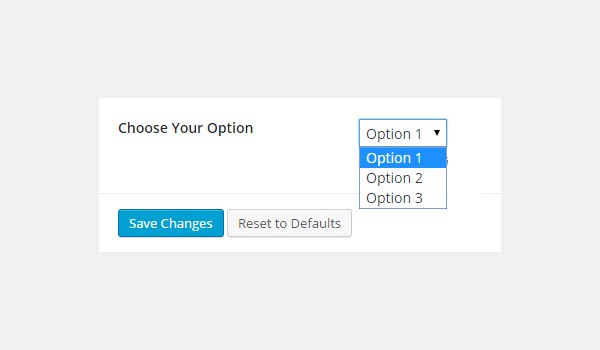
The select type option in Titan Framework helps display a lot of options via a drop-down menu. This is how it looks.
This option type supports a list of settings:
- name: This parameter assigns the display name of option.
- id: It defines a unique name which retrieves the saved options values.
- desc: It adds a one-line description with the option name.
- options: This parameter takes up an associative array of value-label pairs which appear as options in a drop-down menu. You can even add a two-dimensional array to show grouped options (more on this later).
- default: (Optional) It defines the default value of the option.
-
livepreview: (Optional) This parameter displays a live preview of the changes when a
selecttype option is added inside a theme customizer section. - css: (Optional) Whenever you add this option inside an admin page and/or theme customizer section, this parameter automatically generates CSS.
All the parameters are of type string except for the 'Options', which is array in nature.
Available Containers for the Select Type Option
You can add this option inside:
- Admin Panel
- Admin Tabs
- Metabox
- Theme Customizer Section
By now, I'm sure you must be aware of the general format which is followed while adding any option type:
- First get an instance via the
getInstance()function. - Then add an option via the
createOption()function. - In the end, retrieve the saved values via the
getOption()function.
All these containers can be easily added with Titan Framework. Read the previous articles of this series if you don't know how.
Creating a Select Type Option Inside an Admin Panel
Example Declaration
Let's add this option inside an admin panel.
<?php
    /**
     *
     * Create select type option in an Admin Panel
     *
     */

    $aa_panel->createOption( array(

        'id'      => 'aa_select', // The ID which will be used to get the value of this option
        'type'    => 'select', // Type of option we are creating
        'name'    => 'My Select Option', // Name of the option which will be displayed in the admin panel
        'desc'    => 'This is our option', // Description of the option which will be displayed in the admin panel
        'options' => array(    //An array of value-label pairs which appears as options

                        'aa_theme_temp1' => 'Theme Template 1',

                        'aa_theme_temp2' => 'Theme Template 2',

                        'aa_theme_temp3' => 'Theme Template 3'

                    ),

        'default' => 'aa_theme_temp2'

    ) );
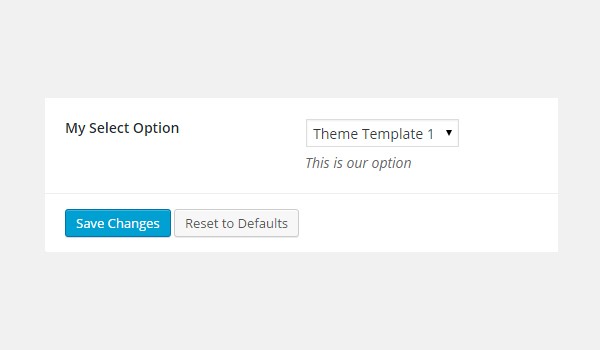
I'm adding a select type option in an admin panel $aa_panel using the createOption() function in line #9. This function defines a list of parameters, i.e. name, id, type, desc, options and default. I've defined a unique ID for my option, i.e. aa_select.
Now take a look at line #15 where I've added an array of key-value pairs. Each pair adds a separate option in the drop-down list. I created three such pairs, i.e. three entries of a select type option.
Therefore, the labels aa_theme_temp1, aa_theme_temp2 and aa_theme_temp3 add options named 'Theme Template 1', 'Theme Template 2' and 'Theme Template 3' in a list.

The screenshot shows My Select Option inside the admin panel called Neat Options.
Example Usage
Let's retrieve the saved options values.
<?php
// 1. Get the titan framework instance and save it to a variable
$titan = TitanFramework::getInstance( 'neat' ); // we will initialize $titan only once for every file where we use it.

// 2. Get the value via ID using getOption function
$aa_select_val = $titan->getOption( 'aa_select' );

/**
 *
 * Print Admin Panel option values
 *
 */

if ( 'aa_theme_temp1' == $aa_select_val ) {

    echo "You've selected Theme Template #1.";

} elseif ( 'aa_theme_temp2' == $aa_select_val ) {

    echo "You've selected Theme Template #2.";

} else {

    echo "You've selected Theme Template #3.";

}
?>
In line #3, get an instance via the getInstance() function. It takes a unique parameter, preferably your theme name (i.e. neat in my case). Then, use the getOption() function in line #6. It registers the option ID aa_select and saves its value in a variable $aa_select_val.
Next I'm using if-else check statements to print the selected values at the front-end, although you can do a lot of different things with this option. According to these:
- If the value of variable
$aa_select_valis equal to the labelaa_theme_temp1then print: 'You've selected Theme Template #1.' - If the value of variable
$aa_select_valis equal to the labelaa_theme_temp2then print: 'You've selected Theme Template #2.' - If the value of labels is not
aa_theme_temp1oraa_theme_temp2then print: 'You've selected Theme Template #3.'
Displaying the Result at the Front-End
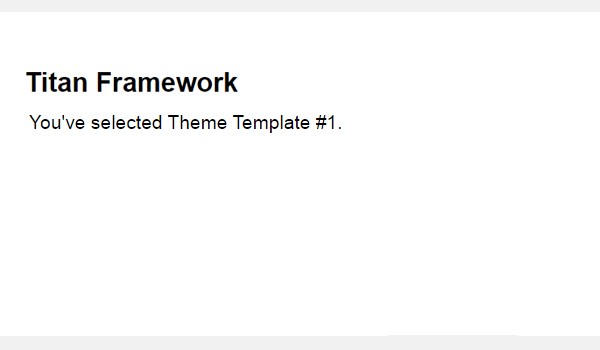
I choose Theme Template 1 as my demo settings.
Let's find out how the saved settings get printed at the front-end. So, here is the screenshot.
Creating a Select Type Option Inside an Admin Tab
Example Declaration
Now I'll create this option in an admin tab but with a different approach.
<?php
    /**
     *
     * Create select type option in an Admin Tab
     *
     */
    $aa_tab1->createOption( array(

        'id'      => 'aa_select_in_tab1_panel2', // The ID which will be used to get the value of this option
        'type'    => 'select', // Type of option we are creating
        'name'    => 'My Select Option', // Name of the option which will be displayed in the admin panel
        'desc'    => 'This is our option', // Description of the option which will be displayed in the admin panel
        'options' => array(    //An array of value-label pairs which appears as options

                        'aa_theme_temp1' => 'Theme Template 1',

                        'aa_theme_temp2' => 'Theme Template 2',

                        'aa_theme_temp3' => 'Theme Template 3'

                    ),

        'default' => 'aa_theme_temp2'

    ) );
I'm adding this option in an admin tab $aa_tab1 with ID aa_select_in_tab1_panel2.
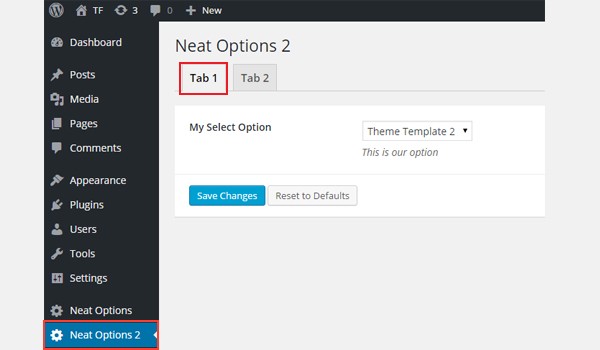
You can find My Select Option inside Tab 1 of admin panel Neat Options 2.
Example Usage
Now I'll retrieve its values.
<?php
// 1. Get the titan framework instance and save it to a variable
$titan = TitanFramework::getInstance( 'neat' ); // we will initialize $titan only once for every file where we use it.

// 2. Get the value via ID using getOption function
$aa_select_in_tab1_panel2_val = $titan->getOption( 'aa_select_in_tab1_panel2' );

/**
 *
 * Print Admin Tab option values
 *
 */

if ( 'aa_theme_temp1' == $aa_select_in_tab1_panel2_val ) {

    echo "You've selected Theme Template #1.";

} elseif ( 'aa_theme_temp2' == $aa_select_in_tab1_panel2_val ) {

    echo "You've selected Theme Template #2.";

} else {

    echo "You've selected Theme Template #3.";

}
We get the values by following these steps:
- Get an instance in line #3.
- Get the saved values in line #6 by registering the unique ID.
- Print the saved values at the front-end via
if-elsecheck statements in lines #16 to #27.
Displaying the Result at the Front-End
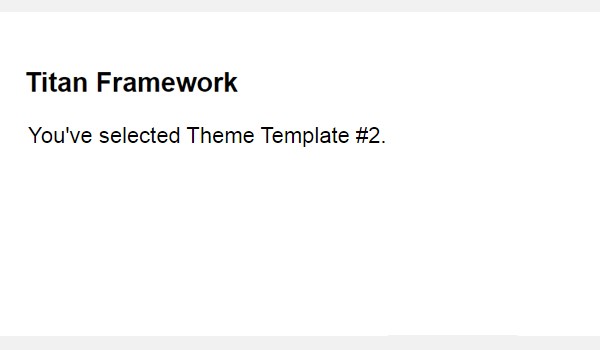
Now I'll choose 'Theme Template 2' as the demo settings. Here is a screenshot of the front-end.
Creating a Select Type Option Inside a Metabox
Example Declaration
Here is the code:
<?php
    /**
     *
     * Create select type option in a Metabox
     *
     */

    $aa_metbox->createOption( array(

        'id'      => 'aa_mb_select', // The ID which will be used to get the value of this option
        'type'    => 'select', // Type of option we are creating
        'name'    => 'My Select Option', // Name of the option which will be displayed
        'desc'    => 'This is our option', // Description of the option which will be displayed
        'options' => array(    //An array of value-label pairs which appears as options

                        'aa_theme_temp1' => 'Theme Template 1',

                        'aa_theme_temp2' => 'Theme Template 2',

                        'aa_theme_temp3' => 'Theme Template 3'

                          ),

        'default' => 'aa_theme_temp2'

    ) );
Here I'm adding a select type option in a metabox $aa_metbox with ID aa_mb_select. Here, I'm using the same associative array which I defined inside an admin panel.
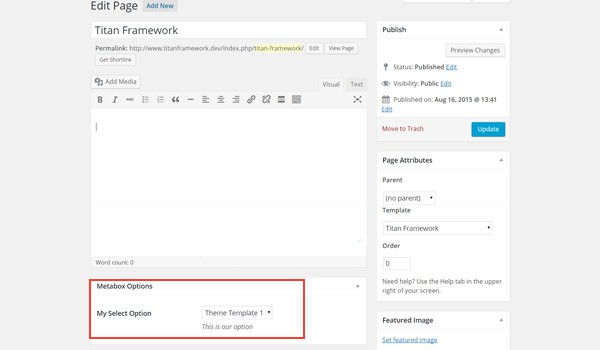
A drop-down menu named My Select Option is shown at the end of the page editing screen inside a metabox Metabox Options.
Example Usage
Let's get the values.
<?php
// 1. Get the titan framework instance and save it to a variable
$titan = TitanFramework::getInstance( 'neat' ); // we will initialize $titan only once for every file where we use it.

// 2. Get the value via ID using getOption function
$aa_mb_select_val = $titan->getOption( 'aa_mb_select', get_the_ID() );

/**
 *
 * Print Metabox option values
 *
 */

if ( 'aa_theme_temp1' == $aa_mb_select_val ) {

    echo "You've selected Theme Template #1.";

} elseif ( 'aa_theme_temp2' == $aa_mb_select_val ) {

    echo "You've selected Theme Template #2.";

} else {

    echo "You've selected Theme Template #3.";

}

?>
The process of getting the saved values is pretty much the same as I discussed in the case of an admin panel. The only difference is in line #6, which retrieves the saved value of a specific page or post ID via the get_the_ID() function.
Displaying the Results at the Front-End
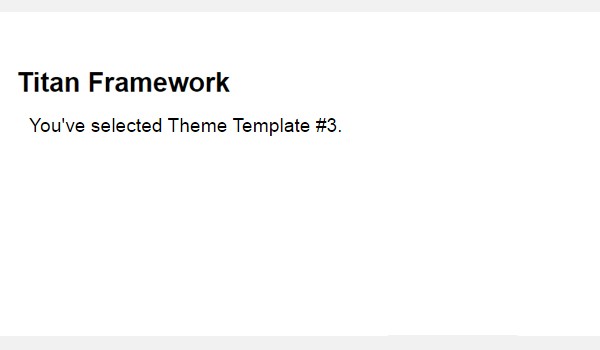
Let's choose 'Theme Template 3' as the demo settings. Here is a screenshot of the front-end.
Creating a Select Type Option Inside a Theme Customizer Section
Example Declaration
In the end, I'll add this option in a theme customizer section.
<?php
    /**
     *
     * Create select type option in a Theme Customizer Section
     *
     */
    $aa_section1->createOption( array(

        'id'      => 'aa_sec_select', // The ID which will be used to get the value of this option
        'type'    => 'select', // Type of option we are creating
        'name'    => 'My Select Option', // Name of the option which will be displayed
        'desc'    => 'This is our option', // Description of the option which will be displayed
        'options' => array(    //An array of value-label pairs which appears as options

                        'aa_red' => 'Red',

                        'aa_blue' => 'Blue',

                        'aa_green' => 'Green'

                    ),

         'default' => 'aa_blue'
    ) );
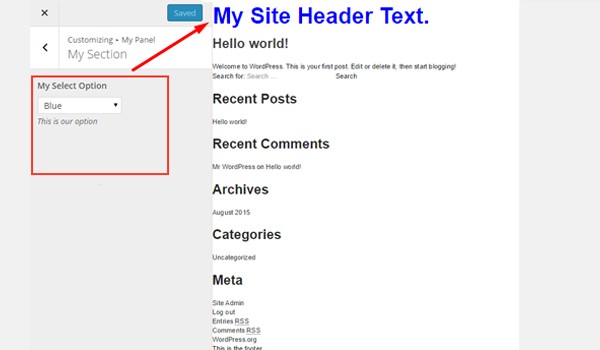
Here I added the select type option in a theme customizer section $aa_section1.
This is how it looks in the customizer.
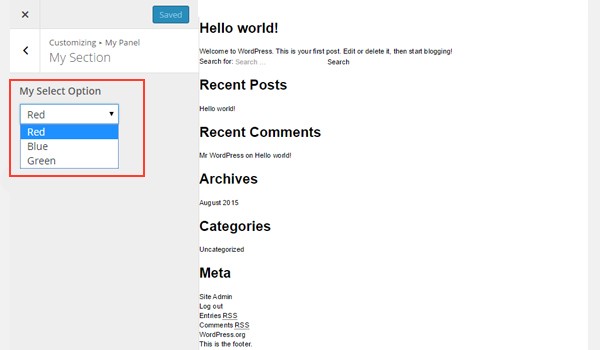
In the above screenshot, you can find a drop-down list containing colors inside a theme customizer section named My Section.
Example Usage
Here is the code.
<?php
// 1. Get the titan framework instance and save it to a variable
$titan = TitanFramework::getInstance( 'neat' ); // we will initialize $titan only once for every file where we use it.

// 2. Get the value via ID using getOption function
$aa_sec_select_val = $titan->getOption( 'aa_sec_select' );

/**
 *
 * Print Customizer option values
 *
 */
 ?>

<div
    style="color: <?php echo $aa_sec_select_val; ?>;">

    <h1> My Site Header Text. </h2>

</div>
First of all I registered an instance via the getInstance() function and then the saved values via the getOption() function in line #3 and #6. Next, in line #16 I created a div tag with some dummy text. Finally I used the inline CSS to print the value of the color.
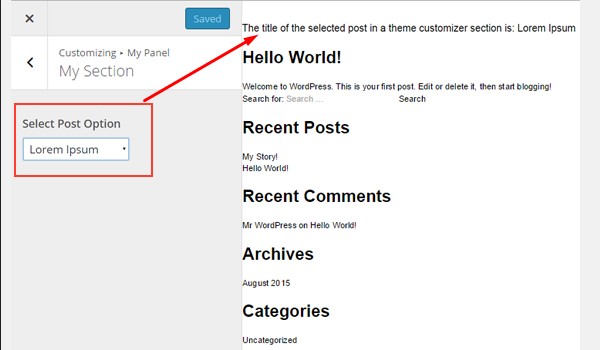
Displaying the Result at the Front-End
Here's a screenshot of the changes which occur in the live preview mode.
While building a WordPress theme or a plugin, sometimes I need to provide an end user with an option to attach a particular post with some custom functionality. This is where the select-posts type option of Titan Framework comes in handy.
The Select-Posts Type Option in Titan Framework
In Titan Framework, you can create a drop-down menu containing a list of existing posts. This is possible via the select-posts type option. Custom post types are also supported, which I'll discuss later in this article.
Let's look at its parameters:
-
name: It displays the name of the
select-poststype option. - id: This parameter assigns a unique name, which gets the saved options values.
- desc: It adds a brief description.
- default: (Optional) This parameter configures the default post ID.
-
livepreview: (Optional) When you add a
select-poststype option in a theme customizer, you can preview the live changes with this parameter. -
post_type: (Optional) It specifies the type of posts which appear in the drop-down list. The default is set to
post. -
post_status: (Optional) This parameter controls the status of displayed posts which appear in the options list. The default value is set to
any, but it can be set to publish, pending, draft, etc. Learn more! -
num: (Optional) It specifies the number of posts in the drop-down list. The default is set to
-1, which refers to all posts. -
orderby: (Optional) The display order of the listed posts is controlled by this parameter. The default setting lists them by
post_date. You can set it to author, id, title, type, etc. Learn more! -
order: (Optional) This parameter decides whether the display order of the options is ascending (
asc) or descending (desc). The default is set todesc.
All parameters are string by type, except for the 'num' which is int in nature.
Available Containers for the Select-Posts Type Option
The select-posts type option is added in:
- Admin Panel
- Admin Tabs
- Metabox
- Theme Customizer Section
To add this option, you need to follow a uniform pattern of steps:
- Get an instance via the
getInstance()function. - Then add an option via the
createOption()function. - In the end, retrieve the saved values via the
getOption()function .
If you don't know how containers are created in Titan Framework then read previous articles of this series.
Creating a Select-Posts Type Option Inside an Admin Panel
Example Declaration
First, I'm going to add this option inside an admin panel.
<?php
/**
*
* Create the slect-posts type option in an Admin Panel
*
*/
$aa_panel->createOption( array(
'id' => 'aa_select_posts_opt', // The ID which will be used to get the value of this option
'type' => 'select-posts', // Type of option we are creating
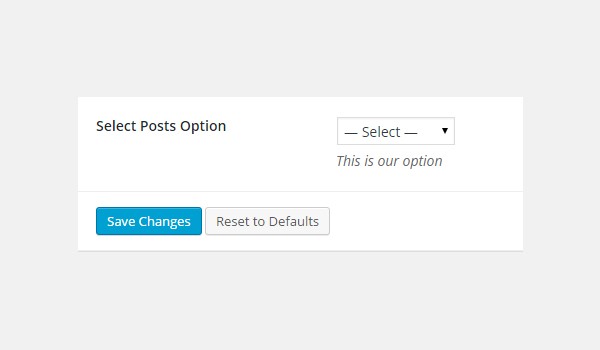
'name' => 'Select Posts Option', // Name of the option which will be displayed in the admin panel
'desc' => 'This is our option' // Description of the option which will be displayed in the admin panel
) );
This code adds a select-posts type option in an admin panel $aa_panel via thecreateOption() function. The parameters which I've used are quite simple: id, name, type and desc. Among these parameters, ID should always be unique.
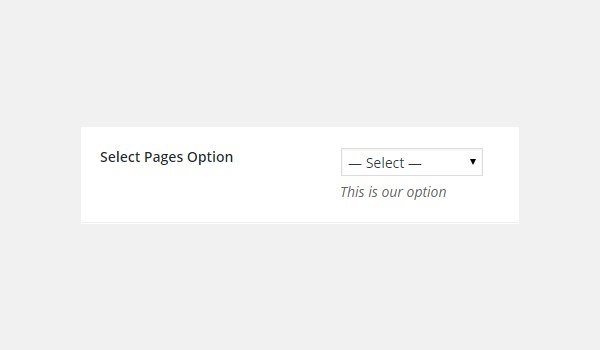
So, a select-posts option with ID aa_select_posts_opt and name 'Select Posts Option' is created, which looks like:
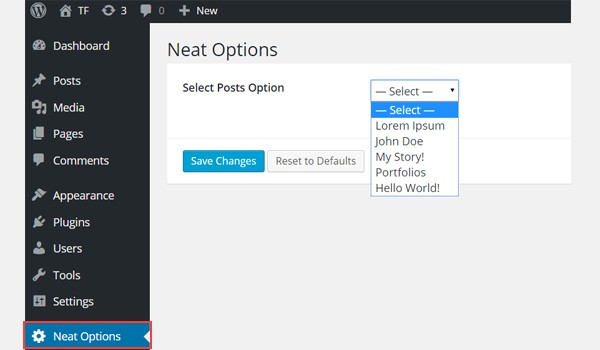
In the above screenshot, there is a drop-down menu named Select Posts Option which list all the posts. Note, this option is inside an admin panel Neat Options.
Example Usage
Let's retrieve the saved options values.
<?php
// 1. Get the titan framework instance and save it to a variable
$titan = TitanFramework::getInstance( 'neat' ); // we will initialize $titan only once for every file where we use it.

// 2. Get the value via ID using getOption function
$aa_panel_getpostid_val = $titan->getOption( 'aa_select_posts_opt' );

// 3. Get the post title from the saved post ID
$aa_panel_getpost_title_val     = get_post_field('post_title', $aa_panel_getpostid_val);

/**
 *
 * Print Admin panel options
 *
 */
?>

<div>
     The title of the selected post is: <?php echo $aa_panel_getpost_title_val; ?>
</div>
In line #3, first get your instance via the getInstance() function; I used my theme name as a parameter here. Then in line #6, retrieve the saved values via the getOption() function, with ID aa_select_posts_opt as its parameter, and save it to a variable$aa_panel_getpostid_val.
Next in line #9, I've used the get_post_field() function, which retrieves data from a post field based on post ID. So, the post ID is provided by the variable$aa_panel_getpostid_val and together with the post_title parameter, the title of selected post gets saved in a new variable $aa_panel_getpost_title_val.
Then I printed it at the front-end using an echo command inside a div (line #20). Pretty fascinating, isn't it? You can do a number of things once you have the selected post ID.
Displaying the Result at the Front-End
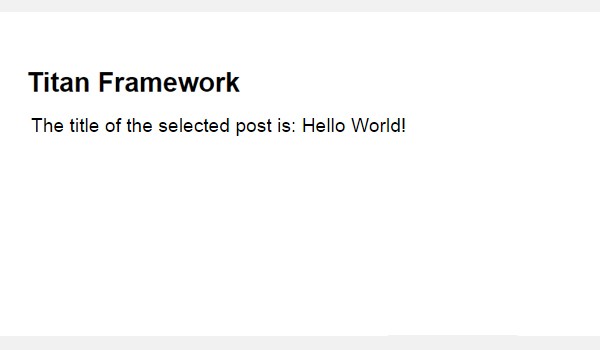
Suppose I choose Hello World as my demo settings.
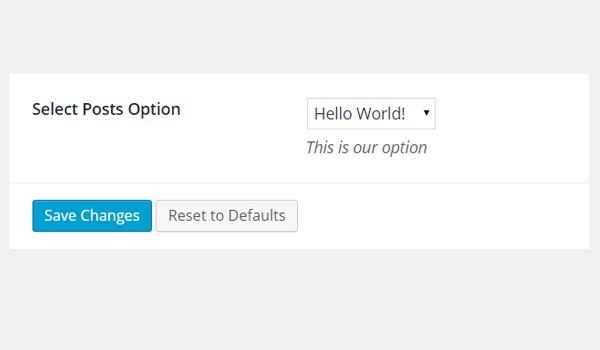
The front-end will appear like this:
Creating a Select-Posts Type Option Inside an Admin Tab
Example Declaration
Let's create this option in an admin tab.
<?php
    /**
     *
     * Create the select-posts type option in an Admin Tab
     *
     */
    $aa_tab1->createOption( array(

            'id'          => 'aa_select_posts_opt_in_tab1', // The ID which will be used to get the value of this option
            'type'        => 'select-posts', // Type of option we are creating
            'name'        => 'Select Posts Option', // Name of the option which will be displayed in the admin panel
            'desc'        => 'This is our option', // Description of the option which will be displayed in the admin panel
            'post_status' => 'draft' //Status of the displayed options

        ) );
Now I'm adding this option in an admin tab $aa_tab1 with ID aa_select_posts_opt_in_tab1. Note there is a new addition in the parameters list. In line #14, I've used the 'post_status' parameter whose value is draft. This means now only the drafted posts are being displayed in the select-posts list.
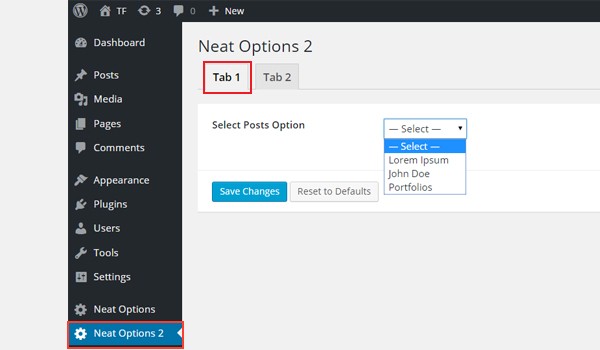
In the screenshot, there is a list named Select Posts Option inside Tab 1 of panel Neat Options 2. You'll also find that there are fewer list options than before for the obvious reasons.
Example Usage
Let's get its values.
<?php
// 1. Get the titan framework instance and save it to a variable
$titan = TitanFramework::getInstance( 'neat' ); // we will initialize $titan only once for every file where we use it.

// 2. Get the value via ID using getOption function
$aa_tab_getpostid_val = $titan->getOption( 'aa_select_posts_opt_in_tab1' );

// 3. Get the post title from the saved post ID
$aa_tab_getpost_title_val     = get_post_field('post_title', $aa_tab_getpostid_val);

/**
 *
 * Print Admin Tab options
 *
 */
?>

<div>
    The title of the selected draft post is: <?php echo $aa_tab_getpost_title_val; ?>
</div>
The process of getting saved is almost the same, so let me summarize all the points briefly:
- Get a unique instance in line #3.
- Get the saved values via the
getOption()function in line #6. - Get the drafted post title via the
get_post_field()function in line #9. - Print the results of variable
$aa_tab_getpost_title_valusing anechocommand in line #20.
Displaying the Result at the Front-End
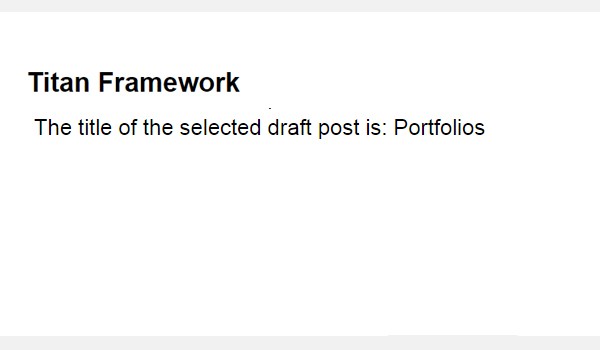
This time I select 'Portfolios' for example. Here's a screenshot of the front-end.
Creating a Select-Posts Type Option Inside a Metabox
Example Declaration
Now I'll create this option in a metabox.
<?php
    /**
     *
     * Create the select-posts type option in a Meta box
     *
     */
    $aa_metbox->createOption( array(

            'id'        => 'aa_select_posts_opt_in_metabox', // The ID which will be used to get the value of this option
            'type'      => 'select-posts', // Type of option we are creating
            'name'      => 'Select Page Option', // Name of the option which will be displayed
            'desc'      => 'This is our option', // Description of the option which will be displayed
            'post_type' => 'page' //Type of the displayed options

        ) );
Now I'm adding this option in a metabox $aa_metbox with IDaa_select_posts_opt_in_metabox. I'm using the 'post_type' parameter in line #14 with value set to page. This means that only the pages will get listed in the drop-down menu.
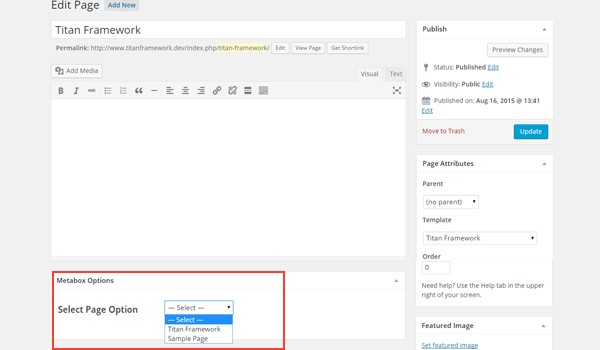
The above screenshot shows a page editing screen, and right at the bottom there is a Select Page Option containing a list of pages in a metabox.
Example Usage
Use this code.
<?php
// 1. Get the titan framework instance and save it to a variable
$titan = TitanFramework::getInstance( 'neat' ); // we will initialize $titan only once for every file where we use it.

// 2. Get the value via ID using getOption function
$aa_metabox_getpostid_val = $titan->getOption( 'aa_select_posts_opt_in_metabox', get_the_ID() );

// 3. Get the post title from the saved post ID
$aa_metabox_getpost_title_val     = get_post_field('post_title', $aa_metabox_getpostid_val);

/**
 *
 * Print Metabox options
 *
 */
?>

<div>
    The title of the selected page in a metabox is: <?php echo $aa_metabox_getpost_title_val; ?>
</div>
The entire code is quite similar to what I've used previously. You'll only find an additional parameter in line #6 which is the get_the_ID() function.
Displaying the Result at the Front-End
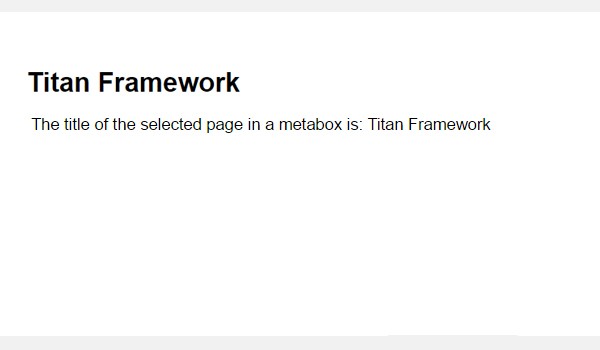
Let's suppose I selected the page 'Titan Framework'. The front-end looks like this:
Creating a Select-Posts Type Option Inside a Theme Customizer Section
Example Declaration
Use the code written below.
<?php

    /**
     *
     * Create the slect-posts type option in a Customizer Section
     *
     */
    $aa_section1->createOption( array(

            'id'    => 'aa_select_posts_opt_in_sec', // The ID which will be used to get the value of this option
            'type'  => 'select-posts', // Type of option we are creating
            'name'  => 'Select Post Option', // Name of the option which will be displayed
            'desc'  => 'This is our option' // Description of the option which will be displayed

        ) );
Finally, a select-posts type option with ID aa_select_posts_opt_in_sec exists inside a theme customizer section $aa_section1.

The image shows this option inside a customizer section named My Section.
Example Usage
Now I'll write the code to get the saved values.
<?php
// 1. Get the titan framework instance and save it to a variable
$titan = TitanFramework::getInstance( 'neat' ); // we will initialize $titan only once for every file where we use it.

// 2. Get the value via ID using getOption function
$aa_sec_getpostid_val = $titan->getOption( 'aa_select_posts_opt_in_sec' );

// 3. Get the post title from the saved post ID
$aa_sec_getpost_title_val = get_post_field('post_title', $aa_sec_getpostid_val);

/**
 *
 * Print Customizer Section options
 *
 */
?>

<div>
     The title of the selected post in a theme customizer section is: <?php echo $aa_sec_getpost_title_val; ?>
</div>
Once again, this code is same. Only the ID and variable names are different here.
Displaying the Result at the Front-End
Here's the screenshot.
This option was fairly simple to implement. You can provide an end user with this option if you want a particular script, function, or action/filter to run only when the selected post is visited. Really, the possibilities here are infinite.
Next, we're going to discuss the select-pages type option of Titan Framework. Let's see how you can add an option for end users to select an existing page inside a custom admin panel, a metabox or the theme customizer.
The Select-Pages Type Option in Titan Framework
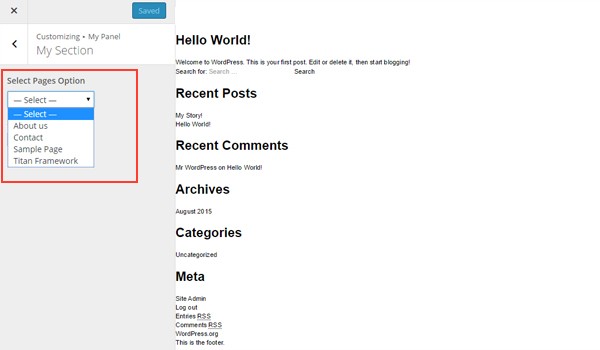
Similar to select-posts, there exists a select-pages type option in Titan Framework which displays a drop-down list containing the existing pages of your website. It appears in the dashboard like this:
Let's list the parameters this option supports:
-
name: This parameter assigns the display name of the
select-pagestype option. - id: It is a unique name which helps to retrieve the saved values.
- desc: It adds a one-line description.
- default: (Optional) This parameter assigns the default page ID.
- livepreview: (Optional) When you add this option in a theme customizer, you can preview live changes with this parameter.
All parameters are string by type.
Available Containers for the Select-Pages Type Option
You can add this option in:
- Admin Panel
- Admin Tabs
- Metabox
- Theme Customizer Section
Read previous articles of this series if you need to understand the details about adding containers with Titan Framework.
- Get an instance through the
getInstance()function. - Add an option using the
createOption()function. - Retrieve the saved values with the
getOption()function.
Creating a Select-Pages Type Option Inside an Admin Panel
Example Declaration
First, I'm going to add this option inside an admin panel.
<?php
    /**
     *
     * Create select-pages type option in an Admin Panel
     *
     */
    $aa_panel->createOption( array(

            'id'    => 'aa_select_pages_opt', // The ID which will be used to get the value of this option
            'type'  => 'select-pages', // Type of option we are creating
            'name'  => 'Select Pages Option', // Name of the option which will be displayed in the admin panel
            'desc'  => 'This is our option' // Description of the option which will be displayed in the admin panel

        ) );
In line #8, I'm using the createOption() function to add a select-pages type option in an admin panel $aa_panel. Of all the parameters, I've used name, id, type and desc.
The value of ID has to be unique as it is later used to get the saved values. Here the option ID is aa_select_pages_opt.
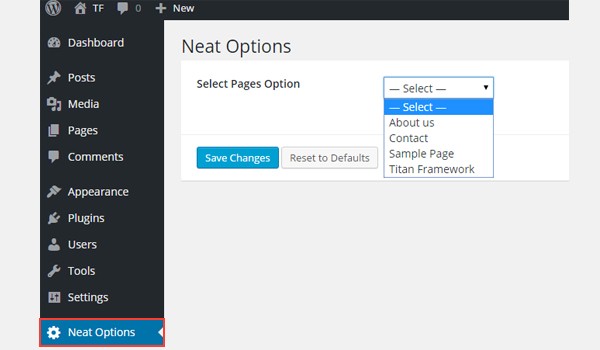
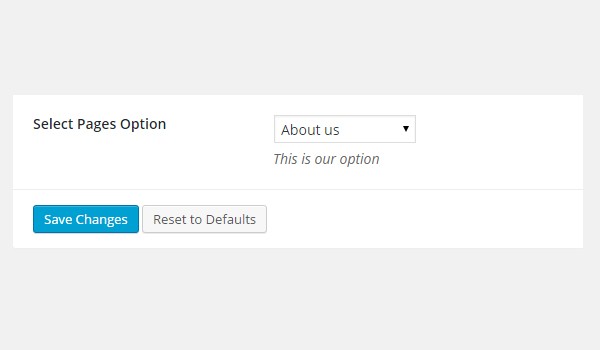
In the screenshot, there is a select-pages type option displayed against the name Select Pages Option in an admin panel Neat Options. Also, look at the list entries. These are the names of the existing pages.
Example Usage
Now I'll get the saved values.
<?php
// 1. Get the titan framework instance and save it to a variable
$titan = TitanFramework::getInstance( 'neat' ); // we will initialize $titan only once for every file where we use it.
// 2. Get the value via ID using getOption function
$aa_getpageid_val     = $titan->getOption( 'aa_select_pages_opt' );
// 3. Get the value of the page title via get_post_field function
$aa_panel_getpage_title_val     = get_post_field('post_title', $aa_getpageid_val);

/**
 *
 * Printing saved values of Admin Panel
 *
 */
?>

<div>
    Title of selected page in an Admin Panel is: <?php echo $aa_panel_getpage_title_val; ?>
</div>
First of all, get an instance via the getInstance() function in line #3. Then in line #5, I'm using the getOption() function which gets the saved values by registering the option ID aa_select_pages_opt as its parameter. The result of this function is saved in a variable $aa_panel_getpageid_val.
In line #7, there is a get_post_field() function which can be used to get data from a post field based on the post ID.
The variable $aa_panel_getpageid_val provides the page ID of the selected page and the post_title parameter, and retrieves the title which I then saved in a new variable $aa_panel_getpage_title_val.
Finally, in line #19 I'm printing the page title at the front-end via an echo command in a div.
Displaying the Result at the Front-End
Suppose I choose the 'About us' page from the list and save the settings.
The title of this page gets printed at the front-end like this:

Creating a Select-Pages Type Option Inside an Admin Tab
Example Declaration
Now, I'm going to add this option inside an admin tab.
<?php
    /**
     *
     * Create select-pages type option in an Admin Tab
     *
     */
    $aa_tab1->createOption( array(

            'id'    => 'aa_select_pages_opt_in_tab', // The ID which will be used to get the value of this option
            'type'  => 'select-pages', // Type of option we are creating
            'name'  => 'Select Pages Option', // Name of the option which will be displayed in the admin panel
            'desc'  => 'This is our option' // Description of the option which will be displayed in the admin panel

        ) );
This time I'm adding a select-pages option inside an admin tab $aa_tab1. Its ID is aa_select_pages_opt_in_tab. The rest of the parameters are the same.
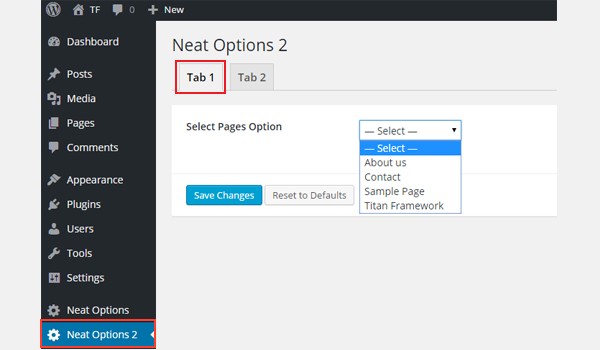
In the image, you can find a drop-down list containing pages inside Tab 1 of admin panel Neat Options 2.
Example Usage
Let's retrieve the saved options values.
<?php
// 1. Get the titan framework instance and save it to a variable
$titan = TitanFramework::getInstance( 'neat' ); // we will initialize $titan only once for every file where we use it.
// 2. Get the value via ID using getOption function
$aa_tab_getpageid_val = $titan->getOption( 'aa_select_pages_opt_in_tab' );
// 3. Get the value of the page title via get_post_field function
$aa_tab_getpage_title_val = get_post_field('post_title', $aa_tab_getpageid_val);

/**
 *
 * Printing saved values of Admin Tab
 *
 */
?>

<div>
    Title of selected page in an Admin Tab is: <?php echo $aa_tab_getpage_title_val; ?>
</div>
The values of an admin tab can be retrieved by following the same steps:
- Get a unique instance in line #3.
- Register the option ID
aa_select_pages_opt_in_tabin thegetOption()function (line #5). - Save the results in variable
$aa_tab_getpageid_val. - Get the selected page's title via the
get_post_field()function in line #7. - Finally, print the page title at the front-end via the
echocommand in line #17.
Displaying the Result at the Front-End
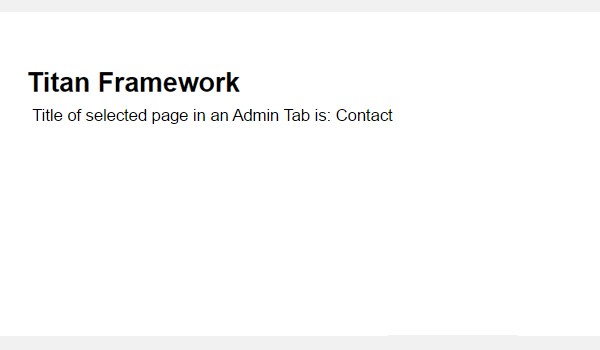
This time I chose the page 'Contact' and its title at the front-end appears like this:
Creating a Select-Pages Type Option Inside a Metabox
Example Declaration
Let's create a select-pages type option inside a metabox.
<?php
    /**
     *
     * Create select-pages type option in a Metabox
     *
     */
    $aa_metbox->createOption( array(

            'id'    => 'aa_select_pages_opt_in_metabox', // The ID which will be used to get the value of this option
            'type'  => 'select-pages', // Type of option we are creating
            'name'  => 'Select Pages Option', // Name of the option which will be displayed
            'desc'  => 'This is our option' // Description of the option which will be displayed

        ) );
I created a select-pages type option with ID aa_select_pages_opt_in_metabox inside a metabox $aa_metbox.
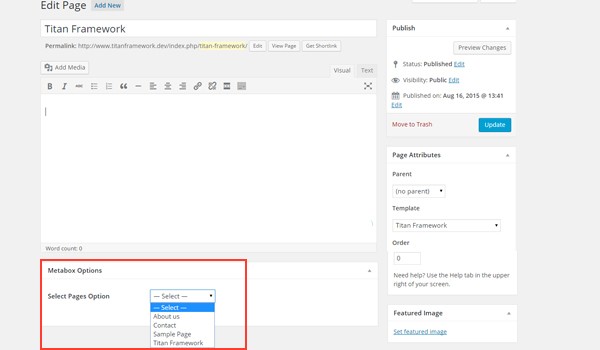
In the above screenshot, you can find a metabox at the end of a page editing screen. Inside it, there is a Select Pages Option which lists all the pages.
Example Usage
Use this code to get the values.
<?php
// 1. Get the titan framework instance and save it to a variable
$titan = TitanFramework::getInstance( 'neat' ); // we will initialize $titan only once for every file where we use it.
// 2. Get the value via ID using getOption function
$aa_metabox_getpageid_val = $titan->getOption( 'aa_select_pages_opt_in_metabox', get_the_ID() );
// 3. Get the value of the page title via get_post_field function
$aa_metabox_getpage_title_val = get_post_field('post_title', $aa_metabox_getpageid_val);

/**
 *
 * Printing saved values of Metabox
 *
 */
?>

<div>
    Title of selected page in a Metabox is: <?php echo $aa_metabox_getpage_title_val; ?>
</div>
In this code, I've registered an additional parameter inside the getOption() function (line #5). This is the get_the_ID() function. The rest of the code is pretty much the same.
Displaying the Result at the Front-End
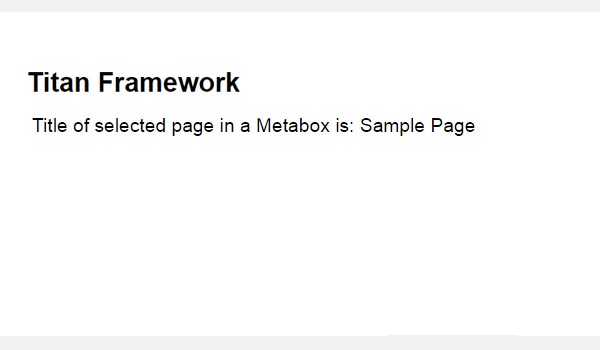
Now let's suppose I select 'Sample Page'. The front-end prints the corresponding title like this:
Creating a Select-Pages Type Option Inside a Theme Customizer Section
Example Declaration
Finally, I'll add this option in a customizer section.
<?php
    /**
     *
     * Create select-pages type option in a Theme Customizer Section
     *
     */
    $aa_section1->createOption( array(

            'id'    => 'aa_select_pages_opt_in_sec', // The ID which will be used to get the value of this option
            'type'  => 'select-pages', // Type of option we are creating
            'name'  => 'Select Pages Option', // Name of the option which will be displayed
            'desc'  => 'This is our option' // Description of the option which will be displayed

        ) );
I created a select-pages type option with ID aa_select_pages_opt_in_sec inside a theme customizer section called $aa_section1.
Example Usage
Let's get the saved values.
<?php
// 1. Get the titan framework instance and save it to a variable
$titan = TitanFramework::getInstance( 'neat' ); // we will initialize $titan only once for every file where we use it.
// 2. Get the value via ID using getOption function
$aa_sec_getpageid_val = $titan->getOption( 'aa_select_pages_opt_in_sec' );
// 3. Get the value of the page title via get_post_field function
$aa_sec_getpage_title_val = get_post_field('post_title', $aa_sec_getpageid_val);

/**
 *
 * Printing saved values of Customizer Section
 *
 */
?>

<div>
    Title of selected page in a Customizer Section is: <?php echo $aa_sec_getpage_title_val; ?>
</div>
Displaying the Result at the Front-End
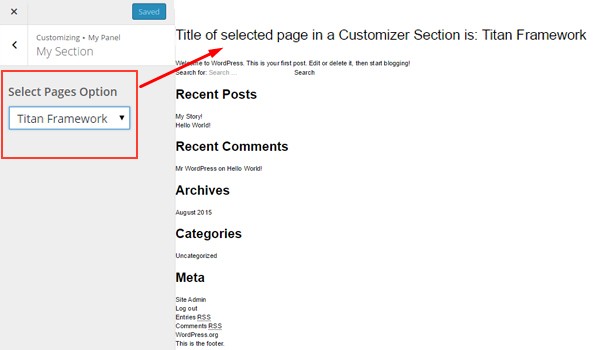
Here is a screenshot of the changes which were previewed in live mode.
Consider a situation where you need an end user to select a category for featured posts. You'll need a dropdown select option with WordPress categories populated inside it as options. Titan Framework can help you create such an option with an option type calledselect-categories. Let's see how to use it.
The Select-Categories Type Option in Titan Framework
In Titan Framework, the select-categories type option creates a drop-down menu containing all the existing post categories. This option supports other taxonomies as well.
This option defines a list of parameters:
- name: It specifies the name of an option.
- id: This parameter assigns a unique name which gets the saved values.
- desc: It adds a brief description with the option name.
- default: (Optional) This parameter sets the default category ID.
-
livepreview: (Optional) Whenever you add the
select-categoriesoption in a theme customizer section, this parameter lets you preview the live changes which you make. -
orderby: (Optional) It decides in what order categories are displayed. The default is set to
name. You may change it accordingly. -
order: (Optional) This parameter list the categories in ascending or descending order. The default is set to
asc. -
taxonomy: (Optional) It helps to display the type of taxonomy you want to show. Its default value is
category. -
hide_empty: (Optional) If this parameter is set to
true, then all such categories and/or taxonomies which do not have posts will not appear. The default value isfalse. -
show_count: (Optional) This parameter displays the number of posts in each category if set to
true. The default setting isfalse.
The last two parameters, hide_empty and show_count, are boolean, while the rest are string by type.
Available Containers for the Select-Categories Type Option
Let's list the containers in which you can add this option:
- Admin Panel
- Admin Tabs
- Metabox
- Theme Customizer Section
Irrespective of the container type, the select-categories option is added by following these steps:
- First get an instance through the
getInstance()function. - Next add an option through the
createOption()function. - Then get saved options values through the
getOption()function.
Creating a Select-Categories Type Option Inside an Admin Panel
Example Declaration
Let's create this option inside an admin panel first.
<?php
    /**
     *
     * Create select-categories type option in an Admin Panel
     *
     */
    $aa_panel->createOption( array(

        'id'   => 'aa_select_categories_opt', // The ID which will be used to get the value of this option
        'type' => 'select-categories', // Type of option we are creating
        'name' => 'Select Categories Option', // Name of the option which will be displayed in the admin panel
        'desc' => 'This is our option' // Description of the option which will be displayed in the admin panel

    ) );
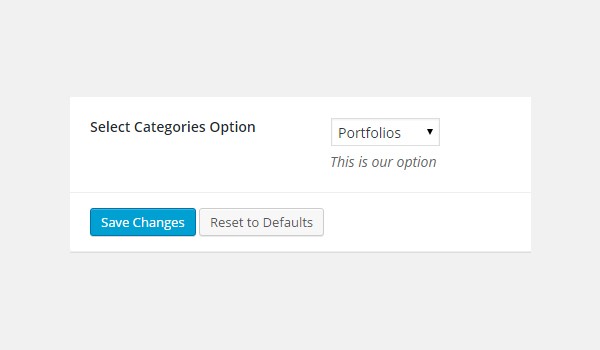
At line #8, the createOption() function adds a select-categories type option in an admin panel called $aa_panel. I've defined a few parameters, i.e. name, type, id and desc. The value of ID, which should always be unique, is aa_select_categories_opt at line #10.
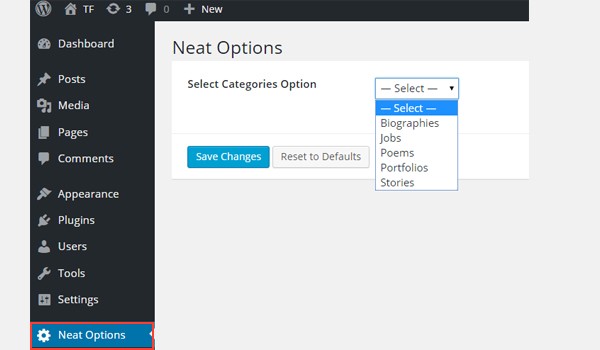
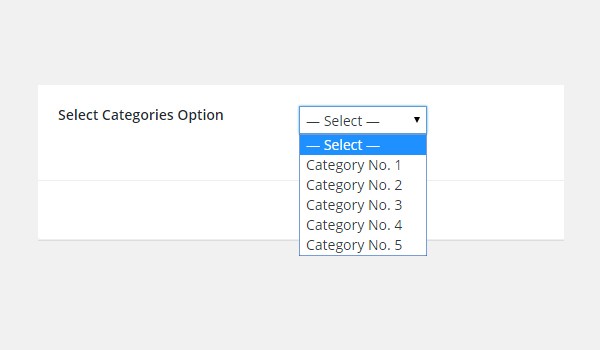
In the above screenshot, there is a Neat Options panel, within which is a drop-down list displaying all the post categories.
Example Usage
Now I'll get the saved options values.
<?php
// 1. Get the titan framework instance and save it to a variable
$titan = TitanFramework::getInstance( 'neat' ); // we will initialize $titan only once for every file where we use it.

// 2. Get the value via ID using getOption function
$aa_panel_getcategoryid_val         = $titan->getOption( 'aa_select_categories_opt' );

// 3. Get title of the selected category
$aa_panel_getcategory_title_val     = get_cat_name( $aa_panel_getcategoryid_val);

/**
 *
 * Print Saved Values in an Admin Panel
 *
 */
?>

<div>
    Title of the selected category in an Admin Panel is: <?php echo $aa_panel_getcategory_title_val; ?>
</div>
At line #3, I'm using the getInstance() function, which takes up a unique parameter, preferably your theme name. Then I'm using the getOption() function at line #6 to retrieve the saved value by registering the option ID, i.e. aa_select_categories_opt. The result is saved in a variable $aa_panel_getcategoryid_val. Up to this point, the ID of the selected category is placed inside this variable.
Let's say I want to display the title of my category at the front-end. To achieve this, I'm going to use the get_cat_name() function. Look at line #9, which retrieves the category title from variable $aa_panel_getcategoryid_val.
I saved the title in a variable $aa_panel_getcategory_title_val and then echoed it.
Displaying the Result at the Front-End
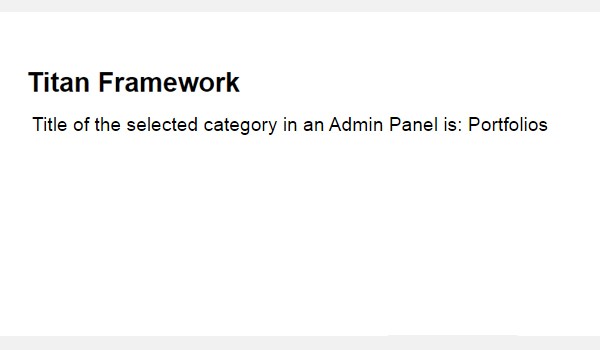
Suppose I choose the 'Portfolios' category from the list and save the settings.
So, according to the code, 'Title of the selected category in an Admin Panel is: Portfolios' must print at the front-end.
Creating a Select-Categories Type Option Inside an Admin Tab
Example Declaration
Next I'll add it in an admin tab.
<?php
    /**
     *
     * Create select-categories type option in an Admin Tab
     *
     */
    $aa_tab1->createOption( array(

        'id'         => 'aa_select_categories_opt_in_tab', // The ID which will be used to get the value of this option
        'type'       => 'select-categories', // Type of option we are creating
        'name'       => 'Select Categories Option', // Name of the option which will be displayed in the admin panel
        'desc'       => 'This is our option', // Description of the option which will be displayed in the admin panel
        'order'      => 'desc', // Display order of the categories
        'show_count' => 'true' // Display no. of posts with each category

    ) );
Here I'm adding the select-categories type option in an admin tab $aa_tab1. Its unique ID is aa_select_categories_opt_in_tab. Take a look at the parameters list. You'll find some new additions, i.e. the order and show_count parameters. Their functions have been discussed previously.
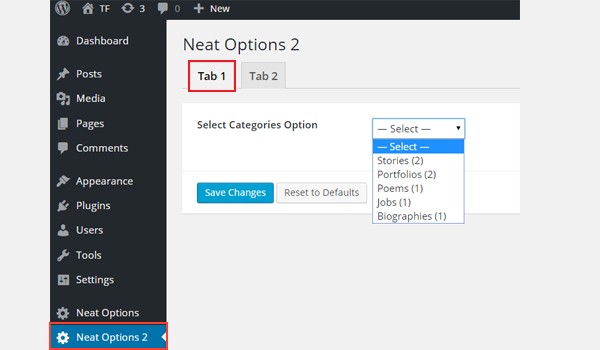
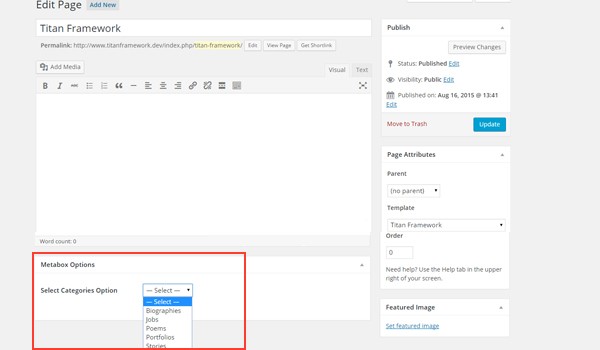
In the screenshot, you can find this option named Select Categories Option in Tab 1 of panel Neat Options 2. Note that the number of posts in each category is also shown due to the show_count parameter. The display order of the categories is also different than before.
Example Usage
Let's retrieve the saved values.
<?php
// 1. Get the titan framework instance and save it to a variable
$titan = TitanFramework::getInstance( 'neat' ); // we will initialize $titan only once for every file where we use it.

// 2. Get the value via ID using getOption function
$aa_tab_getcategoryid_val     = $titan->getOption( 'aa_select_categories_in_tab' );

// 3. Get title of the selected category
$aa_tab_getcategory_title_val     = get_cat_name( $aa_tab_getcategoryid_val);

/**
 *
 * Print Saved Values in an Admin Tab
 *
 */
?>

<div>
    Title of the selected category in an Admin Tab is: <?php echo $aa_tab_getcategory_title_val; ?>
</div>
This code is quite similar; here's a summary of the steps:
- Get an instance on line #3.
- Use the
getOption()function on line #6 to retrieve saved values via ID. - Get the selected category's title via the
get_cat_name()function on line #9. - Print the category title at the front-end via an
echocommand on line #22.
Displaying the Result at the Front-End
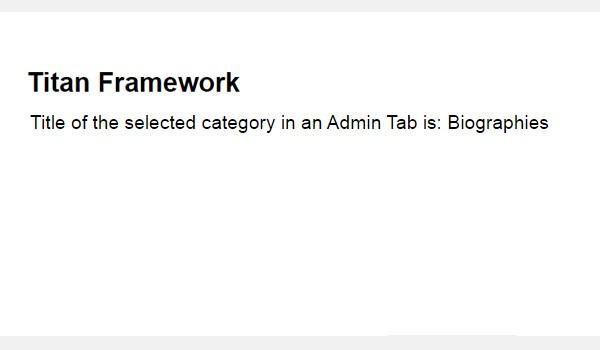
I select 'Biographies' as a demo value. The front-end appears like this:
Creating a Select-Categories Type Option Inside a Metabox
Example Declaration
Now I'll add a select-categories type option in a metabox.
<?php
    /**
     *
     * Create select-categories type option in a Metabox
     *
     */
    $aa_metbox->createOption( array(

        'id'   => 'aa_select_categories_opt_in_metabox', // The ID which will be used to get the value of this option
        'type' => 'select-categories', // Type of option we are creating
        'name' => 'Select Categories Option', // Name of the option which will be displayed
        'desc' => 'This is our option' // Description of the option which will be displayed

    ) );
I created a select-categories type option inside a metabox $aa_metbox with ID aa_select_categories_opt_in_metabox.
In the above image, you can find a metabox at the end of a page editing screen. Inside it is a drop-down list containing all the post categories.
Example Usage
Use the following code.
<?php
// 1. Get the titan framework instance and save it to a variable
$titan = TitanFramework::getInstance( 'neat' ); // we will initialize $titan only once for every file where we use it.

// 2. Get the value via ID using getOption function
$aa_metabox_getcategoryid_val = $titan->getOption( 'aa_select_categories_in_metabox', get_the_ID() );

// 3. Get title of the selected category
$aa_metabox_getcategory_title_val = get_cat_name( $aa_metabox_getcategoryid_val);

/**
 *
 * Print Saved Values in a Metabox
 *
 */
?>

<div>
    Title of the selected category in a Metabox is: <?php echo $aa_metabox_getcategory_title_val; ?>
</div>
On line #6, I've used the get_the_ID() function as a parameter inside the getOption() function. This additional parameter is to fetch the saved values via a specific page or post ID. The rest of the code is the same.
Displaying the Result at the Front-End
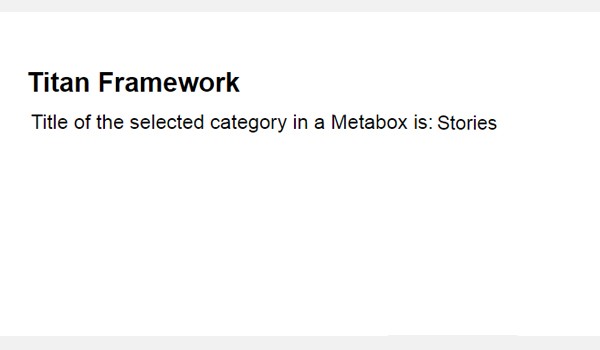
This time I choose 'Stories' and the result appears like this:
Creating a Select-Categories Type Option Inside a Theme Customizer Section
Example Declaration
Finally, I'll create this option in a theme customizer section.
<?php
    /**
     *
     * Create select-categories type option in a Customizer Section
     *
     */
    $aa_section1->createOption( array(

        'id'   => 'aa_select_categories_opt_in_sec', // The ID which will be used to get the value of this option
        'type' => 'select-categories', // Type of option we are creating
        'name' => 'Select Categories Option', // Name of the option which will be displayed
        'desc' => 'This is our option' // Description of the option which will be displayed

    ) );
I am adding this option in a theme customizer section $aa_section1 with ID aa_select_categories_opt_in_sec.
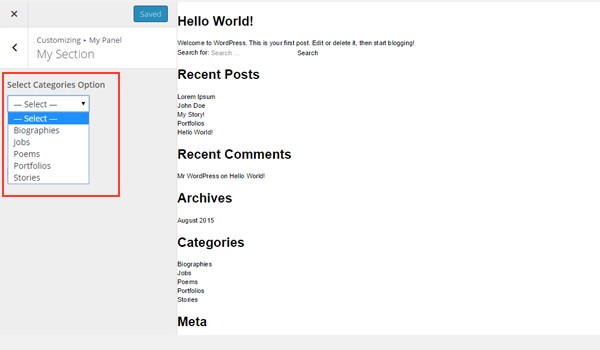
In this image, there is a My Section customizer section containing a drop-down list of categories inside the customizer.
Example Usage
Use the following code to get the values:
<?php
// 1. Get the titan framework instance and save it to a variable
$titan = TitanFramework::getInstance( 'neat' ); // we will initialize $titan only once for every file where we use it.

// 2. Get the value via ID using getOption function
$aa_sec_getcategoryid_val = $titan->getOption( 'aa_select_categories_in_sec' );

// 3. Get title of the selected category
$aa_sec_getcategory_title_val = get_cat_name( $aa_sec_getcategoryid_val);

/**
 *
 * Print Saved Values in a Theme Customizer Section
 *
 */
?>

<div>
    Title of the selected category in a Customizer Section is: <?php echo $aa_sec_getcategory_title_val; ?>
</div>
This code is almost the same as above. Only the ID and variable names are different.
Displaying the Result at the Front-End
Here's a screenshot of the changes which were witnessed in live preview mode.

Conclusion
By now we've discussed all the option types which are related to the select option in Titan Framework.
For example, if I were to code a plugin which provides an end user with 15 layout elements, I could provide those elements in the form of a select box, to keep the options neat and minimal.
Let me know if you have a creative user-case for this option. You can reach out to me on Twitter or leave comments in the box below.

Comments