Ready to learn how to make your first WordPress theme? This tutorial series will take a step by step approach, making use of a "learning theme" affectionately known as WordPress Training Wheels, to help teach the subject. This series will take the absolute WordPress newbie through the basic steps necessary to convert any HTML template into a fully functional WordPress theme.

Series Introduction!
When I started using WordPress back in 2006, there weren't very many tutorials around back then on where to start with Theme Development.
I learned the hard way, through trial and error, mining the WordPress codex, as well as from the few tuts which had existed back then. For the last 2 - 3 Years I've been teaching basic WordPress theme development on and off, and have noticed that, for those not extremely familiar with Content Management Systems, most of the tutorials which exist to teach development from scratch are way too complicated.
So, I have developed a step by step approach, making use of a "learning theme" affectionately known as WordPress Training Wheels, that will take the complete WordPress newbie through the basic steps necessary to convert any HTML template into a fully functional WordPress theme. We're going to start out slowly though, specifically for those who don't have the luxury of previous experience working with CMS code or PHP for that matter. Hence the name, "Training Wheels". Hardcore coders step aside, we're about to clear the race track!
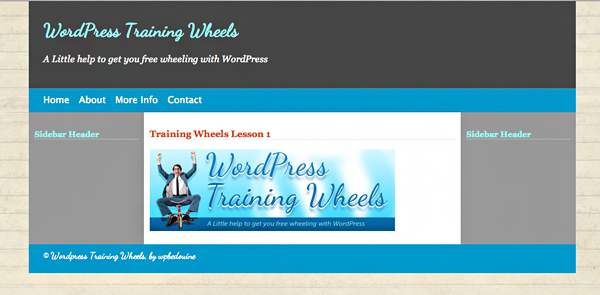
A peek at the preliminary theme that we'll be building on over the series. It's not meant to be visually fantastic, it's meant to be educationally fantastic! Don't worry - once we're done, you'll be on to bigger and better themes in no time.
Our focus will be mainly on the WordPress code, not design. So the template is purposely simplistic with some light styling so you don't ride your bike off a cliff out of boredom.
For a really great intro to web development using HTML & CSS, check out the Net Tuts tutorial series - Web Development From Scratch
Prerequisites:
- Never Coded a WordPress Theme before
- Working HTML & CSS Knowledge
- Knowledge of WordPress Admin Management
- Knowledge of Installation of WordPress either on virtual or live server
- Latest Browser (to avoid old browser bugs)
- Text or Code Editor
- Browser Source Code Inspector like Firebug
- Willingness to Learn! (essential)
Additional Details
WordPress Themes are essentially Plain HTML Templates, with little bits of WordPress specific PHP tags thrown into areas where dynamic content needs to be loaded from the database. For this reason a good understanding of HTML would be necessary to follow through with this series.
Step 1 - Install WordPress
WordPress themes, though primarily made up of HTML, are not able to display by default in your browser due to the PHP which they contain, which changes the way they function. They need to be run through a server which is able to interpret PHP code, which is why it's essential to work on a PHP capable web server when developing WordPress Themes.
We'll be skipping over the installation process for WordPress for now as our focus is going to be purely on Theme Development. I've linked to an Excellent Video Tutorial on installing WordPress on a live server. Tons more can be found online for both Live and Virtual Servers.
"A Virtual Server is essentially a server running on your local desktop machine and can be setup using MAMP(mac), XAMPP(mac & windows) or WAMP(windows)."
To learn how to install WordPress locally on a virtual server check out the following Video.
The installation process essentially entails:
- Creating a Database, as well as a Database User and it's associated Password
- Uploading the WordPress files, downloadable from WordPress.org
- Editing the wp-config.php file so it contains the database name, username, password and mysql server details
- Running the installation script found at www.yoursite.com/wp-admin/install.php
They Don't call it the Famous 5 minute install for nothing. In fact, if you've done it enough times it takes less than 5 minutes.
Step 2 - Preparing The Files
Check out www.freecss templates.org for a ton of templates which are perfect for getting started and are already geared towards being used as WordPress themes.
Once you have your test installation of WordPress running, you'll need a basic HTML template (index.html) with a stylesheet (style.css). I'd encourage anyone learning the HTML to WordPress conversion process to practice by downloading simple free HTML & CSS templates and converting a few for practice.
I'm going to be using the WordPress Training Wheels Theme for the duration of this tutorial series and I urge you to do the same so we're not peddling in different directions to begin with. The Training Wheels theme is a bare bones template, nothing racy or flashy, but contains all the familiar components of a typical WordPress Theme, i.e.. Header, Menu, Sidebars, Content Column & Footer. The Theme will be named training-wheels-0.0 in the beginning, and the name will steadily change as we add more code and progress is towards being a fully fledged theme. At the end of this lesson the name will change to training-wheels-0.1
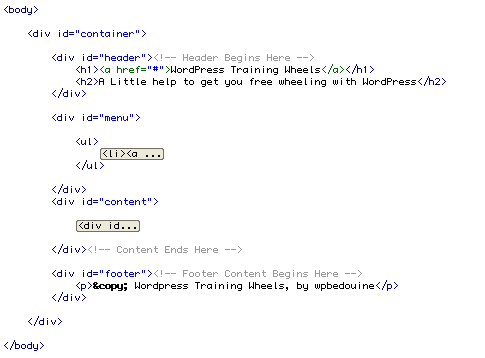
Have a look at the basic HTML structure below. Very simple.
Naming your starter files
Should your starter files not be named according to the manner mentioned above, you will need to rename them. WordPress Requires files with these names as the bare minimum for a theme to be functional. Additionally we'll have an images folder to keep any images neatly tucked out of our way.
- home.html » index.html
- mystyles.css » style.css
Changing File Extensions
The file index.html, which will be the base structure for the theme needs to be renamed to index.php. I always recommend keeping a copy of index.html on the side though, in case anything goes wonky as is bound to happen. Think of it as a spare tire in case you experience a tire burst. Confession: even after years of theme development I still do really dumb things, especially after midnight, when my brain can no longer function but the coffee is keeping me going.
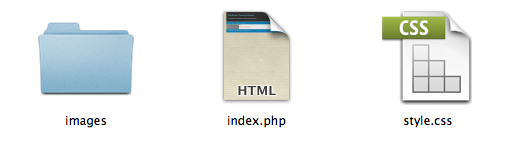
We end up with the following. Mine are housed in the folder called training-wheels-0.0
Step 3 - Stylesheet Header Comment
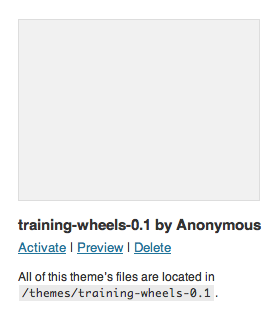
If you've ever tried adding a plain HTML template into the WordPress themes directory, you'd notice that it doesn't show up in the options for activating themes. With older versions of WordPress you would also find that if your stylesheet did not contain the stylesheet comment below, an error message would appear. This is because WordPress used the CSS comment snippet found below to register your theme as a valid WordPress theme. Currently it's no longer necessary to have this comment for your theme to register, but your theme would appear without any details, other than the folder name as seen below.
Personalize your theme with the stylesheet comment
The code below should be modified to contain your own unique details as well as unique information about the theme you're creating.
/*
	Theme Name:
	Theme URI:
	Description:
	Version:
	Author:
	Author URI:
*/
With details from my Training Wheels Theme included, it would look like this:
/*
	Theme Name: Training Wheels
	Theme URI: http://www.wpbedouine.com
	Description: A theme to learn WordPress Theme Development from Scratch
	Version: 0.1
	Author: Nur Ahmad Furlong
	Author URI: http://www.nomad-one.com
*/

There are some additional parameters that can be added, especially if you're considering releasing your theme to the public, selling it, or loading it onto the official wordpress.org themes directory.
Twenty Eleven Theme Stylesheet Comment
An example of a more fleshed out stylesheet comment to provide as much detail as possible about the theme can be found in the twenty eleven default theme. As you can see some additional tag information to help users when searching for specific types of themes via the dashboard theme search or on the themes directory is present. A detailed description as well some some theme licensing information are included. We'll be ignoring these for this exercise.
/*
  Theme Name: Twenty Eleven
  Theme URI: http://wordpress.org/extend/themes/twentyeleven
  Author: the WordPress team
  Author URI: http://wordpress.org/
  Description: The 2011 theme for WordPress is sophisticated, lightweight, and adaptable. Make it yours with a custom menu, header image, and background -- then go further with available theme options for light or dark color scheme, custom link colors, and three layout choices. Twenty Eleven comes equipped with a Showcase page template that transforms your front page into a showcase to show off your best content, widget support galore (sidebar, three footer areas, and a Showcase page widget area), and a custom "Ephemera" widget to display your Aside, Link, Quote, or Status posts. Included are styles for print and for the admin editor, support for featured images (as custom header images on posts and pages and as large images on featured "sticky" posts), and special styles for six different post formats.
  Version: 1.2
  License: GNU General Public License
  License URI: license.txt
  Tags: dark, light, white, black, gray, one-column, two-columns, left-sidebar, right-sidebar, fixed-width, flexible-width, custom-background, custom-colors, custom-header, custom-menu, editor-style, featured-image-header, featured-images, full-width-template, microformats, post-formats, rtl-language-support, sticky-post, theme-options, translation-ready
*/
Once you've got your Stylesheet comments in place, your theme is now ready to be activated via the WordPress Administration Dashboard, under Appearance » Themes
Step 4 - Creating a Screenshot
In order to help yourself and other users of the theme to quickly recognize the theme in the themes installation area of the dashboard, provision has been made for a screenshot.png image to be automatically displayed if found in the root of your theme's folder.
Ideally you'd want to have a screenshot which gives a good representation of what the theme looks like. I find many theme designers include a logo here, which doesn't always help the end user identify the theme they're looking for, especially in the case where the user has tons of themes already installed, quite a common occurrence I believe.
The screenshot.png should be 240px X 180px, which is the size used for the thumbnail within the dashboard. You can insert a different size but the image will be resized to fit into those dimensions. Best to stick with the correct size first time around for an optimal display and page load experience.

Step 5 - Your First PHP Tag
Before we go any further, we need to orientate ourselves a bit with the structure of the PHP development language, and more importantly the structure of WordPress specific PHP. The PHP used in WordPress themes by and large, is customized specifically to work within the WordPress environment only. We'll start with the containing structure of any PHP code, like with HTML having the brackets alone, PHP code is wrapped in.
<?php ?>
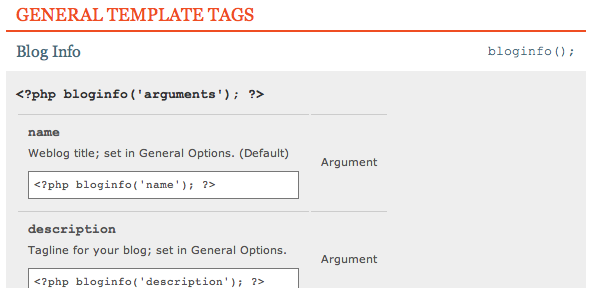
Inside the Brackets is where all the functionality takes place, with code we generally refer to at PHP functions. Always ensure that a space exists between the containing tag's and the inner PHP code. The simplest of these functions we'll be dealing with is the bloginfo(); function. Notice that after the name of the function, we have 2 rounded brackets, opening and closing, with a semi colon at the end, closes off the function and in many cases is essential. The rounded brackets will sometimes end up containing some additional parameters, to tell the bloginfo(); function, specifically what it needs to do.
Some WordPress functions don't need parameters within the rounded brackets to perform a function, though they may optionally have some to make their function more specific. The bloginfo(); parameter however, needs one just to function at all. We'll get to some of the additional functions which work without parameters as time passes.
Site Name
<?php bloginfo('name'); ?>
Notice how the word name, is written with single quote marks around it within the rounded brackets.
is the code which we use in place of the name of the site, wherever we'd like that name to appear in our template. For instance, wherever I have written "WordPress Training Wheels" I could simply replace that text with the that function.
Pay careful attention to the structure of this function, as the rest of the WordPress code follows a similar structure throughout. Leaving out an essential part, like the rounded brackets, the semi colon after the rounded brackets, or the space between php and the word bloginfo, will result in your code not working correctly. In some cases this could kill your entire page. I know, it's a pain to be that careful, but developing good habits early on helps. Obey the rules of the road and your journey will be way less bumpy.
When the WordPress site running this function loads, WordPress queries the database and finds the name which you have inserted in the Blog Name field under Settings » General.
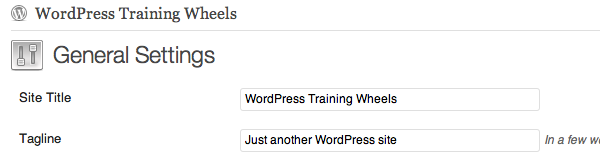
It's also the name you insert in the very beginning when you run the installation for setting up WordPress the first time. Changing this name in the General Settings will result in your template reflecting that change immediately. This is essentially how WordPress, or any other Content Management System for that matter works. Dynamic tags replace static contents so that contents can be managed via the administration interface instead of directly editing the templates.
Your Theme is still not quite ready to be registered within WordPress. It's missing one essential step which allows WordPress to display your theme correctly.
Step 6 - Linking Your Main CSS With WordPress
A few steps back our index.html was easily able to link to it's accompanying stylesheet, because they are located in the same folder and merely inserting the name of the stylesheet file within the stylesheet link would suffice. This is no longer the case though. WordPress themes don't reside at the root level of the site, as they are installed in the wp-content » themes folder within the WordPress software.
As you can see below when activating the theme currently, we're still not seeing the full picture. Though the HTML structure loads, the stylesheet is not being linked, which results in an unstyled page.
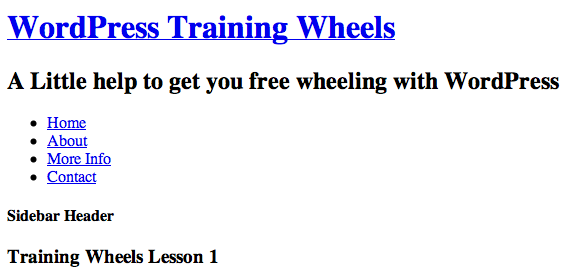
Without explaining too much detail about how WordPress goes about calling the templates from within those folders, we need to be aware now that files can no longer be linked to as easily as we linked to them in simple HTML sites. We need to use some additional WordPress functions to fill in the steps between the root directory and the currently activated theme's folder. We do this with the help of another bloginfo(); function, this time detecting the URL to the currently activated theme's stylesheet. No matter what the name of the theme folder, WordPress will now fill in the blanks and insert the path to the style.css file.
<?php bloginfo('stylesheet_url'); ?>
This function is inserted into the stylesheet link tag
<link href="style.css" rel="stylesheet" type="text/css" />
which now becomes
<link href="<?php bloginfo('stylesheet_url'); ?>" rel="stylesheet" type="text/css" />
If you inspect your source code using view source or with something like firebug, you'll see WordPress includes the full pathway from the root of the site all the way to the stylesheet. The root folder of my example site is located at http://www.wpbedouine.com/training-wheels/. WordPress therefore generates:
<link href="http://www.wpbedouine.com/training-wheels/wp-content/themes/training-wheels-0.1/style.css" rel="stylesheet" type="text/css"/>
The same stylesheet_url function will auto insert the path to any currently activated theme in the same manner, without any source code being edited. You'll see a pattern emerging, with bits of hard coded contents being replaced by dynamic functions which pull data from the database on the fly.
Feel that air rushing through your hair now? Don't worry, the training wheels will come off soon! I Promise.
Step 7 - Adding your files to WordPress
Place your index.php and style.css files into their own folder, named based on what you want the theme to be named and then uploaded to your wp-content » themes folder within your live or virtual host version of your WordPress installation as seen below.

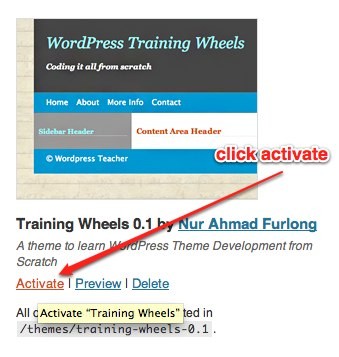
Step 8 - Activating your Theme
And without further ado, go to Appearance » Themes and click activate under your newly created theme. For the rest of the readers on this site, these steps might have been annoyingly simple, but I personally know the feeling of finally clicking with this process and having my very first theme activate within WordPress. It's priceless for the newbie.
Step 9 - A Few Extra Dynamic Pieces of Content
Before we finish off, let's use a few additional, very simple bloginfo(); functions to fill in dynamic content. We've already introduced the bloginfo('name'); and bloginfo('stylesheet_url');. Below we have the initial HTML for the header div of our theme.
	<div id="header"><!-- Header Begins Here -->
	  <h1>
			<a href="#">
				WordPress Training Wheels
			</a>
		</h1>
	  <h2>A Little help to get you free wheeling with WordPress</h2>
	</div>
We'll replace the Contents of the H1 link href attribute, which currently just has a hash symbol and would usually look like href="home.html", with the bloginfo('url'); function.
	<h1>
	    <a href="<?php bloginfo('url'); ?>">
	        <?php bloginfo('name'); ?>
	    </a>
	</h1>
Additionally we'll replace the h2 tagline below the site name with:
<?php bloginfo('description'); ?>
so our code snippet now looks much more wordpressish.
	<div id="header"><!-- Header Begins Here -->
		<h1>
			<a href="<?php bloginfo('url'); ?>">
				<?php bloginfo('name'); ?>
			</a>
		</h1>
	  <h2><?php bloginfo('description'); ?></h2>
	</div>
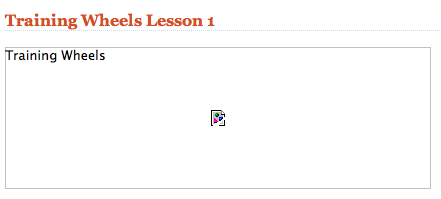
One last issue to resolve is the link to the content image in the middle column of the template. Similar to the issue of linking the stylesheet, we need to use another bloginfo(); function to fill in the image pathway as images/imagename.jpg will no longer work.
	<div id="middle-column"><!-- Main Content Begins Here -->
		<h3>Training Wheels Lesson 1</h3>
		<p><img src="images/training-wheels.jpg" width="426" height="142" alt="Training Wheels" /></p>
	</div>
To solve this problem we use the following code before calling the images directory
<?php bloginfo('template_directory'); ?>
So we'll end up with the following.
	<div id="middle-column"><!-- Main Content Begins Here -->
		<h3>Training Wheels Lesson 1</h3>
		<p><img src="<?php bloginfo('template_directory'); ?>/images/training-wheels.jpg" width="426" height="142" alt="Training Wheels" /></p>
	</div>
Pay careful attention to the forwardslash just after the closing bracket and before the name of the images folder!
Step 10 - A wrap-up of the process we covered
- Install WordPress on local or live server
- Preparing your HTML files by renaming them
- Include and edit your stylesheet's header comment
- Creating a screenshot.png preview of your theme
- Get to grips with the basic WordPress PHP code structure
- Re-linking your stylesheet the WordPress way with bloginfo('stylesheet_url');
- Adding your files to the wp-content > themes folder
- Activating your theme in the dashboard under Appearance > Themes
- Adding a few extra bloginfo functions for dynamic contents.
-
bloginfo('name'); -
bloginfo('url'); -
bloginfo('description'); -
bloginfo('template_directory');
-
The bloginfo(); function has a ton of uses to generate various pieces of content from within your site.
For a more comprehensive list of parameters for bloginfo(); check out the WordPress Codex Documentation on this function - http://codex.wordpress.org/Function_Reference/bloginfo.
Another excellent resource for the many WordPress functions is the DBS Interactive WordPress Tag Reference which is essentially a neater and more orderly presentation of the code listed within the WordPress Codex.
I've added snippets of the code covered in this lesson to my snipplr account.
Free wheeling with WordPress soon to follow. I hear those training wheels rattling to come off :)

Comments