Introduction
Siri has been a core feature of iOS since it was introduced back in 2011. Now, iOS 10 brings new features to allow developers to interact with Siri. In particular, two new frameworks are now available: Speech and SiriKit.
Today, we are going to take a look at the Speech framework, which allows us to easily translate audio into text. You'll learn how to build a real-life app that uses the speech recognition API to check the status of a flight.
If you want to learn more about SiriKit, I covered it in my Create SiriKit Extensions in iOS 10 tutorial. For more on the other new features for developers in iOS 10, check out Markus Mühlberger's course, right here on Envato Tuts+.
Usage
Speech recognition is the process of translating live or pre-recorded audio to transcribed text. Since Siri was introduced in iOS 5, there has been a microphone button in the system keyboard that enables users to easily dictate. This feature can be used with any UIKit text input, and it doesn't require you to write additional code beyond what you would write to support a standard text input. It's really fast and easy to use, but it comes with a few limitations:
- The keyboard is always present when dictating.
- The language cannot be customized by the app itself.
- The app cannot be notified when dictation starts and finishes.
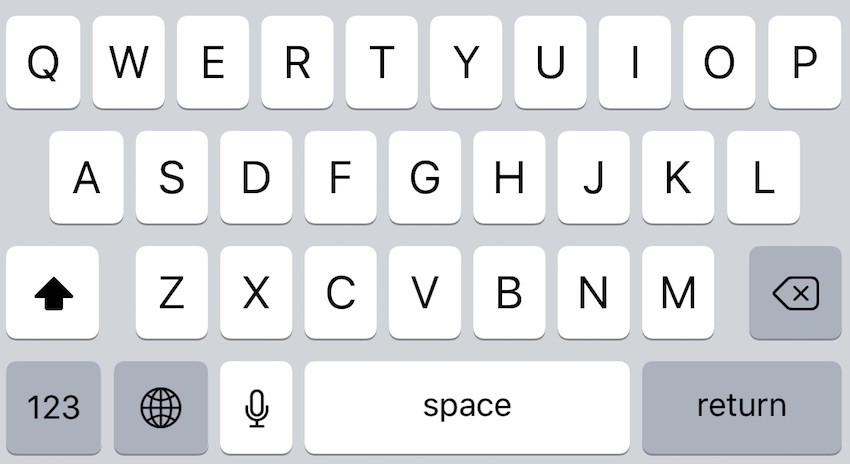
To allow developers to build more customizable and powerful applications with the same dictation technology as Siri, Apple created the Speech framework. It allows every device that runs iOS 10 to translate audio to text in over 50 languages and dialects.
This new API is much more powerful because it doesn't just provide a simple transcription service, but it also provides alternative interpretations of what the user may have said. You can control when to stop a dictation, you can show results as your user speaks, and the speech recognition engine will automatically adapt to the user preferences (language, vocabulary, names, etc.).
An interesting feature is support for transcribing pre-recorded audio. If you are building an instant messaging app, for example, you could use this functionality to transcribe the text of new audio messages.
Setup
First of all, you will need to ask the user for permission to transmit their voice to Apple for analysis.
Depending on the device and the language that is to be recognized, iOS may transparently decide to transcribe the audio on the device itself or, if local speech recognition is not available on the device, iOS will use Apple's servers to do the job.
This is why an active internet connection is usually required for speech recognition. I'll show you how to check the availability of the service very soon.
There are three steps to use speech recognition:
- Explain: tell your user why you want to access their voice.
- Authorize: explicitly ask authorization to access their voice.
- Request: load a pre-recorded audio from disk using
SFSpeechURLRecognitionRequest, or stream live audio usingSFSpeechAudioBufferRecognitionRequestand process the transcription.
If you want to know more about the Speech framework, watch WWDC 2016 Session 509. You can also read the official documentation.
Example
I will now show you how to build a real-life app that takes advantage of the speech recognition API. We are going to build a small flight-tracking app in which the user can simply say a flight number, and the app will show the current status of the flight. Yes, we're going to build a small assistant like Siri to check the status of any flight!
In the tutorial's GitHub repo, I've provided a skeleton project that contains a basic UI that will help us for this tutorial. Download and open the project in Xcode 8.2 or higher. Starting with an existing UI will let us focus on the speech recognition API.
Take a look at the classes in the project. UIViewController+Style.swift contains most of the code responsible for updating the UI. The example datasource of the flights displayed in the table is declared in FlightsDataSource.swift.
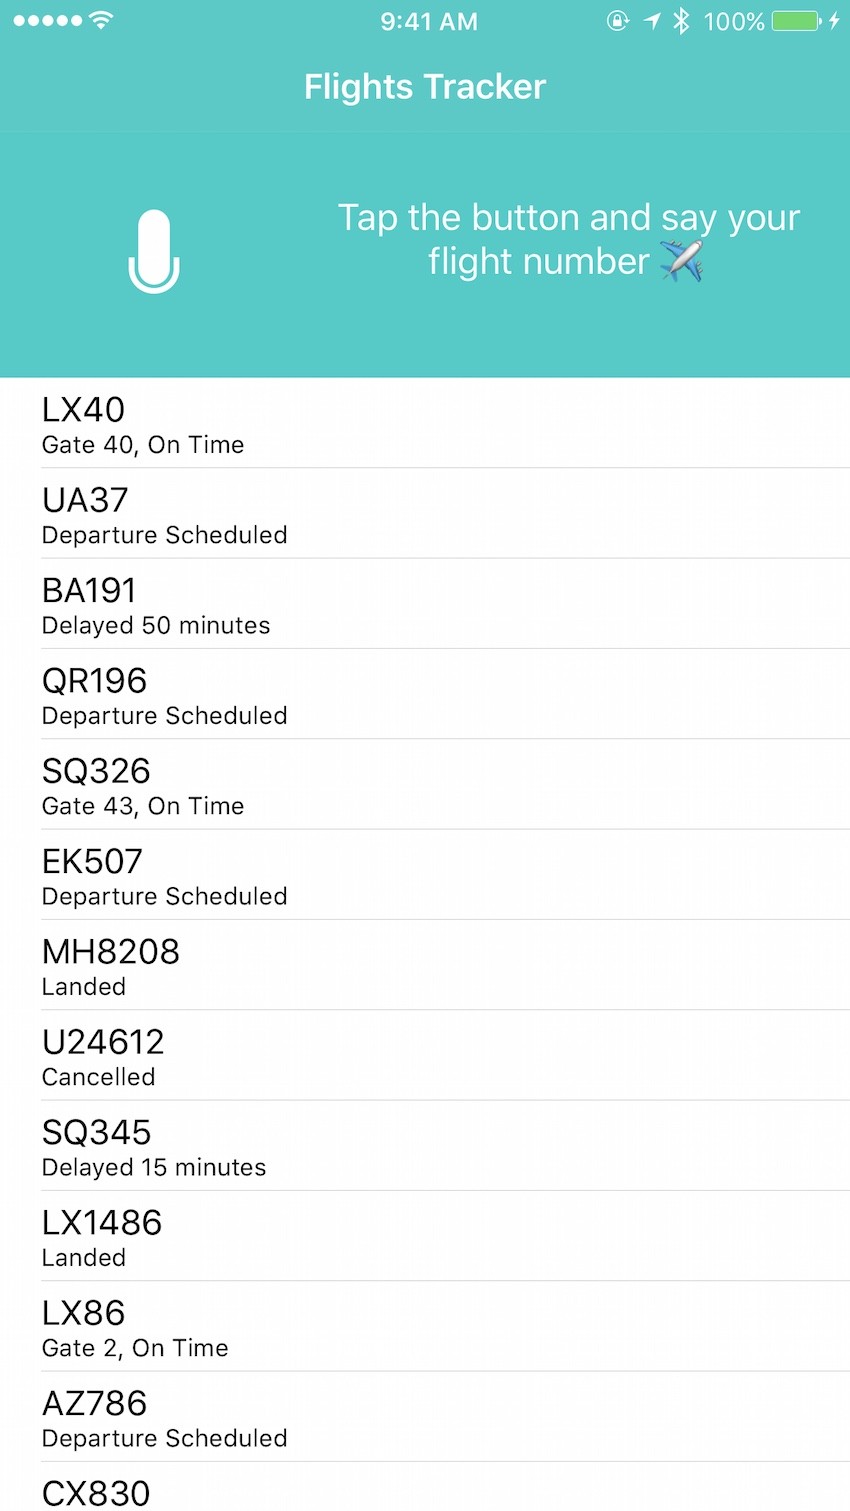
If you run the project, it should look like the following.

After the user presses the microphone button, we want to start the speech recognition to transcribe the flight number. So if the user says "LX40", we would like to show the information regarding the gate and current status of the flight. To do this, we will call a function to automatically look up the flight in a datasource and show the status of the flight.
We are first going to explore how to transcribe from pre-recorded audio. Later on, we'll learn how to implement the more interesting live speech recognition.
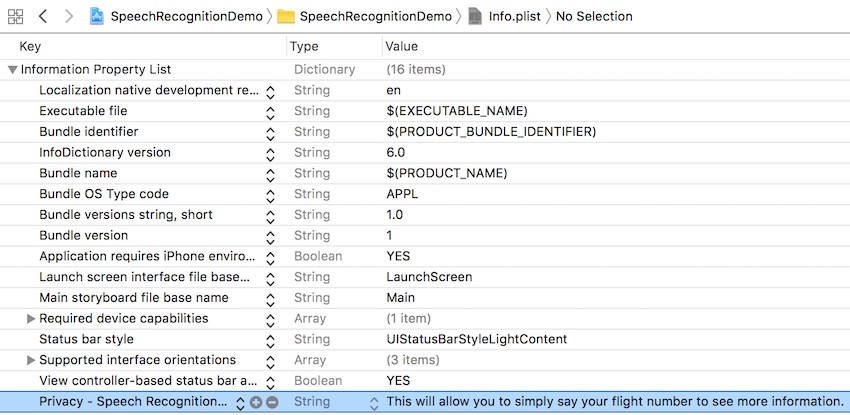
Let's start by setting up the project. Open the Info.plist file and add a new row with the explanation that will be shown to the user when asked for permission to access their voice. The newly added row is highlighted in blue in the following image.
Once this is done, open ViewController.swift. Don't mind the code that is already in this class; it is only taking care of updating the UI for us.
The first step with any new framework that you want to use is to import it at the top of the file.
import Speech
To show the permission dialog to the user, add this code in the viewDidLoad(animated:) method:
switch SFSpeechRecognizer.authorizationStatus() {
    case .notDetermined:
        askSpeechPermission()
    case .authorized:
        self.status = .ready
    case .denied, .restricted:
        self.status = .unavailable
}
The status variable takes care of changing the UI to warn the user that speech recognition is not available in case something goes wrong. We are going to assign a new status to the same variable every time we would like to change the UI.
If the app hasn't asked the user for permission yet, the authorization status will be notDetermined, and we call the askSpeechPermission method to ask it as defined in the next step.
You should always fail gracefully if a specific feature is not available. It's also very important to always communicate to the user when you're recording their voice. Never try to recognize their voice without first updating the UI and making your user aware of it.
Here's the implementation of the function to ask the user for permission.
func askSpeechPermission() {
    SFSpeechRecognizer.requestAuthorization { status in
        OperationQueue.main.addOperation {
            switch status {
            case .authorized:
                self.status = .ready
            default:
                self.status = .unavailable
            }
        }
    }
}
We invoke the requestAuthorization method to display the speech recognition privacy request that we added to the Info.plist. We then switch to the main thread in case the closure was invoked on a different thread—we want to update the UI only from the main thread. We assign the new status to update the microphone button to signal to the user the availability (or not) of speech recognition.
Pre-Recorded Audio Recognition
Before writing the code to recognize pre-recorded audio, we need to find the URL of the audio file. In the project navigator, check that you have a file named LX40.m4a. I recorded this file myself with the Voice Memos app on my iPhone by saying "LX40". We can easily check if we get a correct transcription of the audio.
Store the audio file URL in a property:
var preRecordedAudioURL: URL = {
    return Bundle.main.url(forResource: "LX40", withExtension: "m4a")!
}()
It's time to finally see the power and simplicity of the Speech framework. This is the code that does all the speech recognition for us:
func recognizeFile(url: URL) {
    guard let recognizer = SFSpeechRecognizer(), recognizer.isAvailable else {
        return
    }

    let request = SFSpeechURLRecognitionRequest(url: url)
    recognizer.recognitionTask(with: request) { result, error in
        guard let recognizer = SFSpeechRecognizer(), recognizer.isAvailable else {
            return self.status = .unavailable
        }
        if let result = result {
            self.flightTextView.text = result.bestTranscription.formattedString
            if result.isFinal {
                self.searchFlight(number: result.bestTranscription.formattedString)
            }
        } else if let error = error {
            print(error)
        }
    }
}
Here is what this method is doing:
- Initialize a
SFSpeechRecognizerinstance and check that the speech recognition is available with a guard statement. If it's not available, we simply set the status tounavailableand return. (The default initializer uses the default user locale, but you can also use theSFSpeechRecognizer(locale:)initializer to provide a different locale.) - If speech recognition is available, create a
SFSpeechURLRecognitionRequestinstance by passing the pre-recorded audio URL. - Start the speech recognition by invoking the
recognitionTask(with:)method with the previously created request.
The closure will be called multiple times with two parameters: a result and an error object.
The recognizer is actually playing the file and trying to recognize the text incrementally. For this reason, the closure is called multiple times. Every time it recognizes a letter or word or it makes some corrections, the closure is invoked with up-to-date objects.
The result object has the isFinal property set to true when the audio file was completely analyzed. In this case, we start a search in our flight datasource to see if we can find a flight with the recognized flight number. The searchFlight function will take care of displaying the result.
The last thing that we are missing is to invoke the recognizeFile(url:) function when the microphone button is pressed:
@IBAction func microphonePressed(_ sender: Any) {
    recognizeFile(url: preRecordedAudioURL)
}
Run the app on your device running iOS 10, press the microphone button, and you'll see the result. The audio "LX40" is incrementally recognized, and the flight status is displayed!
Tip: The flight number is displayed in a UITextView. As you may have noticed, if you enable the Flight Number data detector in the UITextView, you can press on it and the current status of the flight will actually be displayed!
The complete example code up to this point can be viewed in the pre-recorded-audio branch in GitHub.
Live Audio Recognition
Let's now see how to implement live speech recognition. It's going to be a little bit more complicated compared to what we just did. You can once again download the same skeleton project and follow along.
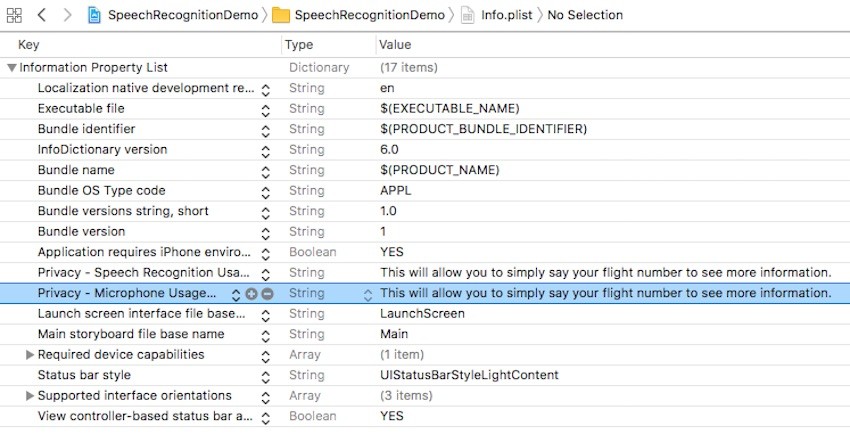
We need a new key in the Info.plist file to explain to the user why we need access to the microphone. Add a new row to your Info.plist as shown in the image.
We don't need to manually ask the user for permission because iOS will do that for us as soon as we try to access any microphone-related API.
We can reuse the same code that we used in the previous section (remember to import Speech) to ask for the authorization. The viewDidLoad(animated:) method is implemented exactly as before:
switch SFSpeechRecognizer.authorizationStatus() {
case .notDetermined:
    askSpeechPermission()
case .authorized:
    self.status = .ready
case .denied, .restricted:
    self.status = .unavailable
}
Also, the method to ask the user for permission is the same.
func askSpeechPermission() {
    SFSpeechRecognizer.requestAuthorization { status in
        OperationQueue.main.addOperation {
            switch status {
            case .authorized:
                self.status = .ready
            default:
                self.status = .unavailable
            }
        }
    }
}
The implementation of startRecording is going to be a little bit different. Let's first add a few new instance variables that will come in handy while managing the audio session and speech recognition task.
let audioEngine = AVAudioEngine()
let speechRecognizer: SFSpeechRecognizer? = SFSpeechRecognizer()
let request = SFSpeechAudioBufferRecognitionRequest()
var recognitionTask: SFSpeechRecognitionTask?
Let's take a look at each variable separately:
-
AVAudioEngineis used to process an audio stream. We will create an audio node and attach it to this engine so that we can get updated when the microphone receives some audio signals. -
SFSpeechRecognizeris the same class we have seen in the previous part of the tutorial, and it takes care of recognizing the speech. Given that the initializer can fail and return nil, we declare it as optional to avoid crashing at runtime. -
SFSpeechAudioBufferRecognitionRequestis a buffer used to recognize the live speech. Given that we don't have the complete audio file as we did before, we need a buffer to allocate the speech as the user speaks. -
SFSpeechRecognitionTaskmanages the current speech recognition task and can be used to stop or cancel it.
Once we have declared all the required variables, let's implement startRecording.
func startRecording() {
    // Setup audio engine and speech recognizer
    guard let node = audioEngine.inputNode else { return }
    let recordingFormat = node.outputFormat(forBus: 0)
    node.installTap(onBus: 0, bufferSize: 1024, format: recordingFormat) { buffer, _ in
        self.request.append(buffer)
    }

    // Prepare and start recording
    audioEngine.prepare()
    do {
        try audioEngine.start()
        self.status = .recognizing
    } catch {
        return print(error)
    }

    // Analyze the speech
    recognitionTask = speechRecognizer?.recognitionTask(with: request, resultHandler: { result, error in
        if let result = result {
            self.flightTextView.text = result.bestTranscription.formattedString
            self.searchFlight(number: result.bestTranscription.formattedString)
        } else if let error = error {
            print(error)
        }
    })
}
This is the core code of our feature. I will explain it step by step:
- First we get the
inputNodeof theaudioEngine. A device can possibly have multiple audio inputs, and here we select the first one. - We tell the input node that we want to monitor the audio stream. The block that we provide will be invoked upon every received audio stream of 1024 bytes. We immediately append the audio buffer to the
requestso that it can start the recognition process. - We prepare the audio engine to start recording. If the recording starts successfully, set the status to
.recognizingso that we update the button icon to let the user know that their voice is being recorded. - Let's assign the returned object from
speechRecognizer.recognitionTask(with:resultHandler:)to therecognitionTaskvariable. If the recognition is successful, we search the flight in our datasource and update the UI.
The function to cancel the recording is as simple as stopping the audio engine, removing the tap from the input node, and cancelling the recognition task.
func cancelRecording() {
    audioEngine.stop()
    if let node = audioEngine.inputNode {
        node.removeTap(onBus: 0)
    }
    recognitionTask?.cancel()
}
We now only need to start and stop the recording. Modify the microphonePressed method as follows:
@IBAction func microphonePressed() {
    switch status {
    case .ready:
        startRecording()
        status = .recognizing
    case .recognizing:
        cancelRecording()
        status = .ready
    default:
        break
    }
}
Depending on the current status, we start or stop the speech recognition.
Build and run the app to see the result. Try to spell any of the listed flight numbers and you should see its status appear.
Once again, the example code can be viewed in the live-audio branch on GitHub.
Best Practices
Speech recognition is a very powerful API that Apple provided to iOS developers targeting iOS 10. It is completely free to use, but keep in mind that it's not unlimited in usage. It is limited to about one minute for each speech recognition task, and your app may also be throttled by Apple's servers if it requires too much computation. For these reasons, it has a high impact on network traffic and power usage.
Make sure that your users are properly instructed on how to use speech recognition, and be as transparent as possible when you are recording their voice.
Recap
In this tutorial, you have seen how to use fast, accurate and flexible speech recognition in iOS 10. Use it to your own advantage to give your users a new way of interacting with your app and improve its accessibility at the same time.
If you want to learn more about integrating Siri in your app, or if you want to find out about some of the other cool developer features of iOS 10, check out Markus Mühlberger's course.
Also, check out some of our other free tutorials on iOS 10 features.
 iOSUpgrade Your App to iOS 10
 iOS SDKiOS 10: Creating Custom Notification Interfaces
 iOS 10Haptic Feedback in iOS 10
 iOS SDKCreate SiriKit Extensions in iOS 10


Comments