This tutorial will teach you how to use Titanium Mobile's SplitWindow and Popover controls while building an awesome gallery of photos from Dribbble. Along the way, you'll work with web service requests, image containers, and other common Titanium Mobile components. Let's get started!
With this tutorial, we will look at how to use the two iPad specific UI elements within Titanium Mobile to create an app. Specifically, this app will be a gallery showing the most popular works on Dribbble. Although most of the same tools and UI elements are used to create phone and tablet apps, there are differences. The most obvious difference in tablet development is screen size.
The screen limitations of a phone pushes designers to create interfaces that tend to only show either the navigation or the content of the app at one time. This often leads to an interface that presents a menu that disappears when the user is looking at the content (with a back button to return to the menu).
However, when working with a tablet, you have much more space and generally want to show the navigation and the content at the same time, keeping the menu items accessible as the user looks at the content. You also frequently want to layer some information temporarily over the content. This is where the iPad specific splitView and Popover controls come in.
Step 1: Setup
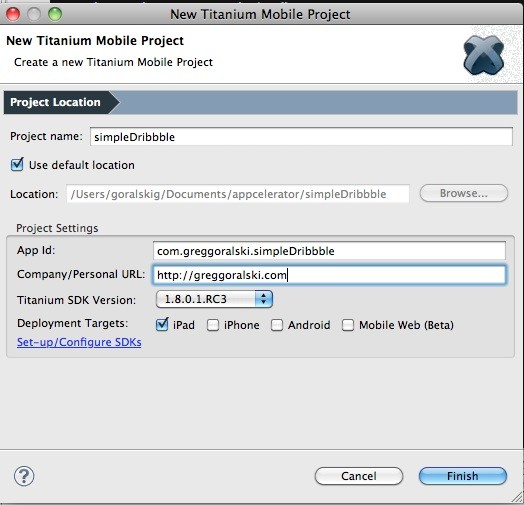
Begin by creating a new mobile project within Titanuim. Enter the Project Name, App ID, and Company URL that you wish. For the deployment targets, uncheck all the options except iPad as this tutorial is focused specifically on iPads. Next click Finish.
This creates the file structure and necessary files for a mobile project. Our focus is on the “app.js” file (within the resources folder) as this is where we will be putting our code. The “app.js” file contains a default application to get you started, but as we will not be using it in this tutorial, you can delete all the default code in this file. After deleting the default code, you will be left with a clean starting point.
Step 2: Getting the Live Data
In order to explore how to use these two UI elements, we will be building out a gallery showing the most popular works on Dribbble. Dribbble, in addition to hosting some remarkably beautiful work, has provided a very easy to use API to access their images. The API is direct and does not need any form of authorization to get started.
From this API, you can access the images on Dribbble in a variety of ways, including looking up individuals, listing the debuts, and listing the most popular images. For this tutorial, we’ll be looking at the most popular. For more information on the API, visit the official documentation.
Through this API, Dribbble sends its images via a JSON object that is structured as so:
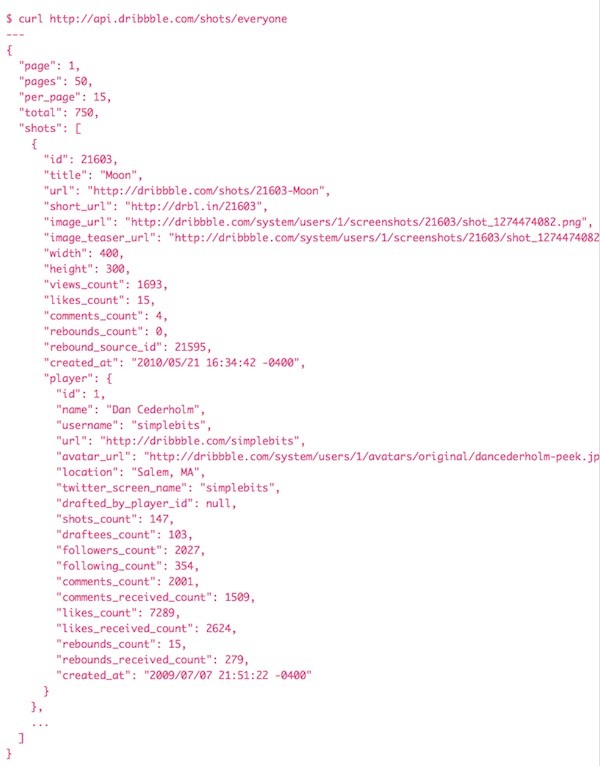
NOTE: The above image was taken straight from http://dribbble.com/api
Within this JSON object is an array called "shots" that has a variety of information about the image. The parts of this data that we will be working with are the title, image_url, image_teaser_url, player name, twitter_screen_name, and location.
To call on the API from Titanium, you create an HTTPClient (in this case, named "myRequest"):
var jsonObject;
var shots;
var myRequest = Ti.Network.createHTTPClient({
    onload: function(e) {
        	jsonObject = JSON.parse(this.responseText)
        	shots = jsonObject.shots
	    },
    onerror: function(e) {
        alert(e.error);
    },
    timeout:5000
});
myRequest.open("GET", "http://api.dribbble.com/shots/popular");
myRequest.send();
Within this bit of code, we are calling on the URL http://api.dribbble.com/shots/popular and, once loaded, putting the response into a variable called jsonObject. We use JSON.parse to convert the string that is sent from Dribbble into a JSON object, making it easier to navigate. The variable “shots” holds an array containing the information for the images. You can see what this looks like by adding “alert(shots)” to the load function.
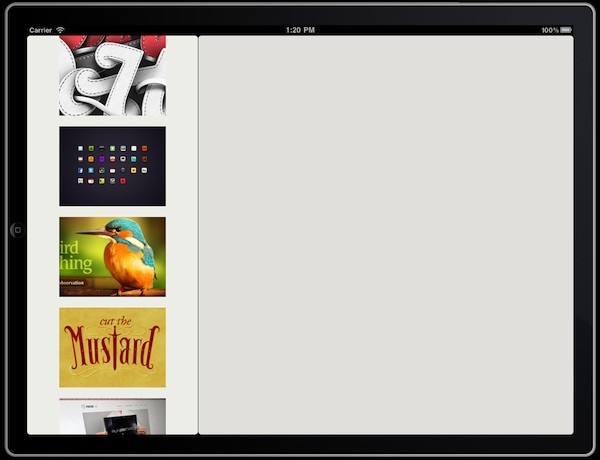
Step 3: Creating a SplitView Layout
The purpose of a splitview layout is to show two windows at the same time. The first window is the navigation (which in our case will contain the thumbnails) and the second window is to hold the content (containing the larger image). Add the following code:
var nav = Ti.UI.createWindow({
   backgroundColor:'#efeeea',
});

var content = Ti.UI.createWindow({
   backgroundColor:'#e2e1df',
});

var splitWin = Ti.UI.iPad.createSplitWindow({
    masterView:nav,
    detailView:content,
    showMasterInPortrait:true,
    });

splitWin.open();
Here, we are creating the two windows that will form our layout, the nav and the content windows. The nav will hold our thumbnails and is therefore defined as the masterView when the split window is created. The masterView is to the left and traditionally holds the navigation. By default, the masterView of a split window is not visible in portrait orientation. To see this in action, have a look at the mail client on the iPad in portrait and landscape orientation. When it disappears, an alternative form of navigation needs to be created. For the sake of simplicity, we will keep the masterView visible in both orientations for this app by setting the showMasterInPortrait property to true.
To change the orientation within the iOS simulator, select Hardware>Rotate Right from the main menu in the simulator, or press Command →.
Step 4: Creating Thumbnails
The Dribbble API sends information on 15 images at a time, which is too many to show in the available space. We can create a scrollView, named scroll, and add it to the nav window to allow the user to scroll through the longer list.
var scroll = Ti.UI.createScrollView({
	contentHeight: 'auto',
showVerticalScrollIndicator:true,
    })
nav.add(scroll)
We have already put the information to create the thumbnails into the array "shots". We can now create a function that uses that information to create the thumbnails.
function loadThumbnails (){
	for (var i = 0; i < shots.length; i++) { // loops for each image
	    var thumb = Ti.UI.createImageView({	 // creates thumb
	    	image:shots[i].image_teaser_url, // sets image to smaller version of image
	    	largeImage:shots[i].image_url, // remembers URL of full size image for later use
			player:shots[i].player,  // remembers information on user who created image
	    	height:150, // sets height
	    	top:i*170, // positions from top
	     })
	scroll.add(thumb)  // adds thumb to scrollview
	}
}
Let’s walk through what this function does. For each of the objects in the shots array (i.e., for each image we will show) we create an image view named "thumb". The image property of this view is set to the url of a smaller version of the image (image_teaser_url) This is a 150px X 200px version of the image. We also take this opportunity to remember the URL for the full size image. We do this by adding a new property, named largeImage, and setting it to the value of shots[i].image.url. We will use this later to know which image to load into the content area. In the same way, we remember the information about the person who created the image, placing it into the property that we created named "player".
We then size and position the thumb and add it to the scroll. This function should be called once the data is loaded, so add loadThumbnails(); to the onload function that you created earlier.
onload: function(e) {
    jsonObject = JSON.parse(this.responseText);
    shots = jsonObject.shots;
    loadThumbnails (); // calls function to load Thumbnails
},
You should now see the thumbnails loaded into the window towards the left and be able to scroll down to see all 15 images.
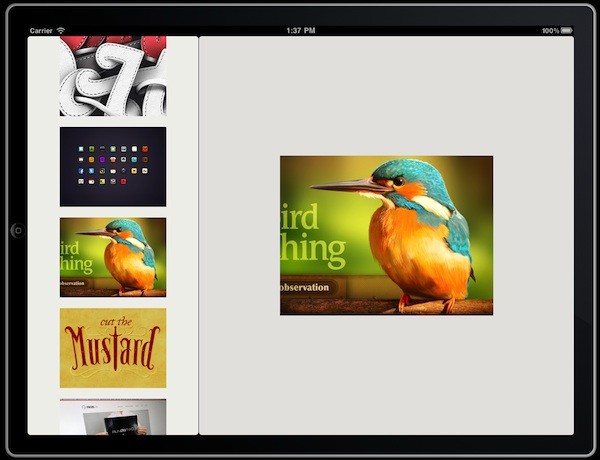
Step 5: Loading Larger Image
Create a new image view to hold the larger image and add it to the content window. This is the image that is shown when the user selects one of the thumbnails. The images from Dribbble are 400x300px so you create the image view by adding this code:
var mainImage = Ti.UI.createImageView({
 	width:400,
 	height:300,
 })
content.add(mainImage)
When on of the thumbs is pressed, we want to have it load the related larger image, the URL for which we have conveniently remembered with the thumb as the property largeImage. To do this, we add an eventListener to each thumb as it gets created within the for loop.
function loadThumbnails (){
	for (var i = 0; i < shots.length; i++) {
	    var thumb = Ti.UI.createImageView({
	    	image:shots[i].image_teaser_url,
	    	largeImage:shots[i].image_url,
		player:shots[i].player,
	    	height:150,
	    	top:i*170,

	    		    })
	    thumb.addEventListener('touchstart', function(e)
			{
				mainImage.image = e.source.largeImage;
			});
	scroll.add(thumb)
			}
	}
We now have a simple, but functioning gallery using live data.
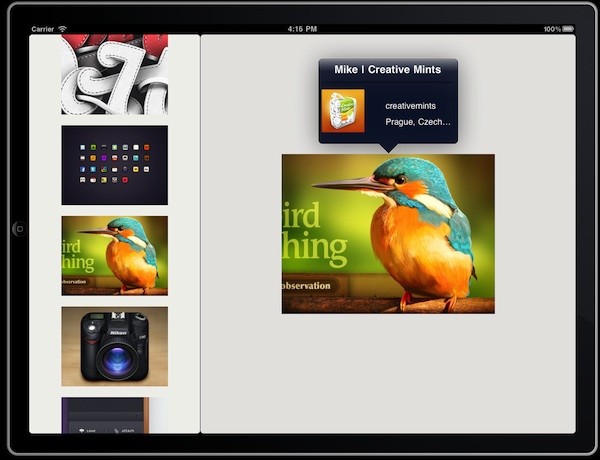
Step 6: Adding the Popover
Popovers are the second of the UI elements that are specific to iPad development. They allow you to add a layer of information onto the existing layout.
var popover = Ti.UI.iPad.createPopover({
	width:250, height:110,
	arrowDirection:Ti.UI.iPad.POPOVER_ARROW_DIRECTION_DOWN,
});
This code creates a popover object, defines the size of the content within it, and sets the direction of the popover arrow (and so the positioning of the popover). The options for the positioning of the popover are:
Ti.UI.iPad.POPOVER_ARROW_DIRECTION_UP
Ti.UI.iPad.POPOVER_ARROW_DIRECTION_DOWN
Ti.UI.iPad.POPOVER_ARROW_DIRECTION_LEFT
Ti.UI.iPad.POPOVER_ARROW_DIRECTION_RIGHT
Ti.UI.iPad.POPOVER_ARROW_DIRECTION_ANY
We want this popover to appear above the mainImage when it is pressed. To do this we create an eventListener for the mainImage and shows the popover.
mainImage.addEventListener('touchstart', function(e)
{
    popover.show({view:mainImage});
});
This defines the mainImage as the view onto which the popover is attached.
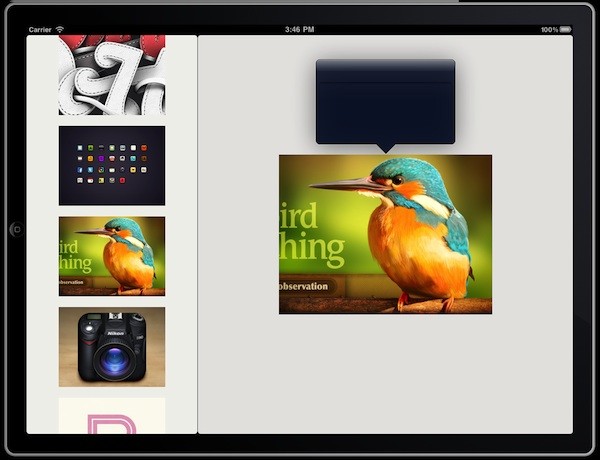
The popover does some nice things automatically. Besides positioning itself next to the image, clicking anywhere outside the popover will cause it to fade away.
Let’s add some content to the popover, specifically the profile pic, twitter name, and location of the creator. Begin by creating the image view and labels that will be used, and adding them to the popover.
var profilePic = Ti.UI.createImageView({
	width:80,
	height:80,
	left:0
	})
var twitterName = Ti.UI.createLabel({
	width:140,
	left:120,
	color:'#ffffff',
    font:{fontSize:16},
    top:30,
    height:30
})
var location = Ti.UI.createLabel({
	color:'#ffffff',
	font:{fontSize:16},
 	left:120,
 	width:140,
	top:60,
	height:30
})

popover.add(profilePic)
popover.add(twitterName);
popover.add(location);
Now all that is left is to tie these views and labels to the information that we received from Dribbble. Since we have held onto this information when we created the thumbs (within the player property), the best time to do this is when the user selects a thumb.
Within the touch start event listener function created earlier add the information for the popover title, profile picture, twitter name, and location.
thumb.addEventListener('touchstart', function(e)
{
    mainImage.image = e.source.largeImage;

    popover.title = e.source.player.name;
    profilePic.image = e.source.player.avatar_url;
    twitterName.text = e.source.player.twitter_screen_name;
    location.text = e.source.player.location;
});

Conclusion
And there you have it, a gallery that uses both specialized iPad UI elements showing off the great work of the Dribbble community. Hope you enjoyed this simple use of the Dribbble API and that you explore more sophisticated uses of it.
var myRequest = Ti.Network.createHTTPClient({
    onload: function(e) {
        	jsonObject = JSON.parse(this.responseText);
        	shots = jsonObject.shots;
        	loadThumbnails ();
	    },
    onerror: function(e) {
        alert(e.error);
    },
    timeout:5000
});
myRequest.open("GET", "http://api.dribbble.com/shots/popular");
myRequest.send();

var nav = Ti.UI.createWindow({
   backgroundColor:'#efeeea',
});
var content = Ti.UI.createWindow({
   backgroundColor:'#e2e1df',
});

var splitWin = Ti.UI.iPad.createSplitWindow({
    masterView:nav,
    detailView:content,
    showMasterInPortrait:true,
    });
splitWin.open();

var scroll = Ti.UI.createScrollView({
		contentHeight: 'auto',
	    showVerticalScrollIndicator:true,
    })
nav.add(scroll)


function loadThumbnails (){
	for (var i = 0; i < shots.length; i++) { // loops for each image
	    var thumb = Ti.UI.createImageView({	 // creates thumb
	    	image:shots[i].image_teaser_url, // sets image to smaller version of image
	    	largeImage:shots[i].image_url,
			player:shots[i].player,
	    	height:150, // sets height
	    	top:i*170, // positions from top
	     })
    thumb.addEventListener('touchstart', function(e)
	{
		mainImage.image = e.source.largeImage;

		popover.title = e.source.player.name;
		profilePic.image = e.source.player.avatar_url;
		twitterName.text = e.source.player.twitter_screen_name;
		location.text = e.source.player.location;

	});
	scroll.add(thumb)  // adds thumb to scrollview
	}
}

var mainImage = Ti.UI.createImageView({
 	width:400,
 	height:300,
 })
content.add(mainImage)
var popover = Ti.UI.iPad.createPopover({
	width:250, height:110,
});
mainImage.addEventListener('touchstart', function(e)
	{
		popover.show({view:mainImage});
	});
var profilePic = Ti.UI.createImageView({
	width:80,
	height:80,
	left:0
	})
var twitterName = Ti.UI.createLabel({
	width:140,
	left:120,
	color:'#ffffff',
    font:{fontSize:16},
    top:30,
    height:30
})
var location = Ti.UI.createLabel({
	color:'#ffffff',
	font:{fontSize:16},
 	left:120,
 	width:140,
	top:60,
	height:30
})
popover.add(profilePic)
popover.add(twitterName);
popover.add(location);

Comments