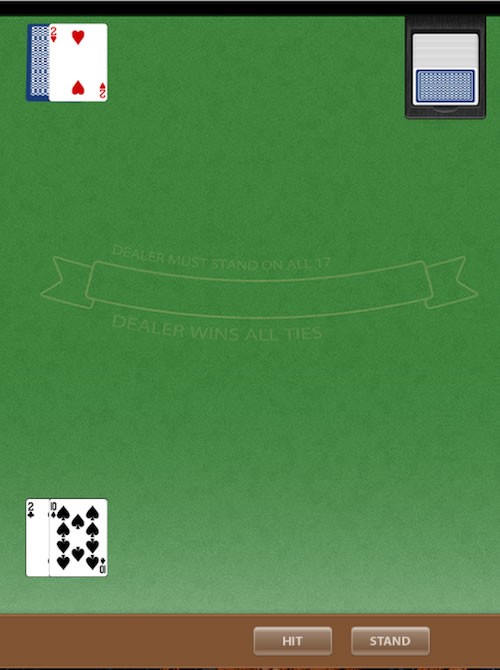
In this tutorial you'll create a blackjack game in SpriteKit using Swift 3. You'll learn about implementing touch, creating visual animations, and many other concepts that will come in handy when building a SpriteKit game.
1. Creating the Project and Importing Resources
Open up Xcode and choose Create a new Xcode project or choose New > Project... from the File menu. Make sure iOS is selected and choose the Game template.
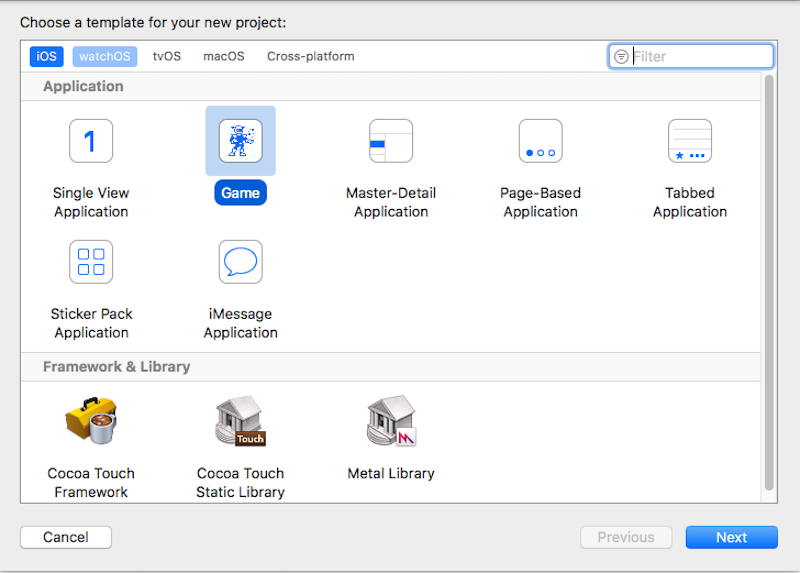
Next, choose whatever you wish for the Product Name, Organization Name, and Organization Identifier. Make sure that Language is set to Swift, Game Technology is set to SpriteKit, and Devices is set to iPad.

Specify a location to save the project files and click Create.
Importing the Helper Classes
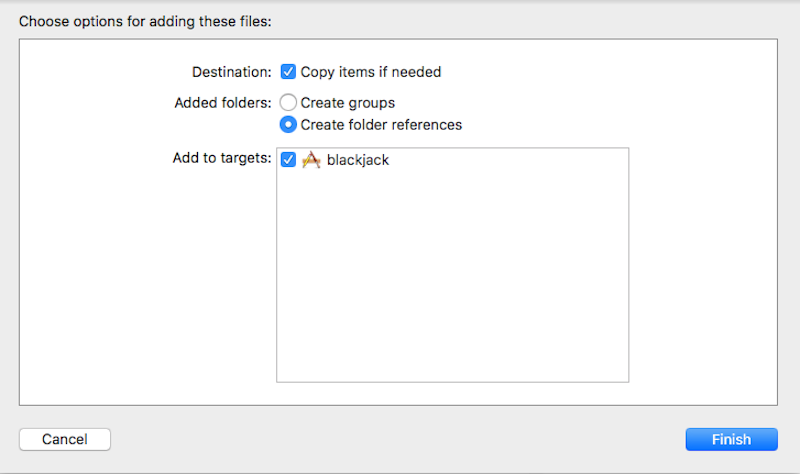
Download the GitHub repo for this project. Inside it you will see a classes folder. Open this folder and drag all the files onto the folder that has the name of whatever you named your project, for example, blackjack. Make sure Copy items if needed is checked as well as the main target in the list of targets.
Importing the Images
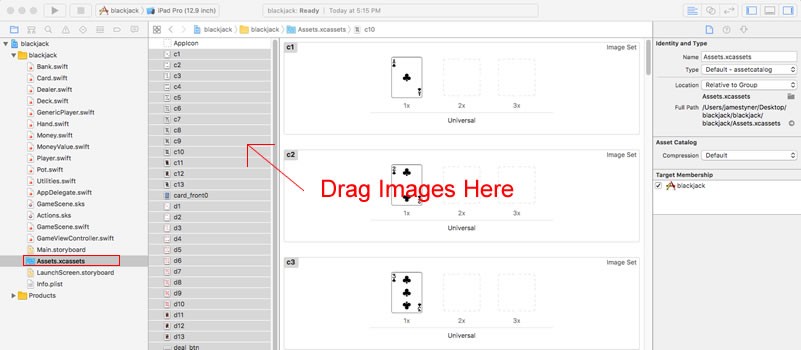
Also within the tutorial GitHub repo is a folder named tutorial images. Inside the project navigator, open Assets.xcassets and drag all the images into the sidebar. Xcode will automatically create texture atlases from these images.
2. Setting Up the Project
Within the project navigator there are two files you can delete (Gamescene.sks and Actions.sks). Delete these two files and select Move To Trash. These files are used by Xcode's built-in scene editor, which can be used to visually lay out your projects. We will be creating everything through code, though, so these files are not needed.
Open GameViewController.swift, delete its contents, and replace it with the following.
import UIKit
import SpriteKit

class GameViewController: UIViewController {

    override func viewDidLoad() {
        super.viewDidLoad()

        let scene = GameScene(size:CGSize(width: 768, height: 1024))
        let skView = self.view as! SKView
        skView.showsFPS = false
        skView.showsNodeCount = false
        skView.ignoresSiblingOrder = false
        scene.scaleMode = .aspectFill
        skView.presentScene(scene)
    }

    override var prefersStatusBarHidden: Bool {
        return true
    }
}
The GameViewController class inherits from UIViewController and will have an SKView as its view. Inside the viewDidLoad method, we downcast the view property to an SKView instance, using the as! type cast operator, and configure the view.
If you were to run this project when you created it fresh, you might notice text in the bottom right of the screen. That is what the showsFPS and showsNodeCount properties are for, showing the frames per second the game is running at and the number of SKNodes visible in the scene. We do not need this information, so we set them to false.
The ignoreSiblingOrder property is used to determine the drawing order of the SKNodes within the game. We set this to false here because we need our SKNodes to draw in the order they are added to the scene.
Lastly, we set the scale mode to .aspectFill, which will cause the scene's content to scale to fill the entire screen. We then invoke the presentScene(_:) method on the skView which presents or "shows" the scene.
Next, delete everything in GameScene.swift and replace it with the following.
import SpriteKit
import GameplayKit

class GameScene: SKScene {

    override func didMove(to view: SKView) {
    }

    override func touchesBegan(_ touches: Set<UITouch>, with event: UIEvent?) {
    }
}
You can now test the project, and you should be presented with a blank black screen. In the next step we will begin adding content to our scene.
3. Variables and Constants
Enter the following code at the start of the GameScene class right beneath where GameScene inherits from SKScene.
class GameScene: SKScene {
    let moneyContainer = SKSpriteNode(color: .clear, size: CGSize(width:250, height: 150))
    let dealBtn = SKSpriteNode(imageNamed: "deal_btn")
    let hitBtn = SKSpriteNode(imageNamed: "hit_btn")
    let standBtn = SKSpriteNode(imageNamed: "stand_btn")
    let money10 = Money(moneyValue: .ten)
    let money25 = Money(moneyValue: .twentyFive)
    let money50 = Money(moneyValue: .fifty)
    let instructionText = SKLabelNode(text: "Place your bet")
We are creating a number of SKSpriteNodes here. SKSpriteNodes are used to create a colored node, or more commonly from an SKTexture, which is most often an image. We use the convenience initializer init(color:size:) to create a clear colored node moneyContainer. The moneyContainer will be used to hold the money the player bets, and at the end of each round we will animate this moving toward whoever won the game. Placing all the money in this single node makes it easy to animate all the money at one time.
Next, we create the constants dealBtn, hitBtn, and standBtn. As the names suggest, these will be used in game to deal, hit, and stand respectively. We are using the convenience initializer init(imageNamed:), which takes as a parameter the name of the image without an extension.
We then create the three constants money10, money25, and money50, which are of the type Money. Money is a custom class that extends SKSpriteNode and depending on the type of moneyValue passed as a parameter creates one of three different money types. The moneyValue parameter is of type MoneyValue, which is an enum. Have a look at the Money class in the project GitHub repo to see how this all works.
Lastly we create an SKLabelNode using the convenience initializer init(text:) which takes as a parameter the text to be shown within the label.
4. Implementing setupTable
Add the following beneath the didMove(to:) function.
func setupTable(){
    let table = SKSpriteNode(imageNamed: "table")
    addChild(table)
    table.position = CGPoint(x: size.width/2, y: size.height/2)
    table.zPosition = -1
    addChild(moneyContainer)
    moneyContainer.anchorPoint = CGPoint(x:0, y:0)
    moneyContainer.position = CGPoint(x:size.width/2 - 125, y:size.height/2)
    instructionText.fontColor = UIColor.black
    addChild(instructionText)
    instructionText.position = CGPoint(x: size.width/2, y: 400)
}
Here we initialize a constant table and add it to the scene using addChild(_:) which takes as a parameter the node to add to the scene. We set the table's position within the scene and set its zPosition to -1. The zPosition property controls the order in which the nodes are drawn. The lowest number is drawn first, with higher numbers being drawn in order. Because we need the table below everything else, we set its zPosition to -1. This ensures that it is drawn before any other nodes.
We also add the moneyContainer and instructionText to the scene. We set the fontColor of the instructionText to black (the default is white).
Update didMove(to:) to the following.
override func didMove(to view: SKView) {
        setupTable()
}
The didMove(to:) method is called
immediately after the scene is presented by the view. Generally, this is
where you will do the setup for your scene and create your assets. If you test now, you should see that table and instructionText has been added to the scene. The moneyContainer is there as well but you cannot see it because we created it with a clear color.
5. Implementing setupMoney
Add the following beneath the setupTable method.
func setupMoney(){
        addChild(money10)
        money10.position = CGPoint(x: 75, y: 40)

        addChild(money25)
        money25.position = CGPoint(x:130, y:40)

        addChild(money50)
        money50.position = CGPoint(x: 185, y:40)
}
Here we simply add the money instances and set their position. Invoke this method within didMove(to:).
override func didMove(to view: SKView) {
    setupTable()
    setupMoney()
}
6. Implementing setupButtons
Add the following beneath the setupMoney method you created in the step above.
func setupButtons(){
    dealBtn.name = "dealBtn"
    addChild(dealBtn)
    dealBtn.position = CGPoint(x:300, y:40)

    hitBtn.name = "hitBtn"
    addChild(hitBtn)
    hitBtn.position = CGPoint(x:450, y:40)
    hitBtn.isHidden = true

    standBtn.name = "standBtn"
    addChild(standBtn)
    standBtn.position = CGPoint(x:600, y:40)
    standBtn.isHidden = true
}
As we did with the moneys in the previous step, we add the buttons and set their positions. Here we use the name property so that we will be able to identify each button through code. We also set the hitBtn and standBtn to be hidden, or invisible, by setting the isHidden property to true.
Now invoke this method within didMove(to:).
override func didMove(to view: SKView) {
    setupTable()
    setupMoney()
    setupButtons()
}
If you run the app now, you should see the money instances and buttons have been added to the scene.
7. Implementing touchesBegan
We need to implement the touchesBegan(_:with:) method to be able to tell when any objects in the scene have been touched. This method is called when one or more fingers have touched down on the screen. Add the following within touchesBegan.
override func touchesBegan(_ touches: Set<UITouch>, with event: UIEvent?) {
    guard let touch = touches.first else {
        return
    }

    let touchLocation = touch.location(in: self)
    let touchedNode = self.atPoint(touchLocation)

    if(touchedNode.name == "money"){
        let money = touchedNode as! Money
        bet(betAmount: money.getValue())
    }
}
The multiTouchEnabled property of the scene's view is set to false by default, which means the view only receives the first touch of a multitouch sequence. With this property disabled, you can retrieve the touch by using the first computed property of the touches set since there is only one object in the set.
We can get the touchLocation within the scene by the location property of the touch. We can then figure out which node was touched by invoking atPoint(_:) and passing in the touchLocation.
We check if the touchedNode's name property is equal to "money", and if it is we know they have touched on one of the three money instances. We initialize a money constant by downcasting the touchedNode to Money, and then we call the bet method invoking the getValue() method on the money constant.
8. Implementing bet
Enter the following beneath the setupButtons function you created in the step above.
func bet(betAmount: MoneyValue ){
    if(betAmount.rawValue > player1.bank.getBalance()){
        print("Trying to bet more than have");
        return
    }else{
        pot.addMoney(amount: betAmount.rawValue)
        let tempMoney = Money(moneyValue: betAmount)
        tempMoney.anchorPoint = CGPoint(x:0, y:0)
        moneyContainer.addChild(tempMoney)
        tempMoney.position = CGPoint(x:CGFloat(arc4random_uniform(UInt32(moneyContainer.size.width - tempMoney.size.width))), y:CGFloat(arc4random_uniform(UInt32(moneyContainer.size.height - tempMoney.size.height))))
         dealBtn.isHidden = false;
    }
}
We first make sure the player is not trying to bet more money than they have, and if they are we simply return from the function. Otherwise, we add the betAmount to the pot, create a constant tempMoney, set its anchorPoint to (0,0), and add it to the moneyContainer. We then set its position and hide the dealBtn by setting its isHidden property to false.
SKSpriteNodes have an anchorPoint property that defaults to (0.5,0.5). The coordinate system places (0,0) at the bottom left and (1,1) at the top right. You would change this property from its default if you were rotating the SKSpriteNode and wanted it to rotate around a different point. For example, if you changed the anchorPoint property to (0,0) then the SKSpriteNode would rotate from its bottom left corner. You'll often change this property to help with positioning, as we have here.
We need to create an instance of the Pot and Player classes for this code to work. Add the following along with the other constants and variables.
let pot = Pot()
let player1 = Player(hand: Hand(),bank: Bank())
If you test now you can press on any of the moneys and have it added to the moneyContainer.
9. Implementing deal
Add the following along with the rest of your constants and variables.
let dealer = Dealer(hand: Hand())
var allCards = [Card]()
let dealerCardsY = 930 // Y position of dealer cards
let playerCardsY = 200 // Y position of player cards
var currentPlayerType:GenericPlayer = Player(hand: Hand(),bank: Bank())
let deck = Deck()
The allCards array will be used to hold all the cards within the game. This will make it easy to loop through them and remove them from the scene all in one go. The dealerCardsY and playerCardsY constants are the positions of the cards on the y axis. This will help us when placing new cards. The currentPlayerType is used to indicate who to deal to next. It will either be equal to dealer or player1.
Inside didMove(to:), add the following.
override func didMove(to view: SKView) {
    setupTable()
    setupMoney()
    setupButtons()
    currentPlayerType = player1
}
In the previous code, we initialized currentPlayerType to an unnamed instance of the Player class. Here we set it to player1.
We need to create a new deck of cards before we implement the deal method. Enter the following within setupTable.
func setupTable(){
    let table = SKSpriteNode(imageNamed: "table")
    addChild(table)
    table.position = CGPoint(x: size.width/2, y: size.height/2)
    table.zPosition = -1
    addChild(moneyContainer)
    moneyContainer.anchorPoint = CGPoint(x:0, y:0)
    moneyContainer.position = CGPoint(x:size.width/2 - 125, y:size.height/2)
    instructionText.fontColor = UIColor.black
    addChild(instructionText)
    instructionText.position = CGPoint(x: size.width/2, y: 400)
    deck.new()
}
Now we can implement the deal function. Add the following beneath the bet method.
func deal() {
    instructionText.text = ""
    money10.isHidden = true;
    money25.isHidden = true;
    money50.isHidden = true;
    dealBtn.isHidden = true;
    standBtn.isHidden = false
    hitBtn.isHidden = false
    let tempCard = Card(suit: "card_front", value: 0)
    tempCard.position = CGPoint(x:630, y:980)
    addChild(tempCard)
    tempCard.zPosition = 100

    let newCard = deck.getTopCard()
    var whichPosition = playerCardsY
    var whichHand = player1.hand
    if(self.currentPlayerType is Player){
        whichHand = player1.hand
        whichPosition = playerCardsY;
    } else {
        whichHand = dealer.hand
        whichPosition = dealerCardsY;
    }

    whichHand.addCard(card: newCard)
    let xPos = 50 + (whichHand.getLength()*35)
    let moveCard = SKAction.move(to: CGPoint(x:xPos, y: whichPosition),duration: 1.0)
    tempCard.run(moveCard, completion: { [unowned self] in
    self.player1.setCanBet(canBet: true)
    if(self.currentPlayerType is Dealer && self.dealer.hand.getLength() == 1){
        self.dealer.setFirstCard(card: newCard)
        self.allCards.append(tempCard)
        tempCard.zPosition = 0
    } else {
        tempCard.removeFromParent()
        self.allCards.append(newCard)
        self.addChild(newCard)
        newCard.position = CGPoint( x: xPos, y: whichPosition)
        newCard.zPosition = 100
    }
    if(self.dealer.hand.getLength() < 2){
        if(self.currentPlayerType is Player){
            self.currentPlayerType = self.dealer
        }else{
            self.currentPlayerType = self.player1
        }
        self.deal()
    }else if (self.dealer.hand.getLength() == 2 && self.player1.hand.getLength() == 2) {
        if(self.player1.hand.getValue() == 21 || self.dealer.hand.getValue() == 21){
            self.doGameOver(hasBlackJack: true)
        } else {
            self.standBtn.isHidden = false;
            self.hitBtn.isHidden = false;
        }
    }

    if(self.dealer.hand.getLength() >= 3 && self.dealer.hand.getValue() < 17){
        self.deal();
    } else if(self.player1.isYeilding() && self.dealer.hand.getValue() >= 17){
        self.standBtn.isHidden = true
        self.hitBtn.isHidden = true
        self.doGameOver(hasBlackJack: false)
    }
    if(self.player1.hand.getValue() > 21){
        self.standBtn.isHidden = true;
        self.hitBtn.isHidden = true;
        self.doGameOver(hasBlackJack: false);
    }

    })
}
This method is quite large, but necessary to implement the dealing logic. Let's take it step by step. We initialize a tempCard constant to an instance of Card, set its position, and add it to the scene. We need this card drawn at a zPosition greater than 0, because the dealer's first card needs to be at 0. We set this to an arbitrary number—100 will do. We also create a newCard constant by invoking the deck's getTopCard() method.
Next, we initialize two variables, whichPosition and whichHand, and then run through some logic to determine their final values. We then add the newCard to the appropriate hand (either the player's or dealer's). The xPos constant determines the final x position of the card once it is finished animating.
The SKAction class has a number of class methods you can call to change a node's properties such as position, scale, and rotation. Here we call the move(to:duration:) method, which will move the node from one position to another. However, to actually execute the SKAction, you have to invoke the run(_:) method of a node and pass in the SKAction as a parameter. Here, however, we are invoking the run(_:completion:) method, which will cause the code within the completion closure to run after the action completes execution.
After the action has run to completion, we allow the player to bet by invoking setCanBet(canBet:) on the player1 instance. We then check if the currentPlayerType is an instance of Dealer, and check that the dealer only has one card by invoking hand.getLength(). If this is the case, we set the dealer's first card, which we will need at the end of the game.
Because the dealer's first card is always face down until the end of the game, we need a reference to the first card so we can show it later. We add this card to the allCards array so we can remove it later, and then set its zPosition property to 0 as we need this card below all the other cards. (Remember the other cards have z-position 100.)
If the currentPlayerType is not an instance of Dealer, and the length of the hand is not equal to 1, then we remove the tempCard and put the newCard in the same position, making sure to set its zPosition to 100.
According to the rules of blackjack, both the dealer and the player get two cards to start the game off with. Here we are checking what the currentPlayerType is and changing it to the opposite. Because the dealer has less than two cards, we invoke the deal function again. Otherwise, we check if both dealer and player1 have two cards, and if this is the case, we check to see if either has cards with a total value of 21—a winning hand. If either has 21 then the game is over because one of them has gotten blackjack. If neither has 21 then we show the standBtn and hitBtn and the game continues.
The rules of blackjack state that the dealer must stand at 17 or greater. The next few lines of code check if the dealer's hand value is less than 17 and if so invokes the deal method. If it is 17 or greater then the game is over. Lastly, if player1's hand value is greater than 21 then the game is over because they have busted.
This was a lot of logic to go through! If anything is unclear, just read it again and take your time to understand it.
Next, we need to implement the gameover method.
We need to be able to tell when the user has pressed on the deal button. Add the following code to the touchesBegan(_:with:) method.
override func touchesBegan(_ touches: Set<UITouch>, with event: UIEvent?) {
    guard let touch = touches.first else {
        return
    }

    let touchLocation = touch.location(in: self)
    let touchedNode = self.atPoint(touchLocation)

    if(touchedNode.name == "money"){
        let money = touchedNode as! Money
        bet(betAmount: money.getValue())
    }

    if(touchedNode.name == "dealBtn"){
        deal()
    }
}
10. Implementing doGameOver
Next, enter the following beneath the deal method you created in the step above.
func doGameOver(hasBlackJack: Bool){
    hitBtn.isHidden = true
    standBtn.isHidden = true
    let tempCardX = allCards[1].position.x
    let tempCardY = allCards[1].position.y
    let tempCard = dealer.getFirstCard()
    addChild(tempCard)
    allCards.append(tempCard)
    tempCard.position = CGPoint(x:tempCardX,y:tempCardY)
    tempCard.zPosition = 0
    var winner:GenericPlayer = player1

    if(hasBlackJack){
        if(player1.hand.getValue() > dealer.hand.getValue()){
            //Add to players Bank Here (pot value * 1.5)
            instructionText.text = "You Got BlackJack!";
            moveMoneyContainer(position: playerCardsY)
        }else{
            //Subtract from players bank here
            instructionText.text = "Dealer got BlackJack!";
            moveMoneyContainer(position: dealerCardsY)
        }
        return
    }

    if (player1.hand.getValue() > 21){
        instructionText.text = "You Busted!"
        //Subtract from players bank
        winner = dealer
    }else if (dealer.hand.getValue() > 21){
        //Add to players bank
        instructionText.text = "Dealer Busts. You Win!"
        winner = player1
    }else if (dealer.hand.getValue() > player1.hand.getValue()){
        //Subtract from players bank
        instructionText.text = "You Lose!"
        winner = dealer
    }else if (dealer.hand.getValue() == player1.hand.getValue()){
         //Subtract from players bank
        instructionText.text = "Tie - Dealer Wins!"
        winner = dealer
    }else if (dealer.hand.getValue() < player1.hand.getValue()){
        //Add to players bank
        instructionText.text="You Win!";
        winner = player1
    }

    if(winner is Player){
        moveMoneyContainer(position: playerCardsY)
    }else{
        moveMoneyContainer(position: dealerCardsY)
    }
}
We get the x and y position of the first card in the allCards array, which is the dealer's first card. Then we instantiate a constant tempCard by invoking getFirstCard on the dealer. Remember we set this Card earlier in the deal method? Here we add it to the scene, set its position using the tempCardX and tempCardY constants, and set its zPosition to 0 so it is beneath the other cards.
We need to know who won the game, so we initialize a variable winner setting it equal to player1, though this may change depending on if the dealer actually won the game.
We then run through some logic to determine who won the game. If hasBlackjack parameter was true then we figure out who won and return from the function. Otherwise, we continue through the logic to figure out who won the game. I am not going to go step by step through this logic as it should be clear to understand. No matter who won, we invoke moveMoneyContainer(position:), which takes as a parameter the position to move the money container to. This will be the y position of either the dealer's or player1's cards.
11. Implementing moveMoneyContainer
Enter the following code beneath the doGameOver method.
 func moveMoneyContainer(position: Int){
    let moveMoneyContainer = SKAction.moveTo(y: CGFloat(position), duration: 3.0)
    moneyContainer.run(moveMoneyContainer, completion: { [unowned self] in
            self.resetMoneyContainer()
    });
}
The moveMoneyContainer(position:) method moves the moneyContainer to whoever won the game, either the player or the dealer. When the SKAction completes, we invoke resetMoneyContainer.
12. Implementing resetMoneyContainer
The resetMoneyContainer method removes all the moneys by invoking the removeAllChildren() method, resets the moneyContainer to its original position, and invokes newGame.
func resetMoneyContainer(){
    moneyContainer.removeAllChildren()
    moneyContainer.position.y = size.height/2
    newGame()
}
13. Implementing newGame
Add the following beneath the resetMoneyContainer method you implemented in the step above.
func newGame(){
    currentPlayerType = player1
    deck.new()
    instructionText.text = "PLACE YOUR BET";
    money10.isHidden = false;
    money25.isHidden = false;
    money50.isHidden = false;
    dealBtn.isHidden = false
    player1.hand.reset()
    dealer.hand.reset()
    player1.setYielding(yields: false)

    for card in allCards{
        card.removeFromParent()
    }
    allCards.removeAll()
    }
Here we reset all the necessary variables and remove all the cards from the scene by looping through the allCards array and invoking removeFromParent() on each element.
14. Implementing the hitBtn and standBtn
All that is left to complete our game is to implement the touches on the hitBtn and standBtn. Enter the following within the touchesBegan(_:with:) method.
override func touchesBegan(_ touches: Set<UITouch>, with event: UIEvent?) {
    guard let touch = touches.first else {
        return
    }

    let touchLocation = touch.location(in: self)
    let touchedNode = self.atPoint(touchLocation)

    if(touchedNode.name == "money"){
        let money = touchedNode as! Money
        bet(betAmount: money.getValue())
    }

    if(touchedNode.name == "dealBtn"){
        deal()
    }

    if(touchedNode.name == "hitBtn"){
        hit()
    }

    if(touchedNode.name == "standBtn"){
        stand()
    }
}
And now we'll implement the methods called in the event handler. Enter the following two methods below the newGame method.
 func hit(){
    if(player1.getCanBet()){
        currentPlayerType = player1
        deal()
        player1.setCanBet(canBet: false)
    }
}

func stand(){
    player1.setYielding(yields: true)
    standBtn.isHidden = true
    hitBtn.isHidden = true
    if(dealer.hand.getValue() < 17){
        currentPlayerType = dealer
        deal();
    }else{
        doGameOver(hasBlackJack: false)
    }
}
Within the hit method, we make sure that player can bet, and if that is the case, we set the currentPlayerType to player1, and then invoke the deal method and stop the player betting further.
Within the stand method, we invoke setYielding on player1, passing in true. We then check if the dealer's hand value is less than 17, and if that is the case we call deal, and if the dealer's hand is 17 or greater it means the game is over.
You can now test the completed game.
Conclusion
This was a long tutorial with a good bit of logic tucked away in the deal method. We did not implement using the Pot and adding and subtracting money from the player's bank. Why don't you try doing that as an exercise to finish the app?
You now have a blackjack game to be proud of. Thank you for reading, and I hope you found this tutorial useful. While you're here, check out some of our other courses and tutorials about app programming with Swift and SpriteKit!



Comments