In this tutorial, we're going to be taking a look a the history of containerization, Docker, its components, and how to get started using it in our day to day work. But before we dive too deeply into the tutorial, let's take a look at what Docker is so that we gain an understand as to what it is with which we'll be working.
1. Introduction
Docker is an open platform for building, shipping and running distributed applications. It gives programmers, development teams and operations engineers the common toolbox they need to take advantage of the distributed and networked nature of modern applications.
As stated in the formal definition of Docker above, it helps developers or operation engineers with automation of the infrastructure environment that applications need.
Let's say that you have an application written in Node.js that uses Express for RESTful service and MongoDB for data persistence. Let's make it more complex and add multiple instances of Node.js and Nginx Load Balancer in front of the Node.js instances.
Wouldn't it be better if I write down the installation steps in a text file and let someone install the entire environment for me? Docker helps you the containerise all the components of the architecture (Node.js instance, Nginx Web Server, MongoDB database, etc.) very easily.
However, what is containerization anyway? Let's have a look at the history of containerization technology.
2. The History of Containerization
The first containerization project that I can remember is OpenVZ, which is a container-based virtualization for Linux first released in 2005. OpenVZ lets you create multiple isolated, secure Linux containers in order to run them on the same physical server without any conflict between applications.
At the same time, another project of FreeBSD came up, called Jails. This lets you put apps and services into one Jail (we can call this a container) by using chroot.
There were other projects like Solaris Containers, but why did Docker become popular even though all the containerization projects above are eight years older than Docker? Continue reading to level up your Docker knowledge.
3. How Does Docker Work?
Before explaining how Docker works, let me explain how containers work. A container is something related to Operating-System-Level Virtualization that allows us to create multiple isolated user spaces instead of just one. This isolation is made by using the chroot.
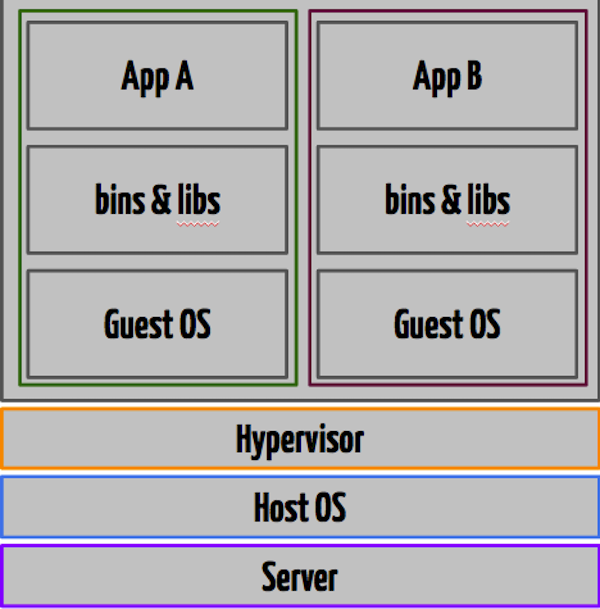
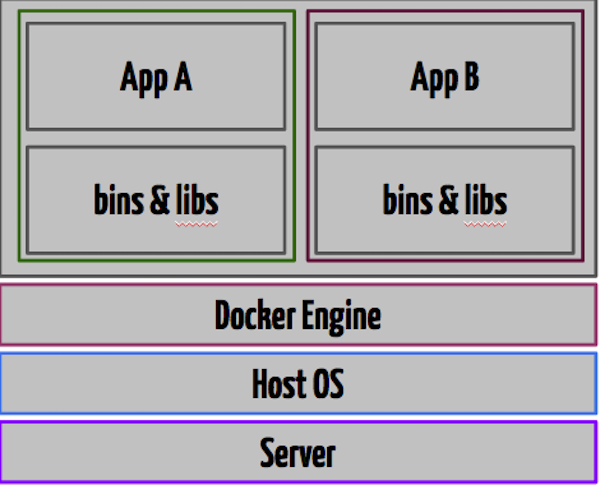
The main difference between Containers and VMs is as follows. When you create multiple virtual machines by using VM, the operating systems and virtualized hardwares are duplicated for each guest. However, if you create multiple containers, only the operating system distribution related folders are created from scratch, while the parts related to the Linux kernel are shared between containers. You can have a look at the image below to see the difference in a visual way.
Virtual Machine
Docker
As you can also see in the schema, if you create Ubuntu and Mint guests by using VM, their Guest OS will be duplicated even if they use same Linux kernel. Actually, distribution means differentiation of the bins and libs folders, and the Linux kernel is the same.
If you have a look at the second picture above, you will see that all the operating system level architecture is shared across containers, and only the bins and libs are created from scratch for different containers. Docker Engine has Namespaces, cgroups, and SELinux, and helps you with orchestrating containers. If you need extra information about Docker Engine, you can have a look at the Docker website.
4. Docker Components
Before proceeding with explaining the components, you can install Docker to your computer. It has pretty basic steps to install.
Docker has mainly two components: Docker Engine and Docker Hub. Docker Engine is for orchestrating containers, as I said above, and Docker Hub is a SaaS service for managing and sharing application stacks. For example, if you want to use Redis with Docker, you can pull it to your local machine by executing the following command:
docker pull redis
This will fetch the all the layers of the container image and will be ready to run on your environment. You can have a look at Docker Hub for lots of repositories.
Docker also has a special file system called AUFS (Advanced Multi Layered Unification File System). With this system, every single commit change is kept in layers, like version control. If you make a change to your Docker image, it will be kept as a different commit, and it will not be completely rebuilt on the build operation. All the other layers are built before.
Additionally, when you pull a repository to your local computer, you will see that the fetching operation is made layer by layer. Let's say that you have made a change and you test your new container, but it fails. No problem, you can roll back your changes and rebuild as you always do it in Git.
5. Quick Start
Assuming that Docker is already installed on your computer, we can get started with some pretty cool Docker commands.
docker pull ubuntu
docker run -it ubuntu bash
As you can guess, the above command will fetch the ubuntu image from Docker Hub and run it followed by the bash command.
You will see you're inside the container after executing the above command. You are now in Ubuntu shell and free to perform *nix commands. You can create something, delete something, see processes, etc.
However, be careful because whenever you exit the container, your data will be lost. Why? Because you need to design your containers as immutable.
First design which packages will be included, which applications will be cloned into the container, etc., and then run your container. Whenever you fail on something, you need to be able to change the configuration and run again. Never keep state in your containers.
5.1. Run
In order to run the container, you can use the following format.
docker run [OPTIONS] IMAGE[:TAG|@DIGEST] [COMMAND] [ARG...]
There are lots of parameters available in Docker for the run operation. You can refer to the documentation for all the options, but I will give you a couple of examples for real-life usage.
docker run -d redis
This command will run a Redis image in detached mode. This means that all the I/O will be done through network or shared connections. You can assume that it is running in daemon mode. We have said redis here, but you can specify the image author and tag also by using a command like the one below.
docker run -d huseyinbabal/mongodb:1.0
We are running a mongodb image that belongs to huseyinbabal with specific version 1.0.
You can also run your image interactively like this:
docker run -it huseyinbabal/ubuntu:1.2 bash
When you run the above command, it will run ubuntu 1.2 and then execute a bash command to put your prompt into terminal inside the container.
5.2. Build
We've run images that have been pulled from Docker Hub Repository. What about building our own image? We can do that by using the Docker build command, but we need to specify a Dockerfile to let Docker run every statement defined inside Dockerfile.
FROM ubuntu
MAINTAINER Huseyin BABAL

RUN apt-key adv --keyserver keyserver.ubuntu.com --recv 7F0CEB10
RUN echo "deb http://downloads-distro.mongodb.org/repo/ubuntu-upstart dist 10gen" | tee -a /etc/apt/sources.list.d/10gen.list
RUN apt-get update
RUN apt-get -y install apt-utils
RUN apt-get -y install mongodb-10gen

RUN echo "some configs" >> /etc/mongodb.conf

CMD ["/usr/bin/mongod", "--config", "/etc/mongodb.conf"]
This is a very simple Dockerfile definition that will help us build our image. In this Dockerfile definition, first of all we are saying that we will inherit all the properties from the ubuntu image. This image will be fetched first from your local server. If it cannot be found, will be fetched from Docker Hub.
On the second line, we are defining the author or maintainer of the image. In the following files, we are simply running some *nix commands with the RUN command in order to install essential packages and MongoDB-related packages. In order to start MongoDB, we are writing mongodb.conf, and in the final step we are running the command by using CMD.
In order to run our image, we should build the image by using this Dockerfile. You can use the following to build the image.
docker build -t huseyinbabal/mongodb:1.0 .
Simply, this will build an image with a tag huseyinbabal/mongodb:1.0 and will use Dockerfile in the current folder (see the dot at the end of the command). In order to test if it is created or not, you can use the following command.
docker images
This will list all the images that exist on your computer as below.

If you want to run a built image, you can simply run:
docker run -d huseyinbabal/mongodb:1.0
But, wait! This is daemon node. So, how can I enter this container? It is very simple. First, get the name of the mongodb containers name by using the following command.
docker ps
You will see an output like below.

You can see the name in the NAMES column. Now it is time to go into the container with the following command.
docker exec -i -t <container_name> bash
You can see the running processes inside this container.
5.3. Shared Folder
As I said before, if you close the running container, all the data related to that container will be lost. This is normal in Docker world.
For example, in our container, MongoDB writes all data in a path specified in mongodb.conf. This folder exists in the container, and if you close the container, all the data will be lost. If you persist the data in a folder which is shared to a host computer that Docker runs, you can use the -v option inside the run command. For example:
docker run -d -v /host/mongo_data_path:/container/mongo_data_path huseyinbabal/mongodb:1.0
This will map /host/mongo_db_path which is in your host machine to /container/mongo_data_path which is in the container. Whenever mongo writes data to the path inside the container, it will automatically be accessible inside the host machine. Even if you close the container, the data will stay in the path inside the host machine.
5.4. Port Exposing
Let say that MongoDB is running inside the container. You can expose the MongoDB port outside the container on port 27017, and you can use the following command to access from outside the container with port 5000.
docker run -d -P 5000:27017 -v /host/mongo_data_path:/container/mongo_data_path huseyinbabal/mongodb:1.0
So you can connect to MongoDB inside the container from outside by using port 5000.
5.5. Container Inspecting
Let say that you need the network information of the specified container. You can grab that detail by using the docker inspect <container_id> command. This command will print lots of metadata about the container. <container_id> is the part that exists in CONTAINER ID in the docker ps output. The output of the inspection will be in JSON format. In order to get the IP address of the container, you can use:
docker inspect --format '{{ .NetworkSettings.IPAddress }}' <container_id>
The above commands are the basic ones while you are doing Docker things. If you need to learn much about Docker commands please refer to the documentation.
6. Tips and Tricks
6.1. Container Single Responsibility
It is best practice to grant only one responsibility to each container. What I mean here is, you shouldn't install MongoDB and Spring Boot applications in one container to serve the DB and Application layers in one container. Instead of that, you can put one app in one container. Each application instance, database member, message queue, etc., should state only one container.
Let's say that you put the application and database layers in one container. It will be very hard to measure performance or diagnostics for the application or database. In the same way, if you want to scale your application, you will not be able to scale that container, because there is also a database application installed in that container.
6.2. Immutable Containers
When you run your container, never ssh into that container to update or delete something. The main reason for using Docker is to keep your changes in Dockerfile historically. If you want to change something, change Dockerfile, build the image, and run the container. Even if you change something inside the container manually, it will be deleted if that container is re-run.
6.3. Dockerfile Layers
Normally, you may want to write every command on separate lines like below.
FROM ubuntu
MAINTAINER Huseyin BABAL
RUN apt-get update
RUN apt-get install -y build-essential
RUN apt-get install -y php5
RUN apt-get install -y nginx
CMD ["nginx", "g", "daemon off;"]
EXPOSE 80
This means one layer for each line. It is not a suggested way to construct Dockerfile. You can separate your commands with a backslash (\) for each group of jobs, as below:
FROM ubuntu:15.04
MAINTAINER Huseyin BABAL

RUN apt-get update \
 -y build-essential
 -y php5 \
 -y nginx=1.7.9 \
 apt-get clean

CMD ["nginx", "g", "daemon off;"]
EXPOSE 80
In the above Dockerfile, we have planned to install the required packages on one line and performed a clean operation to make the environment clean. By doing this, we didn't create separate layers for each command.
6.4. Container Logs
Building and running a container is very easy stuff. After two months you may end up with 50 containers for your application architecture! It will be very hard to find the root cause of a problem if any error occurs in your containers.
The easy way to handle this is to log your container activities in a central log system. For example, redirect your stdout logs to a log file inside each container. And an agent can stream those log contents to a central log management system like ELK, or Splunk. If you send container-specific data inside logs, for example container id, it will be very easy to filter errors on the log management dashboard.
You may want to monitor the container itself. This time, you can have a look at Google cadvisor. This lets you monitor your container through a REST service. For example, in order to see container information, you can make a GET request to http://host_name/api/v1.0/containers/<absolute container name>.
6.5. Standardization
If you apply standard procedures to your container lifecycle, it will be very easy to control your overall architecture. For example, you can create a base container to inherit some operations inside other containers. On the other hand, you can use standard locations for config files, log files, and source files. Be careful about using a separate Dockerfile for each container. Finally, apply versioning to all of your containers to separate features and use different versions according to your needs.
6.6. Security
Security is a very important topic in the case of containers. Always run your containers in unprivileged mode. I suggest that you use Apparmor for protecting your container from external threads, even zero-day attacks. I also suggest SELinux for your containers to apply access control security policies according to your needs. Also, keep up with the updates of the images you use inside containers to apply the latest patches to the container. While doing this, do not forget to pin your image to a stable version.
7. Modulus
Modulus is a fully supported enterprise deployment and orchestration platform. They first started with a Node.js-focused PaaS on top of LXC, and then they decided to switch to Docker, and this let them support more languages different from Node.js, i.e. PHP, Java, Python, and Static projects.
What I mean by supporting languages here is that you are able to deploy your application written in the languages above to Modulus with a single command with predefined properties. Let say that you will a deploy Node.js application to Modulus, and the only thing you need to do is execute modulus deploy inside your project root folder. Modulus consists of the following components.
7.1. Modulus CLI
Modulus CLI is for the deployment operation for your application from the command line, and can be simply installed with npm install -g modulus. You can create projects, deploy projects, stream logs, and do some database-related operations with Modulus CLI. Alternatively, you can deploy your project by uploading though the admin panel.
7.2. Deployment
You can create and deploy your application with a couple of simple steps. You can select language, servo size, and location. Then get ready to deploy your project.
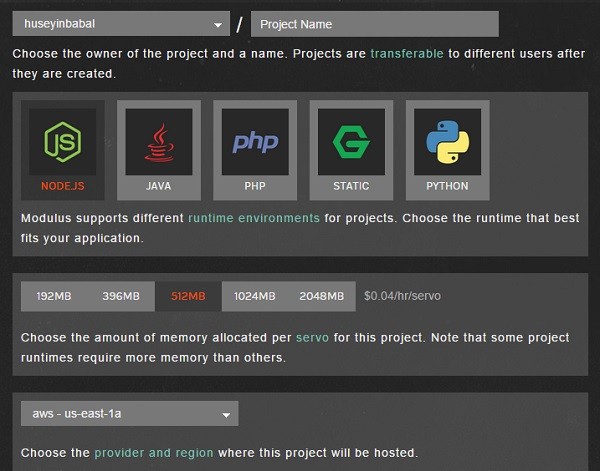
Alternatively, you can create a project on the command line with modulus project create <project_name> and then modulus deploy.
7.3. Database
You may want to store some data within your application. Modulus also lets you add a database to your application. MongoDB is used behind the scenes. You can go and create a database within the dashboard, and also you are able to create a database on the command line. You can see the database screen below.
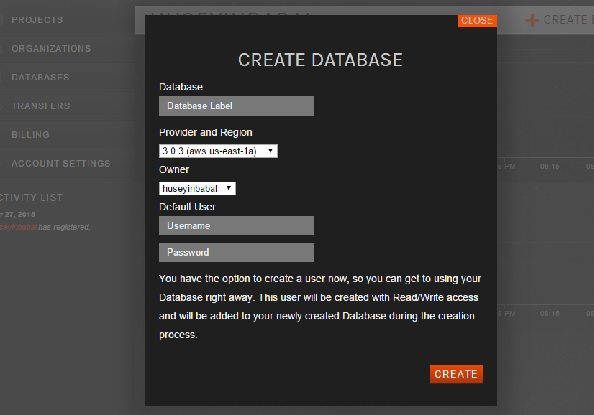
You can grab the database URL on the detail screen and use it in your applications.
7.4. Logs
You can tail application logs from the command line with modulus logs tail, or you can stream logs on the dashboard as below.
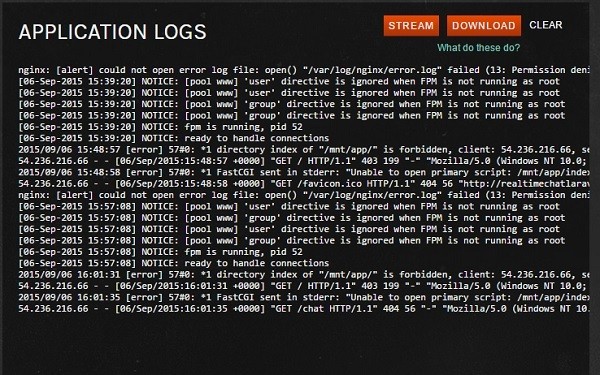
When you click the STREAM button, you can see the logs in real time.
Those are the main components of Modulus. You can have a look at other components like Metrics, Auto-Scaling, Addons, Notifications, and Administration on the Modulus Dashboard.
8. Conclusion
We have discussed containers and given a brief history. When compared to VMs, Docker has lots of alternatives to manage your application infrastructure.
If you are using Docker for your architecture, you need to be careful about some concepts, like Single Responsibility, Immutable Servers, Security, Application and Container Monitoring.
When your system gets bigger, it will be very easy to control. Modulus is one of the companies that uses Docker for its PaaS system. By using the power of Docker, Modulus has designed a great system to help people deploy their applications written in Node.js, PHP, Java and Python very easily.


Comments