WordPress custom taxonomies are a great way to organise your website's content, but what are they exactly? How can they be implemented effectively? More importantly though, how can they benefit your website? Fear not, what you're about to read in the following is the most comprehensive guide to WordPress custom taxonomies you'll find on the internet today.
Custom Taxonomy Basics
At its most basic level, a taxonomy is simply a method of grouping things together. If you've published a post in WordPress before, then chances are you've already used taxonomies. The standard tags and categories within WordPress are considered taxonomies! Now, let's talk more about custom taxonomies. WordPress has allowed you to create your own taxonomies since version 2.3, however, they've only really started becoming popular since around version 2.9.
A popular way of explaining custom taxonomies is to use the example of films. Let's pretend we're writing an article about the film "Terminator 2". What we'd typically do with the standard built-in taxonomies, is classify the article using tags and categories. The problem with the built in taxonomies, is that they're extremely generic.
We'll continue with this example and pretend we've entered "Arnold Schwarzenegger" as one of our tags. For those not familiar with the Austrian actor, this could be quite confusing. It's obviously a person's name, but is this person an actor? A director? A producer? A much better approach would be to create a custom taxonomy called "Actors" and add Arnold's name to that particular taxonomy. We could go even further, and add additional custom taxonomies for other typical film groupings such as genres, directors, producers and others.
Understanding Terms
One word you'd also do well to familiarise yourself with is "term". In WordPress, a term is a single classification that lives within and is defined by its taxonomy. In our previous example we had a taxonomy called "Actors", therefore our terms would be: Arnold Schwarzenegger, Linda Hamilton, Edward Furlong, etc.
How Can Custom Taxonomies Benefit My Website?
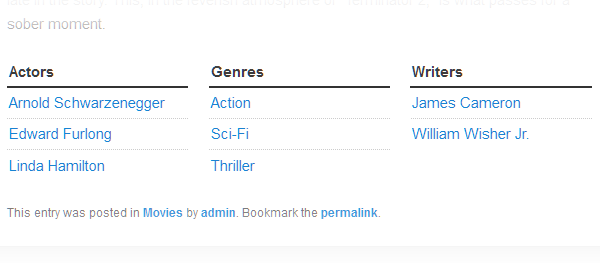
Custom taxonomies can significantly increase the organisation and usability of your website. Because of the flexibility that comes with custom taxonomies, they'll always be more specific to your topic of choice when compared to tags and categories. An obvious example is to include your taxonomies at the bottom or top of your article. In the example below I've created three custom taxonomies, and displayed the associated terms below the main content area of the article.

Cool right? That's not the only use though. You'll note in the example above, that the text appears to be hyperlinked, that's because it is. Custom taxonomies allow you to have archives for specific terms. This not only allows for better content organisation, but also allows users to subscribe to specific terms via RSS. Another lesser implemented use for custom taxonomies is to simply use them as a replacement for tags. I decided to take this exact approach for a gaming blog I recently launched. You don't always have to highlight the fact that you're using custom taxonomies, just remember, their real power lies within the potential for superior archiving, searching, querying and URL structure.
There are various other benefits to using custom taxonomies but rather than discussing theoretical use cases, let's instead look at some practical examples with code to back up it.
Writing Our First Custom Taxonomy
Now that we understand what taxonomies are and how to use them, we can begin to implement them into our themes. To start off with we'll first register our custom taxonomy. In this example, I'm creating a taxonomy called "Actors". If you're following along with this tutorial, you'll want to open up your theme's functions.php file and insert the following code.
$labels = array(
    'name'                          => __( 'Actors', 'your-themes-text-domain' ),
    'singular_name'                 => __( 'Actor', 'your-themes-text-domain' ),
    'search_items'                  => __( 'Search Actors', 'your-themes-text-domain' ),
    'popular_items'                 => __( 'Popular Actors', 'your-themes-text-domain' ),
    'all_items'                     => __( 'All Actors', 'your-themes-text-domain' ),
    'parent_item'                   => __( 'Parent Actor', 'your-themes-text-domain' ),
    'edit_item'                     => __( 'Edit Actor', 'your-themes-text-domain' ),
    'update_item'                   => __( 'Update Actor', 'your-themes-text-domain' ),
    'add_new_item'                  => __( 'Add New Actor', 'your-themes-text-domain' ),
    'new_item_name'                 => __( 'New Actor', 'your-themes-text-domain' ),
    'separate_items_with_commas'    => __( 'Separate Actors with commas', 'your-themes-text-domain' ),
    'add_or_remove_items'           => __( 'Add or remove Actors', 'your-themes-text-domain' ),
    'choose_from_most_used'         => __( 'Choose from most used Actors', 'your-themes-text-domain' )
);

$args = array(
    'labels'                        => $labels,
    'public'                        => true,
    'hierarchical'                  => false,
    'show_ui'                       => true,
    'show_in_nav_menus'             => true,
    'query_var'                     => true
);

register_taxonomy( 'actors', 'post', $args );
Don't be alarmed by the amount of code here, it's all quite simple when you break it down. The majority of the code is located in the $labels array. This array defines the content of certain labels within the WordPress dashboard. The $args array is where the real magic happens; this defines the settings for the taxonomy.
You'll note that for the "labels" argument we're passing in the label array we created earlier. Another argument worthy of mention is the "hierarchical" argument. This defines whether or not our taxonomies have the ability of nested taxonomies, or "child" taxonomies. In our example we won't require this particular functionality but take note of its existence as you might require a granular taxonomy system in future projects.
Explaining each argument is beyond the scope of this particular tutorial, but if you'd like to know more you can always study these arguments in detail on the official WordPress codex register_taxonomy page.
The last thing to take note here is the call to the register_taxonomy function. The first argument defines the name of the taxonomy (this is used internally within WordPress). The second argument defines which post type the taxonomy will be attached to. In our scenario, we're attaching it to standard WordPress posts. Alternatively, you can attach it to a custom post type or even several different post types by passing it an array of post types.
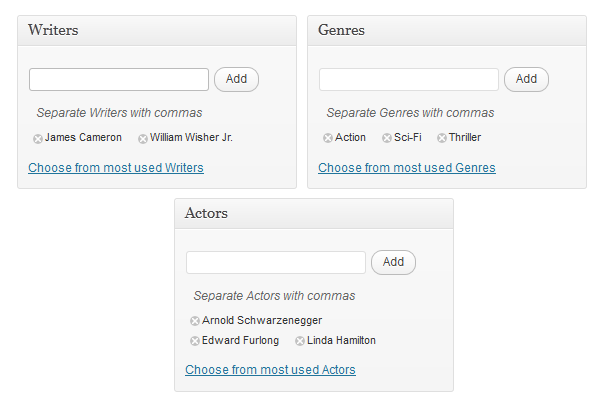
Now that we've successfully registered our custom taxonomy, you'll notice we now have an "Actors" meta box sitting in the right hand column of the WordPress post edit page. At this stage, adding terms into this meta box will save them into the database but will not display them on the front end of your theme. Let's implement the example presented before with the three taxonomy lists, located at the bottom of the post.
For this example you'll need to duplicate the code used to register the actors taxonomy twice and rename the labels to reflect our additional taxonomies, genres and writers. Here's what my functions.php file is looking like so far.
$labels = array(
    'name'                          => __( 'Actors', 'your-themes-text-domain' ),
    'singular_name'                 => __( 'Actor', 'your-themes-text-domain' ),
    'search_items'                  => __( 'Search Actors', 'your-themes-text-domain' ),
    'popular_items'                 => __( 'Popular Actors', 'your-themes-text-domain' ),
    'all_items'                     => __( 'All Actors', 'your-themes-text-domain' ),
    'parent_item'                   => __( 'Parent Actor', 'your-themes-text-domain' ),
    'edit_item'                     => __( 'Edit Actor', 'your-themes-text-domain' ),
    'update_item'                   => __( 'Update Actor', 'your-themes-text-domain' ),
    'add_new_item'                  => __( 'Add New Actor', 'your-themes-text-domain' ),
    'new_item_name'                 => __( 'New Actor', 'your-themes-text-domain' ),
    'separate_items_with_commas'    => __( 'Separate Actors with commas', 'your-themes-text-domain' ),
    'add_or_remove_items'           => __( 'Add or remove Actors', 'your-themes-text-domain' ),
    'choose_from_most_used'         => __( 'Choose from most used Actors', 'your-themes-text-domain' )
);

$args = array(
    'labels'                        => $labels,
    'public'                        => true,
    'hierarchical'                  => false,
    'show_ui'                       => true,
    'show_in_nav_menus'             => true,
    'query_var'                     => true
);

register_taxonomy( 'actors', 'post', $args );

$labels = array(
    'name'                          => __( 'Genres', 'your-themes-text-domain' ),
    'singular_name'                 => __( 'Genre', 'your-themes-text-domain' ),
    'search_items'                  => __( 'Search Genres', 'your-themes-text-domain' ),
    'popular_items'                 => __( 'Popular Genres', 'your-themes-text-domain' ),
    'all_items'                     => __( 'All Genres', 'your-themes-text-domain' ),
    'parent_item'                   => __( 'Parent Genre', 'your-themes-text-domain' ),
    'edit_item'                     => __( 'Edit Genre', 'your-themes-text-domain' ),
    'update_item'                   => __( 'Update Genre', 'your-themes-text-domain' ),
    'add_new_item'                  => __( 'Add New Genre', 'your-themes-text-domain' ),
    'new_item_name'                 => __( 'New Genre', 'your-themes-text-domain' ),
    'separate_items_with_commas'    => __( 'Separate Genres with commas', 'your-themes-text-domain' ),
    'add_or_remove_items'           => __( 'Add or remove Genres', 'your-themes-text-domain' ),
    'choose_from_most_used'         => __( 'Choose from most used Genres', 'your-themes-text-domain' )
);

$args = array(
    'labels'                        => $labels,
    'public'                        => true,
    'hierarchical'                  => false,
    'show_ui'                       => true,
    'show_in_nav_menus'             => true,
    'query_var'                     => true
);

register_taxonomy( 'genres', 'post', $args );

$labels = array(
    'name'                          => __( 'Writers', 'your-themes-text-domain' ),
    'singular_name'                 => __( 'Writer', 'your-themes-text-domain' ),
    'search_items'                  => __( 'Search Writers', 'your-themes-text-domain' ),
    'popular_items'                 => __( 'Popular Writers', 'your-themes-text-domain' ),
    'all_items'                     => __( 'All Writers', 'your-themes-text-domain' ),
    'parent_item'                   => __( 'Parent Writer', 'your-themes-text-domain' ),
    'edit_item'                     => __( 'Edit Writer', 'your-themes-text-domain' ),
    'update_item'                   => __( 'Update Writer', 'your-themes-text-domain' ),
    'add_new_item'                  => __( 'Add New Writer', 'your-themes-text-domain' ),
    'new_item_name'                 => __( 'New Writer', 'your-themes-text-domain' ),
    'separate_items_with_commas'    => __( 'Separate Writers with commas', 'your-themes-text-domain' ),
    'add_or_remove_items'           => __( 'Add or remove Writers', 'your-themes-text-domain' ),
    'choose_from_most_used'         => __( 'Choose from most used Writers', 'your-themes-text-domain' )
);

$args = array(
    'labels'                        => $labels,
    'public'                        => true,
    'hierarchical'                  => false,
    'show_ui'                       => true,
    'show_in_nav_menus'             => true,
    'query_var'                     => true
);

register_taxonomy( 'writers', 'post', $args );
Now that we've registered our three taxonomies, we're ready to start displaying our newly created taxonomies and terms within our theme. Just make sure to edit an existing post to add some dummy terms into the new taxonomy meta boxes.

Insert the following code at the bottom of your functions.php file.
function display_post_taxonomies( $content ) {

	if( is_single() ) {

		$args = array( 'public' => true, '_builtin' => false );

		$output = 'objects';

		$operator = 'and';

		$taxonomies = get_taxonomies( $args, $output, $operator );

		if( $taxonomies ) {

			$content .= '<div class="taxonomy_container">';

			foreach( $taxonomies as $taxonomy ) {

				$args = array(
								'orderby'				=> 'name',
								'echo'					=> false,
								'taxonomy'				=> $taxonomy->name,
								'title_li'				=> '<span class="taxonomy_title">' . __( $taxonomy->labels->name, 'your-themes-text-domain' ) . '</span>',
								'show_option_none'		=> __( 'No ' . $taxonomy->labels->name, 'your-themes-text-domain' )
							);

				$content .= '<ul>' . wp_list_categories( $args ) . '</ul>';

			}

			$content .= '</div>';

		}

	}

	return $content;

}

add_filter( 'the_content', 'display_post_taxonomies' );
In a nutshell, we're filtering the post's content to add our custom taxonomy section at the bottom of the post. Using a filter instead of a template tag means that we avoid editing specific template files. Not only is this easier, but it also allows us to use this code in multiple themes in a more flexible manner.
You'll also notice that this function is extremely generic; we're not at all referencing the taxonomies we created earlier. The above code only grabs custom taxonomies, calling the get_taxonomies function with the args array index "built_in" set to false ensures that we're not including any bundled WordPress taxonomies.
We then loop through our taxonomies and start adding additional HTML elements for formatting purposes. Within our loop we're also making use of the wp_list_categories function. This function prepares an unordered list of terms for a given taxonomy. Not only does it handle the preparation of the HTML structure it also automatically links each individual term to its respective archive page.
Now, if you load up your post you'll notice you have a set of three unordered lists, each displaying a taxonomy heading with the associated terms underneath. The problem is, there's no styling just yet. Add the following code to your themes style.css file to spruce it up a little.
.taxonomy_container {
	overflow: hidden;
	display: block;
	clear: both;
	margin-bottom: 20px;
}

.taxonomy_container ul {
	margin: 0px;
	padding: 0px;
	list-style-type: none;
}

.taxonomy_container > ul {
	width: 31%;
	float: left;
	margin-right: 3.5%;
}

.taxonomy_container > ul:last-child {
	margin-right: 0%;
}

.taxonomy_title {
	padding-left: 2px;
	padding-bottom: 2px;
	border-bottom: 2px solid #333;
	display: block;
	margin-bottom: 2px;
	font-weight: bold;
}

.taxonomy_container > ul li ul li {
	padding-left: 2px;
	padding-bottom: 3px;
	border-bottom: 1px dotted #ccc;
	margin-bottom: 3px;
}

.taxonomy_container > ul li ul li:last-child {
	border-bottom: 0px;
}
Conclusion
There you have it folks; part one of our guide to taking WordPress custom taxonomies to the next level. Today, we've had a look at what custom taxonomies are, what they're good at and how to implement them effectively in your theme. In the next article we'll be looking at customizing your taxonomy and term archive templates.


Comments