In Part 1 and Part 2 of our custom meta box template tutorial series, we learned how to create a field array to loop through and create a custom meta box with your standard fields. Now let's throw in a bit of JavaScript for some fancy, but highly useful fields.
Date Picker
Each of the fields we're covering in this tutorial will require jQuery and the jQuery UI. Thankfully, WordPress makes it super easy to use these with wp_enqueue_script, and as of 3.3, all of the jQuery UI interactions and widgets are bundled with WordPress.
Since we're working on a page that already enqueues jQuery, we can skip that, but we will need to get the jQuery UI Datepicker. We'll also need to create our own stylesheet since the necessary CSS doesn't come bundled in WordPress yet—although, they are working that out.
if(is_admin()) {
	wp_enqueue_script('jquery-ui-datepicker');
	wp_enqueue_style('jquery-ui-custom', get_template_directory_uri().'/css/jquery-ui-custom.css');
}
We only need to load these in the admin, and not on the front end of the site, so wrap the functions in a conditional. The first function calls the datepicker and will also load the jQuery UI Core. The second function will call our jquery-ui-custom.css stylesheet from the theme's css folder. The example stylesheet included in the download at the beginning of this tutorial doesn't require images. You can also create your own jQuery UI theme.
Now let's look at the array item we need to add to our $custom_meta_fields array we started in Part 1.
array(
	'label'	=> 'Date',
	'desc'	=> 'A description for the field.',
	'id'	=> $prefix.'date',
	'type'	=> 'date'
)
This array is almost identical to our text item. It has a main label, a description, a unique id, and the date type is defined. We're just going to go with a basic implementation of the date picker in our example here, but if you need to spice up your usage of the date picker, you could also add other information to the array such as the preferred format, localization, and date range to name a few. Then you could use that information in the following script caller we need to add to the head of the page:
add_action('admin_head','add_custom_scripts');
function add_custom_scripts() {
global $custom_meta_fields, $post;
$output = '<script type="text/javascript">
jQuery(function() {';
foreach ($custom_meta_fields as $field) { // loop through the fields looking for certain types
if($field['type'] == 'date')
$output .= 'jQuery(".datepicker").datepicker();';
}
$output .= '});
</script>';
echo $output;
}
This bit needs to be added outside of the $custom_meta_fields array and outside of the show_custom_meta_box callback function to initialize the date picker on all fields with the class of "datepicker".
// date
case 'date':
	echo '<input type="text" class="datepicker" name="'.$field['id'].'" id="'.$field['id'].'" value="'.$meta.'" size="30" />
			<br /><span class="description">'.$field['desc'].'</span>';
break;
This code will be added after the last “break;” in our meta box switch.
- A basic text input
- Add the class "datepicker" for the jQuery function to find
- Optionally change the type to "date" to be HTML5 ready
Slider
Sometimes you need to collect a number that is set at an exact range or needs to be multiples of 5. The jQuery UI slider is great for this because it makes it easy to drag and slide to the number that you want to enter.
wp_enqueue_script('jquery-ui-slider');
Make sure to call the js file by adding this to your is_admin() wrapped enqueues.
array(
	'label'	=> 'Slider',
	'desc'	=> 'A description for the field.',
	'id'	=> $prefix.'slider',
	'type'	=> 'slider',
	'min'	=> '0',
	'max'	=> '100',
	'step'	=> '5'
)
Again, we’re adding this to our $custom_meta_fields array and there are a few special additions.
- 'min' will be sued to set the minimum number allowed.
- 'max' is for the maximum number allowed
- 'step' is for setting what step interval to use.
if ($field['type'] == 'slider') {
	$value = get_post_meta($post->ID, $field['id'], true);
	if ($value == '') $value = $field['min'];
	$output .= '
			jQuery( "#'.$field['id'].'-slider" ).slider({
				value: '.$value.',
				min: '.$field['min'].',
				max: '.$field['max'].',
				step: '.$field['step'].',
				slide: function( event, ui ) {
					jQuery( "#'.$field['id'].'" ).val( ui.value );
				}
			});';
}
Add this bit of code to the loop in the add_custom_scripts function we created in the last field type. This will add the custom jQuery we need for setting up the slider.
- Get the value saved in the post meta
- If the value is empty (because it's a new post), set the value to the minimum
- Add the jQuery code to the output of the function using the values we set in the array.
- The last bit will tell the value set by the slider to be saved in the input field
// slider
case 'slider':
$value = $meta != '' ? $meta : '0';
	echo '<div id="'.$field['id'].'-slider"></div>
			<input type="text" name="'.$field['id'].'" id="'.$field['id'].'" value="'.$value.'" size="5" />
			<br /><span class="description">'.$field['desc'].'</span>';
break;
Again, we're just using a text field to receive the slider's value.
- Include a div with the same id set int he jQuery for the slider to be created with
- The input could be set to hidden if you customize your slider to display the number differently.
Image
Since the introduction of Post Thumbnails, setting an image with a custom meta field isn't something we do a lot, but every once in awhile there comes a time when you need to set an image other than the post thumbnail, especially when building a plugin that takes into account that the user's theme might not support post thumbnails.
This field will add the ability to upload an image or select one from the media upload, display a preview of the image, and save the ID for maximum usage options.
Upload Button JavaScript
To get our button to trigger the media uploader, we'll need to tie into it with a bit of javascript.
jQuery(function(jQuery) {

	jQuery('.custom_upload_image_button').click(function() {
		formfield = jQuery(this).siblings('.custom_upload_image');
		preview = jQuery(this).siblings('.custom_preview_image');
		tb_show('', 'media-upload.php?type=image&TB_iframe=true');
		window.send_to_editor = function(html) {
			imgurl = jQuery('img',html).attr('src');
			classes = jQuery('img', html).attr('class');
			id = classes.replace(/(.*?)wp-image-/, '');
			formfield.val(id);
			preview.attr('src', imgurl);
			tb_remove();
		}
		return false;
	});

	jQuery('.custom_clear_image_button').click(function() {
		var defaultImage = jQuery(this).parent().siblings('.custom_default_image').text();
		jQuery(this).parent().siblings('.custom_upload_image').val('');
		jQuery(this).parent().siblings('.custom_preview_image').attr('src', defaultImage);
		return false;
	});

});
Put these in a custom js file and enqueue it within your is_admin() wrapped enqueues.
wp_enqueue_script('custom-js', get_template_directory_uri().'/js/custom-js.js');
The first function finds the button we're going to create soon with the class of "custom_upload_image_button'" and preforms a few different things on click.
- Find the field where we'll be saving the data and set it as "formfield"
- Find the default image that will display the image preview and set it as "preview"
- Tell thickbox to open the media uploader where you'll select your image with an upload or from the media uploader
- Collect the image's url and set it as "imgurl"
- Get the image's id by stripping it from the image's class and set it as "id"
- Send the "id" to the value of "formfield"
- Send the "imgurl" to the src of "preview"
- Close the thickbox
The second function tells the link we'll class as "custom_clear_image_button" to clear both the value of the form field and reset the preview to our default image.
Create the Field
array(
	'name'	=> 'Image',
	'desc'	=> 'A description for the field.',
	'id'	=> $prefix.'image',
	'type'	=> 'image'
)
We just need the basic information for this field.
// image
case 'image':
	$image = get_template_directory_uri().'/images/image.png';
	echo '<span class="custom_default_image" style="display:none">'.$image.'</span>';
	if ($meta) { $image = wp_get_attachment_image_src($meta, 'medium');	$image = $image[0]; }
	echo	'<input name="'.$field['id'].'" type="hidden" class="custom_upload_image" value="'.$meta.'" />
				<img src="'.$image.'" class="custom_preview_image" alt="" /><br />
					<input class="custom_upload_image_button button" type="button" value="Choose Image" />
					<small> <a href="#" class="custom_clear_image_button">Remove Image</a></small>
					<br clear="all" /><span class="description">'.$field['desc'].'</span>';
break;
We have a few things going on here, but with the way we've written the javascript, this should work pretty well no matter how many image fields you add.
- Set the path for the default image and save it in a hidden span to use with the remove link
- If there's already a saved image, ovveride it with the medium size of the saved image
- Add a hidden field to save the image ID
- Add the preview image
- Add the Upload button and the Remove link
Repeatable Fields
When you really get into using custom meta fields to store various types of data for a post, you'll eventually run into the need of having multiple instances of the same field. Using a bit of javascript, you can easily duplicate a field as many times as you need it, and even sort them with drag and drop. There are a lot of ways we can use this functionality, but for our example we're just going to use a basic text input.
Add/Remove and Sortable JavaScript
jQuery('.repeatable-add').click(function() {
	field = jQuery(this).closest('td').find('.custom_repeatable li:last').clone(true);
	fieldLocation = jQuery(this).closest('td').find('.custom_repeatable li:last');
	jQuery('input', field).val('').attr('name', function(index, name) {
		return name.replace(/(\d+)/, function(fullMatch, n) {
			return Number(n) + 1;
		});
	})
	field.insertAfter(fieldLocation, jQuery(this).closest('td'))
	return false;
});

jQuery('.repeatable-remove').click(function(){
	jQuery(this).parent().remove();
	return false;
});

jQuery('.custom_repeatable').sortable({
	opacity: 0.6,
	revert: true,
	cursor: 'move',
	handle: '.sort'
});
You can add this javascript to the custom js you've already created in the last step.
The first function looks for the add button and adds a new blank field row to the end of the list of fields. This is set up generically so that you can have as many of these repeatable fields as you need.
- "field" is a cloned version of the last field row
- "fieldLocation" reminds the script where the end of the list is
- Find the input within "field" and rest it's value to empty and add 1 to the numerical integer we'll use to save the data as an array
- Add the field after the fieldLocation
The next function gives each remove button the ability to remove that row when it is clicked.
Finally, we set the lists to be sortable and define a handle so that you can drag and drop the rows. There's no need to enqueue the jQuery UI sortable interaction because it is already being used on the edit post page.
Create the Field
array(
	'label'	=> 'Repeatable',
	'desc'	=> 'A description for the field.',
	'id'	=> $prefix.'repeatable',
	'type'	=> 'repeatable'
)
There isn't anything special about this field in the array for our example. However, you could get pretty crazy here and add options for what kind of fields are used in the repeatable list.
// repeatable
case 'repeatable':
	echo '<a class="repeatable-add button" href="#">+</a>
			<ul id="'.$field['id'].'-repeatable" class="custom_repeatable">';
	$i = 0;
	if ($meta) {
		foreach($meta as $row) {
			echo '<li><span class="sort hndle">|||</span>
						<input type="text" name="'.$field['id'].'['.$i.']" id="'.$field['id'].'" value="'.$row.'" size="30" />
						<a class="repeatable-remove button" href="#">-</a></li>';
			$i++;
		}
	} else {
		echo '<li><span class="sort hndle">|||</span>
					<input type="text" name="'.$field['id'].'['.$i.']" id="'.$field['id'].'" value="" size="30" />
					<a class="repeatable-remove button" href="#">-</a></li>';
	}
	echo '</ul>
		<span class="description">'.$field['desc'].'</span>';
break;
This field requires a loop if there is a meta value saved, and no loop if there isn't.
- The add button can be placed anywhere outside of the
<ul>. - Begin the unordered list with the class we set up in the javascript to target the elements within.
- If there's a meta value saved, loop through each value and output it with an input field and a remove button for that list item.
- Use the
$iinteger to make sure a new number is added to the name array. - If there's no meta value, just output one empty field
- This is a rough handle for sorting, but it gets the job done for our example
Conclusion
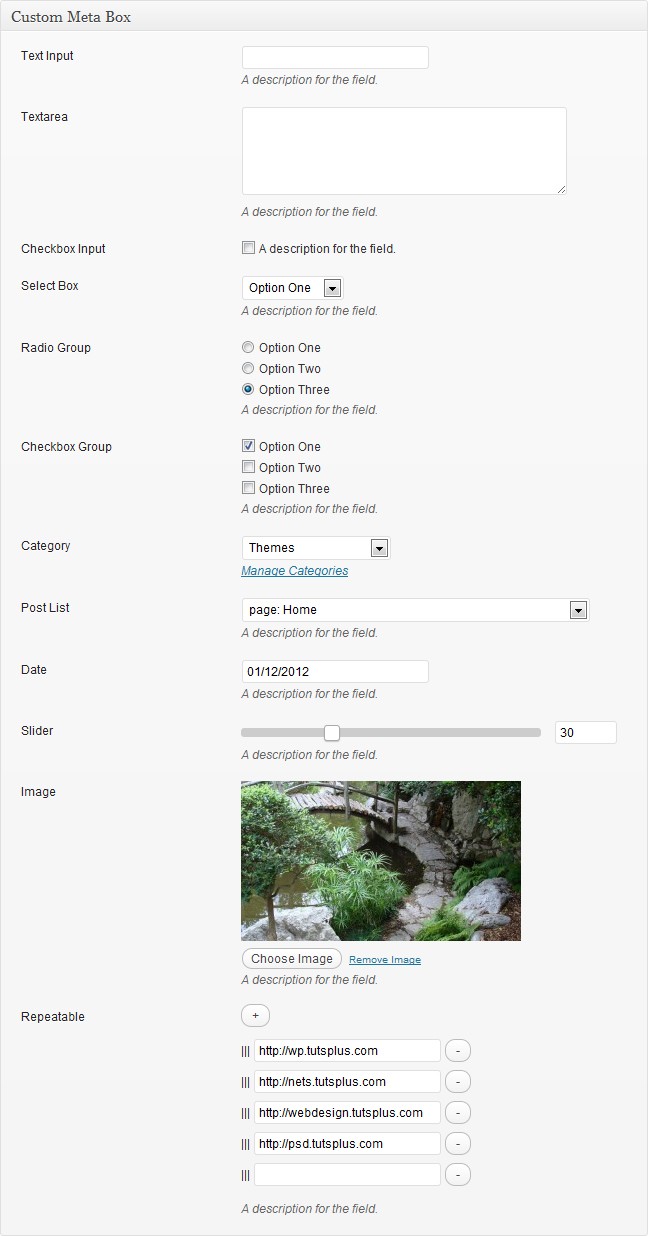
If you’ve been following along with all three parts of this series so far, your final box should look like the one pictured here:
We've really only scratched the surface of what can be done with this method of building a reusable custom meta box template. The more you add to your template, the easier it is to drop it into whatever project you're working on to make the time you spend coding faster and to streamline the process with clean, consistent code.

Comments