If you're asking, "What's Yii?", check out Introduction to the Yii Framework, which reviews the benefits of Yii and includes an overview of Yii 2.0, released in October 2014.
In this Programming With Yii2 series, I'm guiding readers in use of the Yii2 Framework for PHP. In this tutorial, we'll explore the implementation of interactive pages using Ajax. Specifically, I'm going to highlight the use of Ajax in two areas of the Meeting Planner application, which I'm writing the Building Your Startup series about in parallel.
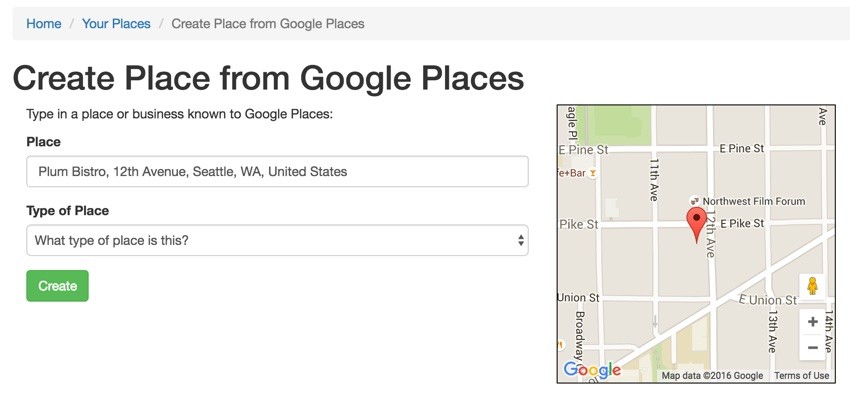
First, we'll review how we load a Google Map on the page in response to the user entering a specific place. As shown below, after I enter Plum Bistro and click return, the map to the right loads dynamically without a page refresh.
Second, I'll show you how we record the changes a user makes to a meeting during the planning phase. Meeting Planner makes it easy for participants to identify their preferred places and date times and then ultimately choose the final one.
Ajax makes the process much easier and faster, allowing people to slide a number of switch controls to indicate their preferences without any page refresh.
Just a reminder, I do participate in the comment threads below. I'm especially interested if you have different approaches, additional ideas or want to suggest topics for future tutorials. If you have a question or topic suggestion, please post below. You can also reach me on Twitter @reifman directly.
Using Ajax With Yii
If you're just beginning with Ajax and want to start slow, the Yii Playground has two simple examples of Ajax that may be helpful for you to review. One changes text on a page via Ajax, and another loads the response to a form on the same page, both without refreshing, and each includes detailed code samples.
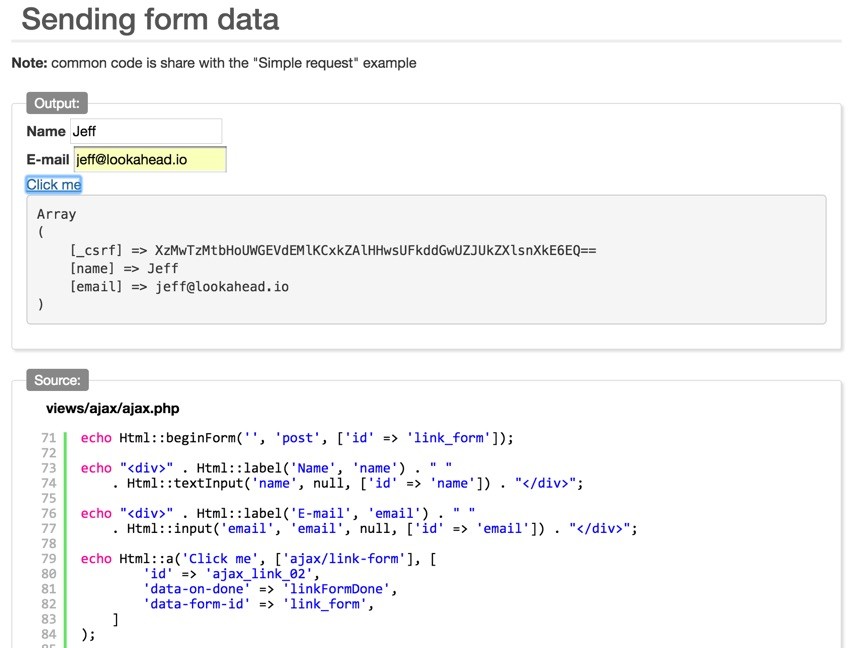
Let's dive into our two primary examples. You can find all of the source for these examples in the Meeting Planner code repository at GitHub.
Interactively Displaying Google Maps
Building the Input Form
When the Create a Place form (/frontend/views/place/create_place_google.php) initially loads, it includes the Google Places live search widget:
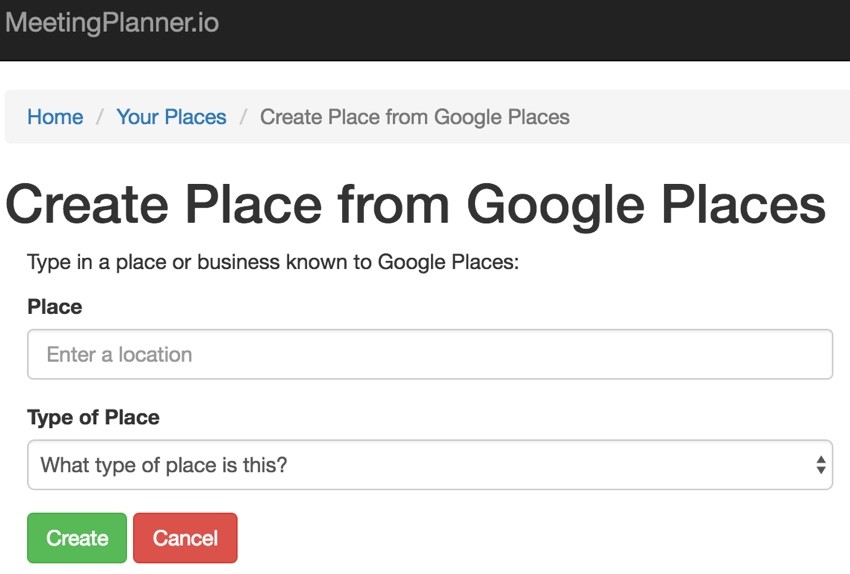
Integrating the Google Places JavaScript API
The form loads the Google Maps JavaScript library and connects it to the place-searchbox input field:
$gpJsLink= 'https://maps.googleapis.com/maps/api/js?' . http_build_query(array(
                          'key' => Yii::$app->params['google_maps_key'],
                          'libraries' => 'places',
                  ));
  echo $this->registerJsFile($gpJsLink);

  $options = '{"types":["establishment"],"componentRestrictions":{"country":"us"}}';
  echo $this->registerJs("(function(){
        var input = document.getElementById('place-searchbox');
        var options = $options;
        searchbox = new google.maps.places.Autocomplete(input, options);
        setupListeners('place');
})();" , \yii\web\View::POS_END );
The _formPlaceGoogle.php partial form includes some hidden fields in which the results from the map can be stored before the entire page is submitted, as well as a hidden div to display the map via Ajax.
use frontend\assets\MapAsset;
MapAsset::register($this);
...
    <?= BaseHtml::activeHiddenInput($model, 'name'); ?>
    <?= BaseHtml::activeHiddenInput($model, 'google_place_id'); ?>
    <?= BaseHtml::activeHiddenInput($model, 'location'); ?>
    <?= BaseHtml::activeHiddenInput($model, 'website'); ?>
    <?= BaseHtml::activeHiddenInput($model, 'vicinity'); ?>
    <?= BaseHtml::activeHiddenInput($model, 'full_address'); ?>
...
<div class="col-md-6">
  <article></article>
</div> <!-- end col2 -->
The Meeting Planner Place table stores the Google name, place_id, location, website, vicinity and full_address for usage throughout the application.
The MapAsset included above loads our create_place.js file which operates between Google and our form; it basically manages the transmit and response of data via Ajax.
Our Ajax Managing JavaScript
I'll guide you through create_place.js in pieces. First, there's setupListeners(), called by the parent form:
function setupListeners(model) {
    // searchbox is the var for the google places object created on the page
    google.maps.event.addListener(searchbox, 'place_changed', function() {
      var place = searchbox.getPlace();
      if (!place.geometry) {
        // Inform the user that a place was not found and return.
        return;
      }  else {
        // migrates JSON data from Google to hidden form fields
        populateResult(place,model);
      }
    });
    var place_input = document.getElementById(model+'-searchbox');
    google.maps.event.addDomListener(place_input, 'keydown', function(e) {
        if (e.keyCode == 13) {
            e.preventDefault();
        }
      });
}
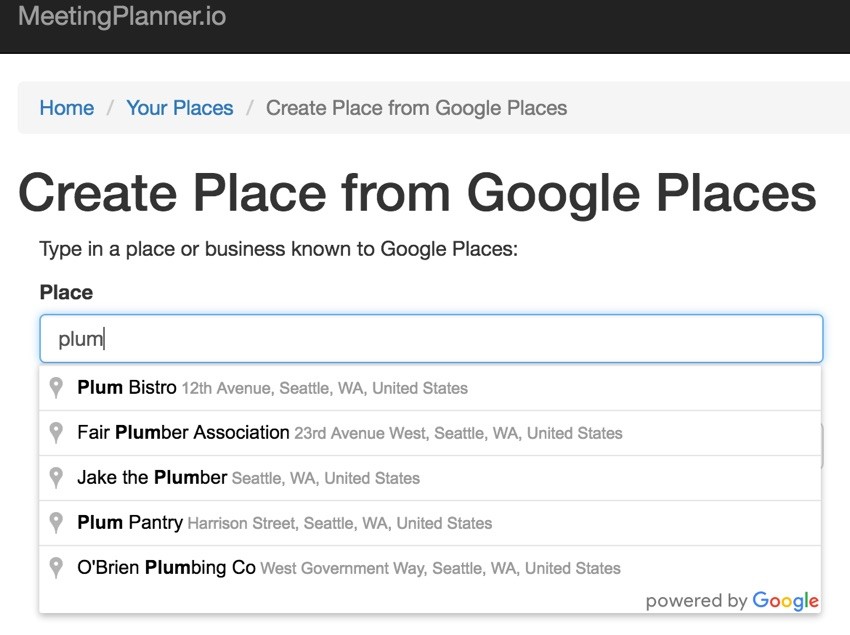
As the user begins typing, the widget drops down typeahead options for real-world places, and the place_changed event is processed with each key press. The keydown listener above prevents the return key (ASCII 13 or 0xD for you hex geeks) from submitting the form.
Here's what it looks like as you type. I'm entering Plum for Plum Bistro:

Collecting the Resulting Map and Its Data
If the person has selected enter or clicked on a place in the dropdown, then populateResult() is called; if not, we do nothing.
function populateResult(place,model) {
  // moves JSON data retrieve from Google to hidden form fields
  // so Yii2 can post the data
    $('#'+model+'-location').val(JSON.stringify(place['geometry']['location']));
    $('#'+model+'-google_place_id').val(place['place_id']);
    $('#'+model+'-full_address').val(place['formatted_address']);
    $('#'+model+'-website').val(place['website']);
    $('#'+model+'-vicinity').val(place['vicinity']);
    $('#'+model+'-name').val(place['name']);
    loadMap(place['geometry']['location'],place['name']);
}
This fills all the hidden fields with data from Google and calls loadMap() to display the map:

The loadMap() function is very specific to Google's Place API and displays the map you see above at right:
function loadMap(gps,name) {
  var gps_parse = gps.toString().replace("(", "").replace(")", "").split(", ");
  var gps_lat = parseFloat(gps_parse[0]);
  var gps_lng = parseFloat(gps_parse[1]);

  if (document.querySelector('article').children.length==0) {
    var mapcanvas = document.createElement('div');
    mapcanvas.id = 'mapcanvas';
    mapcanvas.style.height = '300px';
    mapcanvas.style.width = '300px';
    mapcanvas.style.border = '1px solid black';
    document.querySelector('article').appendChild(mapcanvas);
  }
  var latlng = new google.maps.LatLng(gps_lat,gps_lng); // gps['k'], gps['D']);

  var myOptions = {
    zoom: 16,
    center: latlng,
    mapTypeControl: false,
    navigationControlOptions: {style: google.maps.NavigationControlStyle.SMALL},
    mapTypeId: google.maps.MapTypeId.ROADMAP
  };

  var map = new google.maps.Map(document.getElementById("mapcanvas"), myOptions);
  var marker = new google.maps.Marker({
      position: latlng,
      map: map,
      title:name
  });
}
The user experience is fast and impressive. Try it!
Dynamically Recording Meeting Changes
Next, let's look at how we record changes to meeting plans in real time. There's no Google API here; it's more vanilla AJAX within the Yii Framework.
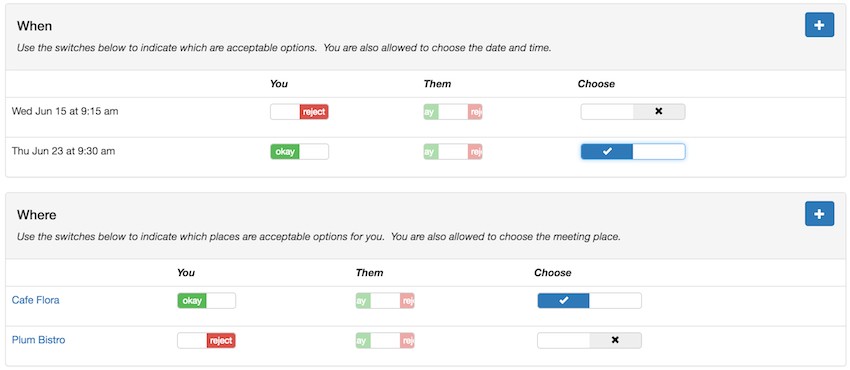
As people add dates, times and places to their meeting plans, you'll see a page like this:

The You and Them columns show each participant's favorability towards places and date times. The larger Choose slider allows the person to make the final decision about the meeting place and time.
There's a lot of data to collect from people, and we don't want to require a page refresh with each change. Ajax is the ideal solution for this problem.
I'll walk through the code for the Meeting-Place panel above. The Meeting-Time panel above works similarly.
Following the Code
Because of the MVC framework and my desire to reuse code partials, the flow here may feel difficult to follow. PHP helper functions and JavaScript sometimes had to be placed in parent files, not the partials they were most closely related to. I'll try to give you an overview first. I encourage you to make a few passes reading it over to fully understand it. And again, you can browse the code via GitHub.
Hint: Keep in mind that filenames for partials usually begin with an underscore.
- The Meeting planner page is loaded at /frontend/views/meeting/view.php. This file also includes helper JavaScript functions to manage the state of buttons such as Send and Finalize (i.e. after this change, can the user now send this invitation? With Meeting Planner, one place and one time generally must be selected before it can be sent) and displaying visual notifications that the changes will be emailed to other participants when the user finishes.
- When displaying the Where panel for places, it loads /frontend/views/meeting-place/_panel.php. This file includes helper PHP functions
showOwnerStatus()andshowParticipantStatus(), which will be reused by its child, _list.php. But, most importantly, _panel.php includes JavaScript methods for the Bootstrap sliderswitchChangeevent. - The _panel.php file uses _list.php to display each individual row for each place. This file will render the Bootstrap sliders by calling _panel.php functions
showOwnerStatus()andshowParticipantStatus(). - The
switchChangefunctions will make Ajax calls to MeetingPlaceChoiceController.php. - And finally, MeetingPlaceChoiceController.php calls the MeetingPlaceChoice.php model to record the changes in the database.
I'm sorry the placement of relevant code is complicated and spread out.
Now, I'll guide you through the key components step by step.
Ajax Code Step by Step
Here's Meeting/view.php rendering Meeting-Place/_panel.php. This displays the partial for the rows of possible places and the participants' selections:
<?php
          // where
          if (!($model->meeting_type == \frontend\models\Meeting::TYPE_PHONE || $model->meeting_type == \frontend\models\Meeting::TYPE_VIDEO)) {
            echo $this->render('../meeting-place/_panel', [
              'model'=>$model,
              'placeProvider' => $placeProvider,
              'isOwner' => $isOwner,
              'viewer' => $viewer,
          ]);
          }
           ?>
Below that is JavaScript related to actions that respond to Ajax results but are not directly needed for Ajax. You don't need to understand what these functions do to understand this Ajax example, but I included them since they are called in response to Ajax events.
<?php
$script = <<< JS
var notifierOkay; // meeting sent already and no page change session flash

if  ($('#notifierOkay').val() == 'on') {
  notifierOkay = true;
} else {
  notifierOkay = false;
}

function displayNotifier(mode) {
  if (notifierOkay) {
    if (mode == 'time') {
      $('#notifierTime').show();
    } else if (mode == 'place') {
       $('#notifierPlace').show();
    } else {
      alert("We\'ll automatically notify the organizer when you're done making changes.");
    }
    notifierOkay=false;
  }
}

function refreshSend() {
  $.ajax({
     url: '$urlPrefix/meeting/cansend',
     data: {id: $model->id, 'viewer_id': $viewer},
     success: function(data) {
       if (data)
         $('#actionSend').removeClass("disabled");
        else
        $('#actionSend').addClass("disabled");
       return true;
     }
  });
}

function refreshFinalize() {
  $.ajax({
     url: '$urlPrefix/meeting/canfinalize',
     data: {id: $model->id, 'viewer_id': $viewer},
     success: function(data) {
       if (data)
         $('#actionFinalize').removeClass("disabled");
        else
        $('#actionFinalize').addClass("disabled");
       return true;
     }
  });
}

JS;
$position = \yii\web\View::POS_READY;
$this->registerJs($script, $position);
?>
Here in Meeting-Place/_panel.php, the table showing places and selections is created, invoking _list.php:
  <table class="table">
     <thead>
     <tr class="small-header">
       <td></td>
       <td ><?=Yii::t('frontend','You') ?></td>
       <td ><?=Yii::t('frontend','Them') ?></td>
        <td >
          <?php
           if ($placeProvider->count>1 && ($isOwner || $model->meetingSettings['participant_choose_place'])) echo Yii::t('frontend','Choose');
          ?></td>
    </tr>
    </thead>
    <?= ListView::widget([
           'dataProvider' => $placeProvider,
           'itemOptions' => ['class' => 'item'],
           'layout' => '{items}',
           'itemView' => '_list',
           'viewParams' => ['placeCount'=>$placeProvider->count,'isOwner'=>$isOwner,'participant_choose_place'=>$model->meetingSettings['participant_choose_place']],
       ]) ?>
  </table>
  <?php else: ?>
  <?php endif; ?>
More importantly, it also includes the JavaScript below, which we use to make Ajax calls when the user moves a switch, changing its state. The chooser functions correspond to the bigger blue choice slider, while the choice functions correspond to the preference sliders.
$script = <<< JS
placeCount = $placeProvider->count;
// allows user to set the final place
$('input[name="place-chooser"]').on('switchChange.bootstrapSwitch', function(e, s) {
  // console.log(e.target.value); // true | false
  // turn on mpc for user
  $.ajax({
     url: '$urlPrefix/meeting-place/choose',
     data: {id: $model->id, 'val': e.target.value},
     // e.target.value is selected MeetingPlaceChoice model
     success: function(data) {
       displayNotifier('place');
       refreshSend();
       refreshFinalize();
       return true;
     }
  });
});

// users can say if a place is an option for them
$('input[name="meeting-place-choice"]').on('switchChange.bootstrapSwitch', function(e, s) {
  //console.log(e.target.id,s); // true | false
  // set intval to pass via AJAX from boolean state
  if (s)
    state = 1;
  else
    state =0;
  $.ajax({
     url: '$urlPrefix/meeting-place-choice/set',
     data: {id: e.target.id, 'state': state},
     success: function(data) {
       displayNotifier('place');
       refreshSend();
       refreshFinalize();
       return true;
     }
  });
});

JS;
$position = \yii\web\View::POS_READY;
$this->registerJs($script, $position);
?>
The functions above make the call to actionSet() in MeetingPlaceChoiceController to respond to the switch change using Ajax requests:
public function actionSet($id,$state)
    {
      Yii::$app->response->format = \yii\web\Response::FORMAT_JSON;
      // caution - incoming AJAX type issues with val
      $id=str_replace('mpc-','',$id);
      //if (Yii::$app->user->getId()!=$mpc->user_id) return false;
      if (intval($state) == 0 or $state=='false')
        $status = MeetingPlaceChoice::STATUS_NO;
      else
        $status = MeetingPlaceChoice::STATUS_YES;
      //$mpc->save();
      MeetingPlaceChoice::set($id,$status,Yii::$app->user->getId());
      return $id;
    }
Controller actions that respond via Ajax need to have a JSON response format (this way Yii knows they're not meant to deliver HTML):
Yii::$app->response->format = \yii\web\Response::FORMAT_JSON;
Here's the MeetingPlaceChoice::set() method, which records the user's actions in the database and creates a MeetingLog entry, which watches all the changes during planning.
public static function set($id,$status,$user_id = 0,$bulkMode=false)
    {
      $mpc = MeetingPlaceChoice::findOne($id);
      if ($mpc->user_id==$user_id) {
        $mpc->status = $status;
        $mpc->save();
        if (!$bulkMode) {
          // log only when not in bulk mode i.e. accept all
          // see setAll for more details
          if ($status==MeetingPlaceChoice::STATUS_YES) {
            $command = MeetingLog::ACTION_ACCEPT_PLACE;
          } else {
            $command = MeetingLog::ACTION_REJECT_PLACE;
          }
          MeetingLog::add($mpc->meetingPlace->meeting_id,$command,$mpc->user_id,$mpc->meeting_place_id);
        }
        return $mpc->id;
      } else {
        return false;
      }
    }
Features Related to Meeting Changes
In Meeting Planner, I keep a log of every single change. This allows me to know when a few minutes have elapsed since a person's last change and notify other meeting participants. It's an experiment I'm trying with this service, instead of requiring that participants hit submit every time they want to make change(s).
However, this requires training them to understand it's okay to change it and leave it, i.e. close the browser window. So the displayNotifier() functions display some flash alerts to help with this—I'll ultimately polish these over time, and remove them for experienced users.
The MeetingLog also allows me to generate a text summary of the meeting's planning history. If you're interested in learning more about this, I've written about it in Building Your Startup: Notifying People About Meeting Changes and Delivering Notifications.
What's Next?
I hope these examples help you understand the basics of Ajax in Yii. If you're interested in more advanced Ajax, I'm planning to include Ajax loaded forms in the Meeting Planner series. And, admittedly, Ajax is an area where the Yii community hasn't shared a lot of examples. Generally, Ajax works similarly in Yii as it does in PHP and other frameworks, so you can learn from examples from other framework communities.
Watch for upcoming tutorials in our Programming With Yii2 series as we continue diving into different aspects of the framework. You may also want to check out our Building Your Startup With PHP series, which is using Yii2's advanced template as we build a real-world application.
If you'd like to know when the next Yii2 tutorial arrives, follow me @reifman on Twitter or check my instructor page. My instructor page will include all the articles from this series as soon as they are published.
Related Links
- Ajax (Wikipedia)
- Getting Started - Ajax (Mozilla Developers Network)
- Yii2 Developer Exchange, my Yii2 resource site


Comments