Today I'd like to show you how to easily add custom sidebars to use within your posts and pages. It could be useful to display different widgets according to your page or post's topic.
We'll see how to use WordPress meta boxes to store and retrieve a chosen sidebar for a specific post. Custom sidebars will be added in the theme options section.
Introduction
I used to deal with the great widget logic plugin to display various widgets on different pages, but the widgets page became very fuzzy and difficult to maintain. So why not use several sidebars and choose which one to display on a specific post? That's what I'll cover in this tutorial.
Step 1 Adding Sidebars in the Theme Options Page (Twenty Eleven)
In this tutorial, I'll use the great WordPress default theme Twenty Eleven to demonstrate how to use custom sidebars in your theme.
First, we are going to add a new setting in Appearance -> Theme options. You can refer to this great tutorial to see how to add settings.
Open the theme-options.php file, located in twentyeleven/inc and add this code at the end of the twentyeleven_theme_options_init() function:
add_settings_field( 'custom_sidebar', __( 'Custom sidebars', 'twentyeleven' ), 'twentyeleven_settings_field_custom_sidebar', 'theme_options', 'general' );
Then add a default value (an empty array) to the default theme options values, at the end of the twentyeleven_get_default_theme_options() function:
$default_theme_options = array(
	'color_scheme' => 'light',
	'link_color'   => twentyeleven_get_default_link_color( 'light' ),
	'theme_layout' => 'content-sidebar',
	'custom_sidebar' => array()
);
Now we are going to create the callback function that handles the setting's display.
Let's add some jQuery to handle interactions such as adding and removing sidebars, which are basically some list elements containing a hidden input. We'll also generate those list elements from already saved sidebars.
function twentyeleven_settings_field_custom_sidebar()
{
	// Retrieve theme options
	$opts = twentyeleven_get_theme_options();

	// A bit of jQuery to handle interactions (add / remove sidebars)
	$output = "<script type='text/javascript'>";
	$output .= '
				var $ = jQuery;
				$(document).ready(function(){
					$(".sidebar_management").on("click", ".delete", function(){
						$(this).parent().remove();
					});

					$("#add_sidebar").click(function(){
						$(".sidebar_management ul").append("<li>"+$("#new_sidebar_name").val()+" <a href=\'#\' class=\'delete\'>'.__("delete", $themename).'</a> <input type=\'hidden\' name=\'twentyeleven_theme_options[custom_sidebar][]\' value=\'"+$("#new_sidebar_name").val()+"\' /></li>");
						$("#new_sidebar_name").val("");
					})

				})
	';

	$output .= "</script>";

	$output .= "<div class='sidebar_management'>";

	$output .= "<p><input type='text' id='new_sidebar_name' /> <input class='button-primary' type='button' id='add_sidebar' value='".__("add", $themename)."' /></p>";

	$output .= "<ul>";

	// Display every custom sidebar
	if(isset($opts['custom_sidebar']))
	{
		$i = 0;
		foreach($opts['custom_sidebar'] as $sidebar)
		{
			$output .= "<li>".$sidebar." <a href='#' class='delete'>".__("delete", $themename)."</a> <input type='hidden' name='twentyeleven_theme_options[custom_sidebar][]' value='".$sidebar."' /></li>";
			$i++;
		}
	}

	$output .= "</ul>";

	$output .= "</div>";

	echo $output;
}
Eventually, add this code in the twentyeleven_theme_options_validate() function to sanitize and validate form input:
if ( isset( $input['custom_sidebar'] ) ) {
	$output['custom_sidebar'] = $input['custom_sidebar'];
}
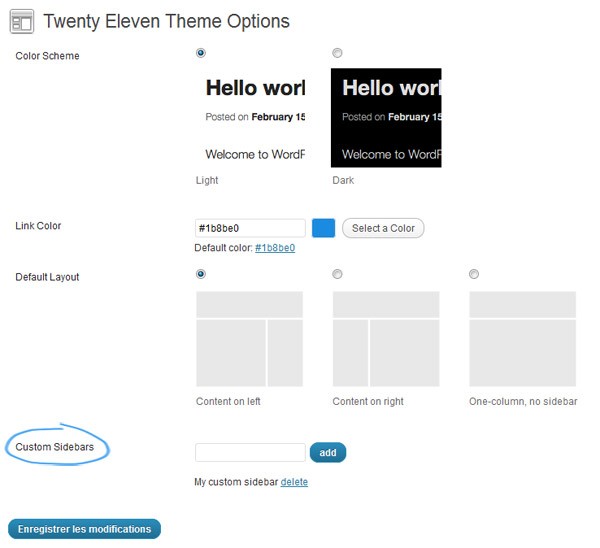
At this point, you should be able to manage and save custom sidebars within your theme. For instance, let's create a new custom sidebar called "My custom sidebar". Your theme options page should look like this:

Step 2 Register Custom Sidebars
Now we're able to add custom sidebars, we need to register them so they can appear in the widgets admin page.
In the Twenty Eleven theme, this is done within the twentyeleven_widgets_init() function. So at the end of this function add this:
$options = twentyeleven_get_theme_options();

if(isset($options['custom_sidebar']) && sizeof($options['custom_sidebar']) > 0)
{
	foreach($options['custom_sidebar'] as $sidebar)
	{
		register_sidebar( array(
			'name' => __( $sidebar, 'twentyeleven' ),
			'id' => generateSlug($sidebar, 45),
			'before_widget' => '<aside id="%1$s" class="widget %2$s">',
			'after_widget' => "</aside>",
			'before_title' => '<h3 class="widget-title">',
			'after_title' => '</h3>',
		) );
	}
}
We retrieve theme options, check that there is at least one custom sidebar and register it. We use a quick function to generate a slug out of the sidebar name to be used as the sidebar ID.
function generateSlug($phrase, $maxLength)
{
	$result = strtolower($phrase);

	$result = preg_replace("/[^a-z0-9\s-]/", "", $result);
	$result = trim(preg_replace("/[\s-]+/", " ", $result));
	$result = trim(substr($result, 0, $maxLength));
	$result = preg_replace("/\s/", "-", $result);

	return $result;
}
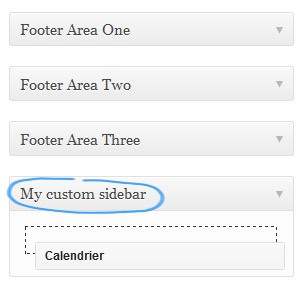
Now, go to Appearance -> Widgets and you should see our new custom sidebar.

Step 3 Adding A Meta Box
Now our custom sidebars are available, we'll add a meta box to display a list of all sidebars available inside the post editing form.
If you're not familiar with meta boxes, you can refer to these links:
add_meta_boxon the WordPress codex- How to Create Custom WordPress Write/Meta Boxes
- Reusable custom meta box series
Now let's dig into the code.
Add Meta Boxes
First, we'll simply add our meta boxes. We need to declare two meta boxes, one for posts and one for pages. We also need to register two hooks, one to add meta boxes and the other one to save them.
So open your functions.php file and add this:
/* Define the custom box */

add_action( 'add_meta_boxes', 'add_sidebar_metabox' );
add_action( 'save_post', 'save_sidebar_postdata' );

/* Adds a box to the side column on the Post and Page edit screens */
function add_sidebar_metabox()
{
	add_meta_box(
		'custom_sidebar',
		__( 'Custom Sidebar', 'twentyeleven' ),
		'custom_sidebar_callback',
		'post',
		'side'
	);
	add_meta_box(
		'custom_sidebar',
		__( 'Custom Sidebar', 'twentyeleven' ),
		'custom_sidebar_callback',
		'page',
		'side'
	);
}
Create the Callback Function
Now, let's create the custom_sidebar_callback function, which will print out the meta boxes' markup.
There're several key steps in this function:
- Retrieve all registered sidebars (theme default sidebars included) with the global
$wp_registered_sidebarsvariable. - Get post metas
- Create nonce security
- Add a select element with all sidebars plus a default one which is defined directly in the template file.
/* Prints the box content */
function custom_sidebar_callback( $post )
{
	global $wp_registered_sidebars;

	$custom = get_post_custom($post->ID);

	if(isset($custom['custom_sidebar']))
		$val = $custom['custom_sidebar'][0];
	else
		$val = "default";

	// Use nonce for verification
	wp_nonce_field( plugin_basename( __FILE__ ), 'custom_sidebar_nonce' );

	// The actual fields for data entry
	$output = '<p><label for="myplugin_new_field">'.__("Choose a sidebar to display", 'twentyeleven' ).'</label></p>';
	$output .= "<select name='custom_sidebar'>";

	// Add a default option
	$output .= "<option";
	if($val == "default")
		$output .= " selected='selected'";
	$output .= " value='default'>".__('default', $themename)."</option>";

	// Fill the select element with all registered sidebars
	foreach($wp_registered_sidebars as $sidebar_id => $sidebar)
	{
		$output .= "<option";
		if($sidebar_id == $val)
			$output .= " selected='selected'";
		$output .= " value='".$sidebar_id."'>".$sidebar['name']."</option>";
	}

	$output .= "</select>";

	echo $output;
}
Save Meta Box
Now let's save our post meta. Again several steps here:
- Check WordPress is not autosaving
- Check nonce and authorizations
- Save post_meta
/* When the post is saved, saves our custom data */
function save_sidebar_postdata( $post_id )
{
	// verify if this is an auto save routine.
	// If it is our form has not been submitted, so we dont want to do anything
	if ( defined( 'DOING_AUTOSAVE' ) && DOING_AUTOSAVE )
	  return;

	// verify this came from our screen and with proper authorization,
	// because save_post can be triggered at other times

	if ( !wp_verify_nonce( $_POST['custom_sidebar_nonce'], plugin_basename( __FILE__ ) ) )
	  return;

	if ( !current_user_can( 'edit_page', $post_id ) )
		return;

	$data = $_POST['custom_sidebar'];

	update_post_meta($post_id, "custom_sidebar", $data);
}
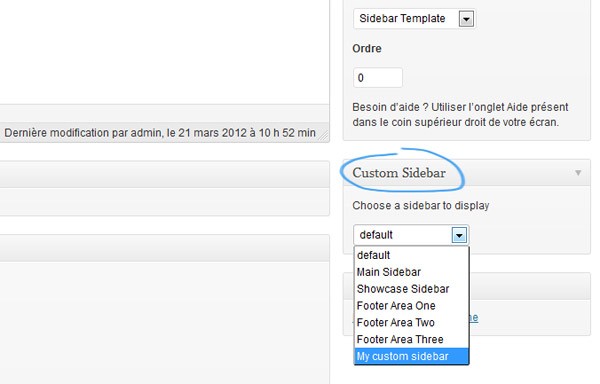
Now you should now be able to see this box in the post edit page, in the right column. If not, check that the custom sidebar box is displayed in the top screen options panel.

Step 4 Adjust Template Files
Now everything is correctly set up, what's left to do is updating our templating files so that they can display custom sidebars.
Let's create a new page based on the sidebar template (available in the page attributes box). This template relies on the sidebar-page.php file. Edit this file and add these lines at the top (below the template's commented header):
$options = get_post_custom(get_the_ID());

if(isset($options['custom_sidebar']))
{
	$sidebar_choice = $options['custom_sidebar'][0];
}
else
{
	$sidebar_choice = "default";
}
We retrieve current post meta data to get the chosen sidebar.
To switch between a custom sidebar and the default one, change the get_sidebar() call at the bottom of this same file to this:
if($sidebar_choice && $sidebar_choice != "default")
{
	get_sidebar("custom");
}
else
{
	get_sidebar();
}
The get_sidebar($slug) calls for sidebar-slug.php. So what we have to do, is to create a file named sidebar-custom.php and add this inside:
$options = get_post_custom($post->ID);
$sidebar_choice = $options['custom_sidebar'][0];

?>
<aside id="sidebar" class="floatleft">

	<ul class="widgets">
		<?php if ( !function_exists('dynamic_sidebar') || !dynamic_sidebar() ) :
			dynamic_sidebar($sidebar_choice);
		else :
			/* No widget */
		endif; ?>
	</ul>

</aside>
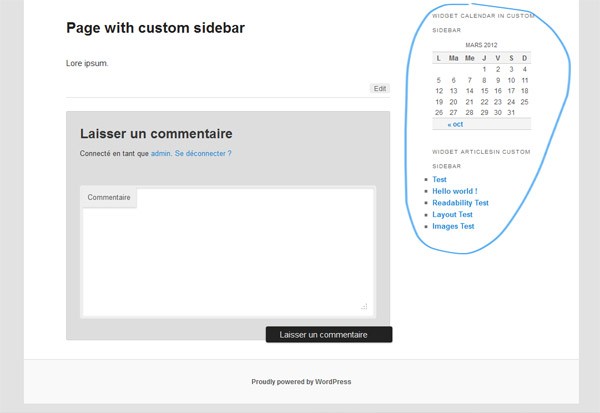
Now your page should display the sidebar you chose. For instance, I added two widgets in my custom sidebar:

I won't cover how to apply this to posts as it's exactly the same behaviour, you just have to update the content-single.php file to manage custom sidebars.
Conclusion
That's all folks! Now you can use unlimited sidebars for your pages and posts. This is just one solution among others, but it's a quick and easy way to implement custom sidebars, so don't hesitate to leave a comment, share your ideas, and give feedback!


Comments