In this tutorial, you'll learn about the Android Telephony and SMS API. You'll learn how to make a call from your app and how to monitor phone call events, as well as how to send and receive SMS.
1. How to Make A Call
To start off, I'll show you how to initiate a call from your application either by using the phone dialer app or directly from your app to make it easier for your users.
Create a New Android Studio Project
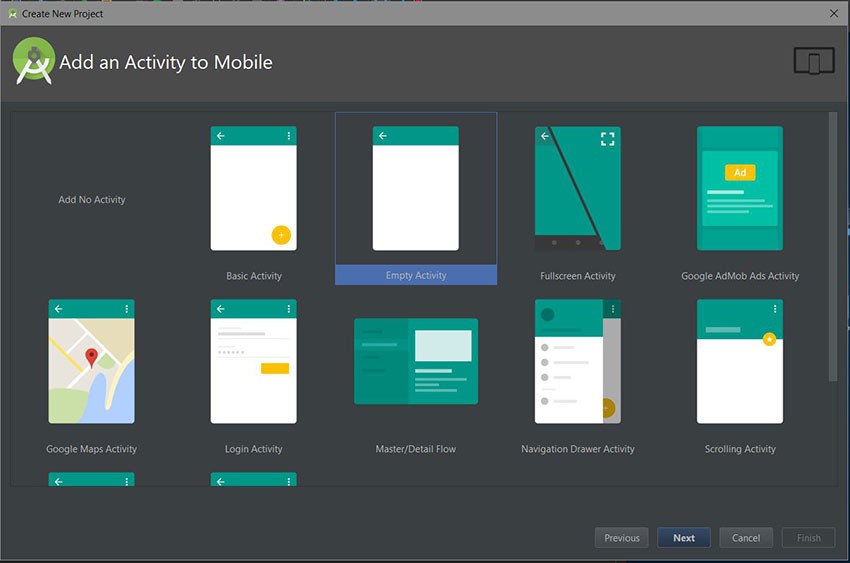
Fire up Android Studio and create a new project with an empty activity called MainActivity.
Lay Out the Screen
For now, our layout will just have an EditText field and a Dial button:
<?xml version="1.0" encoding="utf-8"?>
<LinearLayout
        xmlns:android="http://schemas.android.com/apk/res/android"
        xmlns:tools="http://schemas.android.com/tools"
        android:id="@+id/activity_main"
        android:orientation="vertical"
        android:layout_width="match_parent"
        android:layout_height="match_parent"
        android:paddingLeft="@dimen/activity_horizontal_margin"
        android:paddingRight="@dimen/activity_horizontal_margin"
        android:paddingTop="@dimen/activity_vertical_margin"
        android:paddingBottom="@dimen/activity_vertical_margin"
        android:gravity="center_horizontal|center_vertical"
        tools:context="com.chikeandroid.tutsplust_telephony.MainActivity">

    <EditText
            android:id="@+id/et_phone_no"
            android:hint="Enter Phone number"
            android:inputType="phone"
            android:layout_width="match_parent"
            android:layout_height="wrap_content"/>

    <Button
            android:id="@+id/btn_dial"
            android:layout_gravity="center_horizontal"
            android:text="Dial"
            android:layout_width="wrap_content"
            android:layout_height="wrap_content"/>
</LinearLayout>
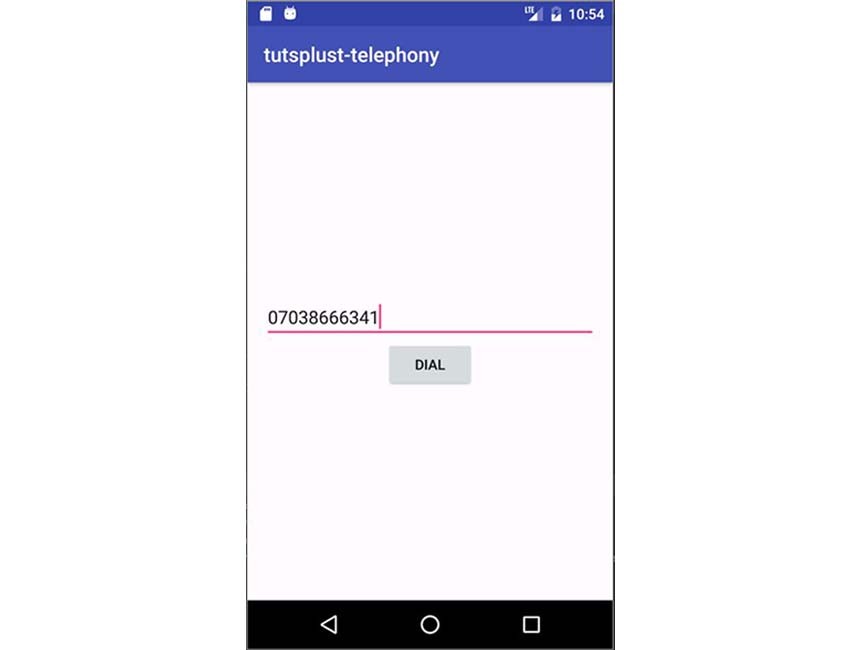
Modify the MainActivity Class
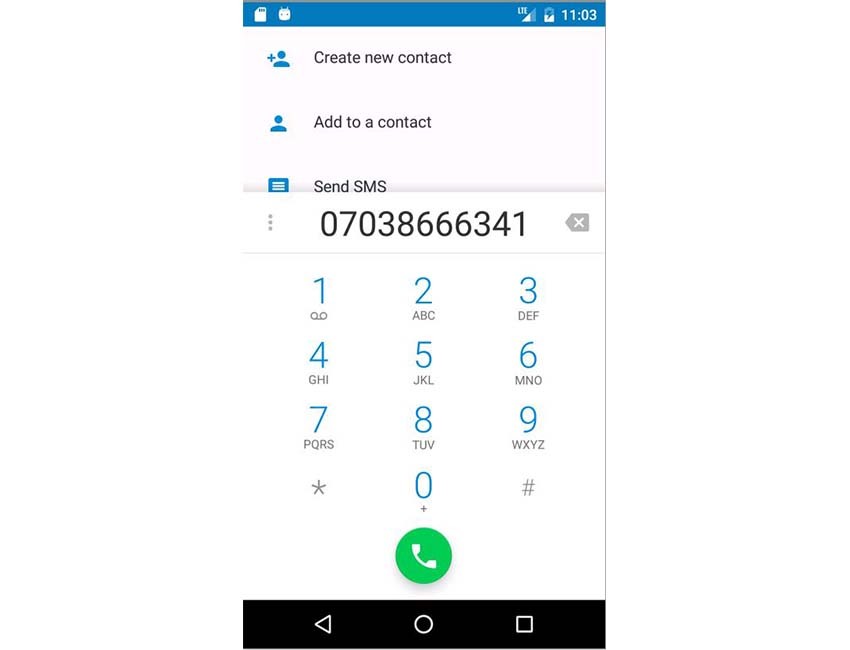
In the code block below, we are creating an ACTION_DIAL intent to display the phone dialer. The phone number is parsed from our tel URI scheme: tel:XXXXXXXX. Note that you don't need any permission for this to work:
import android.content.Intent;
import android.net.Uri;
import android.os.Bundle;
import android.support.v7.app.AppCompatActivity;
import android.text.TextUtils;
import android.view.View;
import android.widget.Button;
import android.widget.EditText;
import android.widget.Toast;

public class MainActivity extends AppCompatActivity {

    @Override
    protected void onCreate(Bundle savedInstanceState) {
        super.onCreate(savedInstanceState);
        setContentView(R.layout.activity_main);
        Button mDialButton = (Button) findViewById(R.id.btn_dial);
        final EditText mPhoneNoEt = (EditText) findViewById(R.id.et_phone_no);

        mDialButton.setOnClickListener(new View.OnClickListener() {
            @Override
            public void onClick(View view) {
                String phoneNo = mPhoneNoEt.getText().toString();
                if(!TextUtils.isEmpty(phoneNo)) {
                    String dial = "tel:" + phoneNo;
                    startActivity(new Intent(Intent.ACTION_DIAL, Uri.parse(dial)));
                }else {
                    Toast.makeText(MainActivity.this, "Enter a phone number", Toast.LENGTH_SHORT).show();
                }
            }
        });
    }
}
If you run the app and click the dial button, you'll be taken to the dialer app, and from there you have to actually dial the number. You can change this flow to actually make the call from within your app by simply changing the ACTION_DIAL intent to ACTION_CALL instead. This will require the android.permission.CALL_PHONE permission, though.
2. Monitoring Phone Call Events
In this section, we are going to learn how to monitor phone call events in the Android system. The phone can be in three states:
- idle (when it is unused)
- ringing (when there is an incoming call)
- off-hook (when the call is answered)
Add the Permission
We need the permission READ_PHONE_STATE to be able to monitor the phone state. Add it to AndroidManifest.xml:
<uses-permission android:name="android.permission.READ_PHONE_STATE"/>
Create the PhoneStateListener Object
We create an object of the PhoneStateListener class, and then override its onCallStateChanged() method (in IntelliJ it is easy to do this with Control-O, and then select or search for the method to override). We'll handle changes to the call state changes by displaying a Toast. Note that we can also access the incoming phone numbers when this method is triggered:
// ...
PhoneStateListener mPhoneStateListener = new PhoneStateListener() {
    @Override
    public void onCallStateChanged(int state, String incomingNumber) {
        super.onCallStateChanged(state, incomingNumber);

        switch (state) {
            case TelephonyManager.CALL_STATE_IDLE:
                Toast.makeText(MainActivity.this, "CALL_STATE_IDLE", Toast.LENGTH_SHORT).show();
                break;
            case TelephonyManager.CALL_STATE_RINGING:
                Toast.makeText(MainActivity.this, "CALL_STATE_RINGING", Toast.LENGTH_SHORT).show();
                break;
            case TelephonyManager.CALL_STATE_OFFHOOK:
                Toast.makeText(MainActivity.this, "CALL_STATE_OFFHOOK", Toast.LENGTH_SHORT).show();
                break;
        }
    }
};
// ...
Depending on your application needs, you could also override one of these other event methods: onCellInfoChanged(), onCallForwardingIndicatorChanged(), onCellLocationChanged(), or onSignalStrengthChanged().
Listening to the Phone Call State
In order to begin listening to the phone call state, we need to get the TelephonyManager from the system service and initialize it in onCreate().
// ...
private TelephonyManager mTelephonyManager;
@Override
protected void onCreate(Bundle savedInstanceState) {
   // ...
   mTelephonyManager = (TelephonyManager) getSystemService(getApplicationContext().TELEPHONY_SERVICE);
}
In the onResume() method, we can begin to listen using the TelephonyManager listen() method, passing it the PhoneStateListener instance and the static LISTEN_CALL_STATE. We stop listening in the onStop() method by passing the LISTEN_NONE as the second argument to listen().
// ...
@Override
protected void onResume() {
    super.onResume();
    mTelephonyManager.listen(mPhoneStateListener, PhoneStateListener.LISTEN_CALL_STATE);
}
@Override
protected void onStop() {
    super.onStop();
    mTelephonyManager.listen(mPhoneStateListener, PhoneStateListener.LISTEN_NONE);
}
// ...
Other phone listening options possible are LISTEN_CELL_LOCATION, LISTEN_SIGNAL_STRENGTH, LISTEN_CALL_FORWARDING_INDICATOR, and LISTEN_CELL_INFO.
Finally, run the app and make sure an incoming call comes in.
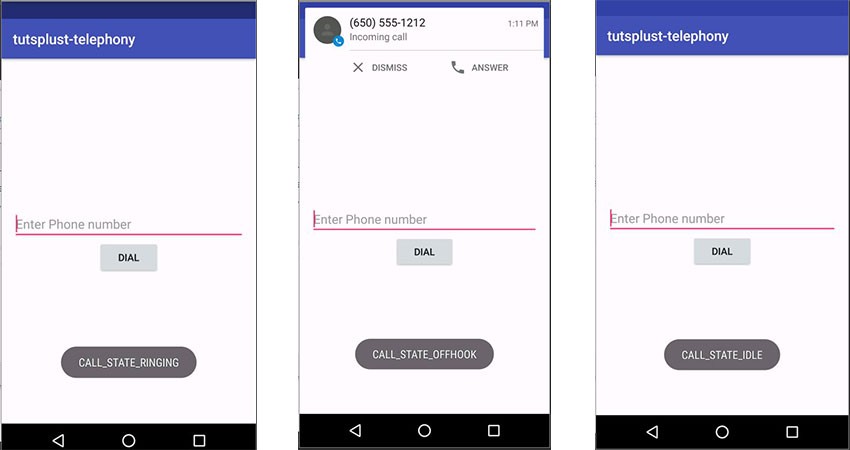
This monitoring will only work when the app is in the foreground. For this to work in the background (when our application is not running), we would need to create a BroadcastReceiver so that even if the app isn't running, we can still monitor for phone call states. Depending on your app requirements, that could be a much better way to listen for phone call state changes. I'll show you how to do this in the next section.
Be aware that we are only monitoring incoming calls. For us to monitor outgoing calls, we need additional permissions. To monitor outgoing calls, include the following line in your AndroidManifest.xml file.
<uses-permission android:name="android.permission.PROCESS_OUTGOING_CALLS"/>
How to Use the Emulator to Make Calls and Send SMS Messages
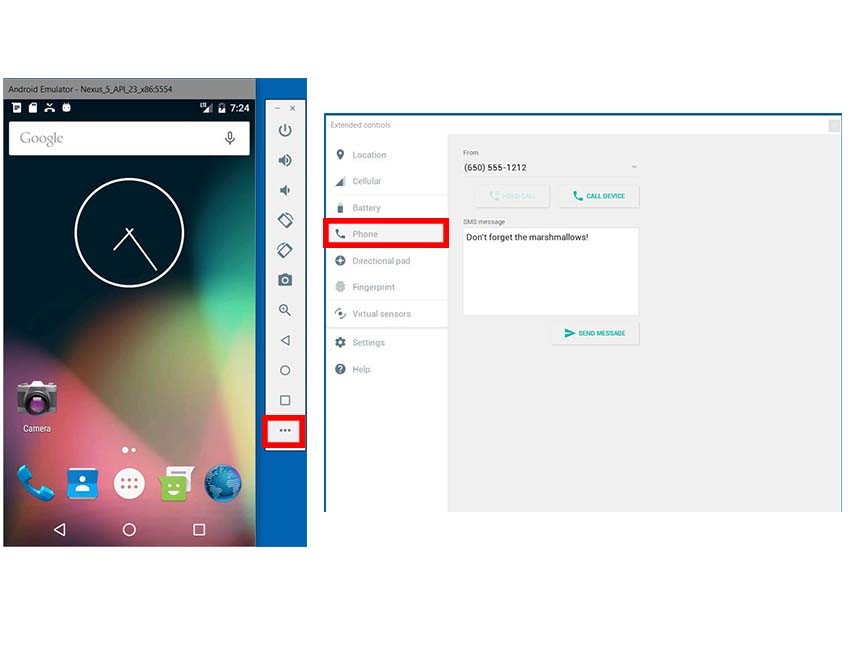
You can use your emulator to simulate making a call or sending an SMS message, but you'll need to do a little setup. Open your emulator, click the last button on the right-side navigation bar to open the extended control dialog, and then select the phone control button.
3. Monitoring Phone Call Events in the Background
Create a BroadcastReceiver
Just like in the previous section, we need to create an event listener to monitor phone state changes. The major difference is that this time we'll extend the BroadcastReceiver base class so we can listen for the phone call state even if the application is not running. Be sure not to register the listener more than once! Our check for this is on line 36.
import android.content.BroadcastReceiver;
import android.content.Context;
import android.content.Intent;
import android.telephony.PhoneStateListener;
import android.telephony.TelephonyManager;
import android.widget.Toast;

public class PhoneCallStateReceiver extends BroadcastReceiver {
    private TelephonyManager mTelephonyManager;
    public static boolean isListening = false;

    @Override
    public void onReceive(final Context context, Intent intent) {

        mTelephonyManager = (TelephonyManager) context.getSystemService(context.TELEPHONY_SERVICE);

        PhoneStateListener mPhoneStateListener = new PhoneStateListener() {
            @Override
            public void onCallStateChanged(int state, String incomingNumber) {
                super.onCallStateChanged(state, incomingNumber);

                switch (state) {
                    case TelephonyManager.CALL_STATE_IDLE:
                        Toast.makeText(context, "CALL_STATE_IDLE", Toast.LENGTH_SHORT).show();
                        break;
                    case TelephonyManager.CALL_STATE_RINGING:
                        Toast.makeText(context, "CALL_STATE_RINGING", Toast.LENGTH_SHORT).show();
                        break;
                    case TelephonyManager.CALL_STATE_OFFHOOK:
                        Toast.makeText(context, "CALL_STATE_OFFHOOK", Toast.LENGTH_SHORT).show();
                        break;
                }
            }
        };

        if(!isListening) {
            mTelephonyManager.listen(mPhoneStateListener, PhoneStateListener.LISTEN_CALL_STATE);
            isListening = true;
        }
    }
}
Modify AndroidManifest.xml
A broadcast receiver works only if it is registered. We need to tell the Android system about our broadcast receiver by registering it in the AndroidManifest.xml file by connecting our PhoneCallStateReceiver class to the <intent-filter> that describes the system broadcast we wish to receive—in this case, PHONE_STATE.
<receiver android:name=".PhoneCallStateReceiver">
        <intent-filter>
            <action android:name="android.intent.action.PHONE_STATE"/>
        </intent-filter>
</receiver>
Monitoring Outgoing Calls
For outgoing calls, you need to include the NEW_OUTGOING_CALL action intent <action android:name="android.intent.action.NEW_OUTGOING_CALL"/> in the <intent-filter> of the receiver in AndroidManifest.xml.
To get the phone number of the intended outgoing call, inside the onReceive(Context, Intent) method, we get the number from the intent as an extra. To prevent that intended call from going through, we can call setResultData() and pass it a null argument. The resultData is used as the actual number to call.
@Override
public void onReceive(final Context context, Intent intent) {
    // for outgoing call
    String outgoingPhoneNo = intent.getStringExtra(Intent.EXTRA_PHONE_NUMBER).toString();
    // prevent outgoing call
    setResultData(null);
}
You can learn more about broadcasts and broadcast receivers in our tutorial here on Envato Tuts+:
4. Sending SMS Messages
You have just two major choices for sending SMS: using the device SMS client application or skipping the client by sending the SMS directly from your app. We'll look at both scenarios, and you can decide which one is better for your use case. Let's start by sending an SMS using the device SMS client.
Set Up the Layout
First, we need to modify our main layout to have an EditText field for the message and a Send Message button.
<!--/ ... /-->
<EditText
        android:id="@+id/et_message"
        android:hint="Enter message"
        android:inputType="textCapSentences|textMultiLine"
        android:maxLength="2000"
        android:maxLines="12"
        android:layout_width="match_parent"
        android:layout_height="wrap_content"/>

<Button
        android:id="@+id/btn_send_message"
        android:layout_gravity="center_horizontal"
        android:text="Send Messange"
        android:layout_width="wrap_content"
        android:layout_height="wrap_content"/>
<!--/ ... /-->
Modify the MainActivity
Inside our onCreate() method in our MainActivity class, create an intent with ACTION_SENDTO as the first argument and a smsto:<phone number> URI as the second argument. The text message will be the value of the sms_body extra:
// ...
Button sendMessageBtn = (Button) findViewById(R.id.btn_send_message);
final EditText messagetEt = (EditText) findViewById(R.id.et_message);
sendMessageBtn.setOnClickListener(new View.OnClickListener() {
    @Override
    public void onClick(View view) {
        String message = messagetEt.getText().toString();
        String phoneNo = mPhoneNoEt.getText().toString();
        if(!TextUtils.isEmpty(message) && !TextUtils.isEmpty(phoneNo)) {
            Intent smsIntent = new Intent(Intent.ACTION_SENDTO, Uri.parse("smsto:" + phoneNo));
            smsIntent.putExtra("sms_body", message);
            startActivity(smsIntent);
        }
    }
});
// ...
Here, the SMS client will monitor the status of the message delivery.
Run the App
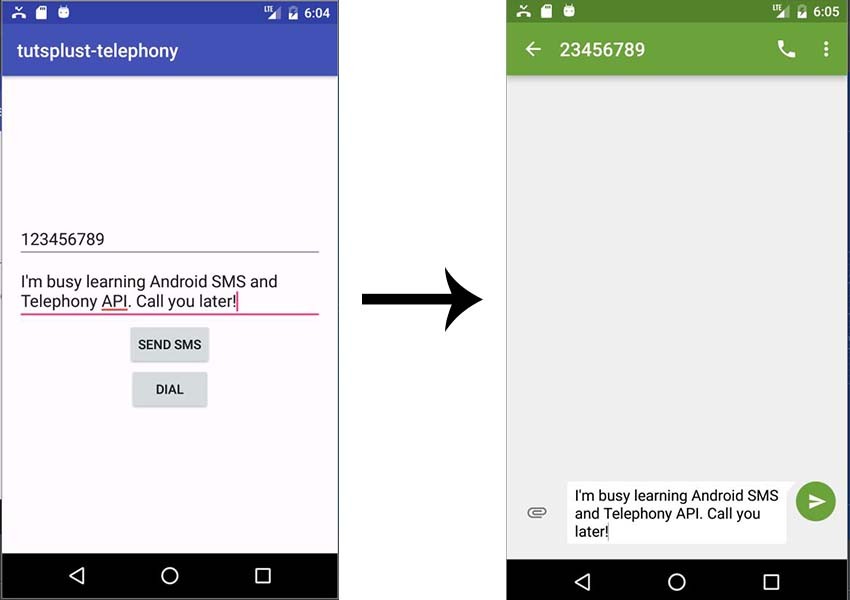
When all required fields are entered, clicking the Send SMS button will open the user's SMS client, or will give the user options to select an app if one hasn't already been chosen.
5. Sending SMS Messages Directly
Next let's see how to send the SMS directly from our application instead of using the device SMS client.
Add Permission in AndroidManifest.xml
As usual, we need to register the permission in AndroidManifest.xml.
<uses-permission android:name="android.permission.SEND_SMS"/>
Modify the MainActivity class
Next, for Android 6.0 (API level 23) and above, we need to request the SEND_SMS permission during runtime.
To learn more about Android runtime permissions and how they've changed in version 6.0, check out our tutorial here on Envato Tuts+:
To send an SMS, we get the default SmsManager instance and then call its sendTextMessage() method, passing in the phone number as the first argument and the message as the second argument:
// ...
final int SEND_SMS_PERMISSION_REQUEST_CODE = 111;
private  Button mSendMessageBtn;

@Override
protected void onCreate(Bundle savedInstanceState) {
    // ...
    mSendMessageBtn = (Button) findViewById(R.id.btn_send_message);
    final EditText messagetEt = (EditText) findViewById(R.id.et_message);

    mSendMessageBtn.setEnabled(false);
    if(checkPermission(Manifest.permission.SEND_SMS)) {
        mSendMessageBtn.setEnabled(true);
    }else {
        ActivityCompat.requestPermissions(this, new String[] {Manifest.permission.SEND_SMS},
                SEND_SMS_PERMISSION_REQUEST_CODE);
    }
    mSendMessageBtn.setOnClickListener(new View.OnClickListener() {
        @Override
        public void onClick(View view) {
            String message = messagetEt.getText().toString();
            String phoneNo = mPhoneNoEt.getText().toString();
            if(!TextUtils.isEmpty(message) && !TextUtils.isEmpty(phoneNo)) {

                if(checkPermission(Manifest.permission.SEND_SMS)) {
                    SmsManager smsManager = SmsManager.getDefault();
                    smsManager.sendTextMessage(phoneNo, null, message, null, null);
                }else {
                    Toast.makeText(MainActivity.this, "Permission denied", Toast.LENGTH_SHORT).show();
                }
            }
        }
    });
}

private boolean checkPermission(String permission) {
    int checkPermission = ContextCompat.checkSelfPermission(this, permission);
    return (checkPermission == PackageManager.PERMISSION_GRANTED);
}

@Override
public void onRequestPermissionsResult(int requestCode, @NonNull String[] permissions, @NonNull int[] grantResults) {
    switch (requestCode) {
        case SEND_SMS_PERMISSION_REQUEST_CODE: {
            if(grantResults.length > 0 && (grantResults[0] == PackageManager.PERMISSION_GRANTED)) {
                mSendMessageBtn.setEnabled(true);
            }
            return;
        }
    }
}
// ...
To monitor the status of delivery, the SMSManager sendTextMessage() method has two optional PendingIntent parameters: sentIntent and deliveryIntent.
void sendTextMessage (String destinationAddress,
                String scAddress,
                String text,
                PendingIntent sentIntent,
                PendingIntent deliveryIntent)
If you want to use sentIntent, watch for the result code Activity.RESULT_OK on success, or one of RESULT_ERROR_GENERIC_FAILURE, RESULT_ERROR_RADIO_OFF, and RESULT_ERROR_NULL_PDU to indicate an error.
6. Receiving an SMS Message
For your app to begin receiving SMS messages from the user's phone, its best to have a broadcast receiver registered so that it can be alerted when a new SMS arrives even if your app is not running in the foreground.
Add the Permission
Add the RECEIVE_SMS permission to AndroidManifest.xml:
<uses-permission android:name="android.permission.RECEIVE_SMS"/>
Next, we need to check and see if the app has permission to receive SMS messages at runtime. So in the MainActivity class, check for the RECEIVE_SMS permission. If it is not found, request it.
// ...
@Override
protected void onCreate(Bundle savedInstanceState) {
    // ...
    if(!checkPermission(Manifest.permission.RECEIVE_SMS)) {
        ActivityCompat.requestPermissions(this, new String[]{Manifest.permission.RECEIVE_SMS}, 222);
    }
}
// ...
Create a Broadcast Receiver
We are retrieving each object of the SmsMessage class by using the method createFromPdu(byte[] pdu), passing it a PDU (protocol data unit). We are then adding it to our messages array.
To support API 23 and above, you should include the format String extra (either "3gpp" for GSM/UMTS/LTE messages in 3GPP format or "3gpp2" for CDMA/LTE messages in 3GPP2 format).
import android.content.BroadcastReceiver;
import android.content.Context;
import android.content.Intent;
import android.os.Build;
import android.os.Bundle;
import android.telephony.SmsMessage;
import android.widget.Toast;

public class SMSReceiver extends BroadcastReceiver {

    @Override
    public void onReceive(Context context, Intent intent) {
        Bundle bundle = intent.getExtras();
        if(bundle != null) {
            Object[] pdus = (Object[]) bundle.get("pdus");
            String format = bundle.getString("format");

            final SmsMessage[] messages = new SmsMessage[pdus.length];
            for(int i = 0; i < pdus.length; i++) {
                if(Build.VERSION.SDK_INT >= Build.VERSION_CODES.M) {
                    messages[i] = SmsMessage.createFromPdu((byte[]) pdus[i], format);
                }else {
                    messages[i] = SmsMessage.createFromPdu((byte[]) pdus[i]);
                }
                String senderPhoneNo = messages[i].getDisplayOriginatingAddress();
                Toast.makeText(context, "Message " + messages[0].getMessageBody() + ", from " + senderPhoneNo, Toast.LENGTH_SHORT).show();
            }
        }
    }
}
Now, run the app, close it, and send your emulated phone an SMS.

Conclusion
In this tutorial, you learned about:
- making a call from your app
- monitoring phone call events
- sending SMS messages using either the device messaging app or directly from your own app
- receiving SMS messages in the background
There's lots more you can do with phone calls and SMS messages in Android. Visit the Android Telephony API and the SMSManager API documentation to learn more.
In the meantime, check out some of our other posts on Android development!





Comments