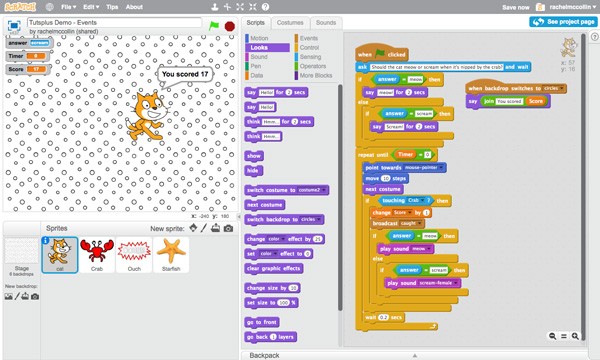
In the previous tutorial, you continued working on a project to make a crab chase a cat around the screen, adding a time limit and keeping score.
In this part we'll continue working on that project. We'll add a broadcast event and use it to trigger scripts for other sprites. Then we'll hide most of the sprites when the game's over and display the final score.
What You'll Need
To complete this tutorial, you'll need:
- a free account with Scratch
- a web browser with access to Scratch (I recommend using a modern browser like Chrome, Firefox, Safari or Opera for the best experience)
Getting Started
We're going to be working with the project created in the previous part of this series. We'll use the assets and scripts we've created so far and add more.
Depending on whether you worked along with that tutorial, there are two ways to get started for this tutorial:
- Open the project you created for the last tutorial and make a duplicate of that.
- Remix the project I created to support the last tutorial.
Alternatively you can just carry on working in the same project you already created. Here's how you do each of these (you'll only need to do one).
Duplicating Your Own Project
Open Scratch and go to the project you want to duplicate. Make sure you've clicked the See Inside button so you can see the workings of the project.
In the toolbar, click File > Save as a copy:

Scratch will open your new copy. Rename it and start working on it.
Remixing My Project
Log in to Scratch and go to the page for my project on data and variables.
Click the See Inside button to view the project:
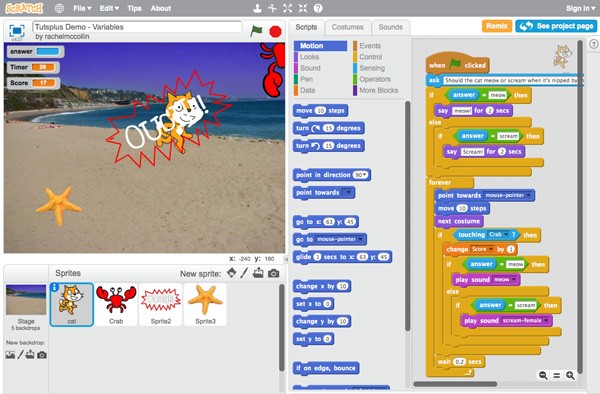
Now click the Remix button. Scratch will save a duplicate of my project as a new project in your account. Rename it and you're good to go!
Creating a Broadcast Event to Send Messages
In this part of the series, you'll add a broadcast message to your project to communicate internally within your project. You can create a broadcast in one script when that script reaches a certain point, or a condition relating to a sprite is met, and then have any of the other sprites (or the stage) react to the broadcasting of that message. This links your sprites together and gives you more scope when it comes to adding user interactions.
You'll remember that earlier on we added a sprite with some text in it (saying 'Ouch!!') which we drew as a costume for that sprite. At the moment that sprite is sitting motionless on the stage and not doing anything. Now we'll use a broadcast to get it to do something.
But first let's create the broadcast.
Click on the cat sprite and edit the script you've already created for it.
Open the Events blocks and drag the broadcast message1 block into the script, immediately below the change Score by 1 block. Click on the dropdown list for message1 and click on new message.... Type in some text which you can use to define your broadcast. This text won't be seen by the user but you'll be using it elsewhere in your project, so it makes sense to call it something meaningful. I'm calling mine caught.
Here's what the cat's script looks like now:
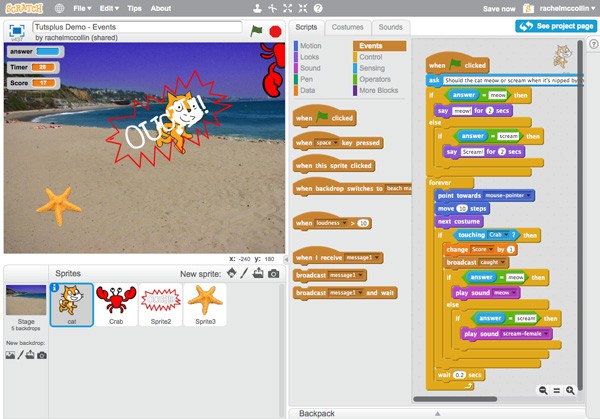
Now we can use that broadcast to trigger scripts for other sprites.
Using a Broadcast Event to Start a Script
So far we've started all of our scripts with the when green flag clicked block, meaning that the script is automatically run when the project starts. Sometimes you don't want that to happen: you want a script to be triggered after the project has started. There are a few ways to do this: you can trigger a script when a sprite or a key is pressed, or when a variable such as loudness changes. The method we'll use here is starting a script when the sprite receives a broadcast message.
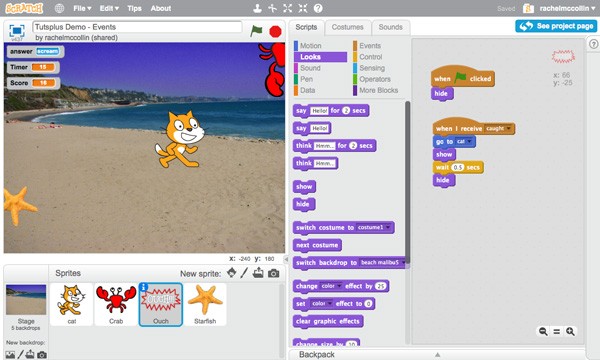
Click on the text sprite you created earlier (Sprite2). Start by giving it a better name (by clicking on the i icon to its top left and editing the name)—I'm calling mine Ouch.
We want this sprite to be invisible for most of the time, and only appear when the crab catches the cat. So we'll create two scripts: the first to hide the sprite and the second to make it appear.
Creating a Script to Make the Sprite Disappear
Create this script for the sprite:
when green flag clickedhide
You'll find the hide block in the Looks blocks. This hides the sprite: now when you start the project it will disappear.
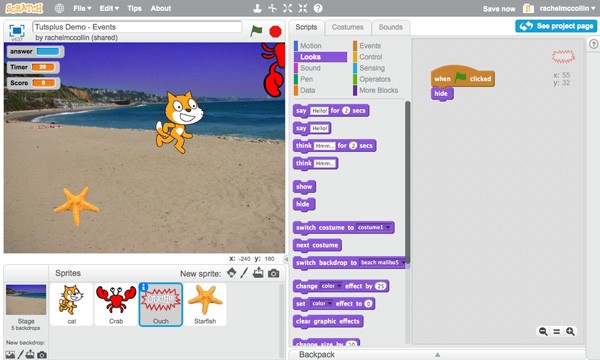
Creating a Script to Make the Sprite Appear Again
Now create a second script for the Ouch sprite:
when I receive caughtgo to catshowwait 0.5 secondshide
You'll find the first sprite in the Events blocks, the go to block in the Motion blocks, the wait block in the Control section and the show and hide blocks in Looks.
Using Events With Backdrops
As your projects become longer and more complex, you may find that you'll want to give the user a feeling of progressing through a game or animation by changing the backdrop. Here we'll do that when the timer runs out and the game finishes.
To do that we need to:
- add a broadcast when the timer runs out
- create a new backdrop to display at the end of the game
- change the backdrop when the timer runs out
- hide the existing sprites when the game ends
- tell the user their score when the game ends
We'll use the broadcast Event blocks and also the when backdrop switches to event block. Let's start by creating that broadcast.
Creating a Broadcast
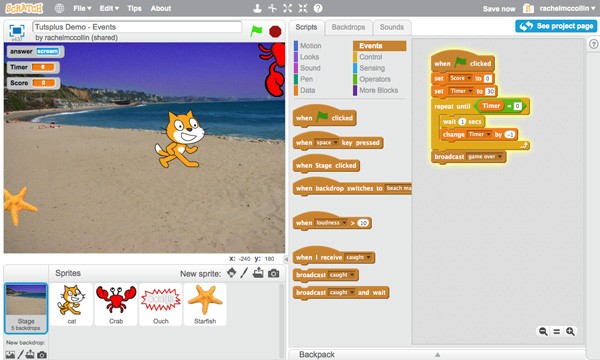
Select the Stage and add a broadcast block to the end of its script, replacing the stop all block. I'm calling this broadcast game over.
Creating a New Backdrop
Now create an extra backdrop for the stage in the same way as you created backdrops earlier in this series. Select the Stage, click on the Backdrops tab and either import, draw or select a backdrop from the library. I'm selecting the Circles backdrop from the library.
The new backdrop will now appear and your original one will disappear—don't panic! We'll make the original one appear when the project is launched and the new one appear when the game finishes.
Changing the Backdrop at the Right Time
By now you can probably work out how to get the first backdrop to appear when the project is launched. Simply drag the switch backdrop to block from the Looks blocks to the script for the Stage, right beneath the when green flag clicked block and above the set Score to 0 block. In the dropdown box in that block, select beach malibu.
Now when you run the project, the backdrop will switch back to the one you're familiar with:
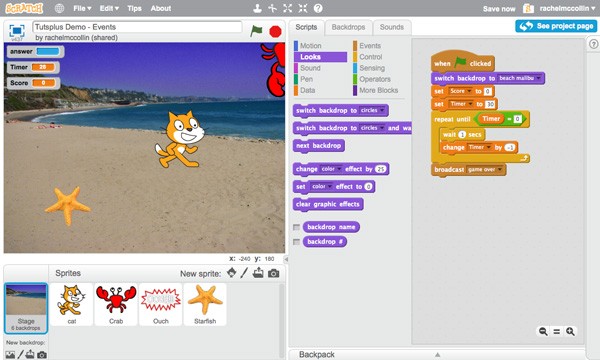
To change the backdrop when the game ends, create a new script for the Stage:
when I receive caughtswitch backdrop to circles
Your Stage will now have two scripts:
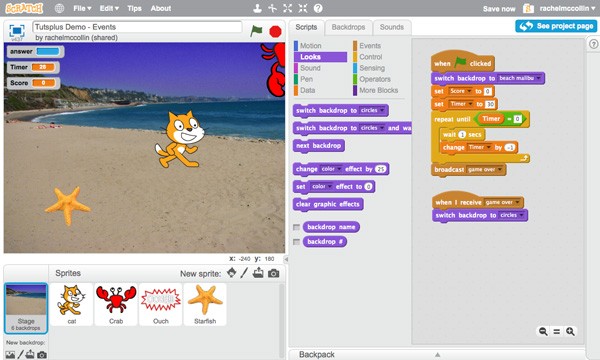
Now when you run your project, the backdrop will change when the game ends, but the game won't actually end. Let's fix that.
Hiding Sprites When the Game Ends (and Showing Them When It Begins)
When the game ends, we want the crab, starfish and ouch sprites to disappear. We therefore need to create an identical script for each of these spites, which will be triggered by the broadcast. The good news is that you can create the script once and then copy it to each of the sprites.
Start with the crab sprite. Create this script for it:
when I receive game overhide
Now copy that script to each of the ouch and starfish sprites by dragging the script from the Scripts pane for the crab sprite onto each of the sprites below the main stage.
Now when you play the game your sprites will disappear when the game ends—but they won't reappear when you play the game again. So you need to make them appear when the project starts.
For each of the crab and starfish sprites, add a show block to the script that begins with when green flag clicked, right at the beginning. Don't do this for the ouch sprite as that only appears when the crab and the cat are touching. The crab sprite for example will now look like this:
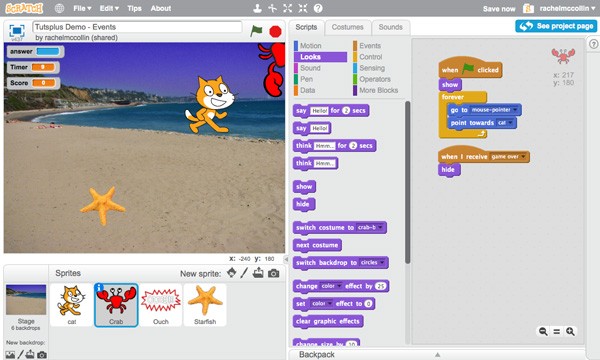
Now when you play the game the sprites will appear at the beginning and disappear at the end. The only thing that isn't working now is the cat sprite, which is still moving around. We don't want it to do that, so we'll edit the existing script for the cat.
The cat currently has a forever block which controls its movement and the score. Replace that forever block with a repeat until block, making sure all of the same blocks are still inside the repeat until block that were inside the forever block. You may find it easier to drag the forever block away from the script on the Scripts pane, drag the repeat until block into position, and then drag the blocks from inside the forever block inside the repeat until block. Then delete the forever block.
In the space in the repeat until block, we can't use a when I receive block, as they're designed to start scripts off. Instead we'll use an operator. Drag the = block into that space, drag the Timer variable to the first space, and type 0 in the second space so the block reads repeat until Timer = 0.
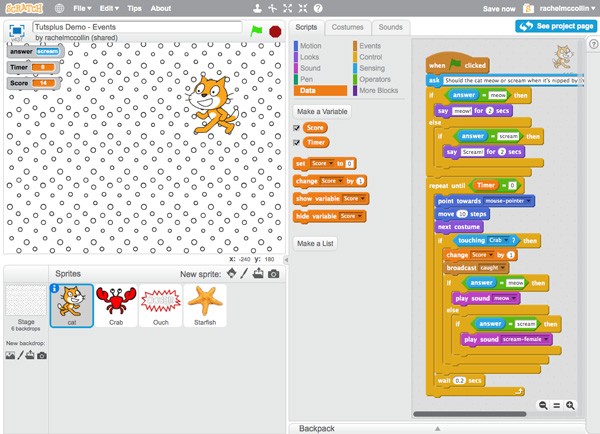
Now run the game and when the time stops, the cat will still be visible but will be still.
Telling the User Their Score When the Game Ends
Let's have the cat tell the user their score. Create a new script for the cat sprite as follows:
when backdrop switches to circlessay join You scored Score
Creating that second block is a bit complicated. You'll need to drag the say Hello! block to the script, then drag the join block from Operators to the space where it says Hello! Then type 'You scored ' in the first space in the join block, and drag the Score variable to the second space. Make sure you add a space at the end of your text. The script will look like this:

Now when you run the game, the cat will appear on its own at the end and tell you your score.
Summary
Adding events to your projects lets you make things happen as the project progresses, in response to user inputs, scripts reaching a certain point, or the value of a variable changing. In this tutorial you've learned how to use events to change the backdrop when the timer counts down to zero, and display the user's score.
If you fancy a challenge, why not add some operators to the sprite you created that tells the user their score. Maybe you could use an if block to detect the value of the Score valuable and have the cat say 'Well done!' if the user scores more than a certain amount, or 'Better luck next time!' if they have a low score.
In the next part of this series we'll move on to creating animated effects using backdrops. We'll make use of the duplicate backdrops we created right at the beginning of the series to create a zooming in effect.


Comments