
RubyMotion is a framework that lets you build iOS applications in Ruby. It gives you all of the benefits of the Ruby language, but because your code is compiled to machine code, you gain all of the raw performance of developing in Objective-C. RubyMotion lets you use the iOS SDK directly, which means you have access to all of the latest features of the platform. You can include Objective-C code into your project and RubyMotion even works with CocoaPods.
In this tutorial, you’ll build a painting application from scratch. I’ll show you how to incorporate Interface Builder into your workflow and how to properly test your application. If you don’t have any prior iOS or Ruby experience, I’d recommend you learn more about those first. The Tuts+ Ruby for Newbies and Learning iOS SDK Development from Scratch guides are a great place to start.
1. Project Setup
Before you can start coding, you need to have RubyMotion installed and set up. For details on how to do this, check out the Prerequisites section of the RubyMotion Getting Started guide.
Once you've done that, open up your terminal and create a new RubyMotion project by running:
motion create paint
cd paint
This creates a paint directory and several files:
- .gitignore: This file tells Git which files to ignore. Because RubyMotion generates build files when it’s running, this file is useful for keeping your generated build files out of source control.
- Gemfile: This file contains your application’s dependencies.
-
Rakefile: RubyMotion uses Rake to build and run your application. The Rakefile configures your application and loads its dependencies. You can see all of the tasks available to your application by running
rake -Tfrom the command line. - app/app_delegate.rb: The application delegate is the entry point to your application. When iOS finishes loading your application into memory, the application delegate is notified.
RubyMotion also generates a spec/main_spec.rb file. I’ll show you how to test your application a little later in this tutorial. For now, you can delete this file by running rm spec/main_spec.rb from the command line.
Install your application’s dependencies by running bundle install followed by bundle exec rake to start your application.
Woohoo! A black screen. You’ll make it more interesting in a minute.
2. First Change
Even though it’s nice to have a running app, a black screen is a little boring. Let’s add a little color.
Like the native iOS SDK, RubyMotion doesn’t force you to organize your files in any specific way. However, it’s useful to create a few folders in the app directory to keep your project organized. Run the following commands from the command line to create a directory for your models, views, and controllers.
mkdir app/models
mkdir app/views
mkdir app/controllers
Next, take a look inside the app/app_delegate.rb file:
class AppDelegate
  def application(application, didFinishLaunchingWithOptions:launchOptions)
    true
  end
end
If you’re familiar with iOS development, you’ll notice this method belongs to the UIApplicationDelegate protocol, which provides several hooks into the application life cycle. Note that the AppDelegate class doesn’t declare that it implements the UIApplicationDelegate protocol. Ruby relies on duck typing as it doesn't support protocols. This means it doesn’t care whether your class says it implements a protocol, it only cares if it implements the correct methods.
The definition of the application:didFinishLaunchingWithOptions: method inside the AppDelegate class may look a little strange. In Objective-C, this method would be written like this:
- (BOOL)application:(UIApplication *)application didFinishLaunchingWithOptions:(NSDictionary *)launchOptions;
Because Objective-C method names can be split into several parts, Ruby implements them in a unique way. The first part of application:didFinishLaunchingWithOptions: is what would be the method name in MRI. The rest of the method signature is written like keyword arguments. In RubyMotion, application:didFinishLaunchingWithOptions: is written like this:
def application(application, didFinishLaunchingWithOptions:launchOptions)
end
Let’s implement this method.
class AppDelegate
  def application(application, didFinishLaunchingWithOptions:launchOptions)

    @window = UIWindow.alloc.initWithFrame(UIScreen.mainScreen.bounds)
    @window.makeKeyAndVisible
    @window.rootViewController = UIViewController.alloc.initWithNibName(nil, bundle: nil)

    true
  end
end
The first two lines of the application:didFinishLaunchingWithOptions: method create a new window object and makes it the key window of the application. Why is @window an instance variable? RubyMotion will garbage collect the window unless we store it. The last line of the method sets the window’s root view controller to a new, empty view controller.
Run the application to make everything is still working.

Hmm. The application runs, but the screen is still black. How do you know your code is working? You can do a quick sanity check by adding the following to the bottom of the application:didFinishLaunchingWithOptions:, before true. Be sure to remove this before moving on.
@window.rootViewController.view.backgroundColor = UIColor.yellowColor

3. Testing
No application is complete without a solid suite of tests. Testing allows you to be confident your code works and it lets you make changes without worrying about breaking existing code.
RubyMotion ships with a port of the Bacon testing library. If you’re familiar with Rspec, Bacon will feel very familiar.
To get started, mirror the app directory structure in the spec directory by running the following commands from the command line.
mkdir spec/models
mkdir spec/views
mkdir spec/controllers
Next, create the AppDelegate's specification file at spec/app_delegate_spec.rb. By convention, source files are mirrors in the spec directory and have _spec appended to the end of their file name.
Start this class by defining a describe block that tells the reader what your file is testing.
describe AppDelegate do
end
Next, add a second describe block within the first to show that you want to test the application:didFinishLaunchingWithOptions: method.
describe AppDelegate do
  describe "#application:didFinishLaunchingWithOptions:" do
  end
end
Did you notice the # at the beginning of the method signature? By convention, instance methods begin with a hash and class methods begin with a period.
Next, add a spec using an it block.
describe AppDelegate do
  describe "#application:didFinishLaunchingWithOptions:" do
    it "creates the window" do
      UIApplication.sharedApplication.windows.size.should == 1
    end
  end
end
One of the best things about Bacon—and other BDD test frameworks—is that the specs are very clear about what they’re testing. In this case, you're making sure the application:didFinishLaunchingWithOptions: method creates a window.
Your spec doesn't have to call the application:didFinishLaunchingWithOptions: method directly. It's called automatically when Bacon launches your application.
Run your application's specs by running bundle exec rake spec from the command line. You should see output like this:
1 specifications (1 requirements), 0 failures, 0 errors
This tells you that Bacon ran one test and didn’t find any errors. If one of your specs fails, you’ll see 1 failure and Bacon will print out a detailed description of the problem.
The above works, but you’ll be using UIApplication.sharedApplication for all of your specs. Wouldn’t it be nice if you could grab this object once and use it in all of the specs? You can with a before block.
describe AppDelegate do

  describe "#application:didFinishLaunchingWithOptions:" do

    before do
      @application = UIApplication.sharedApplication
    end

    it "creates the window" do
      @application.windows.size.should == 1
    end
  end
end
Now you can easily add the rest of the application's specs.
describe AppDelegate do

  describe "#application:didFinishLaunchingWithOptions:" do

    before do
      @application = UIApplication.sharedApplication
    end

    it "creates the window" do
      @application.windows.size.should == 1
    end

    it "makes the window key" do
      @application.windows.first.isKeyWindow.should.be.true
    end

    it "sets the root view controller" do
      @application.windows.first.rootViewController.should.be.instance_of UIViewController
    end
  end
end
Run these to make sure everything works before moving on.
4. Adding the User Interface
There are several ways to create the user interface using RubyMotion. My personal favorite is to use Interface Builder with the IB gem. Open up your Gemfile and add the IB gem.
source 'https://rubygems.org'

gem 'rake'
gem 'ib'
Run bundle install from the command line to install the gem. If you’re using Git, add ib.xcodeproj to your .gitignore file.
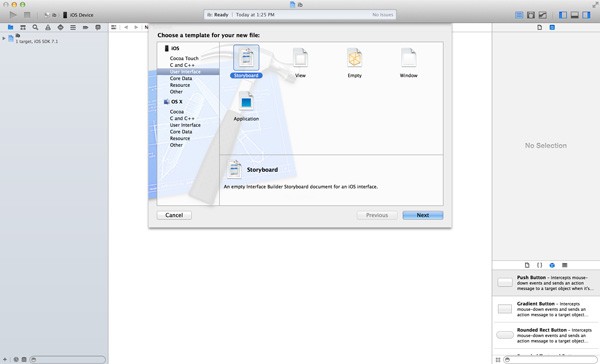
Interface Builder is a part of Xcode. Launch Interface Builder by running bundle exec rake ib:open. This creates an Xcode project tailored to your application. Create a new user interface files by selecting New > File... from Xcode's File menu and select Storyboard from the User Interface category on the left. Click Next twice to complete this step.
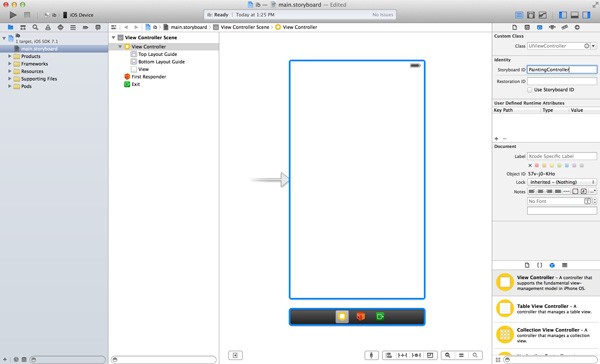
Save the storyboard in the resources directory as main.storyboard. Open the storyboard in Xcode and drag a new View Controller into it from the Object Library on the right. Set the Storyboard ID field of the controller to PaintingController.
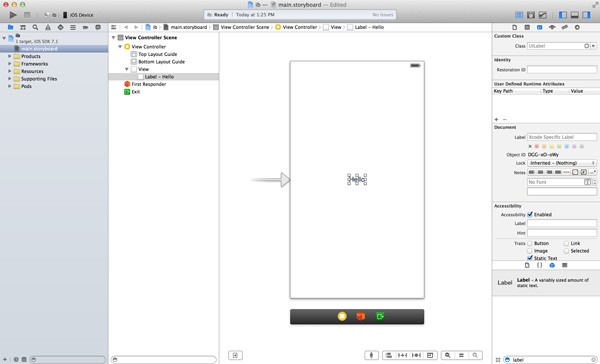
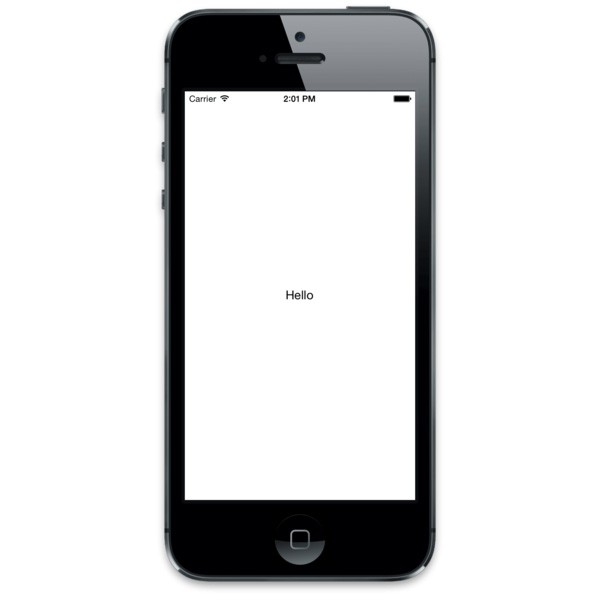
Drag a label into the view controller’s view from the Object Library on the right and set its text to Hello.
Next, open up app/app_delegate and replace the last line of application:didFinishLaunchingWithOptions: with the following:
storyboard = UIStoryboard.storyboardWithName("main", bundle: nil)
@window.rootViewController = storyboard.instantiateInitialViewController
Next, run your application’s tests again with bundle exec rake spec to make sure they still pass. Notice how you didn’t have to change any of them? Good specs test the behavior of the code, not its implementation. This means you should be able to change how your code is implemented and your specs should still work. Run your application to test drive your new user interface.
5. Buttons
What you’ve built so far is great, but wouldn’t it be nice if your app actually did something? In this section, you’ll add the controls for switching the color of the paint brush. Create two new files, a controller and its spec, by running the following commands.
touch app/controllers/painting_controller.rb
touch spec/controllers/painting_controller_spec.rb
Implement the PaintingController's skeleton along with its spec.
class PaintingController < UIViewController
end
describe PaintingController do
  tests PaintingController, :storyboard => 'main', :id => 'PaintingController'
end
RubyMotion handles controller specs in a special way. The tests PaintingController, :storyboard => 'main', :id => 'PaintingController' line of the spec file tells RubyMotion to use the controller with a storyboard ID of PaintingController in the main storyboard. You can use the controller variable to test it.
Next, you’ll need to add outlets to your controller. These allow you to connect objects to your controller in Interface Builder.
class PaintingController < UIViewController
  extend IB

  outlet :black_button
  outlet :purple_button
  outlet :green_button
  outlet :blue_button
  outlet :white_button

  def select_color(sender)
  end
end
extend IB adds several methods to your controller, including outlet. You’ve added five outlets, one for each button.
The images for the buttons are included in the source files of this tutorial. Download the images and copy them into the resources directory. You need to regenerate your Xcode project to allow Interface Builder to pick up the changes we've made. The easiest way to do this is by closing Xcode and running bundle exec rake ib:open, which will reopen the project.
Select the view controller and change its class to PaintingController.

Open spec/app_delegate_spec.rb and modify the last spec to check for the PaintingController class.
it "sets the root view controller" do
  @application.windows.first.rootViewController.should.be.instance_of PaintingController
end
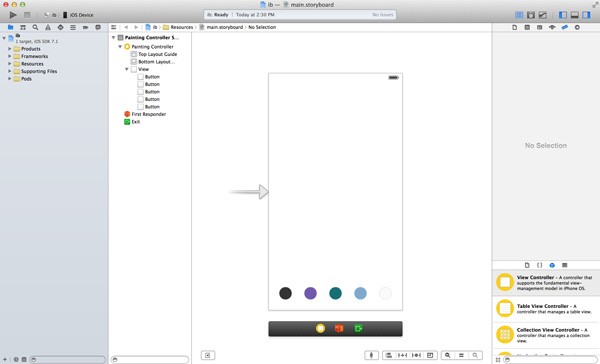
Add five buttons to the view controller's view by dragging Button objects onto the view from the Object Library on the right.
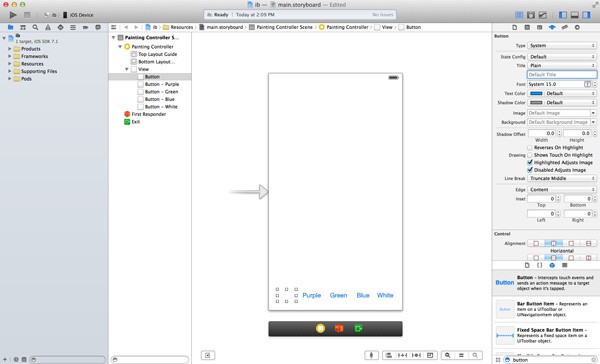
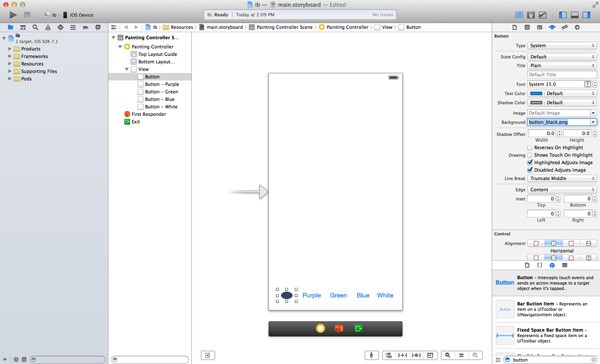
These buttons are a bit dull. Select the first button, change its type to Custom in the Attributes Inspector on the right and remove its title. Be sure the Default state is selected in the State Config drop-down menu and set the background image to button_black.png. Set the Tint property of the button to transparent.
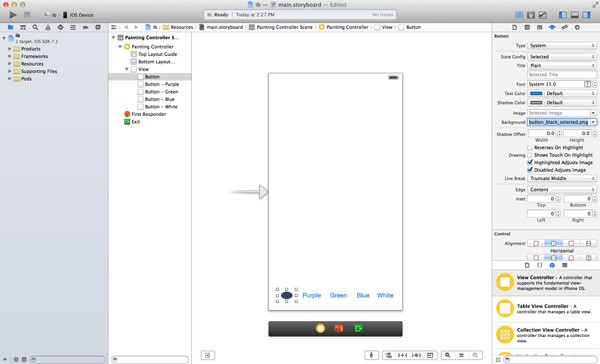
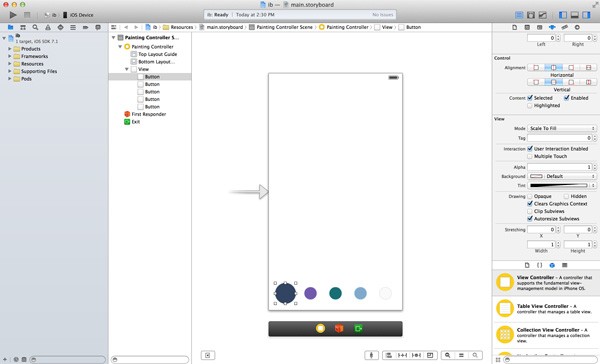
Set the State Config drop-down menu to Selected and change the background image to button_black_selected.png.
In the Size Inspector, change the width and height of the button to 50.

Repeat this process for the other buttons.
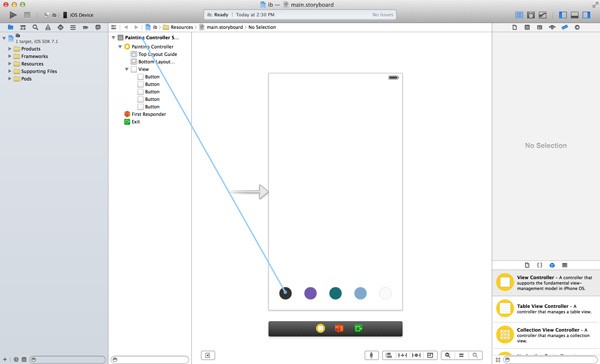
The next step is to hook the buttons up to the view controller's outlets we declared earlier. Hold down the Control key on your keyboard and drag from the view controller to the first button. A menu will pop up when you release your mouse. Select black_button from the menu. Next, hold down the Control key and drag from the button to the view controller and choose the select_color method from the menu that pops up. Repeat these two steps for the other buttons.
Finally, select the first button and click on the Selected checkbox under Control in the Attributes Inspector.
Now's a good time to add a few helpful specs to spec/painting_controller_spec.rb.
describe PaintingController do
  tests PaintingController, :storyboard => 'main', :id => 'PaintingController'

  describe "#black_button" do
    it "is connected in the storyboard" do
      controller.black_button.should.not.be.nil
    end
  end

  describe "#purple_button" do
    it "is connected in the storyboard" do
      controller.purple_button.should.not.be.nil
    end
  end

  describe "#green_button" do
    it "is connected in the storyboard" do
      controller.green_button.should.not.be.nil
    end
  end

  describe "#blue_button" do
    it "is connected in the storyboard" do
      controller.blue_button.should.not.be.nil
    end
  end

  describe "#white_button" do
    it "is connected in the storyboard" do
      controller.white_button.should.not.be.nil
    end
  end
end
These specs ensure the outlets are properly connected in Interface Builder. As always, it’s a good idea to run them before proceeding to make sure they all pass.
Next, you’ll implement the select_color method in PaintingController. When this method is called, the button that was tapped is selected and the previously selected button is deselected.
def select_color(sender)

  [ black_button, purple_button, green_button, blue_button, white_button ].each do |button|
    button.selected = false
  end

  sender.selected = true
end
Add the specs to spec/controllers/painting_controller_spec.rb.
describe "#select_color" do

  before do
    controller.select_color(controller.green_button)
  end

  it "deselects the other colors" do
    controller.black_button.state.should == UIControlStateNormal
    controller.purple_button.state.should == UIControlStateNormal
    controller.blue_button.state.should == UIControlStateNormal
    controller.white_button.state.should == UIControlStateNormal
  end

  it "selects the color" do
    controller.green_button.state.should == UIControlStateSelected
  end
end
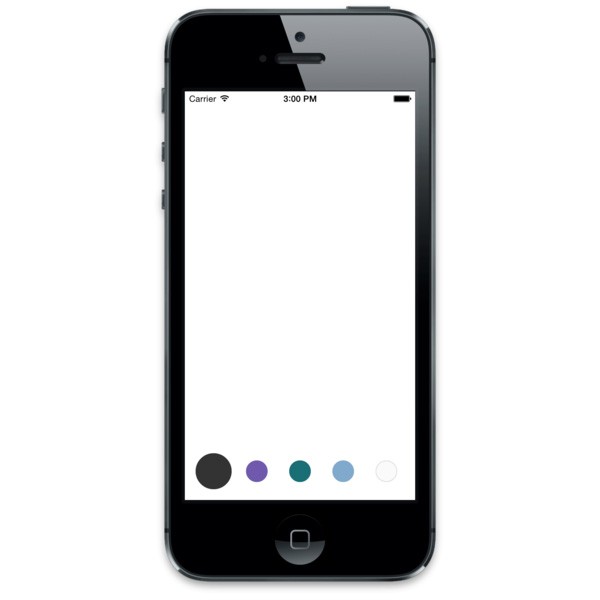
Run the application and make sure the button selection works. When you tap on a button, it should increase in size. While this is cool, what you really want is for a color to be selected when the button is tapped. This is easy to accomplish with a few additions.
Sugarcube is a set of iOS extensions for RubyMotion that make several tasks, like creating colors, simpler. Add gem 'sugarcube' to your Gemfile and run bundle install. Then, add require "sugarcube-color" to your Rakefile above Motion::Project::App.setup.
The gem makes it easy to create colors using their hex code. In the PaintingController class, add the following code snippet below the declaration of the outlets:
COLORS = [
  "#333333".uicolor,
  "#7059ac".uicolor,
  "#196e76".uicolor,
  "#80a9cc".uicolor,
  "#fafafa".uicolor
]
Next, refactor the array of buttons in select_color into a private helper method:
def select_color(sender)

  buttons.each do |button|
    button.selected = false
  end

  sender.selected = true
  @color = COLORS[sender.tag]
end

private

def buttons
  [ black_button, purple_button, green_button, blue_button, white_button ]
end
Finally, add a new method below select_color that returns the selected color.
def selected_color
  COLORS[buttons.find_index { |button| button.state == UIControlStateSelected }]
end
This method grabs the index of the selected button and selects the color that corresponds to it. Of course, this method wouldn’t be complete without tests.
describe "#selected_color" do

  before do
    controller.select_color(controller.green_button)
  end

  it "returns the correct color" do
    controller.selected_color.should == PaintingController::COLORS[2]
  end
end
Run your application again to make sure everything works as expected.
Conclusion
You’ve covered a lot of ground in this tutorial. You’ve learned how to set up and run a RubyMotion application, you've worked with Interface Builder, and you've built a user interface.
In the second part of this tutorial, you’ll dive deeper into the Model-View-Controller pattern on iOS and your application’s organization. You’ll also add a painting view and write the code that allows the user to draw. Stay tuned.

Comments