About Swift
Swift is an awesome programming language that Apple introduced during WWDC 2014, and now almost all Apple developers are using it to program iOS and OS X applications. It's very flexible, easier to use than its predecessor Objective C, and it will save you some precious minutes when coding with XCode.
This is a powerful and intuitive programming language for iOS, OS X, tvOS, and watchOS. Writing Swift code is interactive and fun, the syntax is concise yet expressive, and Swift includes modern features developers love. If you're not using Swift already, check out some of our other great tutorials on the Swift language:
 iOSiOS From Scratch With Swift: Creating Your First iOS Application
 SwiftiOS From Scratch With Swift: Swift in a Nutshell
 SwiftUp and Running With Swift 2
About This Tutorial
Most of the time, when you build an iOS app with more than one screen, you need to pass data between your View Controllers in order for them to share contents without losing them along the way. In this tutorial, you'll learn how to do that. We will use a String, an Integer, and also a UIImage, so keep reading—you'll be amazed at how easy this job is with Swift.
The XCode Project Setup
First of all, create a new XCode project. Choose Single View Application and name the project however you like. You'll find a ViewController.swift file in the files list on the left-side panel and a controller interface in the Storyboard.
Start by dragging a new View Controller from the Object library into your Storyboard.

Embed your first controller into a NavigationController, so when you push to the next controller the top bar will display a default Back button. Now select the first controller in Storyboard and click on Editor > Embed in... > Navigation Controller.

Now add a UILabel and a UIButton to the controller. You can find them in the Object library and drag them into your first controller. Then double-click on the UILabel and type the text you want to pass to the second controller. I've just set its text to "Text to pass".
On the second Controller, drag a new UILabel anywhere you want and just leave the text the way it is.

We have now to create a new .swift file and attach it to our second controller. So, right-click in the files list panel on the left, click New File..., select Cocoa Touch Class from the iOS Source category, click Next, and name the new view controller SecondVC. (No spaces are allowed in the name, and it must start with a capital letter.)
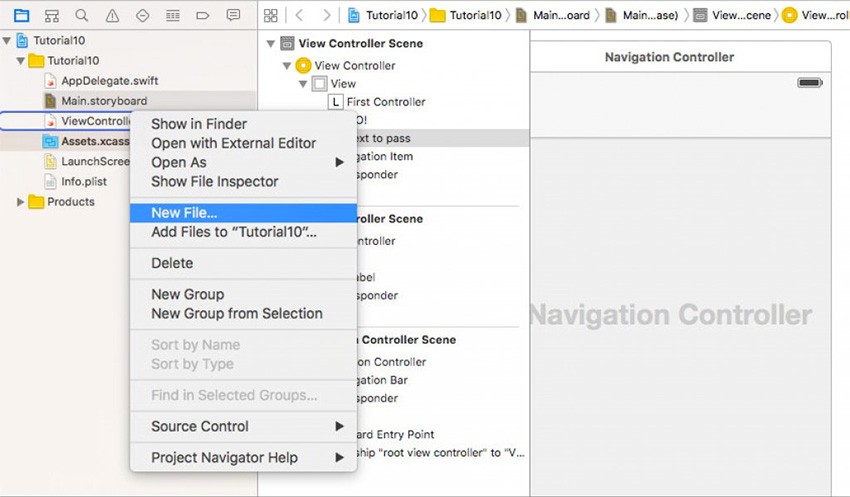
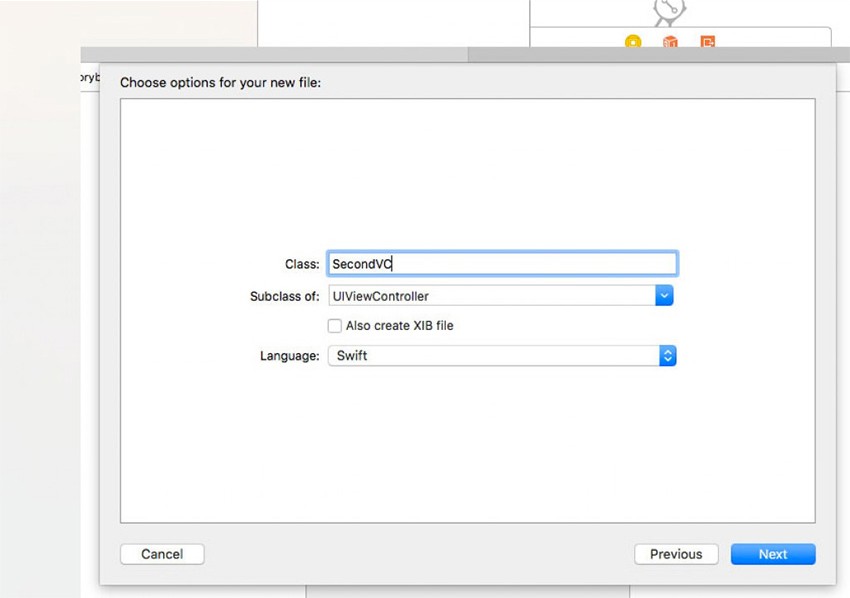
Now you have to link the second Controller in Storyboard with your new SecondVC.swift file. Select the yellow circle at the top of the controller, click on the Identify inspector panel icon on the right side of the XCode window, and type the name of your new .swift file in the Class and StoryboardID fields.

Connecting Views to the .swift Files
Split the XCode window into two parts by clicking on the Assistant editor button in the top-right corner. Now you'll have the Storyboard on the left and its relevant .swift file on the right-hand side.

Connect the UILabel as an IBOutlet and the UIButton as an IBAction to your .swift file by holding the right mouse button (or the Control key and mouse button) over those views and dragging the blue line right below the class declaration.
When you release the mouse, you can give a name to the label's outlet and to the button's action in the little grey popup that shows up. For the button, make sure to click the small combo box that says Outlet and switch it into Action, because we need it to be a function, not an outlet.


Once you're done connecting all the views, keep your XCode window split into two sections and select the first controller from the Storyboard. Now the right side will show the ViewController.swift file and you'll be ready to write some code in it.
Let's Code!
Place the following code into the goButton() method.
let myVC = storyboard?.instantiateViewControllerWithIdentifier("SecondVC") as! SecondVC
myVC.stringPassed = myLabel.text!
navigationController?.pushViewController(myVC, animated: true)
The first line instantiates the SecondVC controller from the Storyboard.
The second line is actually the core of this tutorial, because it assigns the myLabel's text to the UILabel we've placed into the SecondVC controller. It does that by setting a String that we're gong to declare later.
Then finally, we simply push the view to the next controller.
Passing a String
Now select the other controller in Storyboard and add this variable right below the SecondVC's class declaration:
var stringPassed = ""
Make the app assign the value of this variable to secondLabel with the following line of code in the viewDidLoad() method.
secondLabel.text = stringPassed
You're done! Run the app on the iOS Simulator or a real device, tap GO! and you should get something like this:
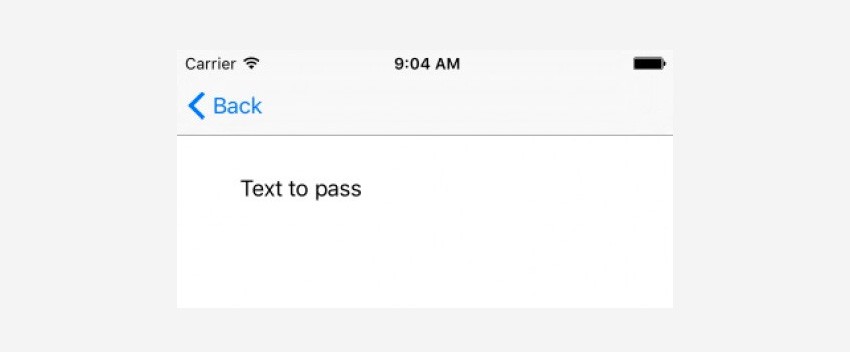
As you can see, the Text to pass String has been successfully passed to our SecondVC controller.
Passing an Integer
Now let's try to add an Integer (Int in Swift) and share it between the two controllers.
Add the following variable to the ViewController.swift, right below the myLabel Outlet's declaration.
var myInt = Int()
Initialize its value in viewDidLoad():
override func viewDidLoad() {
    super.viewDidLoad()

    myInt = 5
}
Next, edit the goButton() function by adding an instance that will also pass our myInt value to the next controller, as follows:
let myVC = storyboard?.instantiateViewControllerWithIdentifier("SecondVC") as! SecondVC
myVC.stringPassed = myLabel.text!
myVC.intPassed = myInt
navigationController?.pushViewController(myVC, animated: true)
Now go into SecondVC.swift and first add a variable of type Int that will get the number we'll send from the first controller. Place this line of code right below the stringPassed variable.
var intPassed = Int()
Edit the secondLabel line of code as it follows:
secondLabel.text = stringPassed + " my Int: \(intPassed)"
That's all. Run the app again and tap the GO! button, and you should get something like this:
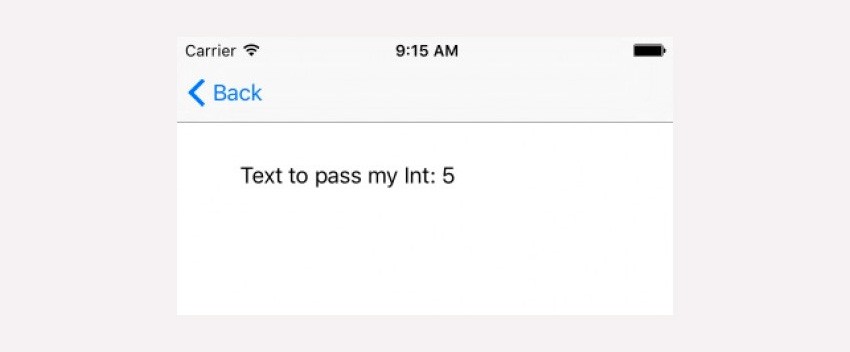
So now you see how easy it is to pass variables from one controller to another. The last thing I'd like to show you is how to pass an image.
Passing an Image
Next we need to add an image into the Assets folder in XCode, a UIImageView in both controllers and their relative variables of type UIImage.
Enter the Assets.xcassets blue folder and create a new Image Set.

Drag the 3x, 2x and 1x images into their relative boxes. You're free to use any image. I've used an Apple logo just as an example.

Go back to the first controller in Storyboard and drag a UIImageView anywhere in it. Attach your image to it using the Attributes inspector panel and set its Mode to Aspect Fit.
Now drag a new UIImageView into the second controller and set its Mode to Aspect Fit. Do not assign any image to it, though, because we'll pass the image from the first controller!

Right-click on the mouse (or hold Control and click the mouse button) and drag a blue line into the first controller's .swift file to declare your UIImageView as an IBOutlet. Do the same thing also on the second controller.


Now you have to add a UIImage variable to the SecondVC.swift file. Place it underneath the intPassed variable.
var theImagePassed = UIImage()
In viewDidLoad(), grab the image passed by the first controller and display it with imagePassed.
imagePassed.image = theImagePassed
Lastly, edit the goButton() method by adding a line of code that will pass the image of the first controller into the UIImageView of the second one. The full goButton() method is now as follows.
let myVC = storyboard?.instantiateViewControllerWithIdentifier("SecondVC") as! SecondVC
myVC.stringPassed = myLabel.text!
myVC.intPassed = myInt
myVC.theImagePassed = myImage.image!
navigationController?.pushViewController(myVC, animated: true)
Run the app, tap the GO! button again, and you should see something like this:
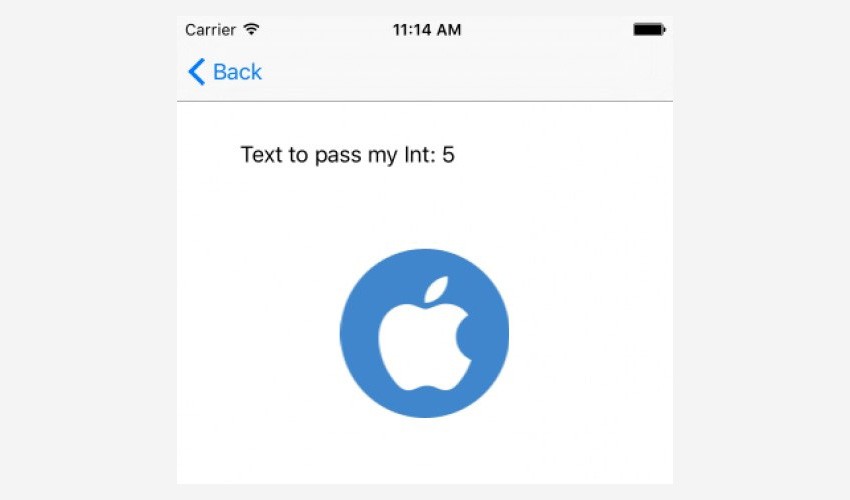
Thanks for following along! I hope you're amazed by how easy it is to exchange variables and images between two controllers. Please check out some of our other tutorials on Xcode and Swift!


Comments