Introduction
One of the
most interesting aspects of the Material
Design specifications is the visual
continuity between activities. With just a few lines of code, the new Lollipop APIs allow you to meaningfully transition
between two activities, thanks to seamless and continuous animations. This breaks the classic activity boundaries of the previous Android versions and
allows the user to understand how elements go from one point to another.
In this tutorial, I will show you how to achieve this result, making a sample application consistent with Google’s Material Design guidelines.
Prerequisites
In this tutorial, I'll assume that you are already familiar with Android development and that you use Android Studio as your IDE. I'll use Android intents extensively, assuming a basic knowledge of the activity lifecycle, and the new RecyclerView widget introduced with API 21, last June. I'm not going to dive into the details of this class, but, if you're interested, you can find a great explanation in this Tuts+ tutorial.
1. Create the First Activity
The basic structure of the application is straightforward. There are two activities, a main one, MainActivity.java, whose task it is to display a list of items, and a second one, DetailActivity.java, which will show the details of the item selected in the previous list.
Step 1: The RecyclerView Widget
To show the list of items, the main activity will use the RecyclerView widget introduced in Android Lollipop. The first thing you need to do is, add the following line to the dependencies section in your project’s
build.grade file to enable backward
compatibility:
compile 'com.android.support:recyclerview-v7:+'
Step 2: Data Definition
For the
sake of brevity, we will not define an actual database or a similar source of
data for the application. Instead, we will use a custom class, Contact. Each item
will have a name, a color, and basic contact information associated to it. This is what the implementation of the Contact class looks like:
public class Contact {

    // The fields associated to the person
    private final String mName, mPhone, mEmail, mCity, mColor;

    Contact(String name, String color, String phone, String email, String city) {
        mName = name; mColor = color; mPhone = phone; mEmail = email; mCity = city;
    }

    // This method allows to get the item associated to a particular id,
    // uniquely generated by the method getId defined below
    public static Contact getItem(int id) {
        for (Contact item : CONTACTS) {
            if (item.getId() == id) {
                return item;
            }
        }
        return null;
    }

    // since mName and mPhone combined are surely unique,
    // we don't need to add another id field
    public int getId() {
        return mName.hashCode() + mPhone.hashCode();
    }

    public static enum Field {
        NAME, COLOR, PHONE, EMAIL, CITY
    }
    public String get(Field f) {
        switch (f) {
            case COLOR: return mColor;
            case PHONE: return mPhone;
            case EMAIL: return mEmail;
            case CITY: return mCity;
            case NAME: default: return mName;
        }
    }

}
You will end up with a nice container for the information you care about. But we need to fill it with some data. At the top of
the Contact class, add the following piece of code to populate the data set.
By defining the data as public and static, every class in the project is able to read it. In a sense, we mimic the behavior of a database with the exception that we are hardcoding it into a class.
public static final Contact[] CONTACTS = new Contact[] {
    new Contact("John", "#33b5e5", "+01 123456789", "[email protected]", "Venice"),
    new Contact("Valter", "#ffbb33", "+01 987654321", "[email protected]", "Bologna"),
    new Contact("Eadwine", "#ff4444", "+01 123456789", "[email protected]", "Verona"),
    new Contact("Teddy", "#99cc00", "+01 987654321", "[email protected]", "Rome"),
    new Contact("Ives", "#33b5e5", "+01 11235813", "[email protected]", "Milan"),
    new Contact("Alajos", "#ffbb33", "+01 123456789", "[email protected]", "Bologna"),
    new Contact("Gianluca", "#ff4444", "+01 11235813", "[email protected]", "Padova"),
    new Contact("Fane", "#99cc00", "+01 987654321", "[email protected]", "Venice"),
};
Step 3: Defining the Main Layouts
The
layout of the main activity is simple, because the list will fill the entire screen. The layout includes a RelativeLayout as the root—but it can just as well be a LinearLayout too—and a RecyclerView as its only child.
<RelativeLayout xmlns:android="http://schemas.android.com/apk/res/android"
    android:layout_width="match_parent"
    android:layout_height="match_parent"
    android:background="#f5f5f5">

    <android.support.v7.widget.RecyclerView
        android:layout_width="match_parent"
        android:layout_height="match_parent"
        android:id="@+id/rv" />

</RelativeLayout>
Because the
RecyclerView widget arranges subelements and nothing more, you also need to design the layout
of a single list item. We want to have a colored circle to the left of each item of the contact list so you first have to define the drawable circle.xml.
<shape
    xmlns:android="http://schemas.android.com/apk/res/android"
    android:shape="oval">
    <solid
        android:color="#000"/>
    <size
        android:width="32dp"
        android:height="32dp"/>
</shape>
You now have all the elements needed to define the layout of the list item.
<RelativeLayout xmlns:android="http://schemas.android.com/apk/res/android"
    android:layout_width="match_parent"
    android:layout_height="82dp"
    android:padding="@dimen/activity_horizontal_margin"
    android:background="?android:selectableItemBackground"
    android:clickable="true"
    android:focusable="true"
    android:orientation="vertical" >

    <View
        android:id="@+id/CONTACT_circle"
        android:layout_width="40dp"
        android:layout_height="40dp"
        android:background="@drawable/circle"
        android:layout_centerVertical="true"
        android:layout_alignParentLeft="true"/>

    <LinearLayout
        android:layout_width="wrap_content"
        android:layout_height="wrap_content"
        android:layout_centerVertical="true"
        android:layout_toRightOf="@+id/CONTACT_circle"
        android:layout_marginLeft="@dimen/activity_horizontal_margin"
        android:orientation="vertical">

        <TextView
            android:id="@+id/CONTACT_name"
            android:layout_width="wrap_content"
            android:layout_height="wrap_content"
            android:text="Jonh Doe"
            android:textColor="#000"
            android:textSize="18sp"/>

        <TextView
            android:id="@+id/CONTACT_phone"
            android:layout_width="wrap_content"
            android:layout_height="wrap_content"
            android:text="+01 123456789"
            android:textColor="#9f9f9f"
            android:textSize="15sp"/>

    </LinearLayout>

</RelativeLayout>
Step 4: Show the Data Using the RecyclerView
We have almost arrived at the end of the first part of the tutorial. You still have to write the RecyclerView.ViewHolder and the RecyclerView.Adapter, and assign everything to the associated view in the onCreate method of the main activity. In this case, the RecyclerView.ViewHolder must also be able to handle clicks so you will need to add a specific class capable of doing so. Let's start defining the class responsible for click handling.
public class RecyclerClickListener implements RecyclerView.OnItemTouchListener {

    private OnItemClickListener mListener;
    GestureDetector mGestureDetector;

    public interface OnItemClickListener {
        public void onItemClick(View view, int position);
    }

    public RecyclerClickListener(Context context, OnItemClickListener listener) {
        mListener = listener;
        mGestureDetector = new GestureDetector(context, new GestureDetector.SimpleOnGestureListener() {
            @Override public boolean onSingleTapUp(MotionEvent e) {
                return true;
            }
        });
    }

    @Override public boolean onInterceptTouchEvent(RecyclerView view, MotionEvent e) {
        View childView = view.findChildViewUnder(e.getX(), e.getY());
        if (childView != null && mListener != null && mGestureDetector.onTouchEvent(e)) {
            mListener.onItemClick(childView, view.getChildPosition(childView));
            return true;
        }
        return false;
    }

    @Override public void onTouchEvent(RecyclerView view, MotionEvent motionEvent) { }

}
It is necessary to specify the RecyclerView.Adapter, which I will call it DataManager. It is responsible for loading the data and inserting it into the
views of the list. This data manager class will also contain the definition of the RecyclerView.ViewHolder.
public class DataManager extends RecyclerView.Adapter<DataManager.RecyclerViewHolder> {

    public static class RecyclerViewHolder extends RecyclerView.ViewHolder {

        TextView mName, mPhone;
        View mCircle;

        RecyclerViewHolder(View itemView) {
            super(itemView);
            mName = (TextView) itemView.findViewById(R.id.CONTACT_name);
            mPhone = (TextView) itemView.findViewById(R.id.CONTACT_phone);
            mCircle = itemView.findViewById(R.id.CONTACT_circle);
        }
    }

    @Override
    public RecyclerViewHolder onCreateViewHolder(ViewGroup viewGroup, int i) {
        View v = LayoutInflater.from(viewGroup.getContext()).inflate(R.layout.contact_item, viewGroup, false);
        return new RecyclerViewHolder(v);
    }

    @Override
    public void onBindViewHolder(RecyclerViewHolder viewHolder, int i) {
        // get the single element from the main array
        final Contact contact = Contact.CONTACTS[i];
        // Set the values
        viewHolder.mName.setText(contact.get(Contact.Field.NAME));
        viewHolder.mPhone.setText(contact.get(Contact.Field.PHONE));
        // Set the color of the shape
        GradientDrawable bgShape = (GradientDrawable) viewHolder.mCircle.getBackground();
        bgShape.setColor(Color.parseColor(contact.get(Contact.Field.COLOR)));
    }

    @Override
    public int getItemCount() {
        return Contact.CONTACTS.length;
    }
}
Finally, add the following code to the onCreate method,
below setContentView. The main activity is ready.
RecyclerView rv = (RecyclerView) findViewById(R.id.rv); // layout reference

LinearLayoutManager llm = new LinearLayoutManager(this);
rv.setLayoutManager(llm);
rv.setHasFixedSize(true); // to improve performance

rv.setAdapter(new DataManager()); // the data manager is assigner to the RV
rv.addOnItemTouchListener( // and the click is handled
    new RecyclerClickListener(this, new RecyclerClickListener.OnItemClickListener() {
        @Override public void onItemClick(View view, int position) {
            // STUB:
            // The click on the item must be handled
        }
    }));
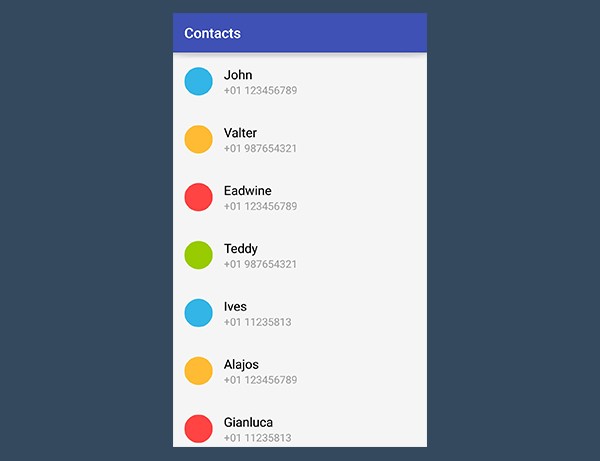
This is what the application looks like if you build and run it.
2. Create
the Details Activity
Step 1: The Layout
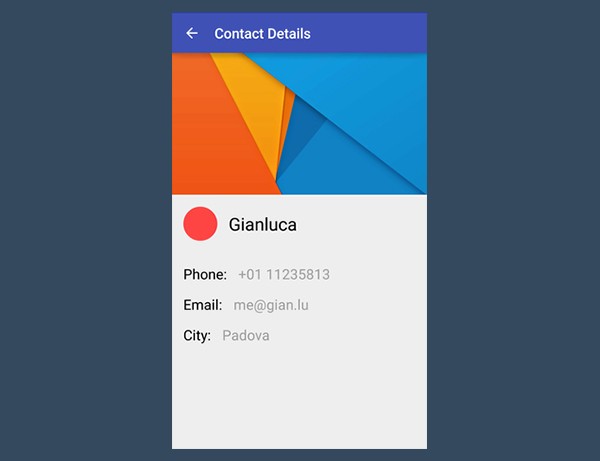
The second activity is much simpler. It takes the ID of the contact selected and retrieves the additional information that the first activity doesn't show.
From a design point of view, the layout of this activity is critical since it's the most important part of the application. But for what concerns the XML, it's trivial. The layout is a series of TextView instances positioned in a pleasant way, using RelativeLayout and LinearLayout. This is what the layout looks like:
<LinearLayout xmlns:android="http://schemas.android.com/apk/res/android"
    xmlns:tools="http://schemas.android.com/tools" android:layout_width="match_parent"
    android:layout_height="match_parent"
    android:orientation="vertical">

    <ImageView
        android:layout_width="match_parent"
        android:layout_height="200dp"
        android:scaleType="centerCrop"
        android:src="@mipmap/material_wallpaper"/>

    <RelativeLayout
        android:layout_width="match_parent"
        android:layout_height="82dp"
        android:padding="@dimen/activity_vertical_margin">

        <View
            android:id="@+id/DETAILS_circle"
            android:layout_width="48dp"
            android:layout_height="48dp"
            android:background="@drawable/circle"
            android:layout_centerVertical="true"
            android:layout_alignParentLeft="true"/>

        <TextView
            android:id="@+id/DETAILS_name"
            android:layout_width="wrap_content"
            android:layout_height="wrap_content"
            android:text="Jonh Doe"
            android:layout_toRightOf="@+id/DETAILS_circle"
            android:layout_marginLeft="@dimen/activity_horizontal_margin"
            android:layout_centerVertical="true"
            android:textColor="#000"
            android:textSize="25sp"/>

    </RelativeLayout>

    <LinearLayout
        android:layout_width="wrap_content"
        android:layout_height="wrap_content"
        android:layout_centerVertical="true"
        android:padding="@dimen/activity_horizontal_margin"
        android:orientation="vertical">

        <RelativeLayout
            android:layout_width="match_parent"
            android:layout_height="wrap_content">

            <TextView
                android:id="@+id/DETAILS_phone_label"
                android:layout_width="wrap_content"
                android:layout_height="wrap_content"
                android:text="Phone:"
                android:textColor="#000"
                android:textSize="20sp"/>

            <TextView
                android:id="@+id/DETAILS_phone"
                android:layout_width="wrap_content"
                android:layout_height="wrap_content"
                android:layout_toRightOf="@+id/DETAILS_phone_label"
                android:layout_marginLeft="@dimen/activity_horizontal_margin"
                android:text="+01 123456789"
                android:textColor="#9f9f9f"
                android:textSize="20sp"/>

        </RelativeLayout>

        <RelativeLayout
            android:layout_width="match_parent"
            android:layout_height="wrap_content"
            android:layout_marginTop="@dimen/activity_vertical_margin">

            <TextView
                android:id="@+id/DETAILS_email_label"
                android:layout_width="wrap_content"
                android:layout_height="wrap_content"
                android:text="Email:"
                android:textColor="#000"
                android:textSize="20sp"/>

            <TextView
                android:id="@+id/DETAILS_email"
                android:layout_width="wrap_content"
                android:layout_height="wrap_content"
                android:layout_toRightOf="@+id/DETAILS_email_label"
                android:layout_marginLeft="@dimen/activity_horizontal_margin"
                android:text="[email protected]"
                android:textColor="#9f9f9f"
                android:textSize="20sp"/>

        </RelativeLayout>

        <RelativeLayout
            android:layout_width="match_parent"
            android:layout_height="wrap_content"
            android:layout_marginTop="@dimen/activity_vertical_margin">

            <TextView
                android:id="@+id/DETAILS_city_label"
                android:layout_width="wrap_content"
                android:layout_height="wrap_content"
                android:text="City:"
                android:textColor="#000"
                android:textSize="20sp"/>

            <TextView
                android:id="@+id/DETAILS_city"
                android:layout_width="wrap_content"
                android:layout_height="wrap_content"
                android:layout_toRightOf="@+id/DETAILS_city_label"
                android:layout_marginLeft="@dimen/activity_horizontal_margin"
                android:text="Rome"
                android:textColor="#9f9f9f"
                android:textSize="20sp"/>

        </RelativeLayout>
    </LinearLayout>
</LinearLayout>
Step 2: Send and Receive the ID via Intent Extras
Since the two activities are linked by an intent, you need to send some piece of information that allows the second activity to understand of which contact you requested the details.
One option may be using the position variable as a reference. The position of the element in the list corresponds to the position of the element in the array so there should be nothing bad in using this integer as a unique reference.
This would work, but if you take this approach and, for whatever reason, the data set is modified at runtime, the reference won't match the contact you're interested in. This is the reason why it is better
to use an ID ad hoc. This information is the getId method defined in the Contact class.
Edit the onItemClick handler of the list of items as shown below.
@Override public void onItemClick(View view, int position) {
    Intent intent = new Intent(MainActivity.this, DetailsActivity.class);
    intent.putExtra(DetailsActivity.ID, Contact.CONTACTS[position].getId());
    startActivity(intent);
}
The DetailsActivity will receive the information from the Intent extras and construct the correct object using the ID as a reference. This is shown in the following code block.
// Before the onCreate
public final static String ID = "ID";
public Contact mContact;
// In the onCreate, after the setContentView method
mContact = Contact.getItem(getIntent().getIntExtra(ID, 0));
Just as before in the onCreateViewHolder method of the RecylerView, the views are initialized
using the findViewById method and populated using setText. For example, to configure the name field we do the following:
mName = (TextView) findViewById(R.id.DETAILS_name);
mName.setText(mContact.get(Contact.Field.NAME));
The process is the same for the other fields. The second activity is finally ready.
3. Meaningful Transitions
We
have finally arrived at the core of the tutorial, animating the two activities using the new Lollipop method for transitioning using a
shared element.
Step 1: Configure Your Project
The first thing you will need to do is edit your theme in the style.xml file in the values-v21 folder. In this way, you enable content transitions and set the entrance and the exit of the views that are not shared between the two activities.
<style name="AppTheme" parent="AppTheme.Base"></style>

<style name="AppTheme.Base" parent="android:Theme.Material.Light">

    <item name="android:windowContentTransitions">true</item>

    <item name="android:windowEnterTransition">@android:transition/slide_bottom</item>
    <item name="android:windowExitTransition">@android:transition/slide_bottom</item>

    <item name="android:windowAllowEnterTransitionOverlap">true</item>
    <item name="android:windowAllowReturnTransitionOverlap">true</item>
    <item name="android:windowSharedElementEnterTransition">@android:transition/move</item>
    <item name="android:windowSharedElementExitTransition">@android:transition/move</item>

</style>
Please note that your project must be targeted to (and thus be compiled with) at least Android API 21.
The animations will be ignored on systems that don't have Lollipop installed. Unfortunately, because of performance reasons, the AppCompat library does not provide complete backward compatibility for these animations.
Step 2: Assign the Transition Name in the Layout Files
Once you've edited your style.xml file, you have to point out the relationship between the two common elements of the views.
In our example, the shared views are the field containing the name of the contact, the one of the phone number, and the colored circle. For each of them, you have to specify a common transition name. For this reason, start adding in the strings.xml resource file the following items:
<string name="transition_name_name">transition:NAME</string>
<string name="transition_name_circle">transition:CIRCLE</string>
<string name=“transition_name_phone”>transition:PHONE</string>
Then,
for each of the three pairs, in the layout files add the android:transitionName
attribute with the corresponding value. For the colored circle, the code looks like this:
<!— In the single item layout: the item we are transitioning *from* —>
<View
    android:id=“@+id/CONTACT_circle”
    android:transitionName=“@string/transition_name_circle”
    android:layout_width=“40dp”
    android:layout_height=“40dp”
    android:background=“@drawable/circle”
    android:layout_centerVertical=“true”
    android:layout_alignParentLeft=“true”/>
<!— In the details activity: the item we are transitioning *to* —>
<View
    android:id=“@+id/DETAILS_circle”
    android:transitionName=“@string/transition_name_circle”
    android:layout_width=“48dp”
    android:layout_height=“48dp”
    android:background=“@drawable/circle”
    android:layout_centerVertical=“true”
    android:layout_alignParentLeft=“true”/>
Thanks to this attribute, Android will know which views are shared between the two activities and will correctly animate the transition. Repeat the same process for the other two views.
Step 3: Configure the Intent
From
a coding point of view, you will need to attach a specific ActivityOptions bundle to the intent. The method you need is makeSceneTransitionAnimation, which
takes as parameters the context of the application and as many shared elements
as we need. In the onItemClick method of
the RecyclerView, edit the previously defined Intent like this:
@Override public void onItemClick(View view, int position) {
    Intent intent = new Intent(MainActivity.this, DetailsActivity.class);
    intent.putExtra(DetailsActivity.ID, Contact.CONTACTS[position].getId());

    ActivityOptionsCompat options = ActivityOptionsCompat.makeSceneTransitionAnimation(
            // the context of the activity
            MainActivity.this,

            // For each shared element, add to this method a new Pair item,
            // which contains the reference of the view we are transitioning *from*,
            // and the value of the transitionName attribute
            new Pair<View, String>(view.findViewById(R.id.CONTACT_circle),
                    getString(R.string.transition_name_circle)),
            new Pair<View, String>(view.findViewById(R.id.CONTACT_name),
                    getString(R.string.transition_name_name)),
            new Pair<View, String>(view.findViewById(R.id.CONTACT_phone),
                    getString(R.string.transition_name_phone))
    );
    ActivityCompat.startActivity(MainActivity.this, intent, options.toBundle());
}
For each shared element to be animated, you will have to add to the makeSceneTransitionAnimation method a new Pair item. Each Pair has two values, the first is a reference to the view you are transitioning from, the second is the value of the transitionName attribute.
Be careful when importing the Pair class. You will need to include the android.support.v4.util package, not the android.util package. Also,
remember to use ActivityCompat.startActivity method instead of the startActivity method, because otherwise you will not be able to run your application
on environments with API below 16.
That's it. You’re done. It's as simple as that.
Conclusion
In this tutorial you learned how to beautifully and seamlessly transition between two activities that share one or more common elements, allowing for a visually pleasant and meaningful continuity.
You started by making the first of the
two activities, whose role it is to display the list of contacts. You then completed
the second activity, designing its layout, and implementing a way to pass a unique
reference between the two activities. Finally, you looked at the way in which makeSceneTransitionAnimation works, thanks to the XML transitionName attribute.
Bonus
Tip: Stylistic Details
To create a true Material Design looking application, as shown in the previous screenshots, you will also need to change the colors of your theme. Edit your base theme in the values-v21 folder to achieve a nice result.
<style name=“AppTheme” parent=“AppTheme.Base”>

    <item name=“android:windowTitleSize”>0dp</item>
    <item name=“android:colorPrimary”>@color/colorPrimary</item>
    <item name=“android:colorPrimaryDark”>@color/colorPrimaryDark</item>
    <item name=“android:colorAccent”>@color/colorAccent</item>
    <item name=“android:textColorPrimary”>#fff</item>
    <item name=“android:textColor”>#727272</item>
    <item name=“android:navigationBarColor”>#303F9F</item>

</style>

Comments