One of the highlights of my week is the Code Club I run at my local school. Every Thursday, I spend an hour with some budding coders helping them learn the fundamentals of code.
Along with other code clubs and similar organizations and groups, our group started programming using Scratch. Scratch is an online tool which helps kids learn the fundamentals of how code works and lets them create their own animations, games and more.
As well as being a tool, Scratch is a community: users can share their projects, make copies of each others' and 'remix' them, which is a bit like forking code in GitHub and consists of copying someone else's project and adding your own improvements or changes to it. Instead of expecting learners to write their code from scratch, Scratch provides them with a set of blocks: lines of code which they drag into place to create their code.
In this series of tutorials I'll give you a detailed introduction to Scratch and how to use it. This first part will give an overview of how Scratch works and its main components and concepts. I'll cover:
- getting started
- projects
- assets: backdrops, sprites, costumes and sounds
- scripts
- where to get help
First, here's how to get started with Scratch.
Getting Started With Scratch
Scratch was first developed in 2003 at the Massachusetts Institute of Technology. It started out as downloadable software but is now an online tool. It's completely free and is funded by grants from various organizations, including the National Science Foundation, Microsoft, Google and the LEGO Foundation.
To get started, just visit the Scratch website and sign up for an account with your email address.
In the top right hand corner of the screen, click Join Scratch. You'll be presented with the join-up screen:
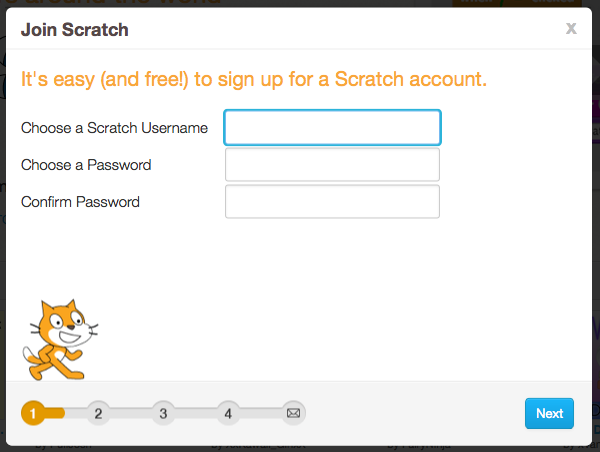
Create a username and password for yourself, and then click the Next button to move to the next screen:
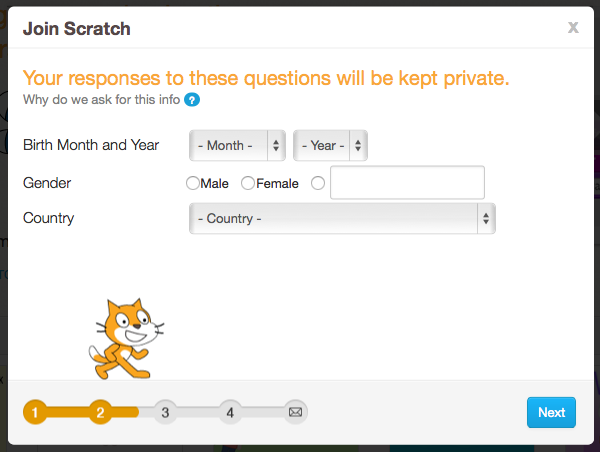
Here you're asked to provide some informant about yourself, which Scratch uses to monitor the type of people using the platform. Click Next again to move on:
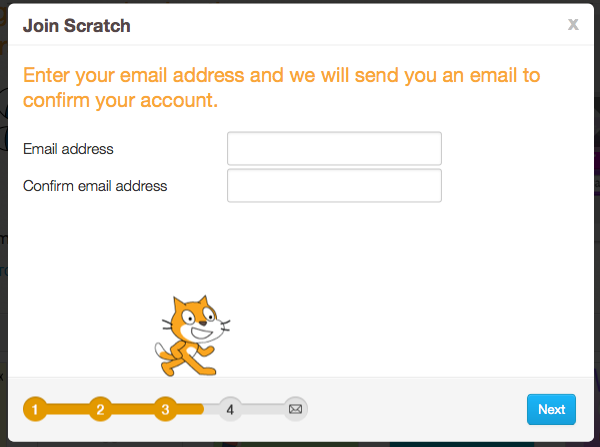
Provide your email address and you'll receive an email confirmation. You have to click the link in your email if you want to share your projects (if you don't want to share, you can continue without doing this, but you'll get a nagging reminder at the top of your screen every time you log in).
After you've given your email address and clicked Next, you'll see a welcome screen:
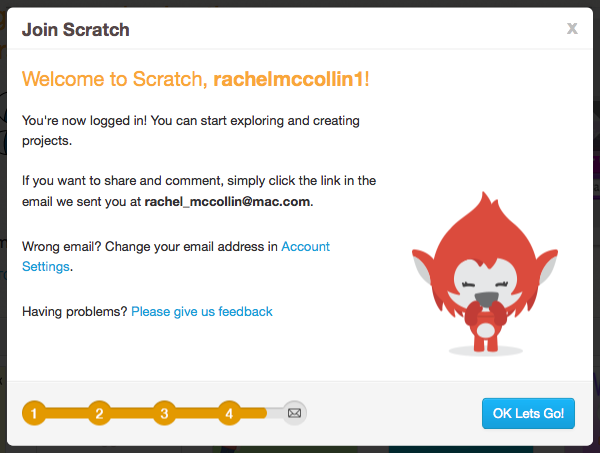
Now when you click OK Let's Go! or log in to your account, you'll see the home page with details of what's happening in the Scratch community, including activity by the people you follow. As you can see in the screenshot, I'm following a few people who've been busy!
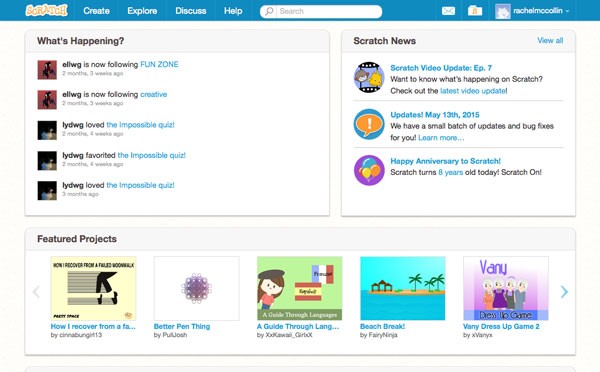
From this screen you can explore other people's projects, catch up on what your friends have been doing, and access your own projects.
Projects
Every time you create something in Scratch, you'll be working on a project. You can create as many projects as you like, share them and copy them. Each project stands alone and can't be linked to other projects.
You can access your projects in two ways from the home screen: either by clicking on the folder at the top right the admin bar with the 'S' icon or by clicking on your username at the top right and then clicking My Stuff in the dropdown menu that appears.
This will take you to the My Stuff screen:
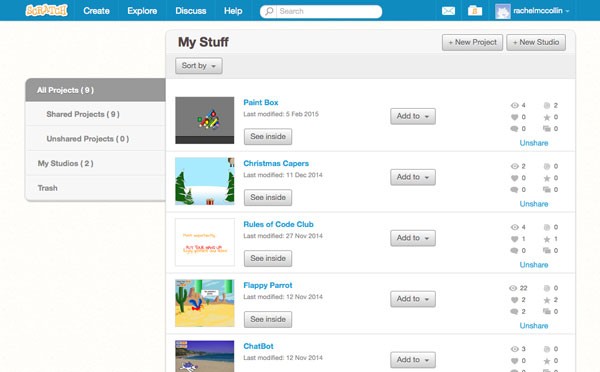
This screen shows all of the projects you've created as well as the studios you're a member of. You can use studios to share your work with a group of friends or other Scratch users—I use a studio to share work between member of the Code Club I run.
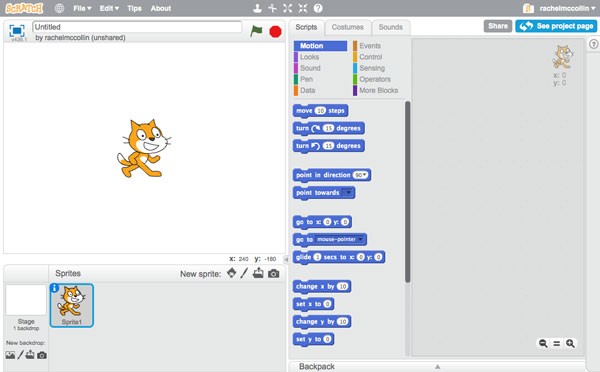
To create a new project, simply click the +New project button above your projects. This takes you to the project screen:
If you're on the home page, you can create a new project without going to the My Stuff screen. Click the Create item in the admin menu and this will open a new project for you.
Every new project looks like this, unless you're working with a copy of an existing project you're remixing.
The project window includes a few key areas:
- The stage, with a cat sprite in place which you can work with or delete.
- Below the stage, the backdrops and sprites you're using in your project.
- To the left of the stage, the scripts pane. This contains blocks of code (called scripts) that you can use in your project. This pane has two more tabs: Costumes and Sounds. I'll explain how those work in the next section of this tutorial.
- The canvas, which is where you place your scripts and create or edit costumes and sounds. You can place multiple scripts on the canvas.
Once you've worked on your project, you'll need to save it. Give it a memorable name by typing one into the field above the stage (I've lost track of how many times I've told students their projects need a better name than Untitled!).
To the left of the My Stuff folder icon in the admin bar will be some text which will either read Saved or Save now. If it reads Saved, then your project has been saved so you don't need to do anything. If it reads Save now, click on the text and Scratch will make an up-to-date save for you.
Assets: Backdrops, Sprites, Costumes and Sounds
Every project you create will need some assets. There are four types of asset: backdrops, sprites, costumes and sounds. Costumes and sounds are assigned to spites, so you start by creating the sprite, and then you can give it a number of costumes and sounds. Use scripts to change the sprite's costume when something happens, or to activate a sound when something happens.
Here's an example project called Rock Band, which I created for my Code Club. It includes a few sprites, each of which has some costumes and sounds. Click the green flag to start the project and then click on the singer and the instruments to make their costumes and sounds change.
You can make a copy of it yourself in Scratch and work on it if you'd like. This is called remixing and means you can take existing projects and add your own twist to them. To do this, go to the project page and click on the See Inside button. This will take you to the project screen that you'll be familiar with from the previous section of this tutorial:
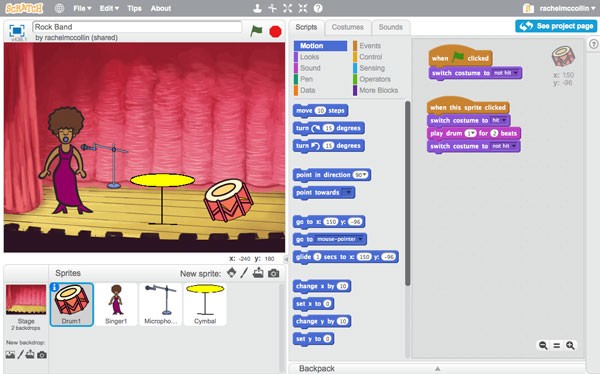
If you're logged in to Scratch, you'll see a Remix button to the left of the See project page button at the top right of the screen. It's not visible in the screenshot above as the project is mine so I can't remix it. This will create a new project in your account which you can view and edit.
The screenshot shows that this project has two backdrops: you can see the active one below the main stage, to the left. You can use scripts to switch backdrops as your project progresses or your user moves through the levels of a game, for example.
The project also has four sprites, which you can see below the stage. It's also got one background image. You can either create sprites and backgrounds yourself by uploading images, or you can import them from the library provided with Scratch, which is a much easier way to get started. You'll learn how to do this later in this tutorial series.
Each of the sprites in my project has two costumes: in the screenshot below you can see the costumes for the Drum1 sprite:
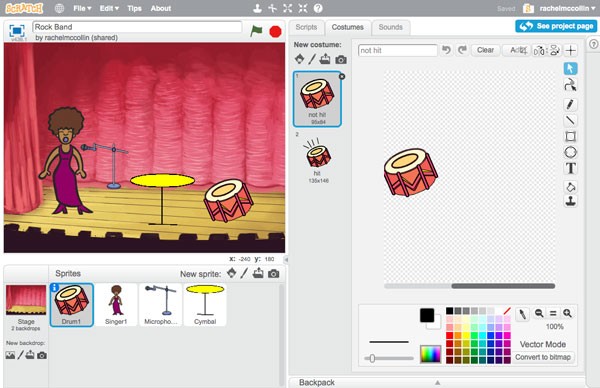
I imported both of these costumes from the Scratch library and I added a script which changes the costume when the user clicks on the drum.
If you want to create your own spites, you do so by creating costumes here, either by using the drawing tools provided or by importing a png file.
Let's take a look at the Sounds pane. In the screenshot below you can see that the Singer1 sprite has two sounds associated with it:
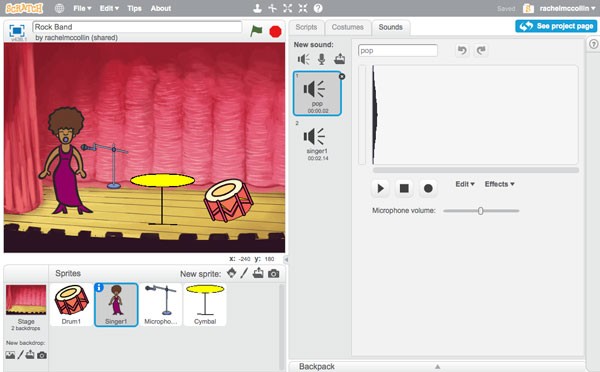
Again, I've used a script in my project to run these sounds when the user clicks on the singer sprite. You can record your own sounds from within Scratch if you want, or import them from the library provided.
Scripts
Scripts are what make your assets do stuff in Scratch. They consist of blocks of code that you drag into position on the canvas, and come under ten categories:
- Motion: scripts that position your sprites and make them move.
- Looks: scripts that change the way your sprites look, including changing their costume and hiding them.
- Sound: scripts to play sounds and change the volume.
- Pen: scripts that let the user write or draw on the project.
- Data: scripts that let you set and work with variables, for example to keep score or time a game.
- Events: these make things happen, and include the start flag being clicked, the user clicking on a sprite or a broadcast which you can create and have your sprites react to.
- Control: these include loops, conditional statements and pauses.
- Sensing: these scripts sense when things happen such as the mouse being used or sprites touching each other. They also include interactions such as asking the user a question.
- Operators: use these to compare values, maybe based on your user's response to a question or on a variable you've defined. For example, you might count the number of times the user clicks on the wrong thing and use an operator to check when this reaches a given number so you can display a message.
- More Blocks: this is where you add your own custom blocks.
Scripts give you a huge amount of variety and flexibility and can be combined in powerful ways to create advanced projects. As we work through this series of tutorials, I'll show you how to use different types of block to create animations, interactions and games.
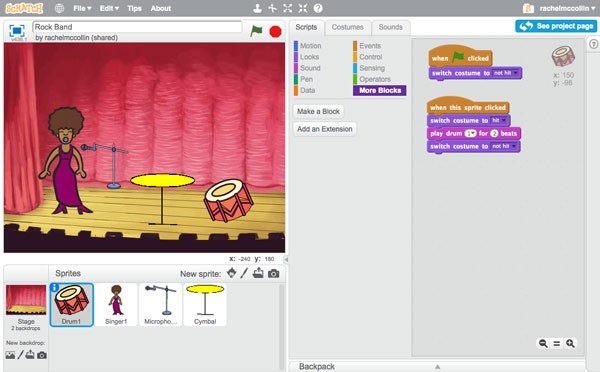
Each script you create will either relate to a sprite or to the background, which means it's independent of your sprites. For example, in my Rock Band project, the Drum1 sprite has scripts which control what happens when the sprite is clicked:
The other sprites each have similar scripts, and the background has its own scripts too:
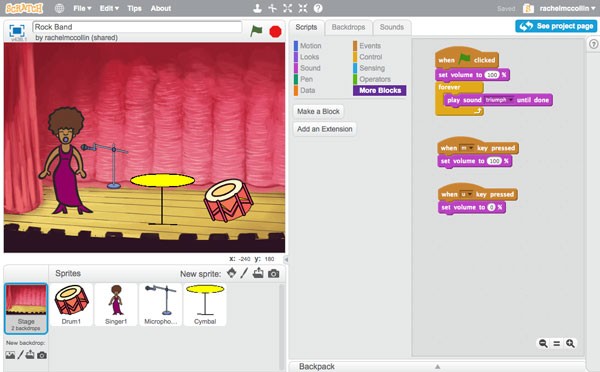
These relate to volume settings, which are independent of the individual sprites.
As you can see from these examples, each sprite can have multiple scripts applied to it. In fact, when you start to work with more advanced projects, keeping track of all these scripts and what they do can be quite confusing, especially if you need to debug your project. Here's the canvas for another project of mine, Flappy Parrot, which has more (and larger) scripts:
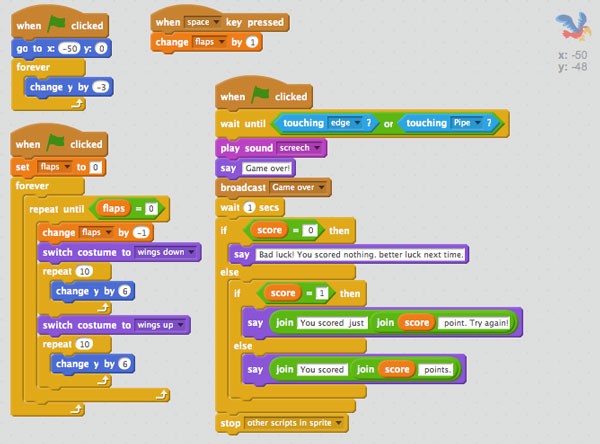
To help keep track of things, you can add comments to your scripts. To do this, right-click on the script, and in the menu that appears, click add comment, and type in your comment. Below you can see that I've added a comment to one of my scripts:

You can make comments as detailed as you want, and they'll help you if you come back to your project after a while and can't remember what everything does.
Getting Help
One of the great things about Scratch is that there's plenty of content to help you understand the platform and get started. Here are some of the resources available:
- Context-specific help: right-click on any block or asset and click on help in the shortcut menu to see information about what that block or asset does.
- Tips: click on the question mark icon on the very far right of the project screen (to the right of the canvas) to see tips.
- Tutorials: click on the tips question mark to access tutorials to help you get started. You can create a new project and view these from your project screen so you can follow the tutorial while you work.
- How To: another option in the tips section is How To, which gives you information on how to create specific types of project.
- Help screens: click on Help in the admin bar to access a variety of help screens, including starter projects, Scratch cards, video tutorials and guides to using Scratch.
- ScratchEd: an online community for educators using Scratch with students.
- The Scratch Wiki includes in-depth information about the components of Scratch.
Summary
Scratch is a fantastic, free tool that helps kids (and adults too!) learn how to write code without having to type the code out. It means they can learn how code is structured and what it does without the frustration of having to learn syntax and helps them get started quickly.
It's also lots of fun to use and has a huge community of users whose projects you can view and copy, which will help you learn in a practical way.
In this tutorial you've learned about how Scratch works and the main components of a Scratch project. As you work through this series you'll learn how to use all of these components to create your own projects. In the next part we'll start by looking at creating your stage and sprites.


Comments