It wasn't that long ago that taking photos was fairly expensive. Cameras required film with limited capacity and seeing the results also required additional time and more money. These inherent constraints ensured that we were selective with the photos we took.
Fast forward to today and these constraints have been diminished thanks to technology, but we are now faced with a new problem, filtering, organizing, and uncovering important photos from the many we take.
This new problem is what inspired this tutorial. In it, I will demonstrate how we can use new tools to help make the user's life easier by introducing new ways of filtering and organizing our content.
1. Concept
For this project, we're going to look at a different way of filtering through your collection of photos. Along the way, you'll learn how to integrate and use Qualcomm's Snapdragon SDK for facial processing and recognition.
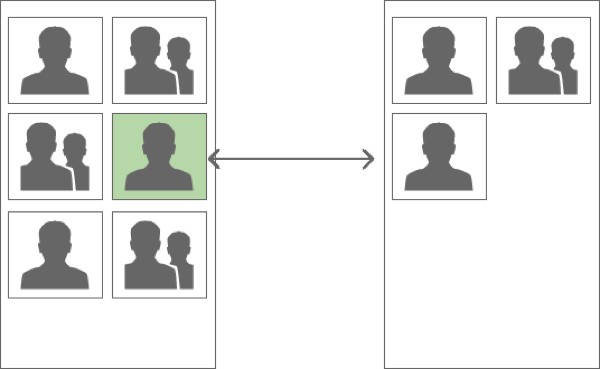
We will enable the user to filter a collection of photos by identity/identities. The collection will be filtered by identities from a photo the user taps on, as demonstrated below.
2. Overview
The main focus of this post is the introduction of facial processing and recognition using Qualcomm's Snapdragon SDK whilst—hopefully—indirectly encouraging new ways of thinking and using derived metadata from content.
To avoid getting fixated in the plumbing, I have creating a template providing the basic service for scanning through the user's collection of photos and a grid for displaying the photos. Our goal is to enhance this with the concept proposed above.
In the following section, we will briefly review these components before moving onto introducing Qualcomm's Snapdragon SDK.
3. Skeleton
As mentioned above, our goal is to focus on the Snapdragon SDK so I have created a skeleton that has all the plumbing implemented. Below is a diagram and description of the project, which is available for download from GitHub.
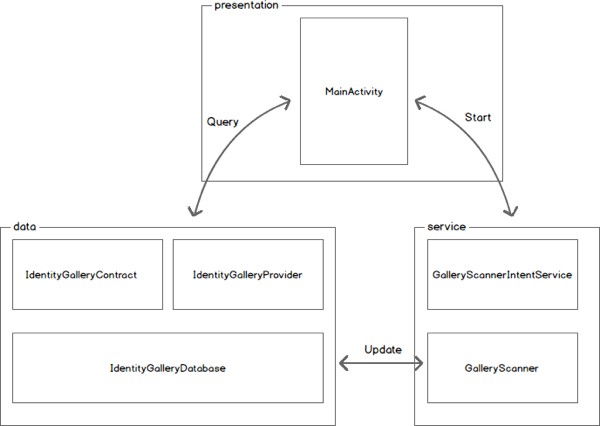
Our data package contains an implementation of SQLiteOpenHelper (IdentityGalleryDatabase) responsible for creating and managing our database. The database will consist of three tables, one to act as a pointer to the media record (photo), another for detected identities (identity), and finally the relationship table connecting identities with their photos (identity_photo).

We will use the identity table to store the attributes provided by the Snapdragon SDK, detailed in a later section of this tutorial.
Also included in the data package are a Provider (IdentityGalleryProvider) and Contract (IdentityGalleryContract) class, which is nothing more than a standard Provider acting as a wrapper of the SQLiteOpenHelper class.
To give you a sense of how to interact with the Provider class, the following code is taken from the TestProvider class. As the name suggests, it is used for testing the Provider class.
//… Query for all Photos
Cursor cursor = mContext.getContentResolver().query(
               IdentityGalleryContract.PhotoEntity.CONTENT_URI,
           	null,
           	null,
           	null,
           	null
   	);

//… Query for all Photos that include any of the identities within the referenced photo
Cursor cursor = mContext.getContentResolver().query(
           	IdentityGalleryContract.PhotoEntity.buildUriWithReferencePhoto(photoId),
           	null,
           	null,
           	null,
           	null
   	);

//… Query call identities
Cursor cursor = mContext.getContentResolver().query(
           	IdentityGalleryContract.IdentityEntity.CONTENT_URI,
           	null,
           	null,
           	null,
           	null
   	);

//… Query for all
Cursor cursor = mContext.getContentResolver().query(
           	IdentityGalleryContract.PhotoEntity.CONTENT_URI,
           	null,
           	null,
           	null,
           	null
   	);
The service package is responsible for iterating through, cataloguing, and eventually processing the images available via the MediaStore. The service itself extends the IntentService as an easy way of performing the processing on its own thread. The actual work is delegated to the GalleryScanner, which is the class we'll be extending for facial processing and recognition.
This GalleryScannerIntentService is instantiated each time the MainActivity is created with the following call:
@Override
protected void onCreate(Bundle savedInstanceState) {
    ...
    GalleryScannerIntentService.startActionScan(this.getApplicationContext());
    ...
}
When started, GalleryScannerIntentService fetches the last scan date and passes this into the constructor of the GalleryScanner. It then calls the scan method to start iterating through the contents of the MediaItem content provider—for items after the last scan date.
If you inspect the scan method of the GalleryScanner class, you'll notice that it's fairly verbose—nothing complicated is happening here. The method needs to query for media files stored internally (MediaStore.Images.Media.INTERNAL_CONTENT_URI) and externally (MediaStore.Images.Media.EXTERNAL_CONTENT_URI). Each item is then passed to a hook method, which is where we will place our code for facial processing and recognition.
private void processImage(ContentValues contentValues, Uri contentUri) {
    throw new UnsupportedOperationException("Hook method is not currently implemented");
}
Another two hook methods in the GalleryScanner class are available to us (as the method names suggest) to initialize and de-initialize the FacialProcessing instance.
private void initFacialProcessing() throws UnsupportedOperationException {
    throw new UnsupportedOperationException("Hook method is not currently implemented");
}

private void deinitFacialProcessing() {
    throw new UnsupportedOperationException("Hook method is not currently implemented");
}
The final package is the presentation package. As the name suggests, it hosts the Activity class responsible for rendering our gallery. The gallery is a GridView attached to a CursorAdapter. As explained above, tapping an item will query the database for any photos that contain one of the identities of the selected photo. For example, if you tap on a photo of your friend Lisa and her boyfriend Justin, the query will filter all photos that contain either or both Lisa and Justin.
4. Qualcomm's Snapdragon SDK
To help developers make their hardware look great and do it justice, Qualcomm has released an amazing set of SDKs, one being the Snapdragon SDK. The Snapdragon SDK exposes an optimized set of functions for facial processing.
The SDK is broadly split into two parts, facial processing and facial recognition. Given that not all devices support both—or any—of these features, which is probably the reason for having these features separated, the SDK provides an easy way of checking which features the device supports. We will cover this in more detail later.
The facial processing provides a way of extracting features from a photo (of a face) including:
- Blink Detection: Measure how open each eye is.
-
Gaze Tracking: Assess where the subject is looking.
-
Smile Value: Estimate the degree of the smile.
-
Face Orientation: Track the yaw, pitch, and roll of the head.
Facial recognition, as the name suggests, provides the ability to identify people in a photo. It's worth noting that all processing is done locally—as opposed to the cloud.
These features can be used real time (video/camera) or offline (gallery). In our exercise, we'll use these features offline, but there are minimal differences between the two approaches.
Consult the online documentation for supported devices to learn more about facial processing and facial recognition.
5. Adding Facial Processing and Recognition
In this section, we will be filling in those hook methods—with surprisingly few lines of code—to provide our application the ability to extract face properties and identify people. To work along, download the source from GitHub and open the project in Android Studio. Alternatively, you can download the completed project.
Step 1: Installing the Snapdragon SDK
The first thing we need to do is grab the SDK from Qualcomm's website. Note that you'll need to register/log in and agree with Qualcomm's terms and conditions.
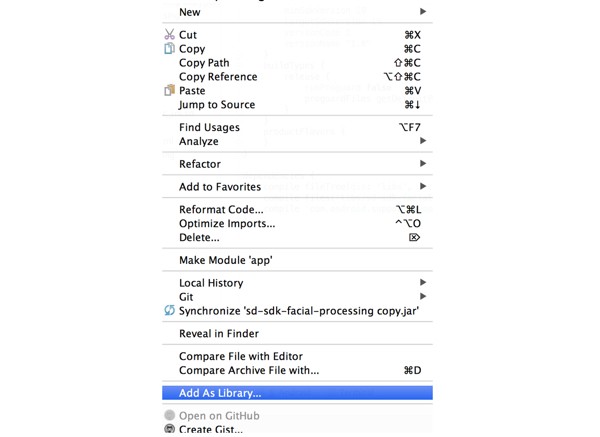
Once downloaded, unarchive the contents and navigate to /Snapdragon_sdk_2.3.1/java/libs/libs_facial_processing/. Copy the sd-sdk-facial-processing.jar file into your project's /app/libs/ folder as shown below.

After copying the Snapdragon SDK, right-click the sd-sdk-facial-processing.jar and select Add as Library... from the list of options.
This will add the library as a dependency in your build.gradle file as shown below.
dependencies {
    compile fileTree(dir: 'libs', include: ['*.jar'])
	compile files('libs/sd-sdk-facial-processing.jar')
	compile 'com.android.support:support-v13:20.0.0'
}
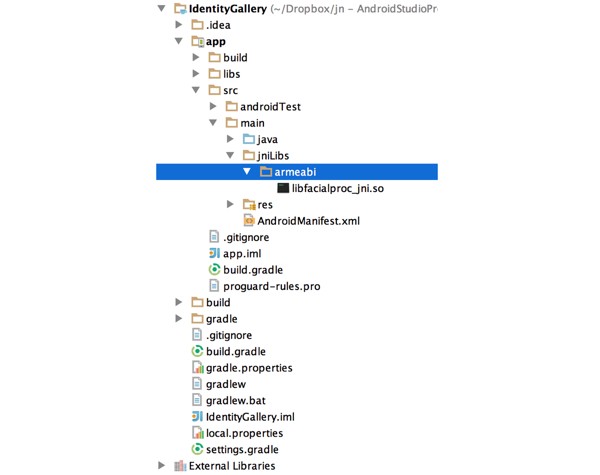
The final step is to add the native library. To do this, create a folder called jniLibs in your /app/src/main/ folder and copy the armeabi folder (from the SDK download) and its contents into it.
We are now ready to implement the logic to identify people using the functionality of the API. The following code snippets belong in the GalleryScanner class.
Step 2: Initialization
Let's first tackle the initialization hook method.
private void initFacialProcessing() throws UnsupportedOperationException{
    if(
         !FacialProcessing.isFeatureSupported(FacialProcessing.FEATURE_LIST.FEATURE_FACIAL_PROCESSING) || !FacialProcessing.isFeatureSupported(FacialProcessing.FEATURE_LIST.FEATURE_FACIAL_RECOGNITION)){
           throw new UnsupportedOperationException("Facial Processing or Recognition is not supported on this device");
   	}

    mFacialProcessing = FacialProcessing.getInstance();
    if(mFacialProcessing != null){
      	mFacialProcessing.setRecognitionConfidence(mConfidenceThreshold);
       	mFacialProcessing.setProcessingMode(FacialProcessing.FP_MODES.FP_MODE_STILL);
       	loadAlbum();
   	} else{
       	throw new UnsupportedOperationException(“An instance is already in use");
   	}
}
We first need to check that the device supports both facial processing and facial recognition. If it doesn't, we throw an UnsupportedOperationException exception.
After that, we assign our local reference of the FacialProcessing class, mFacialProcessing, to a new instance using the factory method getInstance. This will return null if an instance is already in use, in which case the consumer is required to call release on that reference.
If we have successfully obtained an instance of a FacialProcessing object, we configure it by first setting the confidence. We do this using a local variable, which is 57 in this case from a range of 0 to 100. The confidence is a threshold when trying to resolve identities. Any matches below this threshold will be deemed as separate identities.
In terms of determining the value, as far as I can tell, this is a trial and error process. Obviously the higher the threshold, the more accurate the recognition, with the trade-off of increasing the number of false-positives.
We then set the FacialProcessing mode to FP_MODE_STILL. Your options here are either FP_MODE_STILL or FP_MODE_VIDEO. As the names suggest, one is optimized for still images while the other for continuous frames, both having obvious use cases.
P_MODE_STILL, as you might suspect, provides more accurate results. But as you will see later, FP_MODE_STILL is implied by the method we use to process the image so this line can be omitted. I only added it for completeness.
We then call loadAlbum (method of the GalleryScanner class), which is what we'll look at next.
private void loadAlbum(){
    SharedPreferences sharedPreferences = mContext.getSharedPreferences(TAG, 0);
    String arrayOfString = sharedPreferences.getString(KEY_IDENTITY_ALBUM, null);

    byte[] albumArray = null;
    if (arrayOfString != null) {
         String[] splitStringArray = arrayOfString.substring(1,
              arrayOfString.length() - 1).split(", ");

         albumArray = new byte[splitStringArray.length];
         for (int i = 0; i < splitStringArray.length; i++) {
              albumArray[i] = Byte.parseByte(splitStringArray[i]);
         }
         mFacialProcessing.deserializeRecognitionAlbum(albumArray);
    }
}
The only interesting line here is:
mFacialProcessing.deserializeRecognitionAlbum(albumArray);
Its counter method is:
byte[] albumBuffer = mFacialProcessing.serializeRecogntionAlbum();
A single FacialProcessing instance can be thought of as a session. Added persons (explained below) are stored locally (referred to as the "recognition album") within that instance. To allow your album to persist over multiple sessions, that is, each time you obtain a new instance, you need a way to persist and load them.
The serializeRecogntionAlbum method converts the album into a byte array and conversely the deserializeRecognitionAlbum will load and parse a previously stored album as a byte array.
Step 3: De-initialization
We now know how to initialize the FacialProcessing class for facial processing and recognition. Let's now turn our focus to de-initializing it by implementing the deinitFacialProcessing method.
private void deinitFacialProcessing(){
    if(mFacialProcessing != null){
         saveAlbum();
         mFacialProcessing.release();
         mFacialProcessing = null;
    }
}
As mentioned above, there can only be one instance of the FacialProcessing class at a time so we need to ensure we release it before finishing our task. We do this via a release method. But first we make the recognition album persist so that we can use the results over multiple sessions. In this case, when the user takes or receives new photos, we want to ensure that we use the previously recognized identities for the same people.
private void saveAlbum(){
    byte[] albumBuffer = mFacialProcessing.serializeRecogntionAlbum();
    SharedPreferences sharedPreferences = mContext.getSharedPreferences(TAG, 0);
    SharedPreferences.Editor editor = sharedPreferences.edit();
    editor.putString(KEY_IDENTITY_ALBUM, Arrays.toString(albumBuffer));
    editor.commit();
}
Step 4: Processing the Image
We're finally ready to flesh out the final hook method and use the FacialProcessing class. The following code blocks belong to the processImage method. I've split them up for clarity.
private void processImage(ContentValues contentValues, Uri contentUri){
    long photoRowId = ContentUris.parseId(contentUri);

    String uriAsString = contentValues.getAsString(GalleryContract.PhotoEntity.COLUMN_URI);
    Uri uri = Uri.parse(uriAsString);
    Bitmap bitmap = null;
    try{
         bitmap = ImageUtils.getImage(mContext, uri);
    } catch(IOException e){
         return;
    }

    if(bitmap != null) {
         // continued below (1)
    }
}
The method takes a reference to an instance of the ContentValues class, which holds the metadata for this image, along with the URI pointing to the image. We use this to load the image into memory.
The following code snippet is to replace the above comment // continued below (1).
if( !mFacialProcessing.setBitmap(bitmap)){
    return;
}
int numFaces = mFacialProcessing.getNumFaces();

if(numFaces > 0){
    FaceData[] faceDataArray = mFacialProcessing.getFaceData();

    if( faceDataArray == null){
         Log.w(TAG, contentUri.toString() + " has been returned a NULL FaceDataArray");
         return;
     }

    for(int i=0; i<faceDataArray.length; i++) {
         FaceData faceData = faceDataArray[i];
         if(faceData == null){
              continue;
         }
         // continued below (2)
    }
}
As mentioned above, we first pass the static image to the FacialProcessing instance via the setBitmap method. Using this method implicitly uses the FP_MODE_STILL mode. This method returns True if the image was successfully processed and False if the processing failed.
The alternative method for processing streaming images (typically for camera preview frames) is:
public boolean setFrame(byte[] yuvData, int frameWidth, int frameHeight, boolean isMirrored, FacialProcessing.PREVIEW_ROTATION_ANGLE rotationAngle)
Most of the parameters are obvious. You do have to pass in whether the frame is flipped (this is usually necessary for the front-facing camera) and if any rotation has been applied (usually set via the setDisplayOrientation method of a Camera instance).
We then query for the number of faces detected and only continue if at least one is found. The getFaceData method returns the details for each detected face as an array of FaceData objects, where each FaceData object encapsulates facial features including:
- face boundary (
FACE_RECT) - face, mouth, and eye locations (
FACE_COORDINATES) - contour of the face (
FACE_CONTOUR) - degree of smile (
FACE_SMILE)
- direction of eyes (
FACE_GAZE)
- flag indicating if either eye (or both eyes) is blinking (
FACE_BLINK)
- yaw, pitch, and roll of the face (
FACE_ORIENTATION)
- generated or derived identification (
FACE_IDENTIFICATION)
There is an overload to this method which takes a set of enums (as described above) for feature points to be included, removing/minimizing redundant calculations.
public FaceData[] getFaceData(java.util.EnumSet<FacialProcessing.FP_DATA> dataSet) throws java.lang.IllegalArgumentException
We now move on to inspecting the FaceData object to extract the identity and features. Let's first see how facial recognition is done.
The following code snippet is to replace the above comment // continued below (2).
int personId = faceData.getPersonId();
if(personId == FacialProcessingConstants.FP_PERSON_NOT_REGISTERED){
    personId = mFacialProcessing.addPerson(i);
} else{
    if(mFacialProcessing.updatePerson(personId, i) != FacialProcessingConstants.FP_SUCCESS){
         // TODO handle error
    }
}

long identityRowId = getOrInsertPerson(personId);

// continued below (3)
We first request the assigned person id via the getPersonId method. This will return -111 (FP_PERSON_NOT_REGISTERED) if no identity exists in the currently loaded album, otherwise returning the id of a matching person from the loaded album.
If no identity exists, then we add it via the addPerson method of the FacialProcessing object, passing it the index of the FaceData item we're currently inspecting. The method returns the assigned person id if successful, otherwise returning an error. This occurs when trying to add an identity that already exists.
Alternatively, when the person was matched with an identity stored in our loaded album, we call the FacialProcessing object's updatePerson method, passing it the existing id and index of the FaceData item. Adding a person multiple times increases recognition performance. You can add up to ten faces for a single person.
The final line simply returns the associated identity id from our database, inserting it if the person id doesn't already exist.
It's not shown above, but the FaceData instance exposes the method getRecognitionConfidence for returning the recognition confidence (0 to 100). Depending on your needs, you can use this to influence flow.
The final snippet demonstrates how to query each of the other features from the FaceData instance. In this demo, we don't make use of them, but with a little imagination I'm sure you can think of ways to put them to good use.
The following code snippet is to replace the above comment // continued below (3).
int smileValue = faceData.getSmileValue();
int leftEyeBlink = faceData.getLeftEyeBlink();
int rightEyeBlink = faceData.getRightEyeBlink();
int roll = faceData.getRoll();
PointF gazePointValue = faceData.getEyeGazePoint();
int pitch = faceData.getPitch();
int yaw = faceData.getYaw();
int horizontalGaze = faceData.getEyeHorizontalGazeAngle();
int verticalGaze = faceData.getEyeVerticalGazeAngle();
Rect faceRect = faceData.rect;

insertNewPhotoIdentityRecord(photoRowId, identityRowId,
    gazePointValue, horizontalGaze, verticalGaze,
    leftEyeBlink, rightEyeBlink,
    pitch, yaw, roll,
    smileValue, faceRect);
That completes the processing code. If you return to the gallery and tap on an image, you should see it filtering out any photos that do not contain any people identified in the selected photo.
Conclusion
We started this tutorial talking about how technology can be used to help organize the user's content. In context aware computing, whose goal is to use context as an implicit cue to enrich the impoverished interaction from humans to computers, making it easier to interact with computers, this is known as auto-tagging. By marking up content with more meaningful and useful data—for both the computer and us—we allow for more intelligent filtering and processing.
We've seen this used frequently with textual content, the most obvious example being spam filters and, more recently, news readers, but less so with rich media content, such as photos, music, and video. Tools like the Snapdragon SDK provide us with an opportunity to extract meaningful features from rich media, exposing its properties to the user and computer.
It's not hard to imagine how you could extend our application to allow filtering based on sentiment by using a smile as the major feature or social activity by counting the number of faces. One such implementation can be seen in this Smart Gallery feature.

Comments