In September 2013, Apple unveiled the latest iPhone with a range of hardware improvements. The most innovative feature of iPhone 5s was a thin metal band surrounding the home button, a fingerprint sensor called Touch ID. Developers clambered to know about the API. A year on and iOS 8 introduces a new framework giving developers the ability to use the fingerprint sensor.
The Local Authentication framework provides methods to prompt a user to authenticate. You could use this as a login for your app or use it just to protect sensitive data within an app. In this tutorial, I will explain the options available to you, what data you can get from the device, and we’ll also build a sample app.
This tutorial requires Xcode 6 to create the project and you’ll need a device with Touch ID to test the sample app that we'll create.
1. Touch ID
Touch ID refers to the fingerprint sensor built into the home button of iPhone 5s. It was added to help encourage the use of passcodes by making it easier for users to authenticate. You can configure each device with a maximum of five fingerprints. Up to now, it has been used to unlock the device and to make purchases in the iTunes Store, App Store, and iBooks Store. Before we see how you might use it in your apps, here's a quick overview of the sensor itself.
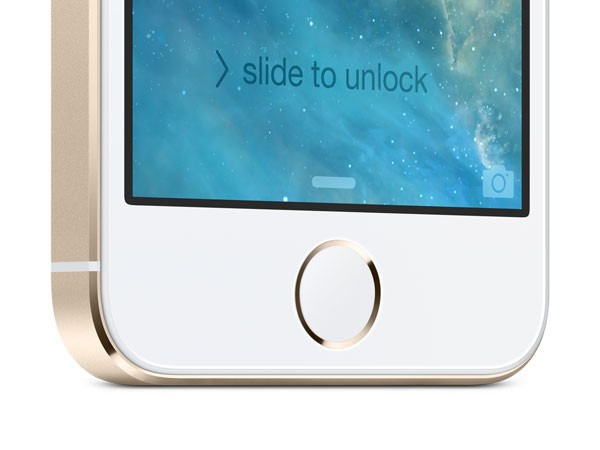
The Touch ID sensor is able to scan your fingers at a resolution of 500 pixels per inch, allowing it to put each print into one of three categories, arch, whorl, or loop. The sensor is designed to be truly convenient, you can scan your finger in any orientation and it'll determine a match with any existing fingerprint regardless of the original orientation.
Apple claim that the odds of a false positive for a given fingerprint is 1 in 50,000, which is much better than the odds of guessing a 4 digit pin code at 1 in 10,000. They don't mention that it's possible to fallback to using the pin number for times when you're not able to use your fingerprints, for example, when you're all wrinkly after swimming.
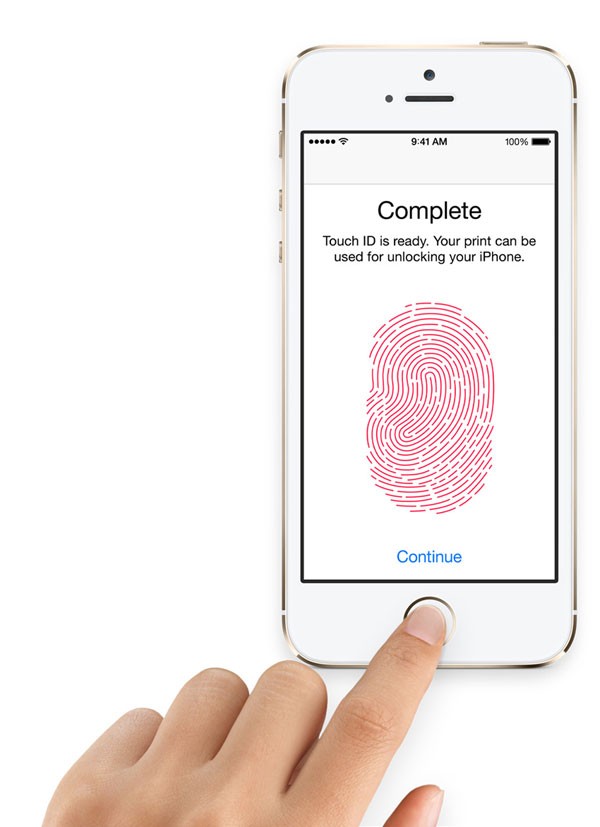
If you plan to use Touch ID, then it's important that you too consider scenarios where users can't use their finger as a means to authenticate. Because you're not able to verify against the device's pin code as Apple do, it may be a good idea to have users create a password within your app.
2. Security Considerations
The biggest concern with the fingerprint sensor is that users's privacy is fundamentally breached. If your password is revealed, you can change it to something new and a malicious person would no longer be able to use it to access your data. If your fingerprint, or Apple's mathematical representation of it, is exposed, you can't change it quite so easily.
The Local Authentication framework handles all of the heavy lifting of verifying users. When working with Touch ID, it's important to know that it reveals no details about the user and no data is transferred from the device. However, developers can use the framework to check if a user is allowed to use the app.
If you're familiar with the OAuth specification, you may see similarities in the way authentication is handled, you ask a third party to verify the identify of a user, if you trust the third party, you can use their response in place of requesting credentials directly from the user.
3. LAContext
The heart of the Local Authentication framework is the LAContext class. Developers can use an instance of LAContext to evaluate a security policy. At the time of writing, there is only one policy. It checks, using the Touch ID sensor, that the person authenticating is the device owner. In the future there may be other security policies. For example, Apple may introduce an unprivileged role that is only able to access certain resources.
If the framework is unable to authenticate, it throws an error. There are several reasons why a device isn't able to authenticate.
-
LAErrorTouchIDNotAvailableThe device doesn't have a fingerprint sensor. -
LAErrorPasscodeNotSetThere is no passcode set on the device, which means that Touch ID is disabled. -
LAErrorTouchIDNotEnrolledThere is a passcode set but the device has not been configured with any fingerprints.
If an error is thrown with any of the above error codes, then you need to provide some other method for users to authenticate. At this point, you can't rely solely on Touch ID.
Let's create a sample app to learn how we can make use of the Local Authentication framework.
4. Project Setup
Step 1
Open Xcode and select New > Project... from the File menu. Choose Single View Application from the list of iOS Application templates and click Next.
Step 2
Enter a name for your project, I've called mine Auth. Enter your organization's name, company identifier, and class prefix. Choose iPhone from the Devices list, click Next, and choose a location to save the project.

Step 3
Click ViewController.h and define a new action, authenticateButtonTapped, which will trigger the authentication process. The interface of the ViewController class should look like this:
#import <UIKit/UIKit.h>

@interface ViewController : UIViewController

- (IBAction)authenticateButtonTapped:(id)sender;

@end
Step 4
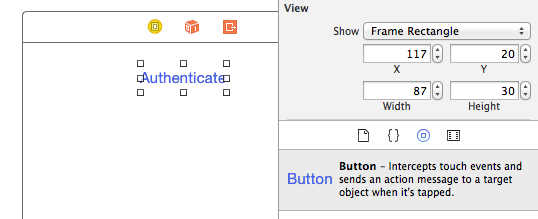
Open Main.storyboard and drag a Button onto the view controller's view. Change the button label to read Authenticate.
Step 5
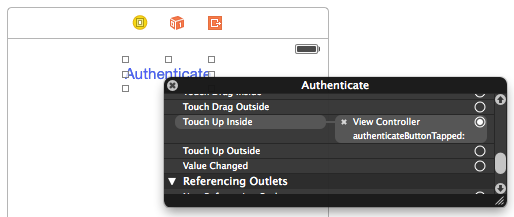
Right-click the button to show the Connections Inspector. Click the plus on the left of the Touch Up Inside event and select the view controller that contains the button. Another menu will appear in which you can select the action we declared a moment ago.
5. Authenticate a User
Step 1
Switch to ViewController.m to implement the authenticateButtonTapped method. At the top of the file add the following import statement for the Local Authentication framework.
#import <LocalAuthentication/LocalAuthentication.h>
Step 2
In the authenticateButtonTapped method, we create a context and determine if the context can evaluate the LAPolicyDeviceOwnerAuthenticationWithBiometrics policy, otherwise show an error message.
- (IBAction)authenticateButtonTapped:(id)sender {
    LAContext *context = [[LAContext alloc] init];

    NSError *error = nil;

    if ([context canEvaluatePolicy:LAPolicyDeviceOwnerAuthenticationWithBiometrics error:&error]) {
        // Authenticate User

    } else {

        UIAlertView *alert = [[UIAlertView alloc] initWithTitle:@"Error"
                                                        message:@"Your device cannot authenticate using TouchID."
                                                       delegate:nil
                                              cancelButtonTitle:@"Ok"
                                              otherButtonTitles:nil];
        [alert show];

    }
}
Step 3
If the LAContext object is able to authenticate using Touch ID, then we try to verify the user's identity. If no error is thrown, we tell the user if they are the owner of the device. The final implementation of the authenticateButtonTapped method is shown below.
- (void)authenicateButtonTapped:(id)sender {
   LAContext *context = [[LAContext alloc] init];

   NSError *error = nil;
   if ([context canEvaluatePolicy:LAPolicyDeviceOwnerAuthenticationWithBiometrics error:&error]) {
       [context evaluatePolicy:LAPolicyDeviceOwnerAuthenticationWithBiometrics
               localizedReason:@"Are you the device owner?"
                         reply:^(BOOL success, NSError *error) {

           if (error) {
               UIAlertView *alert = [[UIAlertView alloc] initWithTitle:@"Error"
                                                               message:@"There was a problem verifying your identity."
                                                              delegate:nil
                                                     cancelButtonTitle:@"Ok"
                                                     otherButtonTitles:nil];
               [alert show];
               return;
           }

           if (success) {
               UIAlertView *alert = [[UIAlertView alloc] initWithTitle:@"Success"
                                                               message:@"You are the device owner!"
                                                              delegate:nil
                                                     cancelButtonTitle:@"Ok"
                                                     otherButtonTitles:nil];
               [alert show];

           } else {
               UIAlertView *alert = [[UIAlertView alloc] initWithTitle:@"Error"
                                                               message:@"You are not the device owner."
                                                              delegate:nil
                                                     cancelButtonTitle:@"Ok"
                                                     otherButtonTitles:nil];
               [alert show];
           }

       }];

   } else {

       UIAlertView *alert = [[UIAlertView alloc] initWithTitle:@"Error"
                                                       message:@"Your device cannot authenticate using TouchID."
                                                      delegate:nil
                                             cancelButtonTitle:@"Ok"
                                             otherButtonTitles:nil];
       [alert show];

   }
}
6. Build and Run
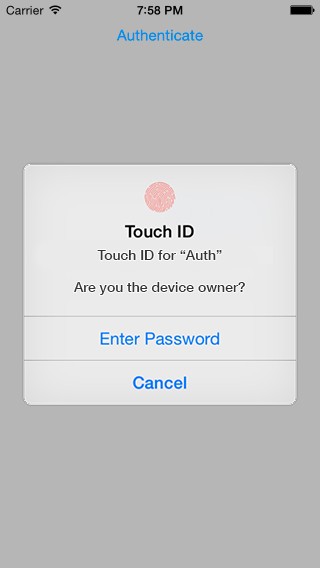
Build and run the application on a physical device with a fingerprint sensor and tap the button to authenticate. As long as your device has Touch ID support, you should be prompted to authenticate. If you put your finger on the sensor, the app should tell you if you're the device owner or not.
Conclusion
In this tutorial, we looked at the Local Authentication framework introduced in iOS 8. By checking the identity of the authenticating user, the LAContext class allows users to identify themselves without providing sensitive data directly to the app.


Comments