This tutorial will help you prepare a Magento install for high traffic, better load times, and simpler ongoing site management. Ready?
Requirements
You can download the finished code for this tutorial, or launch the "magento-basic" Quickstart from your Pagoda Box account to test a working site.
- A Pagoda Box Account (free)
- A functional local Magento Install
- Local Development Software (MAMP or WAMP)
- Git Installed (Can use SFTP)
- The Pagoda Terminal Client Installed
Fair Warning: This tutorial may change your life. Pagoda Box is not traditional hosting. The teachings in this article will not only help scale Magento, but it also lays the groundwork for a progressive development-to-production workflow.
Step 1: Set Up Git Locally (SFTP will work as an alternate)
Note: If you already use Git, you can skip this section. If not, the guide Setting Up Git provides specific instructions for creating an SSH Key, as well as links for downloading and installing Git (also below).
While it is possible to use just SFTP on Pagoda Box, the officially recommended (and most efficient) workflow integrates Git into your daily development. Git enables features like collaboration, uniform code distribution, deploys, deploy history and rolling back code. While most of these features are available to FTP users, using Git makes integration seamless.
If you want to fully take advantage of Pagoda Box, download Git, and Learn the Basics. Depending on your operating system, set up may vary slightly. Regardless of your OS, the commands are identical once Git is installed.
Using Git to manage collaboration and version control may involve a brief learning curve. However, there are generally only three commands we'll use on an ongoing basis to commit changes locally, then deploy to Pagoda Box:
-
git add .- Adds local files to your repository -
git commit -m "some message about what you've done"- Commits your changes -
git push pagoda --all- Pushes changes to Pagoda Box Repository (auto-deployed by default)
We'll use these later.
Step 2: Install the Pagoda Box Terminal Client
                             *
                           /   \
                         /       \
                     +_/ / / | \ \ \_+
                         ||*|||*||
                         |+||*||+|
                         /       \
                     +_/ / / | \ \ \_+
                         ||*|||*||
                         |+||*||+|
     ____   _    ____  ___  ____    _    ____   _____  __
    |  _ \ / \  / ___|/ _ \|  _ \  / \  | __ ) / _ \ \/ /
    | |_) / _ \| |  _| | | | | | |/ _ \ |  _ \| | | \  /
    |  __/ ___ \ |_| | |_| | |_| / ___ \| |_) | |_| /  \
    |_| /_/   \_\____|\___/|____/_/   \_\____/ \___/_/\_\

       Welcome To Your Pagoda Box Terminal Client.
      -----------------------------------------------
          -----------------------------------------
             ---------------------------------
                          Enjoy.
Pagoda Box provides a Terminal Client that lets you clone, create, deploy, destroy, rename and rollback an application from the command line. Later in this tutorial, we'll use the client to create a secure tunnel to the live Magento database with Sequel Pro (the process is similar for other database managment tools like HeidiSQL).
The Pagoda Box Terminal Client is a rubygem, so installation is pretty simple. First off, Ruby needs to be installed. Installation is different for each operating system.
- Mac - Ruby and RubyGems come pre-installed on Mac OSX. As long as you are running v10.5 or later, you should be good to go.
- Windows - There are a couple of different ways to install Ruby in Windows. We recommend this auto-installer. If it doesn't work for your set-up, a Google search will give you a pretty good list of installation walk-throughs.
- Linux - Use your preferred package manager to download the Ruby package. For Ubuntu users, the gem is available through getdeb.net.
Install and Verify Terminal Client
Once Ruby is installed, simply run the following command to install the Pagoda RubyGem:
On Mac or Linux:
$ sudo gem install pagoda
On Windows:
$ gem install pagoda
Then, to verify you have the Pagoda Gem installed properly, run:
$ pagoda list
If this is the first time you've used the Gem, it will ask for your Pagoda Box Username and Password. After you've entered those, expect to see a list of your Pagoda Box applications. If you haven't created any applications, the list will be blank.
If you get an error, it's most likely invalid credentials. You can verify or change which credentials the gem uses by editing the file located on your local computer at ~/.pagodarc. Make sure to exactly match the credentials you use in your Pagoda Box account. (Note: this is a hidden file, so you'll need to enable hidden files or open via the terminal. Also note that the file stores your credentials twice, so edit both if needed.)
Step 3: Install Magento Locally
Note: Skip this step if you already have a working local Magento install.
If you don't have it already, ensure you are using local webserver and database management software. There are several options available, depending on your operating system. A common option for Mac is MAMP, or WAMP for Windows. Both are free and easily set up.
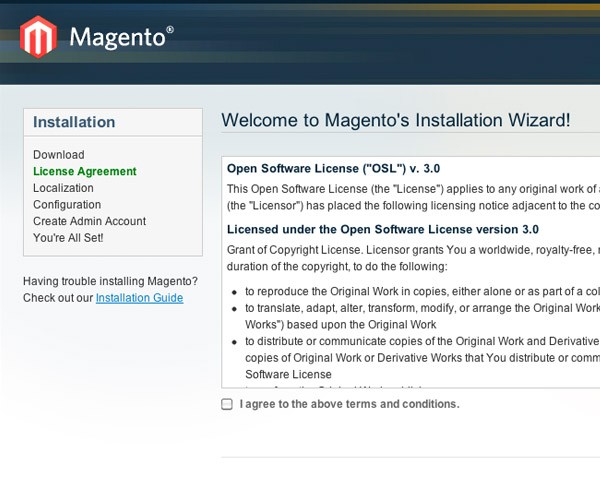
Once your local development environment is set up, go ahead and download Magento, then follow the official guide to install Magento locally.
Feel free to use Magento's auto install script to set up the application in your local environment. However, due to Pagoda Box's distributed cloud architecture, the script will not install Magento directly in your production environment. The Pagoda Box workflow and architecture requires you to make code modifications locally, commit, then deploy to production. This workflow accommodates collaboration and development > staging > production best practices.
Step 4: Configure PHP Using a Boxfile
Note: On Pagoda Box, a YAML Boxfile can be included in the root of your code repository. While the Boxfile is optional, it does provide advanced features, like manipulating your hosted environment on each deploy. We'll use the Boxfile extensively in this Tutorial to simplify tasks, and to make the respository reusable on Pagoda Box.
Create a file named "Boxfile" in the root of your local Magento installation, then copy the following into your Boxfile (explanation below):
web1:
  name: mag-app
  shared_writable_dirs:
    - media
    - var
  php_version: 5.3.8
  php_extensions:
    - pdo_mysql
    - mysql
    - simplexml
    - mcrypt
    - hash
    - gd
    - dom
    - iconv
    - curl
    - soap
Create / Name the Web Cluster
This Boxfile serves several purposes. First, it creates a web1 component, then names it mag-app.
Shared Writable Directories
Second, the Boxfile identifies media and var as shared writable directories. This allows users to upload images, video, and other media to a distributed Magento cloud site without instances writing themselves out of sync.
When a directory is marked as writable, the contents are no longer deployed to Pagoda Box from your local repository. Any time local files need to be deployed to these directories, they must be manually copied via SSH or SFTP. You may also use SSH/SFTP to transfer files from Pagoda Box to your local machine as needed.
PHP Version and Extensions
The Boxfile also declares which PHP version and extensions will be included in your web instances as they deploy. This way, both the environment and the application are versioned together, so rolling back to a previous deploy includes the correct PHP version and extensions. The list of PHP extensions in this Boxfile was taken from Magento's official system requirements.
Tip: Once Git is installed in your local environment, use the
.gitignorefile to ignore the writable directories specified in your Boxfile. Identifying these directories inside the.gitignorefile helps reduce the size of your repo, and your deploy time. In addition to the writable directories, you can also add thedownloaderdirectory to the.gitignorefile, since it's used locally, and not on Pagoda Box.
Once you've installed Git and the Terminal Client, configured the Boxfile and finalized your local source code, you're ready to launch on Pagoda Box.
Step 5: Create a Free Pagoda Box Account
If you don't already have one, create a free Pagoda Box account. You will not need to enter a credit card to install Magento for testing.
If you have not already done so, follow this guide to Add an SSH Key in your Pagoda Box Admin panel. The guide will provide specific instructions for setting up an SSH Key on either Mac or Windows.
Step 6: Upload Magento to Pagoda Box
Once you've created a Pagoda Box account and set up an SSH Key, go to the Home Page in your new account and click the "New Application" button to create a new application.
Note: This tutorial names our sample application "magento". The app name is also used for the Pagoda Box repository, the subdomain for the freshly deployed application (magento.pagodabox.com), and the username in SFTP mode. Replace "magento" with "your-app-name-here" where appropriate throughout the remainder of this tutorial.

Upload to an Empty Repo (recommended for this tutorial)
Next, choose from the 3 options to launch your Magento site. Since you already have a customized version of Magento locally, select 'Empty Repo' to deploy using SFTP or Git, name your application, and click "Launch Application".
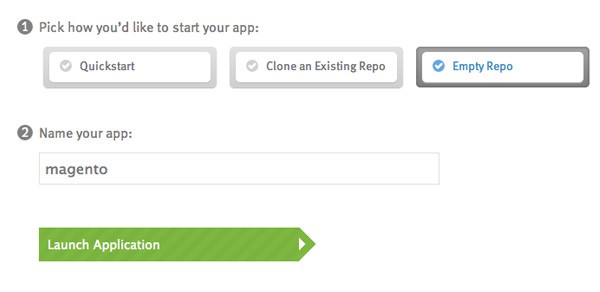
You'll be asked to select your preferred deployment method (Git or SFTP). Click on your preference, and follow the instrutions on-screen.
Git Option
You can copy and paste the on-screen instructions from the Pagoda Box dashboard to your terminal after using Terminal to change directory (cd) to the root of your project.
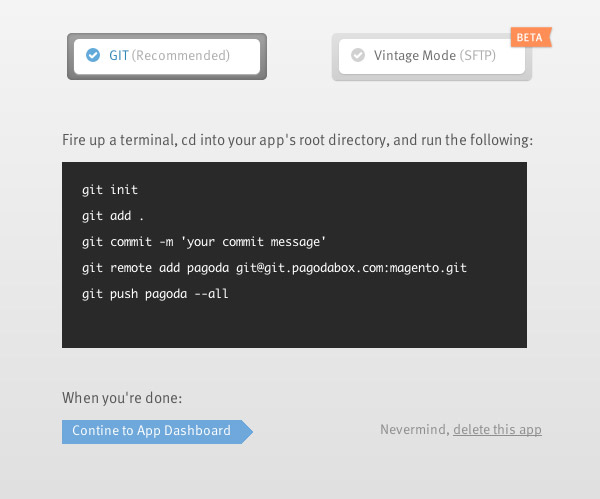
The pasted commands do the following:
-
git init- Initialize your Magento project as a Git Repository -
git add .- Add all files from the project to the repo -
git commit -m 'your commit message'- Commit files with a message that allows you to quickly scan deploy history in the future, in case you need to revert or modify changes -
git remote add pagoda [email protected]:magento.git- Add Pagoda Box as a remote (the specific git url for your application appears on both this screen, and in your app dashboard -
git push pagoda --all- Push your local code to the Pagoda Box remote repository. As long as you're on the "master" branch (which is the default), Pagoda Box will automatically deploy your code, and carry out the instructions we set in the Boxfile. Auto-deploy can be turned off in the Admin dashboard, or configured to deploy automatically from a Git branch other than Master.
SFTP Option
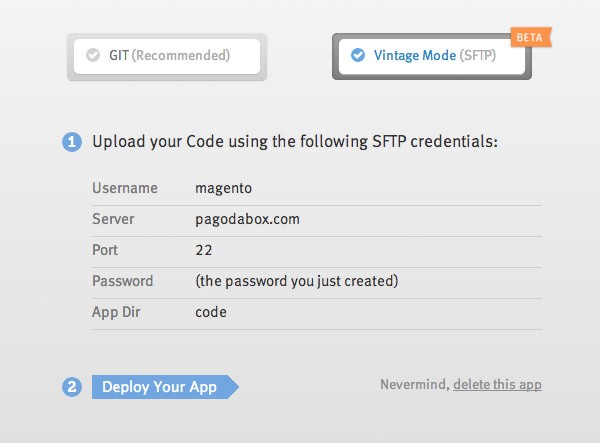
If you opted for SFTP, Pagoda Box will guide you through establishing credentials and a password. Connect via SFTP to Pagoda Box, and upload your Magento source code in the code directory.
Step 7: Create a Database
There are two ways to create a database on Pagoda Box. Each has benefits, explained below:
Create a DB in the Boxfile
The Boxfile will automatically create a database component on deploy, as long as that component (db1, db2, etc.) doesn't already exist. Declaring the database in the Boxfile saves a bit of time now, and makes deploying multiple Magento sites from a standardized code base much simpler in the future. (Note: Only cloud DBs can be deployed from the Boxfile. If you need a larger, dedicated or redundant database, see the Dashboard option later in this Step.) Add the following to your Boxfile:
db1:
  name: mag-db
  type: mysql
Your updated Boxfile should look like this:
web1:
  name: mag-app
  shared_writable_dirs:
    - media
    - var
  php_version: 5.3.8
  php_extensions:
    - pdo_mysql
    - mysql
    - simplexml
    - mcrypt
    - hash
    - gd
    - dom
    - iconv
    - curl
    - soap
db1:
  name: mag-db
  type: mysql
Then commit changes to the updated file and push changes to Pagoda Box:
$ git commit -m "pagoda config"
$ git push pagoda --all
Alternate: Create a DB in the Dashboard
You can also create a database from the Pagoda Box Dashboard. This is where you add a larger, dedicated or redundant database.
First, click "Add Database" in the Dashboard.

Pagoda Box will step through a series of screens to configure your database, depending on your choices. If you've chosen the Dedicated option, you will be asked to size your database as follows:
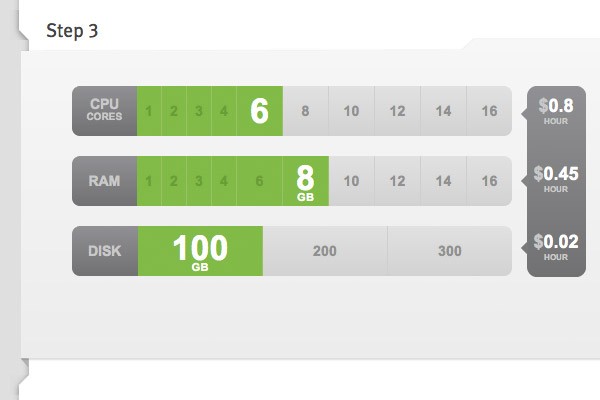
Cloud databases usually deploy within minutes. If you chosen Dedicated, don't get impatient. You may wait for up to 90 minutes for a big server to be provisioned to your specifications.
Step 8: Configure DB Credentials for Production
Your database automatically generates credentials when it's created on Pagoda Box. We'll use those credentials to configure Magento in production.
However, since Magento will be used in both local environments and in production, we need to supply different database credentials for each. We'll use Deploy Hooks in the Boxfile to simplify this process by executing scripts or commands during deploy.
In the case of Magento, we'll swap the local.xml file upon deploy. That way, without manually switching credentials, the app/etc/local.xml file will automatically have local database credentials in development, but production database credentials on Pagoda Box.
Create a local.xml for Production
First, create a directory named pagoda in root, then copy Magento's app/etc/local.xml to the new directory.
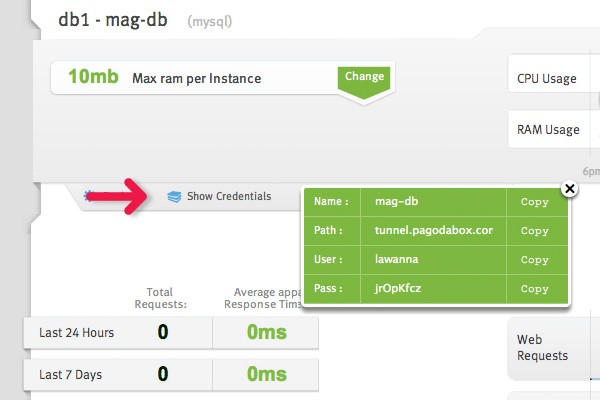
Next, edit local.xml to include Pagoda Box database credentials from your account dashboard. Note that Pagoda Box uses 3 levels of authentication, so that even if your credentials are compromised, other users cannot access your database.
Swap local.xml Configs on Deploy
Add the following into your Boxfile, under the web1 section to create the Deploy Hook.
after_build:
  "mv pagoda/local.xml app/etc/local.xml"
Your updated Boxfile should look like this:
web1:
  name: mag-app
  shared_writable_dirs:
    - media
    - var
  php_version: 5.3.8
  php_extensions:
    - pdo_mysql
    - mysql
    - simplexml
    - mcrypt
    - hash
    - gd
    - dom
    - iconv
    - curl
    - soap
  after_build:
  - "mv pagoda/local.xml app/etc/local.xml"
db1:
  name: mag-db
  type: mysql
Then commit changes and push to Pagoda Box:
$ git add .
$ git commit -m "pagoda config"
$ git push pagoda --all
Step 9: Migrate the Database
With the same tools you use to manage a local database, you can securely manage a live database on Pagoda Box. We'll use Sequel Pro for this example, but the process is similar for tools like HeidiSQL.
Export Your Local DB
When the Magento install script ran locally, it created several tables in the local database. Those tables need to be migrated to production.
First, export your local database using your database manager: File > Export.
Now choose a location, and Save the export.
Establish a Secure DB Connection
Now establish a database tunnel. Using the Pagoda Box Terminal Client, specify the app whose database you are trying to access, and the ID of the database component (e.g. db1), as in this example:
$ pagoda -a magento tunnel -c db1
--OR--
$ pagoda --app=magento tunnel --component=db1
Once the tunnel is established, use Sequel Pro (or similar) to connect to the database using the Host and Port provided by the Pagoda Terminal Client...
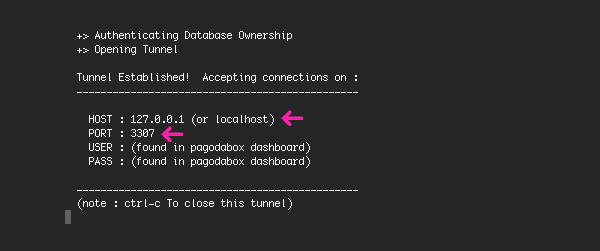
And the username and password in your Pagoda database credentials. These were automatically created with your database, and may be found in the Pagoda Box Dashboard under the database component (see example in Step 8).
Import and Update the Production DB
Next, import your database into production using Sequel Pro (or similar): File > Import. Now select the database export file, and Open.
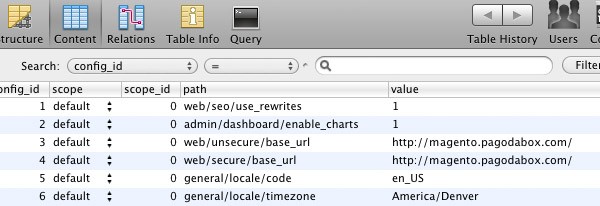
Finally, since we ran the install script locally, it's necessary to adjust the base url directly in the database before browsing the site. While you are still connected to the Pagoda Box database in Sequel Pro, navigate/filter to the core_config_data table and edit the value for the following paths:
web/unsecure/base_url
web/secure/base_url
The values for each should look something like this:
Step 10: Configure Mail
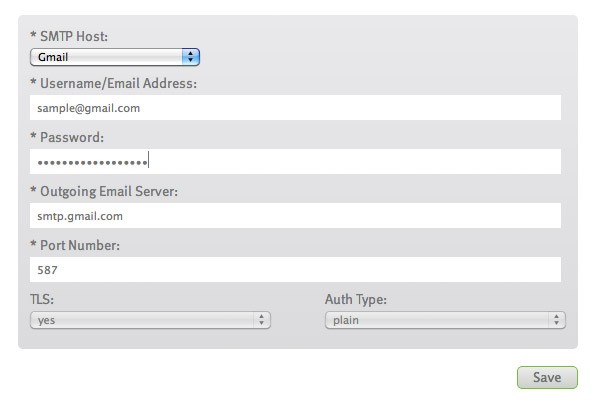
To protect your IPs from being flagged as spam, Pagoda Box uses the SMTP mail protocol to send email via third party mail provider SMTP credentials. In English, that means you need a company (like Gmail) that provides mail services.
Regardless of which mail provider you choose, enter account credentials from that provider in your Pagoda Box dashboard. It should look something like this:
Step 11: Cron Jobs (Optional)
A few recurring tasks in Magento (e.g. sending newsletters, log cleaning, customer notifications, etc.) need to happen periodically. The cron.php file located in Magento's root will trigger these tasks. We'll set up a Cron Job in the Pagoda Box admin panel to run cron.php every 15 minutes. (Note: To configure Magento specific tasks, see their Official Guide.)
Cron Jobs in the Boxfile
Cron Jobs can be added or updated via the Boxfile, then deployed to Pagoda Box. To schedule a task at 15 minute intervals, add the following to your Boxfile under the web1: component (change the "magento" to point to your own app name / subdomain):
  cron:
    - "*/15 * * * *": "curl -s -o /dev/null http://magento.pagodabox.com/cron.php"
Your updated Boxfile should look like this:
web1:
  name: mag-app
  shared_writable_dirs:
    - media
    - var
  php_version: 5.3.8
  php_extensions:
    - pdo_mysql
    - mysql
    - simplexml
    - mcrypt
    - hash
    - gd
    - dom
    - iconv
    - curl
    - soap
  after_build:
  - "mv pagoda/local.xml app/etc/local.xml"
cron:
    - "*/15 * * * *": "curl -s -o /dev/null http://magento.pagodabox.com/cron.php"
db1:
  name: mag-db
  type: mysql
Alternate: Cron Jobs in the Dashboard
In the Pagoda Box admin panel under the Cron tab, add the following (change the "magento" to point to your own app name):
Command: curl -s -o /dev/null http://magento.pagodabox.com/cron.php
Schedule: */15 * * * *
It should look like this:

Part 2 - Optimization: Redis, Scaling & Benchmarking
You've already gotten the heavy lifting out of the way. Your Magento application is scalable, and changes are easily deployed across all instances with $ git push pagoda --all.
In the follow-up article, we'll optimize Magento, add a Redis cache, SSL and Domain aliases, then scale the application for benchmarking and production. See you soon!


Comments