Viral launch pages are turning up everywhere and for good reason. They are an elegant and effective way to turn what could be a business's least-effect time online (no website or product ready yet) into the most effective marketing opportunity. Little explanation is required to create a lot of buzz, especially when there's an incentive thrown in there. Leverage the power of mystery! Also, people like free stuff.
Introduction
In this tutorial I'm going to show you how to code up a quick viral launch page using WordPress. The tutorial is based off the code used for a theme we developed last month for WordPress called Launch Effect. You can see that theme in action here: Launch Effect Demo.
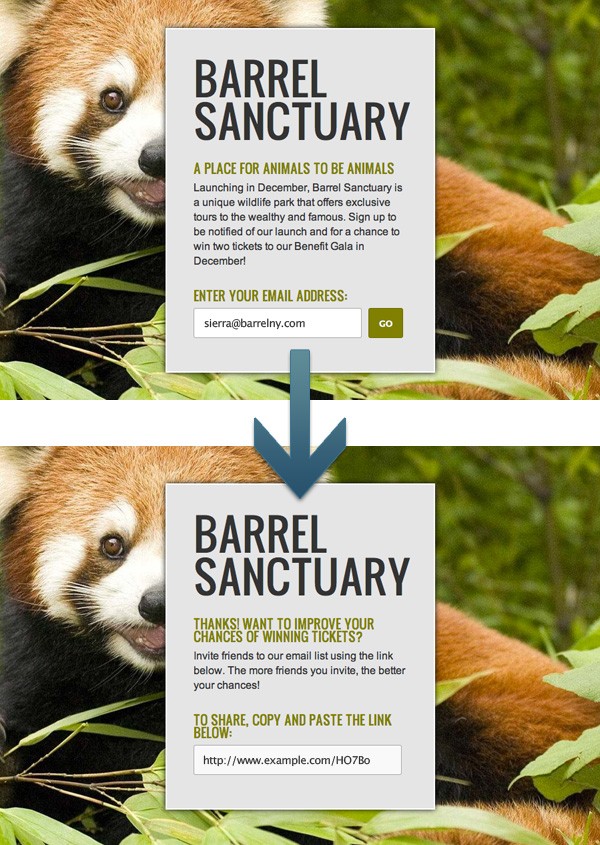
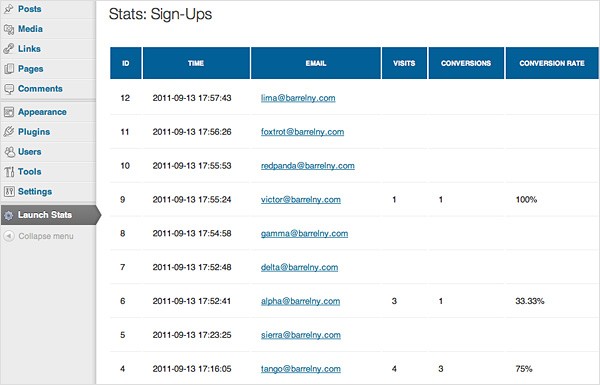
The Launch Effect theme allows the site owner to customize a landing page that introduces their business, product, or event and prompts visitors to sign up with their email to earn some sort of incentive (beta invites, gift cards, discounts, etc). Upon submission, the page generates a unique referral link that the site owner can use to track their most active referrers in order to know who to reward. Sign-up, visit and conversion data are all stored within the site owner's database and outputted to a private stats page.
Using a "light" version of the Launch Effect theme, this tutorial will show you how to accomplish the same email capture and unique URL generation functionality, as well as set up the stats page within the WordPress admin.
Skill-wise, this is more of a beginners PHP tutorial that gets you talking with a database and doing what you want with the data. We'll be using the proprietary functions you'll need to get things working inside of WordPress, specifically, though this basic knowledge is surely transferable to non-WordPress contexts. I hope the tutorial will be a helpful beginners' project for front-end coders looking to beef up their development knowledge beyond HTML/CSS.
Source Files
The tutorial source files are actually a standalone WordPress theme. To install:
- Upgrade a fresh install of WordPress to the latest version.
- Download and activate the theme.
- Go to Settings > Permalinks and select the third option.
The theme should look like the photos and function right out of the box. The stats data is available via the Launch Stats menu within the WordPress admin.
Though not necessary for this tutorial, it's always a good idea to have some kind of access to your database so you can get comfortable with it and have more power to troubleshoot future issues.
You'll Learn How To
- Create a table for your data within the same database that holds your WordPress install
- Validate and submit a form on a WordPress page with smooth Ajax action
- Log visits and conversions using a unique referral link generated by your site
- Output the form data to a page for viewing
Step 1 The Table
Referenced Files:
- functions.php
- functions/le-tables.php
Within the tutorial theme folder you'll notice that the functions.php file "requires" three additional files located within the functions folder. One of them, "le-tables.php," takes care of the actual creation of the new table within your database. If you've already activated the tutorial theme, your new table has already been created in the database. This is because the table creation is triggered simply when you VISIT any page within your WordPress site (visiting a WordPress page calls functions.php which calls le-tables.php).
// CREATE TABLES
require_once(TEMPLATEPATH . '/functions/le-tables.php');

// QUERY FUNCTIONS
require_once(TEMPLATEPATH . '/functions/le-functions.php');

// STATS PAGE
require_once(TEMPLATEPATH . '/functions/le-stats.php');
Below, I go through and explain the different parts of the le-tables.php code that creates the database table. You can create any number of additional tables via this method. I strongly urge you to check out this entry in the WordPress Codex for the full scoop: WordPress Codex: Creating Tables with Plugins
functions/le-tables.php
Connect to the database with the WordPress global variable $wpdb. This instantiates a class already set up by WordPress to talk to the WordPress database. Always connect this way when you're working from inside WordPress.
// CREATE TABLES

$wordpressapi_db_version = "1.0";

global $wpdb;
global $wordpressapi_db_version;
Our table is going to be named "wp_launcheffect" and will be referred to by the $stats_table variable throughout the theme.
$stats_table = $wpdb->prefix . "launcheffect";
Check that the table doesn't already exist before creating it.
if($wpdb->get_var("show tables like '$stats_table'") != $stats_table) {
This $sql variable specifies the table structure. We're creating the following columns: id, time, email, code, referred_by, visits, conversions, and ip.
$sql = "CREATE TABLE " . $stats_table . " (
	id mediumint(9) NOT NULL AUTO_INCREMENT,
	time VARCHAR(19) DEFAULT '0' NOT NULL,
	email VARCHAR(55),
	code VARCHAR(6),
	referred_by VARCHAR(6),
	visits int(10),
	conversions int(10),
	ip VARCHAR(20),
	UNIQUE KEY id (id)
);";
You're actually going to be using this WordPress dbDelta function to execute the SQL query. This function is not covered in this tutorial but basically it's in charge of making sure updates go smoothly if you have built a plugin, for example. Ideally it's supposed to compare current table structure with an updated one and add or modify as necessary.
require_once(ABSPATH . 'wp-admin/includes/upgrade.php');
dbDelta($sql);
Why not create a few variables to submit test data to the new table?
$test_email = "Email OK";
$test_code = "OK";
$test_referred_by = "OK";
$test_visits = 0;
$test_conversions = 0;
Upon creation of the table, insert the test data into the table. Running the variables through the $wpdb->escape function can help prevent security issues (but obviously the test data is no threat).
// INSERT TEST VALUES
$insert = "INSERT INTO " . $stats_table .
" (time, email, code, referred_by, visits, conversions, ip) " .
"VALUES ('" . date('Y-m-d H:i:s') . "','" . $wpdb->escape($test_email) . "','" . $wpdb->escape($test_code) . "','" . $wpdb->escape($test_referred_by) . "','" . $wpdb->escape($test_visits) . "','" . $wpdb->escape($test_conversions) . "','" . $_SERVER['REMOTE_ADDR'] . "')";
Once again we use WordPress's $wpdb class to perform the actual database manipulation. $wpdb->query is the broadest of all the built-in WordPress database manipulation functions. It allows you execute any SQL query on the WordPress database, on both WordPress-created tables or tables such as the one you just created. There are others for more specific purposes though, such as $wpdb->get_results, which we'll use to pull a results from the database as an array of rows.
$results = $wpdb->query( $insert );
Step 2 The Form
Referenced Files:
- header.php
- index.php
- post.php
- js/init.js
- functions/le-functions.php
Our form has only one user-facing input—the email address signup. Upon submit, the form is hidden and a container is revealed with a success message and the unique referral link generated by the theme. The unique referral link is simply 5 random characters attached to the end of your site's base URL.

The functionality of this form is exactly what we use to power our Launch Effect theme. Let's dive into the files!
header.php
In this file, please just note the super-important line below which prevents the page from throwing a 404 status code (visible in Firebug) when someone accesses via a unique referral link.
header('HTTP/1.1 200 OK');
index.php
This is the front page of your site—all that the visitor sees and interacts with is contained within this page. This file contains a straightforward form with a hidden success container and an error div to hold any error messages. The form tag should have an ID but the action should be left blank. jQuery takes care of the submission part and identifies the form via its ID.
Create a session so that we can store information inside of session variables across pages. In this case we'll be storing the "referred by" code. This means, if the visitor is arriving to your site via a referral link (a link with the unique code at the end), that information will be captured and passed along to the database.
session_start();

get_header();
If a visitor was referred by someone and arrived to the page via a unique referral link, the last 5 characters of the URL (the code) are stored within this session variable. (Please refer to the le-functions.php section for explanation.)
$_SESSION['referredBy'] = $referredindex;
If a visitor was referred by someone, this function logs as a visit everytime someone comes the page via that unique referral link. (Please refer to the le-functions.php section for explanation.)
logVisits($stats_table, $referredindex);
We'll store the base URL in this span so that our Ajax function can pick it up and use it to build a proper unique referral link. This is so we don't have to hardcode the URL in the javascript.
<!-- STORE BASE URL -->
<span class="dirname"><?php bloginfo('url'); ?></span>
Pre-Signup Form This container disappears after the visitor submits their email address. The hidden inpput stores the unique, random 5-character code that will henceforth be associated with this visitor's email. If the email is invalid, that message will appear within the error div.
<!-- FORM (PRE-SIGNUP) -->
<form id="form" action="">
	<fieldset>

		<input type="hidden" name="code" id="code" value="<?php codeCheck(); ?>" />

		<label for="email">Enter your email address:</label>
		<input type="text" id="email" name="email" />

		<span id="submit-button-border"><input type="submit" name="submit" value="Go" id="submit-button" /></span>

		<div id="error"></div>

	</fieldset>
</form>

Post-Signup If they are a new signup, this container appears after the visitor submits their email address. The unique, random 5-character code will be paired with the base URL we stored in span.dirname and output within the successcode input as the unique referral link.
<!-- FORM (POST-SIGNUP) -->
<form id="success" action="">
	<fieldset>
		<label>To share, copy and paste the link below:</label>
		<input type="text" id="successcode" value=""/>
	</fieldset>
</form>
Returning Visitor If they are a returning visitor, this container appears after the visitor submits their email address. This contains empty spans where the javascript can stick specific data pulled from database about the returning visitor.
<!-- FORM (RETURNING VISITOR) -->
<form id="returning" action="">
	<fieldset>
		<h2>Hello!</h2>
		<p>Welcome back <span class="user"> </span>.<br /><span class="clicks"> </span> clicked your link so far and <span class="conversions"> </span> signed up.<br /><br /></p>

		<label>Here's your unique URL:</label>
		<input type="text" id="returningcode" value=""/>
	</fieldset>
</form>

post.php
This file works in tandem with the javascript in js/init.js to post the form data. Credit goes to this super helpful tutorial for the functionality that we have modified for our needs: Jensbits.com: jQuery Ajax and jQuery Post Form Submit Examples with PHP.
Since this file is not a post or a page, WordPress doesn't really know it exists. Therefore, we have to bring it back into the loop just enough to talk to the WordPress database by including the following files:
// INCLUDE WORDPRESS STUFF
include_once('../../../wp-load.php');
include_once('../../../wp-includes/wp-db.php');
Resuming the current session where we're storing our "referred by" code...
session_start();
Variable for our "referred by" code
$referredpost = $_SESSION['referredBy'];
Set up the variables we'll use to store data from our form.
// POST FORM WITH AJAX
$email_check = ''; // if email is valid
$reuser = ''; // if visitor is a returning visitor
$clicks = ''; // if returning visitor, number of visits via his link
$conversions = ''; // if returning visitor, number of people that signed up via his link
$return_arr = array(); // this array will store our form data and the above additional information.  we'll use it later on down the page.
Check to see if an email has been submitted, and then if that email passes PHP's built-in email validator.
if(isset($_POST['email'])){
	if(filter_var($_POST['email'], FILTER_VALIDATE_EMAIL)) {
If it passes, set the $email_check variable to valid. We'll need this variable set to valid in order for our javascript to know it can submit the form.
$email_check = 'valid';
Check to see whether visitor is a returning user (Please refer to the le-functions.php section for explanation.)
$count = countCheck($stats_table, 'email', $_POST['email']);
If the visitor is a returning visitor, mark $reuser variable as true and grab stats for that visitor from the database using getDetail function. (Please refer to the le-functions.php section for explanation.)
if ($count > 0) {

	$reuser = 'true';

	$stats = getDetail($stats_table, 'email', $_POST['email']);

	foreach ($stats as $stat) {
		$clicks = $stat->visits;
		$conversions = $stat->conversions;
		$returncode = $stat->code;
	}
If the visitor is a new signup, mark $reuser as false and insert the form data into the database using the postData function. (Please refer to the le-functions.php section for explanation.)
} else {

	$reuser = 'false';
	postData($stats_table, $referredpost);

}
Store the email_check data, each piece of form data, and our returning visitor data (if applicable) as an array in a JSON-formatted string
$return_arr["email_check"] = $email_check;
$return_arr["reuser"] = $reuser;
$return_arr["clicks"] = $clicks;
$return_arr["conversions"] = $conversions;
$return_arr["returncode"] = $returncode;
$return_arr["email"] = $_POST['email'];
$return_arr["code"] = $_POST['code'];
Echo the JSON string response for use by the javascript file. If you're using FireFox have Firebug installed, you can actually see the response in the console if you expand the POST item.
echo json_encode($return_arr);
js/init.js
We're using this bit of jQuery to take of the actual form submission. Once again, take a look at this excellent tutorial which was the basis of this functionality: Jensbits.com: jQuery Ajax and jQuery Post Form Submit Examples with PHP.
When the user presses the submit button within the #form form...
$("#form").submit(function(e){
Encode all the data in #form as a standard query string with jQuery's "serialize" method.
dataString = $("#form").serialize();
This is the function that's going to allow us to post data without a page refresh:
$.ajax({
type: "POST",
url: "wp-content/themes/launcheffect/post.php",  // This receives the form data
data: dataString,  // This is the data from our form that we serialized above
dataType: "json",  // Let the function know that we're going to be sending it the JSON-formatted string
success:  // What to do when the data posts successfully
If the email address doesn't validate: Insert an error message into the empty #error div. Notice how data.email_check contains our valid/invalid information as passed from post.php. In the same way, data.code, data.returncode, data.clicks, data.conversions etc... will be accessible to us from here.
if(data.email_check == "invalid"){

	$('#error').html('Invalid Email.');
If returning visitor: Hide the pre-signup form and fade in the returning visitor container.
} else {

	if(data.reuser == "true") {

    	$('#form, #error, #presignup-content').hide();
        $('#returning').fadeIn();
Format the unique referral link attaching the base URL we stored in that span in index.php to the 5-character code (data.returncode).
var returningCode = $('span.dirname').text() + '/' + data.returncode;
Stick the info about the returning visitor we pulled from the database into the following spans. That way, the returning visitor can see how many people clicked and signed up with their link so far.
$('#returning span.user').text(data.email);
$('#returning span.clicks').text(data.clicks);
$('#returning span.conversions').text(data.conversions);
Output the unique referral link onto the page.
$('#returning input#returningcode').attr('value',returningCode);
If a NEW signup: Hide the pre-signup form and fade in the success container.
} else {

	$('#form, #error, #presignup-content').hide();
	$('#success, #success-content').fadeIn();
Format the unique referral link attaching the base URL we stored in that span in index.php to the 5-character code (data.code).
var referCode = $('span.dirname').text() + '/' + data.code;
Output the unique referral link onto the page
$('#success input#successcode').attr('value',referCode);
functions/le-functions.php
This file defines all of the PHP functions used throughout the tutorial theme in a centralized location. I'll explain each one here.
Random Code Generator: We generate the random 5-character code with this function. Pretty straightforward...
// GET RANDOM

function randomString() {
    $length = 5;
    $characters = '0123456789ABCDEFGHIJKLMNOPQRSTUVWXTZabcdefghiklmnopqrstuvwxyz';
    $string = '';
    for ($p = 0; $p < $length; $p++) {
        $string .= $characters[mt_rand(0, strlen($characters))];
    }
    return $string;
}
Get "Referred by" Code: This grabs the current URL and puts it in the $url variable. We use PHP's parse_url function to grab the path portion of the URL, then we use the substr function to grab the last 5 characters of that URL portion. If the last 5 characters contain a slash or are empty, then it's a direct visit (no referral code). If not, then the "referred by" code is those last 5 characters.
// GET REFERRED_BY CODE

$url = (!empty($_SERVER['HTTPS'])) ? "https://".$_SERVER['SERVER_NAME'].$_SERVER['REQUEST_URI'] : "http://".$_SERVER['SERVER_NAME'].$_SERVER['REQUEST_URI'];

$parseurl = parse_url($url, PHP_URL_PATH);
$parseurlstr = substr($parseurl, -5, 5);

if (strstr($parseurlstr, '/') OR $parseurlstr == '') {
	$referredindex = 'direct';
} else {
	$referredindex = $parseurlstr;
}
Query: This just globalizes $wpdb so we can have access to all the WordPress database functions and creates an easy shorthand for specifying the SQL query ($query) and type of function ($type). For our forms our $type will be query, get_results, prepare, or get_var. See this Codex document to learn about all of the database functions available to you in the $wpdb class: WordPress Codex: WPDB Class Reference.
// QUERY IT

function wpdbQuery($query, $type) {

	global $wpdb;
	$result = $wpdb->$type( $query );
	return $result;

}
Log Visits via Referral Link: If a visitor was referred by someone, this function logs visits every time someone comes the page via that unique referral link. It increments the visits column by 1 wherever the referred_by column is equal to the $referredBy code grabbed from the URL.
// LOG VISITS VIA REFERRAL LINK

function logVisits($table, $referral) {

	$update = wpdbQuery("UPDATE $table SET visits = visits+1 WHERE code = '$referral'", 'query');

}
Insert Data: The first half of this function takes care of actually inserting a new email and code pair into the database, along with the time. This also sets visits and conversions to 0. When someone visits the site via this person's unique referral link, those columns will be incremented. If the new signup was a result of someone's referral link, $update2 takes care of incrementing the conversions column by 1 for that person (same logic as logVisits only for conversions instead of visits).
// POST DATA

function postData($table, $referral) {

	$result = wpdbQuery("INSERT INTO $table (time, email, code, referred_by, visits, conversions, ip) VALUES('" . date('Y-m-d H:i:s') . "','$_POST[email]', '$_POST[code]','$referral',0,0,'" . $_SERVER['REMOTE_ADDR'] . "')", 'query');

	$update2 = wpdbQuery("UPDATE $table SET conversions = conversions+1 WHERE code = '$referral'", 'query');

}
Count: We use this function in a couple ways: in post.php to see whether the visitor is a returning visitor, we check whether or not the email address posted via the form matches any email addresses in the database table (e.g. $entry = email, $value = $_POST['email']). If so, then the count of such instances would be greater than 0, and the visitor would be a returning visitor. We also use it in index.php for the codeCheck function (see below) to check whether or not a code generated by the randomString function has already been used (unlikely but safe to check anyway).
// COUNT CHECK (RETURN COUNT OF INSTANCES WHERE X = Y)

function countCheck($table, $entry, $value) {
	$query = wpdbQuery(wpdbQuery("SELECT COUNT(*) FROM $table WHERE $entry = '$value'", 'prepare'), 'get_var');
	return $query;
}

// REPEAT CODE CHECK

function codeCheck() {
	global $wpdb;
	$code = randomString();
	$count = countCheck($wpdb->prefix . 'launcheffect', 'code', $code);
	if($count > 0) { echo randomString(); } else { echo $code; }
}
Get Data: This simply grabs everything from our table. The get_results function type stores the results in an array.
// GET DATA

function getData($table) {

	$result = wpdbQuery("SELECT * FROM $table ORDER BY time DESC", 'get_results');
	return $result;

}
Get Data by Value: This grabs everything from our table that matches a certain parameter. We use this in a couple of places: in post.php, if a visitor is a returning visitor, we return all data where the posted email address equals the email address already existing in the database. This returns visits and conversions data for that visitor. We also use it in in the Launch Stats admin page to see specific data for one visitor.
// GET DATA BY VALUE (RETURN X WHERE Y = Z)

function getDetail($table, $entry, $value) {

	$result = wpdbQuery("SELECT * FROM $table WHERE $entry = '$value' ORDER BY time DESC", 'get_results');
	return $result;

}
Step 3 The Stats
Referenced Files:
- functions/le-stats.php
As you've no doubt discovered, the stats page is located as a top-level menu item in the WordPress admin. We'll pull the our data into a nice table on this page where you can drill down to individual people. Extra credit for pagination and sorting!
Need to redefine this variable for our table here again.
$stats_table = $wpdb->prefix . 'launcheffect';
If the URL contains a "view" query string, we're actually going to be looking at a specific visitor's detail page (a page that shows everyone that signed up so far as a result of their link), as opposed to all of the stats at once. Visitors are catalogued by their 5-character codes, so the query string would look like "?view=XXXXX" at the end of the URL.
if (isset($_GET['view'])) {
Set the $view variable equal to the query string's value.
$view = $_GET['view'];
Query the wp_launcheffect table for entries where the "referred_by" column is equal to $view and store it in the $results variable. Basically, show us the people that have signed up as a result of this visitor's unique referral link. (Please refer to the le-functions.php section for explanation of the function.)
$results = getDetail($stats_table, 'referred_by', $view);
If there aren't any results, say so.
if (!$results) : ?>

	<h2>Stats: <a href="?page=launch_stats_page">Sign-ups</a>: Detail</h2>
	<p>Nothing to see here yet. <a href="?page=launch_stats_page">Go to Sign-Ups Stats.</a></p>

<p>Otherwise, display the contents of the $results array using a foreach loop.</p>

	<h2>Stats: <a href="?page=launch_stats_page">Sign-ups</a>: Detail</h2>

	<table id="individual">
		<thead>
			<th>ID</th>
			<th>Time</th>
			<th>Converted To</th>
			<th>IP</th>
		</thead>

		<?php foreach ($results as $result) : ?>

			<tr>
				<td><?php echo $result->id; ?></td>
				<td style="white-space:nowrap;"><?php echo $result->time; ?></td>
				<td><a href="?page=launch_stats_page&view=<?php echo $result->code; ?>"><?php echo $result->email; ?></a></td>
				<td><?php echo $result->ip; ?></td>
			</tr>

		<?php endforeach; ?>
	</table>
If the URL does not contain any query strings, just show the main stats page. Get all the data from the wp_launcheffect table and store it in the $results variable. Display the contents of the $results array using a foreach loop.
<h2>Stats: Sign-Ups</h2>

<table id="signups">
	<thead>
		<th>ID</a></th>
		<th>Time</a></th>
		<th>Email</a></th>
		<th>Visits</a></th>
		<th>Conversions</a></th>
		<th>Conversion Rate</th>
		<th>IP</th>
	</thead>

	<?php

	$results = getData($stats_table);
	foreach ($results as $result) :

	?>

	<tr>
		<td><?php echo $result->id; ?></td>
		<td style="white-space:nowrap;"><?php echo $result->time; ?></td>
		<td><a href="?page=launch_stats_page&view=<?php echo $result->code; ?>"><?php echo $result->email; ?></a></td>
		<td><?php if($result->visits != 0) { echo $result->visits; }?></td>
		<td><?php if($result->conversions != 0) { echo $result->conversions; } ?></td>
		<td><?php

			// calculate the conversion rate: divide conversions by results and multiply it by 100.  show up to 2 decimal places.

			if($result->visits + $result->conversions != 0 ) {
				$conversionRate = ($result->conversions/$result->visits) * 100;
				echo round($conversionRate, 2) . '%';
			} ?>
		</td>
		<td><?php echo $result->ip; ?></td>
	</tr>

	<?php endforeach;?>

</table>
Thanks!
I hope this was helpful and look forward to hearing your comments!

Comments