We have covered quite a bit in this series already, including navigation. However, Ionic provides a few components that provide additional features for building more functional navigation. In this tutorial, we add the side menu and tabs components into the app, and we also look at some additional services to make our app's navigation smarter.
Tutorial Project Files
The tutorial project files are available on GitHub. The general premise of the app is that it shows some information about local facilities. In this tutorial, we add the ability to show libraries, museums, parks, and hospitals. Currently, it is only displaying locations in Chicago, which is something we fix in the next tutorial.
You can download the completed project for this tutorial from GitHub at.
If you clone the project, you can also code along by using Git and running git checkout –b start. The final example is also available to preview.
Note that I have removed the resolve from the place view that we had in the third part of this series. I don’t want to cover it in depth, but the controller loads the data now and makes our navigation simpler.
1. Adding a Side Menu
One of the most common navigational patterns in mobile apps is a side menu. This is a drawer that slides out from the side and exposes navigational links and perhaps other content, such as the current login status. By design, they are off-screen and are opened by some kind of button, often the hamburger icon, even though people disagree on the use of that icon.
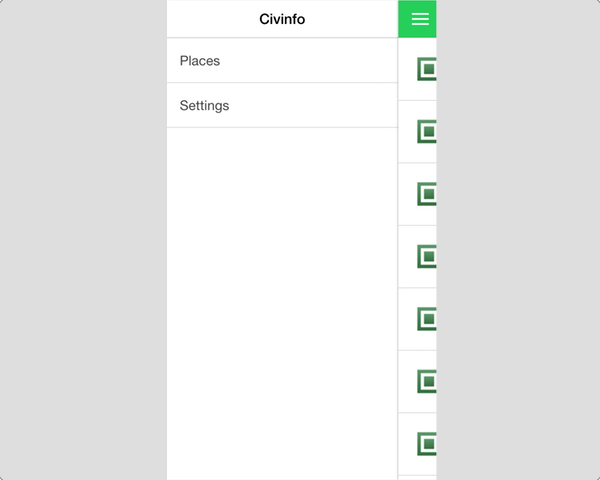
Side menus are often able to be opened by swiping from the side to pull it open or swipe back to push it closed. This can be handy, but it can sometimes get in the way of other gestures and you should keep an eye out for conflicting behaviors. You should consider the best use of swiping with the entire vision and experience of your app in mind, and if there is a concern you can disable it.
Ionic provides a couple of components that make it trivial
to set up a side menu. You can create up to two side menus, one on the right and
one on the left. A side menu comprises several components, ionSideMenus,
ionSideMenu, and ionSideMenuContent.
To see this in action, let’s update www/index.html and set up a side menu. You will replace the existing content with the code below, which adds the side menu components around our existing code.
<body ng-app="App">
  <ion-side-menus>
    <ion-side-menu side="left">
      <ion-header-bar>
        <h1 class="title">Civinfo</h1>
      </ion-header-bar>
      <ion-content>
        <ion-list>
          <ion-item ui-sref="places" menu-close>Places</ion-item>
          <ion-item ui-sref="settings.preferences" menu-close>Settings</ion-item>
        </ion-list>
      </ion-content>
    </ion-side-menu>
    <ion-side-menu-content drag-content="false">
      <ion-nav-bar class="bar-balanced">
        <ion-nav-buttons side="left">
          <button menu-toggle="left" class="button button-icon icon ion-navicon"></button>
        </ion-nav-buttons>
        <ion-nav-back-button class="button-clear">
          <i class="ion-arrow-left-c"></i> Back
        </ion-nav-back-button>
      </ion-nav-bar>
      <ion-nav-view></ion-nav-view>
    </ion-side-menu-content>
  </ion-side-menus>
</body>
To enable a side menu, we start by wrapping our app content
in ionSideMenus. It enables Ionic to coordinate the side menu and
content areas. We then have an ionSideMenu with a side="left" attribute to designate which side it occupies.
In the side menu, we can put any content we wish. In
this case, and probably the most common scenario, the content is an ionHeaderBar component and an ionList component to render the app title and a list of links respectively. We haven’t defined the settings view yet, so
that link will fail for the moment. Also note that the ionItem
components have a menu-close attribute. This automatically closes the side
menu when a user clicks the link, otherwise it remains open.
The ionSideMenuContent component is used to contain the
primary content area. This content area takes up the whole screen, but this
component just helps the side menu component render properly. We have also used the drag-content="false" attribute to disable drag gestures because they will interfere with scrolling list and tabs.
We have also added a new button to the navigation bar using ionNavButtons. This is
the side menu icon that appears at the top right as three stacked lines. This
button has the menu-toggle="left" attribute, which triggers the left side menu
to toggle when selected.
Now that our side menu is in place, let’s work on setting up the next major navigational component by adding tabs for the settings view.
2. Tabs With Individual Navigation History
Tabs are another common navigation pattern for navigating an app. Tabs are easy to understand because we see them in so many types of interfaces, not just mobile apps.
Tabs can be stateful or stateless. A tab that displays content that doesn’t retain a memory of any changes is stateless while a tab that maintains a state based on user interaction is stateful (for example, persisting a search result). We look at how to build stateful tabs with Ionic as they are more complex and more powerful.
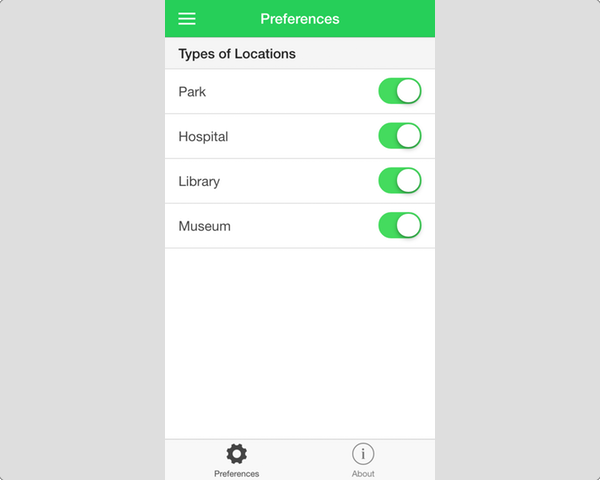
Setting up tabs is fairly easy with the ionTabs and ionTab
components. Much like the side menus, you put as many tab components
inside as you like. There is no hard limit, but I
find five is a healthy maximum. On smaller devices, too many icons makes it hard to select a tab.
We are going to set up the tabs by creating a couple of new files. First, let's set up the template by creating a new file at www/views/settings/settings.html. Add the following code to the new file.
<ion-tabs class="tabs-icon-top tabs-stable">

  <ion-tab title="Preferences" icon-on="ion-ios-gear" icon-off="ion-ios-gear-outline" ui-sref="settings.preferences">
    <ion-nav-view name="preferences"></ion-nav-view>
  </ion-tab>

  <ion-tab title="About" icon-on="ion-ios-information" icon-off="ion-ios-information-outline" ui-sref="settings.about">
    <ion-nav-view name="about"></ion-nav-view>
  </ion-tab>

</ion-tabs>
The ionTabs component is used to wrap the inner ionTab components. There are several classes that can define how the tabs appear, such as putting tabs at the top top or bottom, using icons with or without titles, and more. Here, we have decided to use tabs that have a title with the icon at the top with the stable color preset.
The ionTab component has a number of attributes that can be used to define its behavior. It supports many features, such as showing a small notification badge, linking tabs to states, icon behavior, and more. For our tabs, each has a title, an icon class for when the tab is active (icon-on) or inactive (icon-off), and links to a state using ui-sref.
Within each tab is another ionNavView. This may seem out of place since we already have an ionNavView set up in index.html. What we are doing is declaring additional locations that a state can be rendered, which can be thought of as child views.
Each tab is able to have its own navigational history, because each ionNavView is independent of the others. Each tab also has a unique name, which will come in handy so we can define certain states to appear in the named ionNavView.
You may have noticed there is no ionView element on this page and that is important to note when using stateful tabs. It is not needed when you use ionTabs in this way, only if you use the stateless tabs, the CSS component version, would you need it.
we now need to set up some additional states to make the example functional. Create another file at www/views/settings/settings.js and add the following code to it.
angular.module('App')
.config(function($stateProvider, $urlRouterProvider) {
  $stateProvider.state('settings', {
    url: '/settings',
    abstract: true,
    templateUrl: 'views/settings/settings.html'
  })
  .state('settings.about', {
    url: '/about',
    views: {
      about: {
        templateUrl: 'views/settings/tab.about.html'
      }
    }
  })
  .state('settings.license', {
    url: '/license',
    views: {
      about: {
        templateUrl: 'views/settings/tab.license.html'
      }
    }
  })
  .state('settings.preferences', {
    url: '/preferences',
    views: {
      preferences: {
        controller: 'PreferencesController',
        controllerAs: 'vm',
        templateUrl: 'views/settings/tab.preferences.html'
      }
    }
  });

  $urlRouterProvider.when('/settings', '/settings/preferences');
})
.controller('PreferencesController', function(Types) {
  var vm = this;

  vm.types = Types;
});
You can see that we are setting up several new states, but these appear different from other states we have defined so far. The first state is an abstract state, which is essentially a state that cannot be directly loaded on its own and has children. This makes sense for us with the tabs interface because the settings state loads the tabs components template, but users are never just on the tabs component. They are always viewing the active tab, which contains another state. So using abstract gives us this ability to wire these up properly.
The other three states are defined as settings.[name]. This allows us to define a parent-child relationship between these states, which essentially reflects the parent-child relationship of the ionTabs and ionTab components. These states use the view property, which is an object with a property named for the view to use.
The name you give in your template with ionNavView should match the property name. The value of that property is then the same state definition, without the url that was declared in the usual way. The url also follows the parent-child relationship by combining the two. So all of these child states render like /settings/preferences.
You need to add settings.js to index.html using another script tag. Once you have done that, you will see some errors because we are referencing a number of files that we haven't created yet. Let's finish up with our tabs templates.
<script src="views/settings/settings.js"></script>
We need to create three. The first two are static content so I am not going to go over them in detail. Create a file at www/views/settings/tab.about.html and add the following content to it.
<ion-view view-title="About" hide-back-button="true">
  <ion-content>
    <div class="list">
      <a href="https://github.com/gnomeontherun/civinfo-part-3" target="_blank" class="item">
        <h2>Project on GitHub</h2>
        <p>Click to view project</p>
      </a>
      <div class="item" ui-sref="settings.license">
        <h2>License</h2>
        <p>See full license</p>
      </div>
    </div>
  </ion-content>
</ion-view>
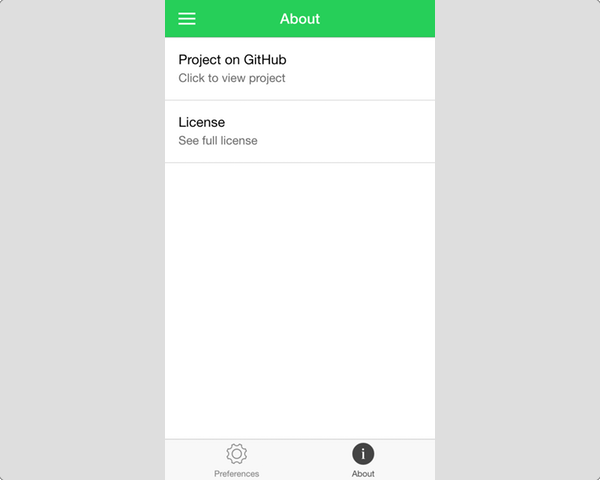
This contains a template that displays some information. It links to the GitHub project and the license. This is what it looks like.
Create another file at www/views/settings/tab.license.html and add the following content to it.
<ion-view view-title="License">
  <ion-content>
    <div class="card">
      <div class="item item-divider">
        The MIT License (MIT)
      </div>
      <div class="item item-text-wrap">
        <p>Copyright (c) 2016 Jeremy Wilken</p>
        <p>Permission is hereby granted, free of charge, to any person obtaining a copy of this software and associated documentation files (the "Software"), to deal in the Software without restriction, including without limitation the rights to use, copy, modify, merge, publish, distribute, sublicense, and/or sell copies of the Software, and to permit persons to whom the Software is furnished to do so, subject to the following conditions:</p>
        <p>The above copyright notice and this permission notice shall be included in all copies or substantial portions of the Software.</p>
        <p>THE SOFTWARE IS PROVIDED "AS IS", WITHOUT WARRANTY OF ANY KIND, EXPRESS OR IMPLIED, INCLUDING BUT NOT LIMITED TO THE WARRANTIES OF MERCHANTABILITY, FITNESS FOR A PARTICULAR PURPOSE AND NONINFRINGEMENT. IN NO EVENT SHALL THE AUTHORS OR COPYRIGHT HOLDERS BE LIABLE FOR ANY CLAIM, DAMAGES OR OTHER LIABILITY, WHETHER IN AN ACTION OF CONTRACT, TORT OR OTHERWISE, ARISING FROM, OUT OF OR IN CONNECTION WITH THE SOFTWARE OR THE USE OR OTHER DEALINGS IN THE SOFTWARE.</p>
      </div>
    </div>
  </ion-content>
</ion-view>
This contains the license content (MIT) for this code. There is a simple card to contain the content. This is what it looks like.

The final template contains some form elements. I will go over it in a little more detail. Create a new file at www/views/settings/tab.preferences.html and add the following content to it.
<ion-view view-title="Preferences" hide-back-button="true">
  <ion-content>
    <ul class="list">
      <li class="item item-divider">
        Types of Locations
      </li>
      <li class="item item-toggle" ng-repeat="type in vm.types">
        {{type.type}}
        <label class="toggle">
          <input type="checkbox" ng-model="type.enabled">
          <div class="track">
            <div class="handle"></div>
          </div>
        </label>
      </li>
    </ul>
  </ion-content>
</ion-view>
This view contains a list of toggles that shows the four types of places the app can display, museum, park, library, and hospital. Each of these list items allows you to enable or disable a type of place from the list. The toggle button is a CSS component. We just need to use a checkbox input with this specific markup and CSS class structure to make them appear as mobile toggle buttons.
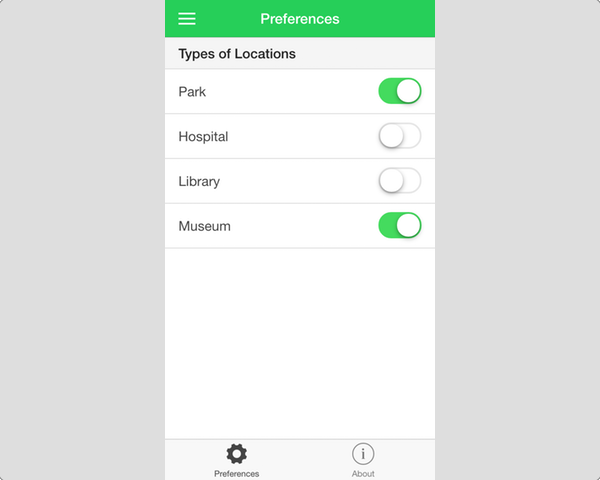
This view has a controller declared in settings.js, but it injects a Types service that we haven't created yet. We will fix that by adding a new service to www/js/app.js.
.factory('Types', function() {
  return [
    {type: 'Park', enabled: true},
    {type: 'Hospital', enabled: true},
    {type: 'Library', enabled: true},
    {type: 'Museum', enabled: true}
  ];
})
This service holds an array of place types. It has a property for the name of each place type and whether it is enabled or disabled. We use the enabled property in the toggle button ngModel to track the state if that type should be displayed.
At this point, you can open the side menu and navigate to the settings link. You are able to see the two tabs, preferences and about. In the preferences tab, you can toggle the place types on or off.
If you go to the about tab, you can select the license to see how it navigates to another route within the tab. If you switch between the preferences and about tab after viewing the license, you can see that the tab remembers you were on the license state even after you left, demonstrating the stateful nature of these tabs.
The last step of this tutorial is to update the places view to use the Types service to load only the desired types of places and use the history service to handle when to reload or use the cache.
3. Caching and Using the History Service
By default, Ionic caches the last 10 views and keeps them in memory. Many apps may not even have that many states, which means your entire app could remain in memory. This is useful because it means that Ionic doesn't have to render the view again before navigating, which speeds up the app.
This can cause some behavioral issues because you might think that your states always reload and reinitialize the controller anytime the state is accessed. Since only 10 views are cached, if you have 20 views, only the last 10 will be in the cache. That means you cannot be guarantee that a view is in the cache or not. So you should avoid performing setup logic in your controllers outside of life cycle hooks. You can also configure caching strategies using the $ionicConfigProvider.
Sometimes you need to look at the user's navigational history to determine what to do. For example, in this app, we want to keep the list of places cached if the user taps on a place and then returns back to the list. If we automatically refreshed the list on every visit, users could lose their place in the list after they have scrolled and viewed a place.
On the other hand, if a user navigates to the settings page and then back to the places list, we want to refresh the list since they may have changed the types of places they wish to display.
We are going to use a combination of the life cycle events that we have looked at before with the $ionicHistory service to add some logic that will help determine when the places state should reload the list. We also want to use the Types service to help us load only the types of places the user wishes to see.
Open www/views/places/places.js and update it to match the following code. We need to change the way data is loaded and use the $ionicHistory service to inspect the history to determine when to reload.
angular.module('App')
.config(function($stateProvider) {
  $stateProvider.state('places', {
    url: '/places',
    controller: 'PlacesController as vm',
    templateUrl: 'views/places/places.html'
  });
})
.controller('PlacesController', function($http, $scope, $ionicLoading, $ionicHistory, Geolocation, Types) {
  var vm = this;
  var base = 'https://civinfo-apis.herokuapp.com/civic/places?location=' + Geolocation.geometry.location.lat + ',' + Geolocation.geometry.location.lng;
  var token = '';
  vm.canLoad = true;
  vm.places = [];

  vm.load = function load() {
    $ionicLoading.show();
    var url = base;
    var query = [];
    angular.forEach(Types, function(type) {
      if (type.enabled === true) {
        query.push(type.type.toLowerCase());
      }
    });
    url += '&query=' + query.join('|');

    if (token) {
      url += '&token=' + token;
    }

    $http.get(url).then(function handleResponse(response) {
      vm.places = vm.places.concat(response.data.results);
      token = response.data.next_page_token;

      if (!response.data.next_page_token) {
        vm.canLoad = false;
      }
      $scope.$broadcast('scroll.infiniteScrollComplete');
      $ionicLoading.hide();
    });
  };

  $scope.$on('$ionicView.beforeEnter', function() {
    var previous = $ionicHistory.forwardView();
    if (!previous || previous.stateName != 'place') {
      token = '';
      vm.canLoad = false;
      vm.places = [];
      vm.load();
    }
  });
});
First, we have modified the way the URL is built for our API to change from loading just parks to loading the requested types. If you compare this to the previous version, it is primarily using angular.forEach to loop over each type and add it to the URL.
We have also modified the way the $ionicLoading service behaves. Instead of running immediately when the controller runs initially, we trigger it anytime the vm.load() method is called. This is important because the controller will be cached and will not reload data by default.
The biggest change is the $ionicView.beforeEnter life cycle event handler. This event fires before the view is about to become the next active view and allows us do some setup. We use the $ionicHistory.forwardView() method to get information about the last view the user was on.
If it is the first load, then this will be empty, otherwise it returns some data about the last state. We then check if the previous state was the place state and, if so, we use the cached result list. Also, since we have less than 10 states, we know the state will always be kept in memory.
Otherwise, it will reset the cached values and trigger a new load of data. This means anytime I return to the places view after going to settings, it will reload the data. Depending on your app design, you will likely want to design different conditional rules for how to handle caching and reloading.
The history service provides more information, such as the entire history stack, the ability to modify the history, details about the current state, and more. You can use this service for fine-tuning the experience while navigating in the app.
We are going to make two other small tweaks to our places template. Open www/views/places/places.html and change the title to Local Places.
<ion-view view-title="Local Places" hide-back-button="true">
Next, update the infinite scroll component with one more attribute, immediate-check, to prevent the infinite scroll component from loading data at the same time that the initial load occurs. This essentially helps prevent duplicate requests for more data.
<ion-infinite-scroll on-infinite="vm.load()" ng-if="vm.canLoad" immediate-check="false"></ion-infinite-scroll>
At this point, we have built a pretty solid app that has a pretty nice set of features. We will wrap up this series with one last tutorial looking at Cordova and integrating with some of the device features, such as accessing GPS data.
Conclusion
Navigation with Ionic always starts with declaring some states. Exposing that navigation can be done a number of ways as we have seen in this tutorial. This is what we have covered in this tutorial:
- The side menu components make it easy to create one or two side menus that can be activated on demand or on swipe.
- Tabs can be stateless or stateful. Stateful tabs can have individual views with separate navigational histories.
- Tabs have many configuration options for how the icons and text display.
- A toggle button is a CSS component that works like a checkbox, but it is designed for mobile.
- You can use the
$ionicHistoryservice to learn more about the navigational history of the app to customize the experience.


Comments