Recently, I’ve been doing a considerable amount of CoffeeScript work. One problem I ran into early-on was testing: I didn’t want to manually convert my CoffeeScript to JavaScript before I could test it. Instead, I wanted to test from CoffeeScript directly. How’d I end up doing it? Read on to find out!
Every few weeks, we revisit some of our reader's favorite posts from throughout the history of the site. This tutorial was first published in November of 2012.
You’ll need to have Node.js and Node Package Manager installed.
Before we continue on, I'll point out that you need to have a decent knowledge of CoffeeScript for this tutorial; I won’t be explaining the bits and pieces here. If you’re interested in CoffeeScript, you should check out the CoffeeScript tuts available here on Nettuts+, or the CoffeeScript documentation.
Additionally, you’ll need to have Node.js and the Node Package Manager (npm) installed for this tutorial. If you don’t have ‘em installed, no worries: head over to nodejs.org and download the installer for your platform; then, well, install it!
Meeting Mocha and Chai
We’ll be building the beginnings of a todo list application (cliché, I know). These will be CoffeeScript classes. Then, we’ll write some tests with Mocha and Chai to test that functionality.
Why both Mocha and Chai? Well, Mocha is a testing framework, but it doesn’t include the actual assertions component. That might sound strange: after all, there isn’t much more to a testing library, is there? Well, there is, in Mocha’s case. The features that brought me to the library are two-fold: the ability to run tests from the command line (instead of having an HTML page to run them in the browser), and the ability to run test in CoffeeScripts, without having to convert that code to JavaScript (as least manually: Mocha does it behind the scenes). There are other features, too, that I won’t be talking about here, including:
- You can easily test asynchronous code.
- You can watch for especially slow tests.
- You can output the results in a number of different formats.
And on, and on. See more at the Mocha home page. To install Mocha simply run npm install -g mocha, and you’re set.
As for Chai: it’s a great assertion library that offers interfaces for doing both BDD and TDD; you can use it both in the browser or on the command line via node, which is how we’ll use it today. Install it for Node, via npm install -g chai.
Now that we have our libraries installed, let’s start writing some code.
Setting Up Our Project
Let’s begin by setting up a mini project. Create a project folder. Then, create two more folders in that one: src, and test. Our CoffeeScript code will go in the src folder, and our tests will go in, you guessed it, the tests folder. Mocha looks for a test folder by default, so by doing this, we’ll save ourselves some typing later.
Mocha looks for a
testfolder by default.
We’re going to create two CoffeeScript classes: Task, which will be a todo item, and TaskList, which will be a list of todo items (yes, it’s more than an array). We’ll put them both in the src/task.coffee file. Then, the tests for this will be in test/taskTest.coffee. Of course, we could split ‘em into their own files, but we’re just not going to do that today.
We have to start by importing the Chai library and enabling the BDD syntax. Here’s how:
chai = require 'chai'
chai.should()
By calling the chai.should method, we’re actually adding a should property to Object.prototype. This allows us to write tests that read like this:
task.name.should.equal "some string"
If you prefer the TDD syntax, you can do this:
expect = chai.expect
… which allows you to write tests like this:
expect(task.name).to.equal "some string"
We’ll actually have to use both of these, as you’ll see; however, we’ll use the BDD syntax as much as possible.
Now we’ll need to import our Task and TaskList classes:
{TaskList, List} = require '../src/task'
If you aren’t familiar with this syntax, that’s CoffeeScript’s destructured assignment at work, as well as some of its object literal sugar. Basically, our require call returns an object with two properties, which are our classes. This line pulls them out of that object and gives us two variables named Task and TaskList, each of which points to the respective class.
Writing Our First Tests
Great! Now, how about a test? The beauty of the Mocha syntax is that its blocks (describe and it) are identical to Jasmine’s (both being very similar to RSpec). Here’s our first test:
describe 'Task instance', ->
    task1 = task2 = null
    it 'should have a name', ->
        task1 = new Task 'feed the cat'
        task1.name.should.equal 'feed the cat'
We start with a describe call: all these tests are for a Test instance. By setting test1 = test2 = null outside our individual tests, we can use those values for multiple tests.
Then, in our first test, we’re simply creating a task and checking to see that its name property has the correct value. Before writing the code for this, let’s add two more tests:
it 'should be initially incomplete', ->
    task1.status.should.equal 'incomplete'
it 'should be able to be completed', ->
    task1.complete().should.be.true
    task1.status.should.equal 'complete'
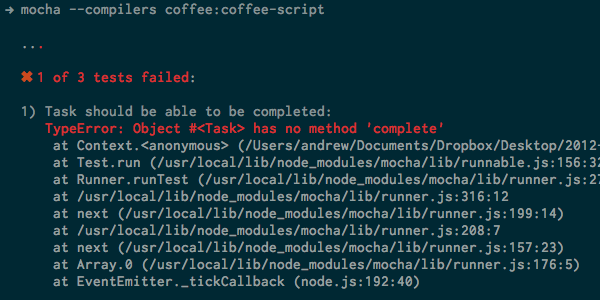
Ok, let’s run these tests to make sure they’re failing. To do this, let’s open a command prompt and cd to your project folder. Then, run this command:
mocha --compilers coffee:coffee-script
Mocha doesn’t check for CoffeeScript by default, so we have to use the --compilers flag to tell Mocha what compiler to use if it finds a file with the coffee file extension. You should get errors that look like this:

If, instead of seeing that, you get the error Cannot find module '../src/task', it’s because your src/task.coffee file doesn’t exist yet. Make said file, and you should get said error.
Coding Our First Features
Well, now that we have failing tests, it’s time to write the code, correct? Open that src/task.coffee file and let’s get cracking.
class Task
    constructor: (@name) ->
Just this is enough to get our first test passing. If you aren’t familiar with that parameter syntax, that just sets whatever value was passed to new Task to the @name (or this.name) property. However, let’s add another line to that constructor:
@status = 'incomplete'
That’s good. Now, head back to the terminal and re-run our tests. You’ll find that—wait a second, nothing’s changed! Why aren’t our first two tests passing?
A simple problem, actually. Because the CoffeeScript compiler wraps the code in each file in a IIFE (or, a self-invoking anonymous function), we need to “export” anything we want to be accessible from other files. In the browser, you’d do something like window.Whatever = Whatever. For Node, you can use either global or exports. We’ll be using exports, since 1) that’s considered best practice, and 2) that’s what we prepared for when setting up our tests (remember our require call?). Therefore, at the end of our task.coffee file, add this:
root = exports ? window
root.Task = Task
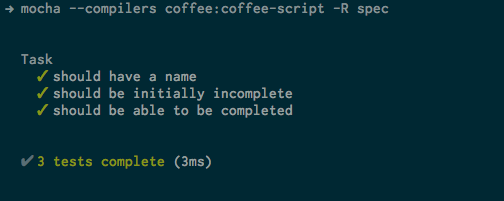
With that in place, you should find that two of our three tests are now passing:
To get the last test to pass, we’ll have to add a complete method. Try this:
complete: ->
    @status = 'complete'
    true
Now, all tests pass:

Now’s a good time to mention that Mocha has a number of different reports: these are just different ways to output the test results. You can run mocha --reporters to see your options:
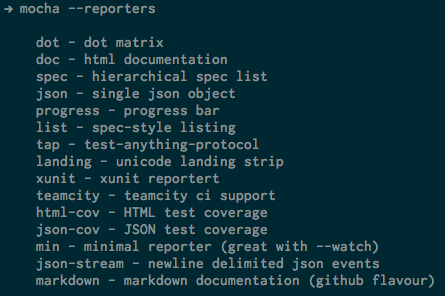
By default, Mocha uses the dot reporter. However, I prefer the spec reporter, so I tack -R spec on the end of command (-R is the reporter-setting flag).
Adding a Feature
Let’s add a feature to our Task class: we’ll let tasks be dependent on other tasks. If the “parent” task isn’t completed, the “child” task can’t be done. We’ll keep this feature simple and allow tasks to have only one sub-task. We also won’t check for recursiveness, so while it will be possible to set two tasks to be the parent and child of each other, it will render both tasks incomplete-able.
Tests first!
it 'should be able to be dependent on another task', ->
    task1 = new Task 'wash dishes'
    task2 = new Task 'dry dishes'

    task2.dependsOn task1

    task2.status.should.equal 'dependent'
    task2.parent.should.equal task1
    task1.child.should.equal task2

it 'should refuse completion it is dependent on an uncompleted task', ->
    (-> task2.complete()).should.throw "Dependent task 'wash dishes' is not completed."
Task instances are going to have a dependsOn method, which tasks the task that will become their parent. Tasks that have a parent task should have a status of “dependent.” Also, both tasks get either a parent or child property that points to the appropriate task instance.
In the second test there, we say that a task with an incomplete parent task should throw an error when its complete method is called. Notice how test syntax works: we need to call should off of a function, and not the result of the function: therefore, we wrap the function in parentheses. This way, the test library can call the function itself and check for the error.
Run those tests and you’ll see that both fail. Coding time!
dependsOn: (@parent) ->
    @parent.child = @
    @status = 'dependent'
Again, very simple: we just set the task parameter to the parent task, and give it a child property which points to this task instance. Then, we set the status of this task to be “dependent.”
If you run this now, you’ll see that one of our tests is passing, but the second isn’t: that’s because our complete method doesn’t check for an uncompleted parent task. Let’s change that.
complete: ->
    if @parent? and @parent.status isnt 'completed'
        throw "Dependent task '#{@parent.name}' is not completed."
    @status = 'complete'
    true
Here’s the completed complete method: if there’s a parent task, and it isn’t completed, we throw an error. Otherwise, we complete the task. Now, all tests should pass.
Building the TaskList
Next, we’ll build the TaskList class. Again, we’ll start with a test:
describe 'TaskList', ->
    taskList = null
    it 'should start with no tasks', ->
        taskList = new TaskList
        taskList.tasks.length.should.equal 0
        taskList.length.should.equal 0
This is old-hat to you by now: we’re creating a TaskList object and checking its tasks and length properties to makes sure their both at zero. As you might guess, tasks is an array that holds the tasks, while length is just a handy property that we’ll update when adding or removing tasks; it just saves us from having to write list.tasks.length.
To make this test pass, we’ll make this constructor:
class TaskList
    constructor: () ->
        @tasks = []
        @length = 0
Good start, and that gets our test passing.
We’ll want to be able to add tasks to a task list, right? We’ll have an add method that can take either a Task instance, or a string which it will convert to a Task instance.
Our tests:
it 'should accept new tasks as tasks', ->
    task = new Task 'buy milk'
    taskList.add task
    taskList.tasks[0].name.should.equal 'buy milk'
    taskList.length.should.equal 1
it 'should accept new tasks as string', ->
    taskList.add 'take out garbage'
    taskList.tasks[1].name.should.equal 'take out garbage'
    taskList.length.should.equal 2
First, we add an actual Task object, and check the taskList.tasks array to verify that it’s been added. Then, we add a string, and make sure that a Task object with the right name was added to the tasks array. In both cases, we check the length of taskList as well, to make sure that it’s being property updated.
And the function:
add: (task) ->
    if typeof task is 'string'
        @tasks.push new Task task
    else
        @tasks.push task
    @length = @tasks.length
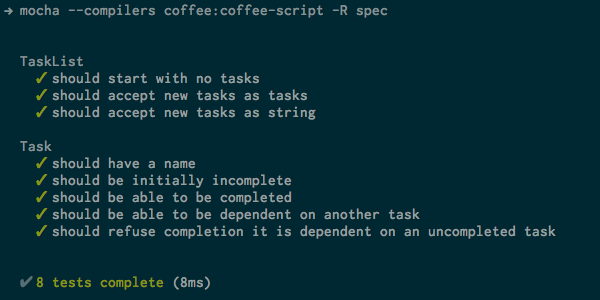
Pretty self-explanatory, I think. And now our tests pass:
Of course, we might want to remove tasks from our list, right?
it 'should remove tasks', ->
    i = taskList.length - 1
    taskList.remove taskList.tasks[i]
    expect(taskList.tasks[i]).to.not.be.ok
First, we call the remove method (yet to be written, of course), passing it the last task currently in the list. Sure, we could just hardcode the index 1, but I’ve done it this way because that makes this test flexible: if we changed our previous tests or added more tests above this one, that might have to change. Of course, we have to remove the last one because otherwise, the task after it will take its place and there’ll be something at that index when we’re expecting there to be nothing.
And speaking of expecting, notice that we’re using the expect function and syntax here instead of our usual should. This is because taskList.tasks[i] will be undefined, which doesn’t inherit from Object.prototype, and therefore we can’t use should.
Oh, yeah, we still need to write that remove function:
remove: (task) ->
    i = @tasks.indexOf task
    @tasks = @tasks[0...i].concat @tasks[i+1..] if i > -1
    @length = @tasks.length
Some fancy array footwork combined with CoffeeScript’s ranges and array splicing shorthand closes this deal for us. We’re simply splitting off all the items before the one to remove and all the items after it; the we concat those two arrays together. Of course, we’ll update @length accordingly. Can you say “passing tests”?
Let’s do one more thing. We want to print our a (relatively) nice-looking list of the current tasks. This will be our most complex (or at least, our longest) test yet:
    it 'should print out the list', ->
        taskList = new TaskList
        task0 = new Task 'buy milk'
        task1 = new Task 'go to store'
        task2 = new Task 'another task'
        task3 = new Task 'sub-task'
        task4 = new Task 'sub-sub-task'

        taskList.add task0
        taskList.add task1
        taskList.add task2
        taskList.add task3
        taskList.add task4

        task0.dependsOn task1
        task4.dependsOn task3
        task3.dependsOn task2

        task1.complete()

        desiredOutput = """Tasks

- buy milk (depends on 'go to store')
- go to store (completed)
- another task
- sub-task (depends on 'another task')
- sub-sub-task (depends on 'sub-task')

"""
        taskList.print().should.equal desiredOutput
What’s going on here? First, we’re creating a new TaskList object so that we start from scratch. Then, we create five tasks and add them to taskList. Next, we set up a few dependencies. Finally we complete one of our tasks.
We’re using CoffeeScript’s heredoc syntax to create a multi-line string. As you can see, we’re keeping it pretty simple. If a task has a parent task, it’s mentioned in parentheses after the task name. If a task is completed, we put that, too.
Ready to write the function?
print: ->
    str = "Tasks\n\n"
    for task in @tasks
        str += "- #{task.name}"
        str += " (depends on '#{task.parent.name}')" if task.parent?
        str += ' (complete)' if task.status is 'complete'
        str += "\n"
    str
It’s actually pretty straightforward: we just look over the @tasks array and add ‘em to a string. If they have a parent, we add that, and if they’re complete, we add that too. Notice that we’re using the modifier form of the if statement, to tighten up our code. Then, we return the string.
Now, all our tests should pass:
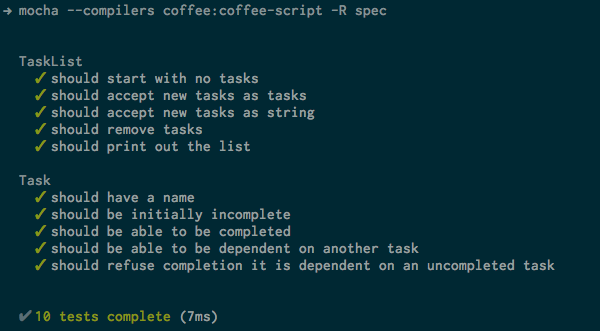
Wrapping Up
Try adding a few features to get the hang of it all.
That’s the extent of our little project today. You can download the code from the top of this page; in fact, why don’t you try adding a few features to get the hang of it all? Here are a few ideas:
- Prevent
Taskinstances from being able to depend on each other (recursive dependencies). - Make the
TaskList::addmethod throw an error if it receives something other than a string or aTaskobject.
These days, I’m finding CoffeeScript more and more attractive, but the biggest downside to it is that it must be compiled to JavaScript before it’s useful. I’m grateful for anything that negates some of that workflow breaker, and Mocha definitely does that. Of course, it’s not perfect (since it’s compiling to JS before running the code, line numbers in errors don’t match up with your CoffeeScript line numbers), but it’s a step in the right direction for me!
How about you? If you’re using CoffeeScript, how have you been doing testing? Let me know in the comments.


Comments