When I last left you, we had looked at some design principles, explored other frameworks, and came to the inevitable conclusion that we'd build our own. In this tutorial, we're going to cover the steps I took to create what I called my WordPress Boilerplate, taking a close look at the CSS, functions.php, and select template pages.
The important thing to keep in mind throughout development is we want to keep this general enough that we can easily adopt it/build on it in future themes; I also made it a personal goal of mine to make this good enough to stand along as it barebones theme. Let's remember that going forward.
The Theme's CSS
The first thing we need to do is arrange the CSS. There are 2 main components to the CSS in my WordPress Boilerplate: style.css, which is required, and the /css/ folder, which includes all of the CSS for the framework. In style.css you'll find two sections: The theme definition and the calls to my actual CSS. The entire style.css file looks like this:
/*
Theme Name: WordPress 3.0 Boiler Plate
Theme URI: http://casabona.org/
Description: A Boiler Plate  Theme for WP 3.0. Now with more HTML5!
Version: 1.5
Author: Joe Casabona
Author URI: http://www.casabona.org
*/


@import url("css/reset.css");
@import url("css/master.css");
@import url("css/ie.css");
After the theme definition, you see three @import lines. This is where all of the heavy lifting for the CSS goes. reset.css is obviously the CSS reset. I actually recently changed this to use normalize.css for a few reasons. The first reason is that instead of resetting everything to a default, unformatted style, it creates styles that you'd expect from a default browser. For example, in a standard reset, <strong> is no longer boldface type. In normalize.css, it is. The second reason is that it has default styles for HTML5 elements, which are necessary for older browsers that don't support the new ones.
Note: I use HTML5 in this theme. It works in Firefox, Chrome, Safari, and IE7-9.
After reset.css is called, I call my main stylesheet, master.css (naming conventions thanks to Dan Cederholm of SimpleBits). This is crux of the matter! All of my post-reset default styles will be here. I won't paste all of the CSS here, but I have included the files for you to view. In creating the CSS, I kept in mind styles that usually stay the same for me from site to site; things like the width of the overall container, my navigation styles, how I arrange my sidebar, etc. I also generally use padding/margins in multiples of 15 for my paragraph and list elements, so I have some basic definitions for those too.
I also include default styles for some common WordPress classes, including ones generated by the WordPress editor. They are: .navigation, .post, .postmetadata, ol.commentlist, ol.commentlist li, ol.commentlist li .vcard, ol.commentlist li .vcard img, form#commentform, form#commentform p label, form#commentform input, form#commentform textarea, form#commentform textarea, form#commentform input[type="submit"], img.centered, .alignright , .alignleft, .aligncenter, div.aligncenter, .wp-caption , .wp-caption img, .wp-caption p.wp-caption-text.
The last thing I include in master.css is a class that will make divs "self-clearing." That is, it will eliminate the need for a .clearfix div (again, thanks to Dan Cederholm for this).
/* self-clear floats */
.group:after {
	content: ".";
    display: block;
    height: 0;
    clear: both;
    visibility: hidden;
}
After master.css is called, I call in the final piece of our puzzle, ie.css. This is where any and all IE fixes will go. Right now, it's just a fix for .group and a PNG fix. Keep in mind that the import order is very important here, as some things may get overridden, and changing the order may mess with the styles we've defined.
Functions.php
Just as important as the CSS stuff is the functions.php file. This is where we will add any general functions we plan to use throughout the theme, as well as any definitions for sidebars, menus, and more will go. I start this off with two lines:
define( 'TEMPPATH', get_bloginfo('stylesheet_directory'));
define( 'IMAGES', TEMPPATH. "/images");
These are two constants I use quite frequently throughout the theme. The first one is the template's path; this is good for referencing theme specific files. I used 'stylesheet_directory' instead of 'template_directory' because if we use this as a parent theme (tutorial coming soon), 'template_directory' would grab the wrong path (namely this one instead of the child's path). The second line actually uses TEMPPATH to create a path to the /images/ directory, which we'll also use very frequently, whether it be in this theme or in child themes.
After these two lines, I add support for dynamic menus and 2 widgetized sidebars; one is the primary sidebar, and one is a 2nd "just in case" sidebar. Generally I will use it in my theme's footer. Finally, I created two other functions that I found I was using regularly:
function print_post_nav(){
?>
		<div class="navigation group">
			<div class="alignleft"><?php next_posts_link('« Next') ?></div>
			<div class="alignright"><?php previous_posts_link('Previous »') ?></div>
		</div>
<?php

}

function print_not_found(){
?>
		<h3 class="center">No posts found. Try a different search?</h3>
		<?php get_search_form(); ?>
<?php
}
The first one prints the post's navigation and should be used outside the Loop. That means we can use it on any page that lists posts (index, search, and any custom post type template). The second function creates the "Posts not found" area, which I was using on almost every template page.
There is, of-course, no limit to how many functions you create here. These were just the ones I was using frequently.
Template Pages
Next up are the template pages. We'll look at 4 specific pages: header.php, footer.php, single.php, and page.php. The others are basically derivatives of the page or single templates.
Header & Footer
Below is our entire header.php file:
<!DOCTYPE html>

<html xmlns="http://www.w3.org/1999/xhtml" dir="ltr" lang="en-US">

<head>
<title><?php bloginfo('name'); ?> | <?php wp_title(); ?> </title>
<link rel="stylesheet" href="<?php bloginfo('stylesheet_url'); ?>" type="text/css" media="screen" />
<link rel="pingback" href="<?php bloginfo('pingback_url'); ?>" />

<!--[if lt IE 9]> <script src="//html5shim.googlecode.com/svn/trunk/html5.js"></script> <![endif]-->

<?php wp_head(); ?>


</head>
<body>
	<div id="container" class="group">

		<!--Header - Name of Item Here-->
		<header class="group">
			<h1><a href="<?php bloginfo('home'); ?>"><?php bloginfo('name'); ?></h1>

			<nav>
				<?php wp_nav_menu( array('menu' => 'Main' )); ?>
			</nav>
		</header>


		<!-- End Header -->

		<!-- Main Area -->
		<?php get_sidebar(); ?>

		<div id="content" class="group">
You can see that aside from our regular <header> declarations, there isn't too much. I include <!--[if lt IE 9]> <script src="//html5shim.googlecode.com/svn/trunk/html5.js"></script> <![endif]--> to ensure our theme is HTML5 ready, and then in the body, create a basic header with the site's name and navigation, call the sidebar, and start the "content" area, all wrapped in out predefined #container div. You can see that the way I lay things out is consistent with how my CSS is define (for example, the sidebar, which I float right, is above the main content area).
Note: I'm not talking about the sidebar.php template because it's the same as every standard sidebar: check to see if a widget area is defined; if not, print some default widgets.
The same goes for our footer:
<?php print "\n\n"; ?>

</div>

<!--Footer Information-->
		<footer class="group">

			<?php if ( !function_exists( 'dynamic_sidebar' ) || !dynamic_sidebar('Sidebar2') ) : ?>
			<?php endif; ?>

			<p>© <a href="<?php bloginfo('home'); ?>"><?php bloginfo('name'); ?></p>
		</footer>
		<!-- End Footer Information -->

	</div>
	<!--end container-->


	<?php wp_footer(); ?>

</body>
</html>
I print two line breaks, mostly to make the code look pretty, end the content div, then start on the footer. I include the secondary sidebar in the footer as this is something I often do, then have some general copyright info, and round out the theme by closing any open tags. Again, I try not to do too much with the footer since this is a framework, but I do provide some options to add info to the footer if I need to.
Single & Page
These files are also pretty basic. I tried to cut out most of the stuff that's not needed while leaving in the information you'd expect to see on each. single.php should look familiar:
<?php get_header(); ?>

	<?php if (have_posts()) : while (have_posts()) : the_post(); ?>

		<div <?php post_class() ?> id="post-<?php the_ID(); ?>">
			<h2><?php the_title(); ?></h2>

			<div class="entry">
				<?php the_content('<p class="serif">Read the rest of this entry »</p>'); ?>

				<p class="postmetadata alt">
					<small>
						Posted on <?php the_time('l, F jS, Y') ?> at <?php the_time() ?> | Category <?php the_category(', ') ?> | <?php the_tags( 'Tags: ', ', ', '|'); ?>
						<?php if ( comments_open() && pings_open() ) {
							// Both Comments and Pings are open ?>
							<a href="#respond">Comment</a> |

						<?php } elseif ( !comments_open() && pings_open() ) {
							// Only Pings are Open ?>
							Comments are currently closed |

						<?php } elseif ( comments_open() && !pings_open() ) {
							// Comments are open, Pings are not ?>
							<a href="#respond">Comment</a> |

						<?php } elseif ( !comments_open() && !pings_open() ) {
							// Neither Comments, nor Pings are open ?>
							Both comments and pings are currently closed. |

						<?php } edit_post_link('Edit this entry','','.'); ?>

					</small>
				</p>
			</div>
		</div>

	<?php comments_template(); ?>

	<div class="navigation group">
			<div class="alignleft"><?php previous_post_link('« %link') ?></div>
			<div class="alignright"><?php next_post_link('%link »') ?></div>
		</div>

	<?php endwhile; else: ?>

		<?php print_not_found(); ?>

<?php endif; ?>


<?php get_footer(); ?>
We have the header and footer, and our loop. I kept the classes that are common among most WordPress themes so that people who use this can just define those classes in the CSS without having to change the single.php template. I also include the standard post meta data and a comments area. Notice I don't use the post navigation function I write in functions.php. That's because this is inside the Loop, and that function would behave unpredictably.
The page.php template is a bit shorter:
<?php get_header(); ?>


	<?php if (have_posts()) : while (have_posts()) : the_post(); ?>
		<h2><?php the_title(); ?></h2>

			<?php the_content('<p class="serif">Read the rest of this page »</p>'); ?>

			<?php wp_link_pages(array('before' => '<p><strong>Pages:</strong> ', 'after' => '</p>', 'next_or_number' => 'number')); ?>

	<?php endwhile; endif; ?>


<?php get_footer(); ?>
Again, I include only what's needed. There are no extra classes or information. The pages on websites focus on content, which is why I tried to streamline this template as much as possible.
Other Templates
Obviously I can't cover each template page here; I suggest you check the included source. For each template I tried to cut away what I wasn't using, and in some cases, I left templates along (as WordPress' default info). Since we all code differently the way I add things might not suit you best, but I did try to make this as general as possible.
Here is what the theme looks like out of the box:
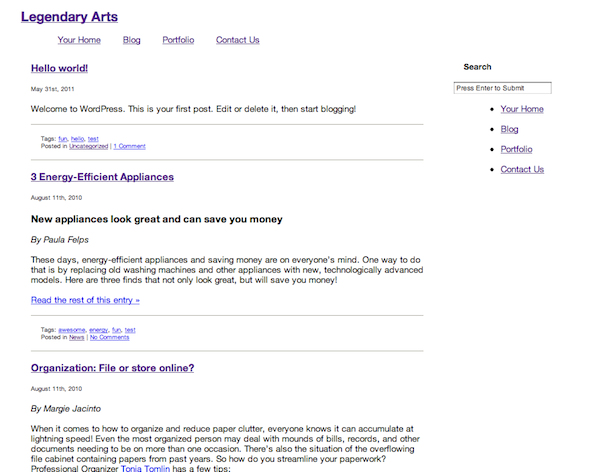
The WordPress Boilerplate Theme
Conclusion
So here's an overview with some examples of creating a theme framework. Looking at my sample code, you can see that I didn't try to do too much with any single template file. If I am going to add anything to this theme, it will be in the functions.php file because the template files should be left basic- especially if we are just going to overwrite them when creating a child theme. Speaking of, that's what we'll be doing next time, so stay tuned!

Comments