Themes are a huge part of what makes WordPress as popular as it is, and in this three-part series we’ll take you through a step-by-step process that results in a completed, functioning WordPress theme. In part three, we'll be implementing the comment system, adding sidebar widgets, and wrapping everything up!
Part Three
Welcome to the final part of this three-part series on developing a WordPress theme from scratch. Last time we built the basic structure of a theme, this week we're going to add the missing pieces and finish off our first theme.
- Developing Your First WordPress Theme: Day 1 of 3
- Developing Your First WordPress Theme: Day 2 of 3
- Developing Your First WordPress Theme: Day 3 of 3
Our Theme So Far
So last time around we converted our standard HTML/CSS design in to a working WordPress theme which could be selected in the dashboard. The theme has a working front page, can show single posts/pages and the navigation. The first thing we're going to look at is the sidebar and how to incorporate widgets in to it.
Sidebar Widgets
Before we begin, we'll create a simple text widget in WordPress so we can easily see when the widgets are working. To do that we'll head to Widgets under the Appearance drop down in the dashboard.

As you can see, WordPress has detected that we don't have any areas setup in our theme to display any widgets. In order for WordPress to allow the use of widgets, we need to register some areas in our theme where widgets can be displayed - the two most common being the sidebar or the footer.
Of course widgets aren't restricted to these two locations, they can go anywhere - they can even be broken up. A common practice is to create a location called ‘sidebar top' and another called ‘sidebar bottom'. Between these two locations, sites can show ads or have anything else custom to their design - of course ads can be widgets too, but some designs have different ways of dealing with things.
In our theme, we're going to simply have one area - the sidebar. To do this, we need to open up our currently blank functions.php file. Inside this file, paste the following code;
<?php
if ( function_exists('register_sidebar') )
	register_sidebar(array(
	'name' => 'sidebar',
	'before_widget' => '<div class="sidebar-box">',
	'after_widget' => '</div>',
	'before_title' => '<span class="sidebar-title">',
	'after_title' => '</span><div class="dots"></div>',
));
?>
Now if we head back to the dashboard and go to Widgets under Appearance, the page should look a bit more like this (although without the text widget, we're going to add that now);
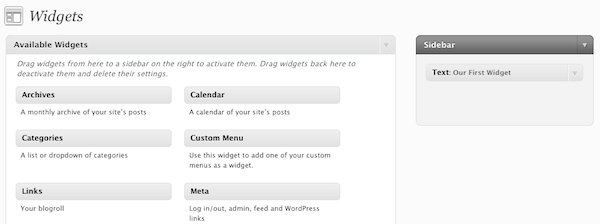
WordPress now knows our sidebar exists and we can drag widgets from the Available Widgets panel in to our sidebar. For now, drag across a simple text widget. Set the title to “Our First Widget” and the text to anything you'd like. Make sure you enable the automation of paragraphs.
With this done, we now need to add some code to our theme to let it know where this specific widget location is, so open up sidebar.php. Since sidebar content is now automatically generated, we can replace the code in this file with the following;
		<div id="sidebar">
			<?php if ( !function_exists('dynamic_sidebar') || !dynamic_sidebar("sidebar") ) : ?>
			<?php endif; ?>
		</div><!-- sidebar -->
		<div class="spacer"></div>
	</div><!-- wrapper -->
	</body>
</html>
With this code in place, when we visit the front page of our theme we should the following (if your paragraphs are not styled, be sure you ticked the automatic paragraphing option under the edit text widget window);
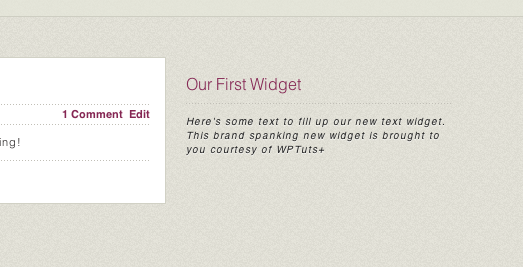
Great, we now have a working widget-ready sidebar! It's easy to repeat this functionality elsewhere using the same concept; name the widget-ready area, set the styling options in functions.php and paste in the widget displaying code.
Comments
The final river to cross before our theme is completed is comments. Comments can make or break a blog, it's imperative that comments are implemented in our theme and conform to the standard UI we're so accustomed to.
Comments work similar to displaying posts and so on - by using a loop. The loop cycles through each comment for a specific page, post (or ID) and allows us to output it however we want. Comments are largely configured from the dashboard, meaning we theme developers have less decisions to make and users have more - a goal that many think we should strive for in theme development.
As a quick recap, last week when we implemented our single post and page files, we added the following line after the content;
<?php comments_template( '', true ); ?>
This function loads the comments file. The first parameter, which we have left blank, is the name of the file. If left blank then the function will default to loading comments.php, which is what we are using. The second parameter specifies whether or not we wish to separate the comments by type, which we do.
There are three things we want to do here;
- Display a title with the number of comments (if any).
- Loop through and display all the comments.
- If allowed, display a form to add a comment.
The Title
So, first of all the title. Much like how we displayed the comment count in index.php, we want to have a dynamic title that changes according to the amount of comments. For no comments we'll simply display there are no comments (or we could add a ‘Be the first' message). For 1 comment or more, we'll display the count (removing the ending ‘s' if only one comment exists.
<?php if ( have_comments() ) : ?>
<h4><?php printf( _n( 'One Comment', '%1$s Comments', get_comments_number() ),number_format_i18n( get_comments_number() ) );
?></h4>

// Comment loop goes here

<?php else: ?>
<h4>No comments</h4>
<?php endif; ?>
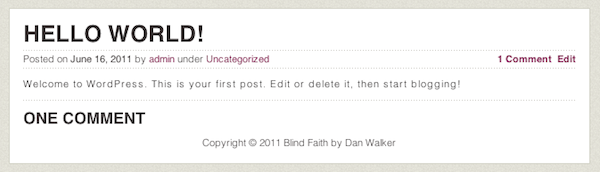
Breaking it down, we're using the have_comments() function to check there are comments to display. If there are, we'll display how many using some simple PHP number formatting. If there are not, we'll simply display a title stating that and we won't attempt to run the comment loop as we know no comments exist.
If we visit a post with a comment now, it should look like this;
The Comment Loop
Our comment loop looks like this;
<?php foreach ($comments as $comment) { ?>
<div class="comment">
	<a name="comment-<?php comment_ID(); ?>"></a>
	<?php echo get_avatar( $comment->comment_author_email, $size = '40'); ?>
	<div class="comment-right">
		<span class="comment-author"><a href="<?php comment_author_url(); ?>"><?php comment_author(); ?></a></span> <span class="comment-date">on <?php comment_date(); ?></span>
		<p><?php echo $comment->comment_content; ?></p>
	</div>
	<div class="spacer"></div>
</div><!-- comment -->
<?php } ?>
Paste the above code in to the comments.php file, replacing the commented line we left earlier. A large amount of the code is simply design markup. So let's break it down, here's what the code looks like without any of the HTML;
<?php foreach ($comments as $comment) { ?>

		<?php comment_ID(); ?>
		<?php echo get_avatar( $comment->comment_author_email, $size = '40'); ?>
		<?php comment_author_url(); ?><?php comment_author(); ?><?php comment_date(); ?>
		<?php echo $comment->comment_content; ?>

<?php } ?>
As with most things in WordPress, the simple naming conventions make things quite self explanatory. First of all we're establishing the comments loop using a simple foreach statement. From there on we use a series of inbuilt methods and functions to display each piece of information.
The comment_ID() function returns the unique identification number for the comment. When we have our HTML in place, we put this ID in to an anchor (#comment-[id]) so that it's possible to jump and link to specific comments.
Next we use get_avatar(). This is a fairly new function (implemented in WordPress 2.5.0 onwards) that makes use of the extremely popular Gravatar service. The two parameters we need to pass are the email of the user, to determine which gravatar to fetch, and the size. We pass 40, meaning the image returned will be 40px by 40px.
Next up we use two pieces of information about the author, the authors URL (this could be to the authors personal website or to a profile - customizable in the dashboard) and the authors name. These two pieces of information are supplied by comment_author_url() and comment_author(), respectively. Next we use comment_date() which can take a parameter to customize how the date should be displayed, otherwise it uses the default date format set in the dashboard.
Finally, the comment content itself is displayed using $comment->comment_content;.
The Form
Now that we have a title and the comments being displayed, all that is left to do is allow users to add their own comments. This is mostly just styling as so long as we supply the correct information in $_POST format, WordPress will take care of all the validation and so on. The code for our form is as follows;
<?php if ( ! comments_open() ) : ?>
	<h4>Comments are closed.</h4>
<?php else: ?>

<h4>Leave a Comment</h4>
<a name="comments"></a>
			<form action="<?php bloginfo('url'); ?>/wp-comments-post.php" method="post" id="commentform">
				<input type='hidden' name='comment_post_ID' value='<?php echo $post->ID; ?>' id='comment_post_ID' />
				<input type="text" value="Name" name="author" onfocus="if(this.value == this.defaultValue) this.value = ''"><label>Name / Alias (required)</label><br />
				<input type="text" value="Email" name="email" onfocus="if(this.value == this.defaultValue) this.value = ''"><label>Email Address (required, not shown)</label><br />
				<input type="text" value="" name="url"><label>Website (optional)</label><br />
				<textarea rows="7" cols="60" name="comment"></textarea><br />
				<input type="submit" value="Add Your Comment" />
			</form>

<?php endif; ?>
We use a simple if statement to check if this particular page or post has comments allowed, if not then a message stating this is shown, otherwise our form is displayed.
Comments must be submitted to the wp-comments-post.php file using the POST method. The values that must be included in order to make a successful comment are;
- comment_post_ID - the ID of the post/page
- author - the name of the author
- email - the author email
- comment - the comment content
Of course, url is also accepted, but it is optional. If a user leaves the field blank, then WordPress throws no error. It's good practice to let the user know that the URL is optional.
The Result
Now if we visit a post with a comment on it (with comments enabled) we will see this;
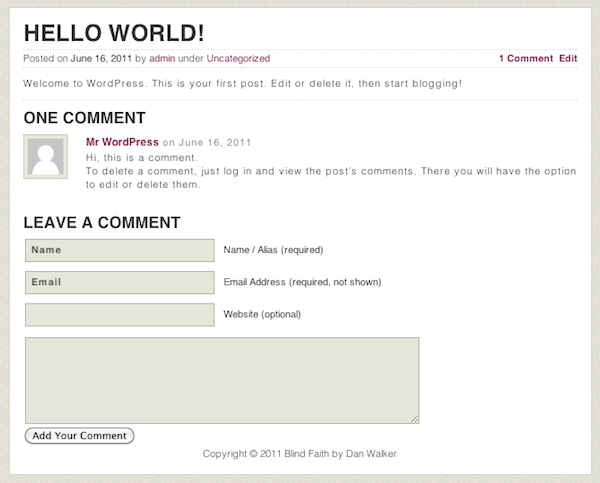
Great, we now have a working theme with a working comments system! There are many other options to explore with comments, such as adding an edit/delete button for the admin or nested comments. Although beyond the scope of this series, features like these are definitely worth looking in to and greatly increase a themes value.
The WordPress Footer
One final touch to complete our theme needs to be done in sidebar.php as this is where we close our theme. Before the final body tag, we need to add the wp_footer() method like so;
		<div id="sidebar">
			<?php if ( !function_exists('dynamic_sidebar') || !dynamic_sidebar("sidebar") ) : ?>
			<?php endif; ?>
		</div><!-- sidebar -->
		<div class="spacer"></div>
	</div><!-- wrapper -->
	<?php wp_footer(); ?>
	</body>
</html>
This is a WordPress hook that allows plugins to output anything needed before the theme closes. An example of this is the Google Analytics plugin, which needs to add its javascript at the end of the HTML.
Job Done!
This series has been an introduction to theme development, showing you how a theme fits together and what resources are needed. Hopefully you have found something to take away, even if you have worked on themes before.
Although not difficult, WordPress themes can range from a simple personal layout like we've created here, all the way up to complex magazine-style themes with multiple custom plugins and options pages.
Thanks for reading, and any questions/comments or requests for similar tutorials can be left below in the comments!

Comments