In the previous part of this tutorial series, we populated the dashboard page of our application with the wishes created by different users. We also attached a like button to each wish so that a user could like a particular wish.
In this part of the series, we'll see how to toggle the like/unlike display and show the total number of likes received by a particular wish.
Getting Started
Let's start by cloning the previous part of the tutorial from GitHub.
git clone https://github.com/jay3dec/PythonFlaskMySQLApp_Part7.git
Once the source code has been cloned, navigate to the project directory and start the web server.
cd PythonFlaskMySQLApp_Part7
python app.py
Point your browser to http://localhost:5002/ and you should have the application running.
Adding a Like Count
We'll start by implementing a feature to show the total number of counts a particular wish has garnered. When a new wish gets added, we'll make an entry into the tbl_likes table. So modify the MySQL stored procedure sp_addWish to add an entry into the tbl_likes table.
DELIMITER $$
CREATE DEFINER=`root`@`localhost` PROCEDURE `sp_addWish`(
    IN p_title varchar(45),
	IN p_description varchar(1000),
	IN p_user_id bigint,
	IN p_file_path varchar(200),
	IN p_is_private int,
	IN p_is_done int
)
BEGIN
	insert into tbl_wish(
		wish_title,
		wish_description,
		wish_user_id,
		wish_date,
		wish_file_path,
		wish_private,
		wish_accomplished
	)
	values
	(
		p_title,
		p_description,
		p_user_id,
		NOW(),
		p_file_path,
		p_is_private,
		p_is_done
	);

	SET @last_id = LAST_INSERT_ID();
	insert into tbl_likes(
		wish_id,
		user_id,
		wish_like
	)
	values(
		@last_id,
		p_user_id,
		0
	);


END$$
DELIMITER ;
As seen in the above stored procedure code, after inserting the wish into the tbl_wish table, we fetched the last inserted ID and inserted the data into tbl_likes table.
Next, we need to modify the sp_GetAllWishes stored procedure to include the number of likes each wish has garnered. We'll make use of a MySQL function to get the total number of wishes. So create a function called getSum which will take the wish ID and return the total number of likes.
DELIMITER $$
CREATE DEFINER=`root`@`localhost` FUNCTION `getSum`(
    p_wish_id int
) RETURNS int(11)
BEGIN
	select sum(wish_like) into @sm from tbl_likes where wish_id = p_wish_id;
RETURN @sm;
END$$
DELIMITER ;
Now, call the above MySQL function called getSum in the stored procedure sp_GetAllWishes to get the total number of likes for each wish.
DELIMITER $$
CREATE DEFINER=`root`@`localhost` PROCEDURE `sp_GetAllWishes`()
BEGIN
    select wish_id,wish_title,wish_description,wish_file_path,getSum(wish_id)
	from tbl_wish where wish_private = 0;
END$$
DELIMITER ;
Modify the getAllWishes Python method to include the like count. While iterating the result returned from the MySQL stored procedure, include the like field as shown:
for wish in result:
    wish_dict = {
        'Id': wish[0],
        'Title': wish[1],
        'Description': wish[2],
        'FilePath': wish[3],
        'Like':wish[4]}
    wishes_dict.append(wish_dict)
Modify the CreateThumb JavaScript method to create an additional span which we'll use to display the like count.
var likeSpan = $('<span>').attr('aria-hidden','true').html(' '+like+' like(s)');
And append the likeSpan to the parent paragraph p. Here is the modified CreateThumb JavaScript function.
function CreateThumb(id, title, desc, filepath, like) {
var mainDiv = $('<div>').attr('class', 'col-sm-4 col-md-4');
var thumbNail = $('<div>').attr('class', 'thumbnail');
var img = $('<img>').attr({
'src': filepath,
'data-holder-rendered': true,
'style': 'height: 150px; width: 150px; display: block'
});
var caption = $('<div>').attr('class', 'caption');
var title = $('<h3>').text(title);
var desc = $('<p>').text(desc);
var p = $('<p>');
var btn = $('<button>').attr({
'id': 'btn_' + id,
'type': 'button',
'class': 'btn btn-danger btn-sm'
});
var span = $('<span>').attr({
'class': 'glyphicon glyphicon-thumbs-up',
'aria-hidden': 'true'
});
var likeSpan = $('<span>').attr('aria-hidden', 'true').html(' ' + like + ' like(s)');
p.append(btn.append(span));
p.append(likeSpan);
caption.append(title);
caption.append(desc);
caption.append(p);
thumbNail.append(img);
thumbNail.append(caption);
mainDiv.append(thumbNail);
return mainDiv;
}
Include the like parameter while calling the CreateThumb JavaScript function from the success callback of the jQuery AJAX call to /getAllWishes.
CreateThumb(data[i].Id,data[i].Title,data[i].Description,data[i].FilePath,data[i].Like)
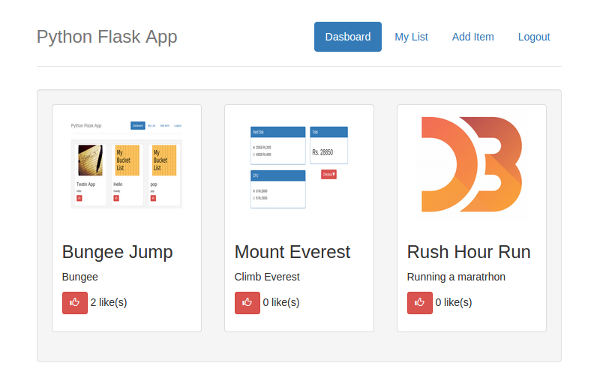
Save the changes and restart the server. Once signed in to the application you should be able see the like count corresponding to each of the wishes.

Show If a Wish Is Liked
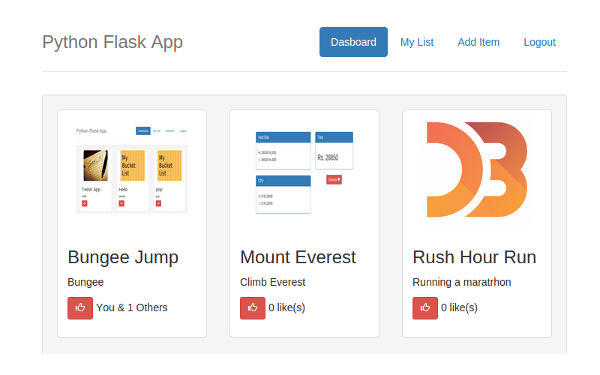
Seeing the likes under each wish, it isn't very clear whether the logged-in user has liked the wish or not. So we'll show a proper message like You & 20 Others. In order to implement that, we need to modify our sp_GetAllWishes to include a bit of code indicating whether the logged-in user has liked a particular wish or not. To check if a wish has been liked, we make a function call. Create a function called hasLiked which takes in user ID and wish ID as the parameters and returns whether the wish has been liked by the user or not.
DELIMITER $$
CREATE DEFINER=`root`@`localhost` FUNCTION `hasLiked`(
    p_wish int,
	p_user int
) RETURNS int(11)
BEGIN

	select wish_like into @myval from tbl_likes where wish_id =  p_wish and user_id = p_user;
RETURN @myval;
END$$
DELIMITER ;
Now call the above MySQL function hasLiked inside sp_GetAllWishes to return an extra field in the returned data set indicating the user like status.
DELIMITER $$

CREATE DEFINER=`root`@`localhost` PROCEDURE `sp_GetAllWishes`(
    p_user int
)
BEGIN
	select wish_id,wish_title,wish_description,wish_file_path,getSum(wish_id),hasLiked(wish_id,p_user)
	from tbl_wish where wish_private = 0;
END
Open app.py and modify the call to the MySQL stored procedure sp_GetAllWishes to include the user ID as a parameter.
_user = session.get('user')
conn = mysql.connect()
cursor = conn.cursor()
cursor.callproc('sp_GetAllWishes',(_user,))
Now modify the getAllWishes method to include the like status of the user for a particular wish. Modify the code to include HasLiked in the created dictionary.
for wish in result:
    wish_dict = {
       'Id': wish[0],
       'Title': wish[1],
       'Description': wish[2],
       'FilePath': wish[3],
       'Like':wish[4],
       'HasLiked':wish[5]}
    wishes_dict.append(wish_dict)
Inside the CreateThumb JavaScript function, we'll check for HasLiked and add the HTML accordingly.
if (hasLiked == "1") {
    likeSpan.html(' You & ' + (Number(like) - 1) + ' Others');
} else {
    likeSpan.html(' ' + like + ' like(s)');
}
As seen in the above code, we are showing the like count if the user has not liked a particular wish. If the user has liked the wish we are showing a more descriptive message.

Refreshing the Like Count
At the moment when we click on the like button, the like status gets updated in the database, but doesn't change in the dashboard. So let's update it in the success callback of the AJAX call on the like button click.
We'll start by making a change in the MySQL stored procedure sp_AddUpdateLikes. Earlier we were passing in the like status, 1 for a like and 0 for unlike. We'll modify that and toggle the like/unlike in the stored procedure. Open sp_AddUpdateLikes and select the like status into a variable and check the variable status. If the variable status is a like, we'll update the status to unlike and vice versa. Here is the modified sp_AddUpdateLikes stored procedure.
-- --------------------------------------------------------------------------------
-- Routine DDL
-- Note: comments before and after the routine body will not be stored by the server
-- --------------------------------------------------------------------------------
DELIMITER $$

CREATE DEFINER=`root`@`localhost` PROCEDURE `sp_AddUpdateLikes`(
    p_wish_id int,
	p_user_id int,
	p_like int
)
BEGIN

	if (select exists (select 1 from tbl_likes where wish_id = p_wish_id and user_id = p_user_id)) then


		select wish_like into @currentVal from tbl_likes where wish_id = p_wish_id and user_id = p_user_id;

		if @currentVal = 0 then
			update tbl_likes set wish_like = 1 where wish_id = p_wish_id and user_id = p_user_id;
		else
			update tbl_likes set wish_like = 0 where wish_id = p_wish_id and user_id = p_user_id;
		end if;

	else

		insert into tbl_likes(
			wish_id,
			user_id,
			wish_like
		)
		values(
			p_wish_id,
			p_user_id,
			p_like
		);


	end if;
END
In the CreateThumb JavaScript function, assign an ID to the likeSpan that we created earlier, so that we can update the status as required.
var likeSpan = $('<span>').attr({'aria-hidden':'true','id':'span_'+id});
Open up app.py. Inside the addUpdateLike method, once the data has been updated successfully, we'll fetch the wish like count and status using another stored procedure call. So create a MySQL stored procedure called sp_getLikeStatus. Inside sp_getLikeStatus we'll be calling the already created MySQL functions getSum and hasLiked to get the status.
DELIMITER $$
CREATE DEFINER=`root`@`localhost` PROCEDURE `sp_getLikeStatus`(
    IN p_wish_id int,
	IN p_user_id int
)
BEGIN
	select getSum(p_wish_id),hasLiked(p_wish_id,p_user_id);
END$$
DELIMITER ;
Once a call to sp_AddUpdateLikes from the Python method addUpdateLike has been made, close the cursor and connection.
if len(data) is 0:
    conn.commit()
    cursor.close()
    conn.close()
Now make a call to the stored procedure sp_getLikeStatus.
conn = mysql.connect()
cursor = conn.cursor()
cursor.callproc('sp_getLikeStatus',(_wishId,_user))
result = cursor.fetchall()
Return the like count and like status along with the response.
return json.dumps({'status':'OK','total':result[0][0],'likeStatus':result[0][1]})
In dashboard.html, in the success callback of the AJAX call made to the addUpdateLike method, parse the returned response and based on the like status show the like count.
success: function(response) {

    var obj = JSON.parse(response);

    if (obj.likeStatus == "1") {
        $('#span_' + spId).html(' You & ' + (Number(obj.total) - 1) + ' Others');
    } else {
        $('#span_' + spId).html(' ' + obj.total + ' like(s)');
    }

}
Save the changes, restart the server, and sign in using valid credentials. Once on the dashboard page, try to like a particular wish, and see how the like status gets updated accordingly.
Wrapping It Up
In this part of the series, we implemented the like/unlike functionality for the wishes displayed in the dashboard page. In the coming parts of the series, we'll implement some more new features in the application and refine some of the existing features.
Do let us know your thoughts and suggestions, or any corrections, in the comments below. Source code from this tutorial is available on GitHub.


Comments