In this tutorial, you will learn how to take advantage of new APIs and functionality in watchOS 2 to make a native Apple Watch application. This includes picker interface elements, native animations, and alert controllers.
Introduction
At WWDC 2015, Apple announced the first major update to their Apple Watch platform, watchOS 2. Along with many new features and improvements, the most important aspect of this update for developers is the ability to create native Apple Watch apps. These native apps perform better and give developers access to new features, including the digital crown, microphone, and health sensors.
In this tutorial, I will show you how to create a native WatchKit application and briefly outline some of the new APIs available in watchOS 2. I will also show you how to upgrade an existing non-native watchOS 1 app to a native watchOS 2 app.
This tutorial requires that you are running Xcode 7 on a Mac running OS X Yosemite (10.10) or later. This tutorial builds on the concepts and WatchKit APIs available in watchOS 1. If you are not yet comfortable with the WatchKit framework, then start with one of our introductory tutorials on WatchKit.
1. Setting Up the Project
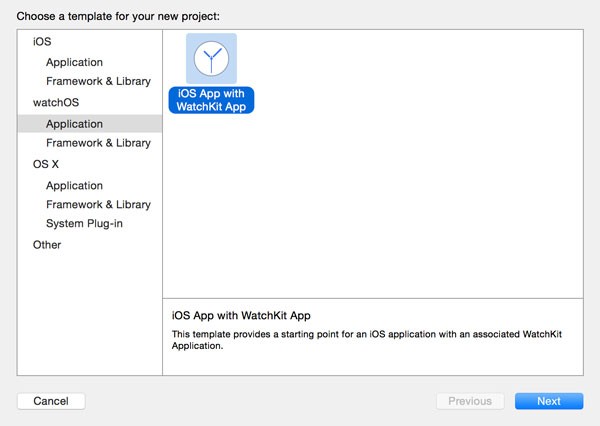
Open Xcode and create a new project. In Xcode 7, the new project wizard includes a watchOS section on the left. Choose the iOS App with WatchKit App template from the watchOS > Application section. Click Next to continue.
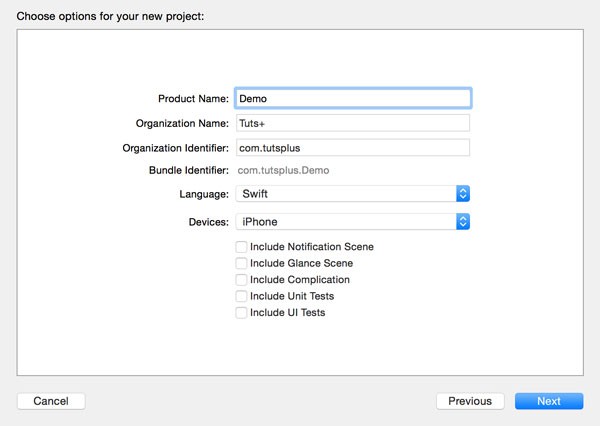
Fill in the information as shown in the below screenshot. Uncheck the checkboxes at the bottom, because we won't be needing those for this tutorial.
Complete the project setup and take a look at the folders Xcode has created for us. You should see three groups or folders in the Project Navigator on the left:
- The Demo folder contains the source files and resources of the iOS application.
- The Demo WatchKit App folder houses the storyboard and resources of the WatchKit application.
- The Demo WatchKit Extension includes the source files and resources of the WatchKit extension, the brains of the WatchKit application so to speak.
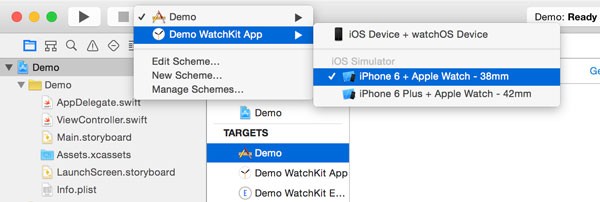
Before we can start adding anything, we need to configure Xcode to build and run the correct target. In the top left of your Xcode window, next to the greyed out stop button, click the active scheme, Demo, and choose the following option:
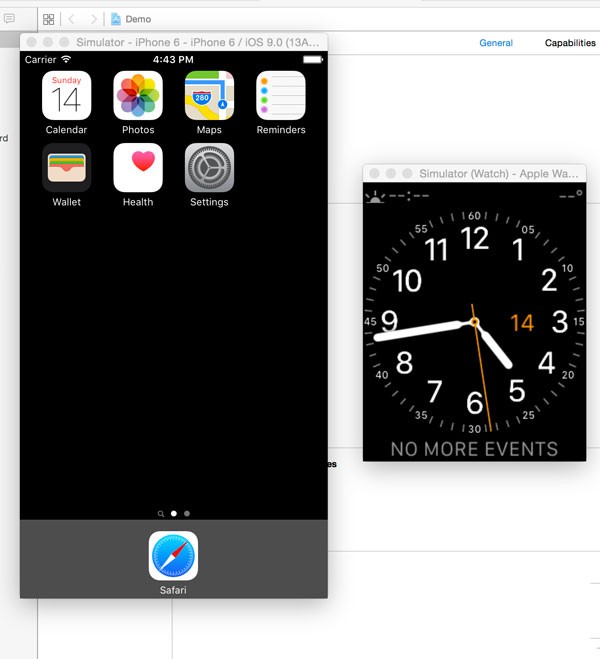
Click the play button to build and run your app. In your dock, you should see two simulator icons appear. One of these is the regular iOS Simulator while the other is the Apple Watch Simulator.
If the blank screen of your Apple Watch app does not appear automatically on the Apple Watch Simulator, then complete the following steps:
1. Navigate to the Apple Watch app on the iOS Simulator. You can find the Apple Watch app on the second home screen page.
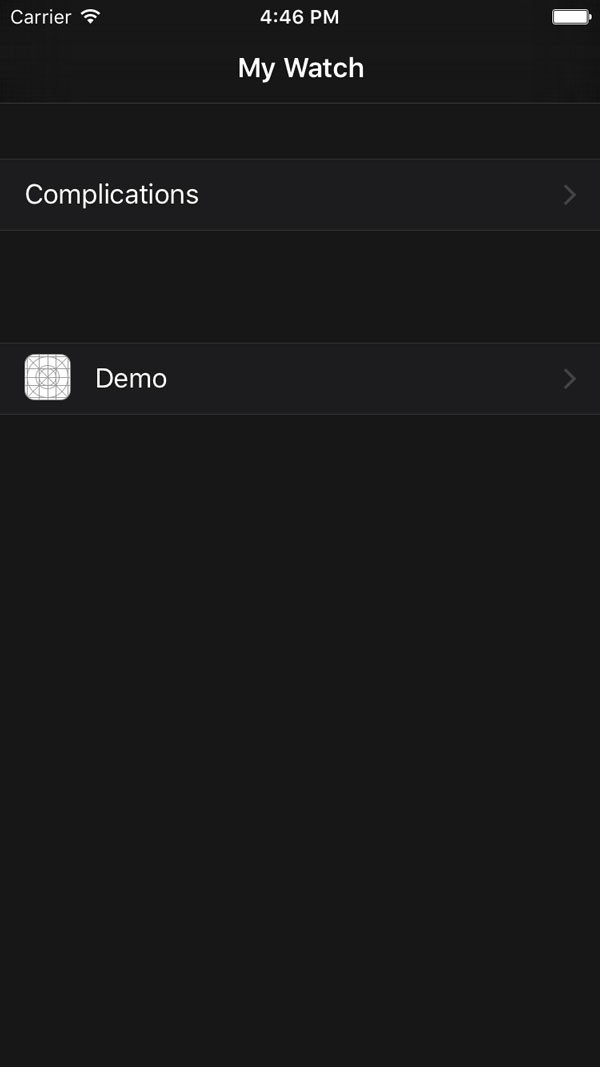
2. Click on the Demo table view cell as shown below.
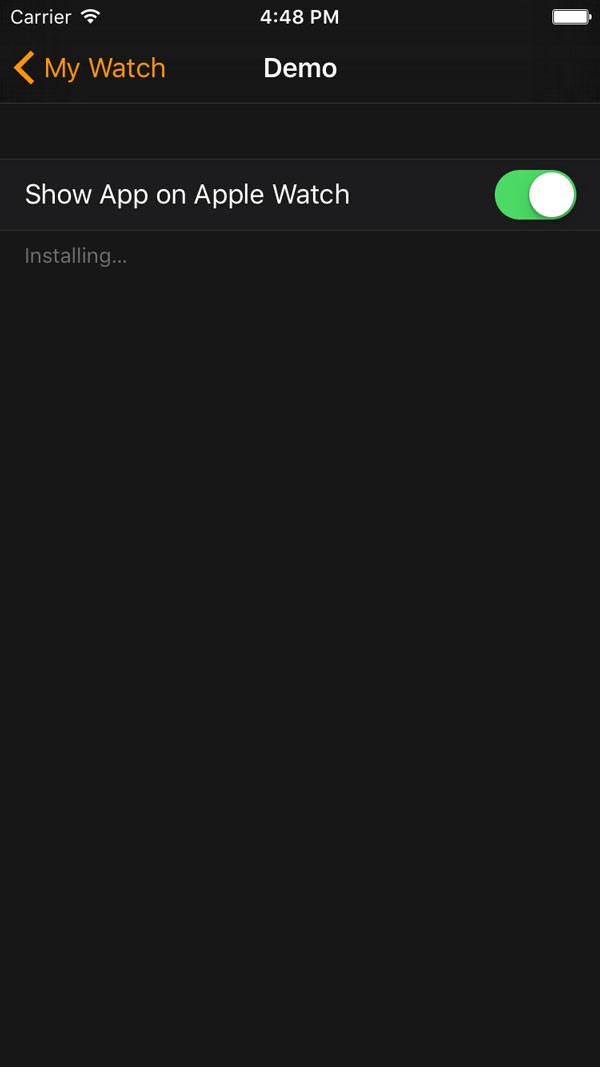
3. Enable the Show App on Apple Watch switch as shown below.
4. In the Apple Watch Simulator, navigate to the home screen by pressing Command+Shift+H or choosing Home from the Hardware menu of the Apple Watch Simulator.

If this doesn't immediately work, then toggle the switch on the iOS Simulator on and off. It may also help to quit Xcode and run the WatchKit app again.
If everything is working correctly, click the icon of the Apple Watch app in the Apple Watch Simulator. You should see a black screen with the time displayed in the top right.

2. Creating the User Interface
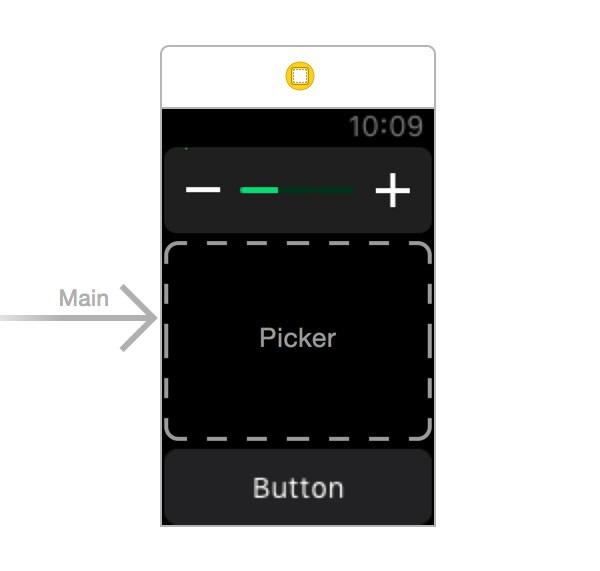
It's time to start using some of the new APIs introduced in watchOS 2. In Xcode, open Interface.storyboard in the Demo WatchKit App folder and and add the following components to the Interface Controller Scene:
-
slider
- picker
- button
Select the slider and set its Maximum and Steps properties to 5 in the Attributes Inspector.

Double click the button and change its title to "Show Alert". Open the Assistant Editor so that you have the storyboard on the left and the contents of InterfaceController.swift on the right. Create an outlet for the slider by control-dragging from the slider in the storyboard to the InterfaceController class. Name the outlet slider. Do the same for the picker and name the outlet picker.

Control-drag from the button to the InterfaceController on the right to create an action. Name the action showAlertPressed. This action will be executed when the user taps the button.

Close the Assistant Editor on the right and open InterfaceController.swift in Xcode's code editor.
The slider and button that you added to the InterfaceController class should be familiar if you've worked with the WatchKit framework. The picker, however, is one of the new interface elements available in watchOS 2.
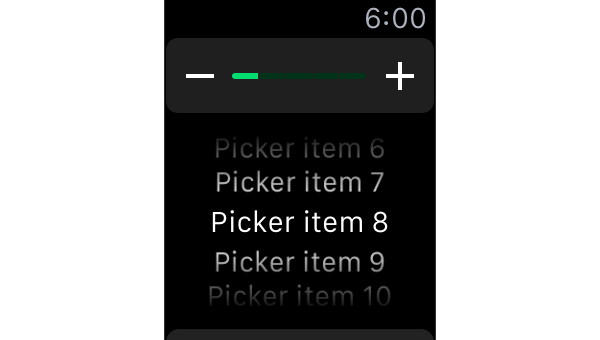
A picker for Apple Watch is represented by the WKInterfacePicker class. It works similarly to its iOS counterpart, UIPickerView. Users interact with a WKInterfacePicker instance by tapping it, scrolling through WKPickerItem objects with the digital crown, and then tapping again to select an item. A WKInterfacePicker can show items in one of three different styles:
-
List: This style displays picker items in a vertically stacked list for the user to scroll through. These items have a title and an optional accessory image. This is the only
WKInterfacePickerstyle that supports text-based items and can show multiple items at once. - Stacked: This picker style presents a series of images as vertically animated cards. As the user turns the digital crown, the old card animates off-screen and the new card animates on-screen from the bottom of the picker. Items for this style can only contain images.
- Image Sequence: This style shows a sequence of images without the transitions being animated. Turning the crown immediately displays the next or previous image in the sequence. Items for this picker style can also only contain images.
For this tutorial, you are going to create a simple list style picker with text-based items. Add the following code to awakeWithContext(_:) method of the InterfaceController class:
override func awakeWithContext(context: AnyObject?) {
    super.awakeWithContext(context)

    var pickerItems: [WKPickerItem] = []
    for i in 1...10 {
        let item = WKPickerItem()
        item.title = "Picker item \(i)"
        pickerItems.append(item)
    }
    self.picker.setItems(pickerItems)
}
Build and run your app. You will see that the first three picker items are visible.
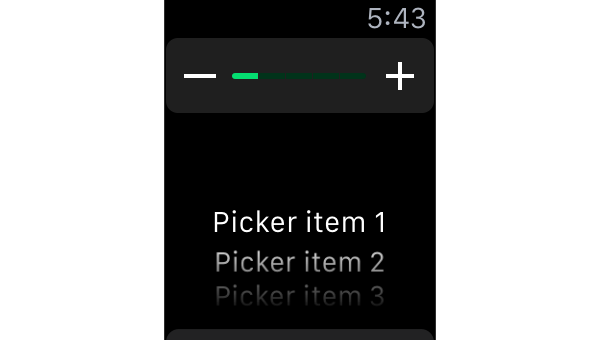
To interact with your picker interface element, click it once and then scroll on your Mac's mouse or trackpad as you normally would. This will simulate the digital crown of the watch. You will then be able to scroll through the picker items.
3. Animation
Along with new interface elements and new ways for users to interact with Apple Watch apps, watchOS 2 supports native animations for WatchKit interface objects. The following attributes of interface elements are animatable in watchOS 2 apps:
- alpha (opacity)
- width and height
- horizontal and vertical alignment
- background color and tint color
- content insets for groups
Animation is done through a single WKInterfaceController instance method, animateWithDuration(_:animations:). As a simple example, you are going to animate the slider by making it fade out and shrink towards the top of the screen. Add the following code to the willActivate method of the InterfaceController class:
override func willActivate() {
    super.willActivate()

    self.animateWithDuration(5) { () -> Void in
        self.slider.setHeight(0)
        self.slider.setAlpha(0)
    }
}
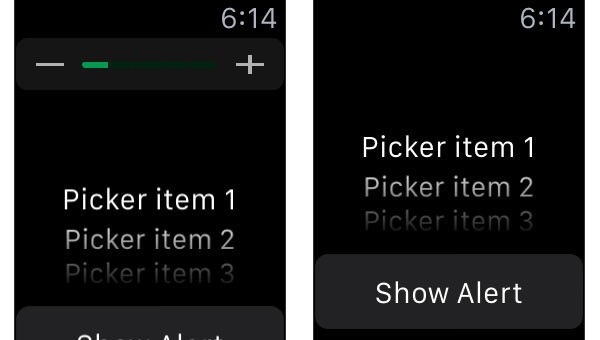
Build and run your app and, once your app has finished launching, you should see the slider slowly shrinking and fading out.
In the animation closure, you can animate any of the properties listed above. This applies to any of the interface elements in your app. This allows for another level of customization in your app's interface and also provides a much smoother way of hiding and showing elements.
4. Alerts
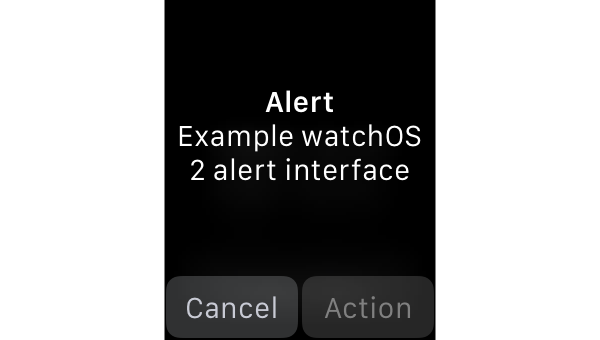
watchOS 2 also enables apps the present an alert interface very similar to that of a UIAlertView or UIAlertController on iOS. These alerts are shown by calling the presentAlertControllerWithTitle(_:message:preferredStyle:actions:) method on a WKInterfaceController instance.
The title and message parameters of this method are strings to be displayed on the alert's interface. The third parameter is a WKAlertControllerStyle enum:
-
Alertdisplays an alert sheet with stacked buttons and a default Cancel button at the bottom. -
SideBySideButtonsAlertdisplays two buttons side by side.
-
ActionSheetdisplays one or two custom buttons with a Cancel button in the top left corner.
The fourth parameter is an array of WKAlertAction objects, which provide details for the alert buttons. This array must contain at least one object and for SideBySideButtonsAlert it must contain two.
A WKAlertAction object is created with a title, style (WKAlertActionStyle.Default, WKAlertActionStyle.Cancel, or WKAlertActionStyle.Destructive) and a block to be executed when that action is selected. Add the following code to the button's showAlertPressed action:
@IBAction func showAlertPressed() {
    let cancel = WKAlertAction(title: "Cancel", style: WKAlertActionStyle.Cancel, handler: { () -> Void in

    })

    let action = WKAlertAction(title: "Action", style: WKAlertActionStyle.Default, handler: { () -> Void in

    })

    self.presentAlertControllerWithTitle("Alert", message: "Example watchOS 2 alert interface", preferredStyle: WKAlertControllerStyle.SideBySideButtonsAlert, actions: [cancel, action])
}
Build and run your app. When you press the Show Alert button, you will see an alert interface animate in and display the two actions you created.
5. Upgrading to watchOS 2
When you open an existing Xcode project with a WatchKit app in Xcode 7, the following warning will show up in the Issue navigator on the left:

Clicking the warning will show a list of the settings that need to be changed in your application to transition an existing WatchKit app to watchOS 2. At the bottom, you will see the following item:
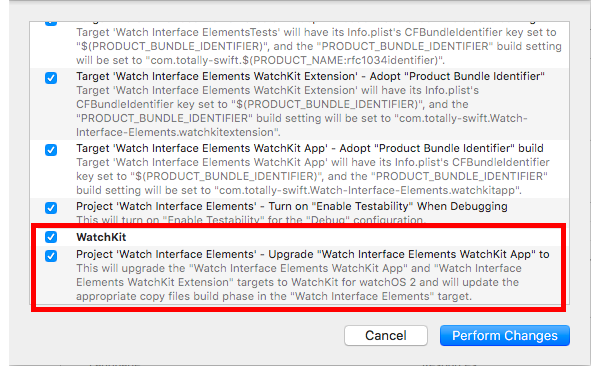
If you click Perform Changes, Xcode will upgrade your existing WatchKit app for you. Once the upgrade has completed, you are ready to build, test, and ship a native app for watchOS 2.
Conclusion
The new APIs and features that you learned about in this tutorial are only the tip of the iceberg. Picker interface elements, alert controllers, and native animations are just some of the new features you can take advantage of in your Apple Watch apps on watchOS 2.
We will be posting many more tutorials on Tuts+ in the coming months, covering the new features and APIs available on watchOS 2. Be sure to look for those and feel free to leave any comments or questions you have in the comments below.

Comments