Introduction
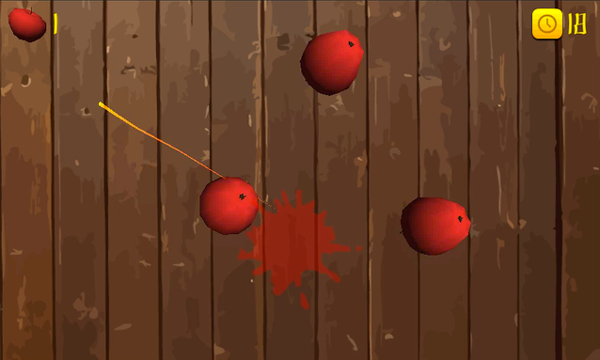
In this tutorial, you'll learn how to create a mobile 3D game using C# and Unity. The objective of the game is to cut the fruit that appears on the stage using the touch screen.
You will learn about the following aspects of Unity game development in this tutorial:
- importing 3D models
- swipe gestures
- line renderers
- physics forces
- 2D sprites
The user interface of the game is straightforward. The screenshot below gives you an idea of the artwork we'll be using and how the final user interface will end up looking. You can find the artwork and additional resources in the tutorial's source files on GitHub.

1. Project Setup
Step 1: Create a New Unity Project
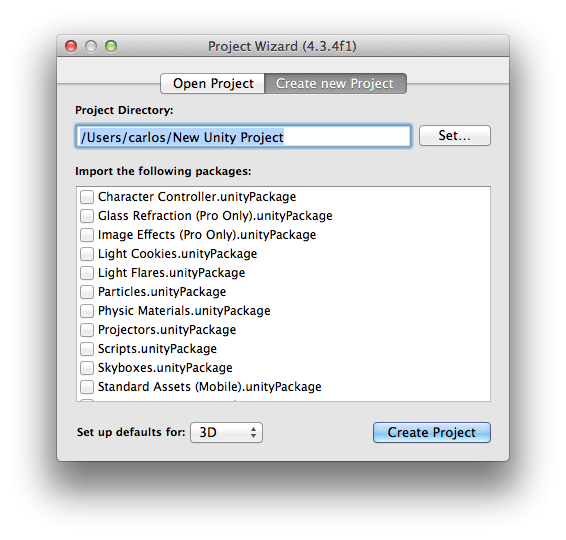
Open Unity and select New Project from the File menu to open the new project dialog. Tell Unity where you want to save the project and set the Set up defaults for: menu to 3D.
Step 2: Configure Build Settings
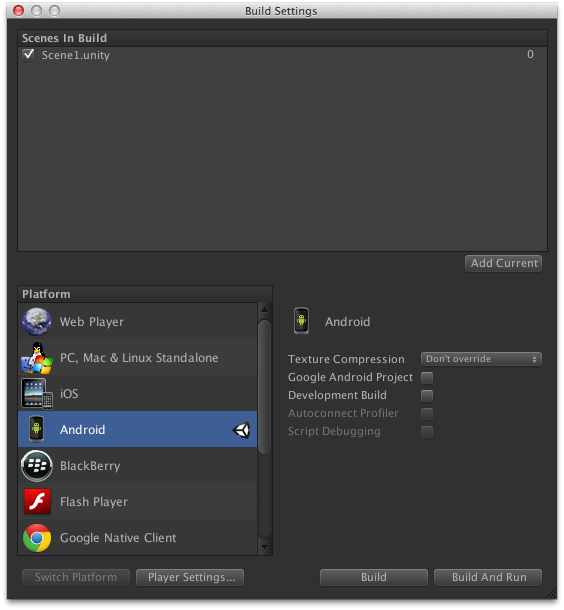
In the next step, you're presented with Unity's user interface. Set the project up for mobile development by choosing Build Settings from the File menu and selecting your platform of choice.
Step 3: Artwork
The first thing we need to do after selecting the target platform is choosing the size of the artwork we'll be using in the game. This will help us select a proper size for the 3D textures and 2D GUI without making the artwork blurry or use textures that are too large for the target device. For example, the artwork needs to have a higher resolution if you're targeting an iPad with a retina display than a Lumia 520.
iOS
- iPad without Retina: 1024px x 768px
- iPad with Retina: 2048px x 1536px
- 3.5" iPhone/iPod Touch without Retina: 320px x 480px
- 3.5" iPhone/iPod with Retina: 960px x 640px
- 4" iPhone/iPod Touch: 1136px x 640px
Android
Because Android is an open platform, there's a wide range of devices, screen resolutions, and pixel densities. A few of the more common ones are listed below.
- Asus Nexus 7 Tablet: 800px x 1280px, 216 ppi
- Motorola Droid X: 854px x 480px, 228 ppi
- Samsung Galaxy SIII: 720px x 1280px, 306 ppi
Windows Phone & BlackBerry
- Blackberry Z10: 720px x 1280px, 355 ppi
- Nokia Lumia 520: 400px x 800px, 233 ppi
- Nokia Lumia 1520: 1080px x 1920px, 367 ppi
Note that the code we'll write in this tutorial can be used to target any of the platforms.
Step 4: Export Graphics
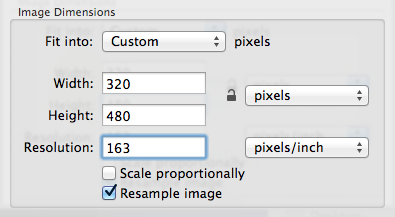
Depending on the devices you're targeting, you may need to convert the artwork to the recommended size and pixel density. You can do this in your favorite image editor. I've used the Adjust Size... function under the Tools menu in OS X's Preview application.
Step 5: Configure Unity's User Interface
Before we get started, make sure the 2D button in the Scene panel is not highlighted. You can also modify the resolution that's being displayed in the Game panel.
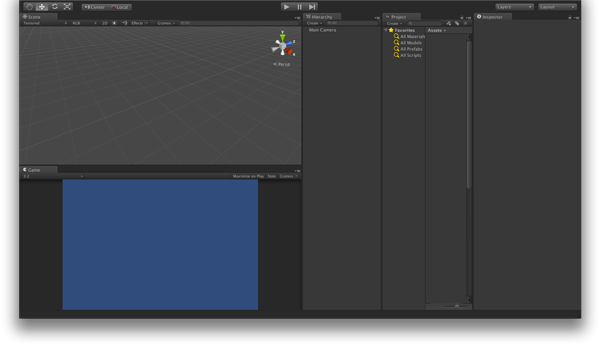
You're then presented with the workspace panels, which we'll also use in this tutorial. Take a moment to look at the main interface panels, such as the Scene, Game, Hierarchy, Project, Assets, and Inspector. We'll use them frequently in this tutorial.
Step 6: Programming Language
You can use one of three programming languages when using Unity, C#, UnityScript, a variation of JavaScript, and Boo. Each programming language has its pros and cons, and it's up to you to decide which one you prefer. My personal preference goes to the C# programming language so that's the language I'll be using in this tutorial.
If you decide to use another programming language, then make sure to take a look at Unity's Script Reference for examples.
2. Resources
Sound Effects
I'll use a number of sounds to improve the audial experience of the game. The sound effects used in this tutorial were obtained from PlayOnLoop and Freesound.
3D Models
To create the game, we first need to get a few 3D models. I recommend 3docean for high quality models and textures, but if you're testing or learning, then free models will work just as fine. The models in this tutorial were downloaded from SketchUp 3D Warehouse where you can find a wide variety of 3D models.
Because Unity doesn't recognize the SketchUp file format, we need to convert it to something Unity can import. We first need to download the free version of SketchUp, which is called SketchUp Make.
Open the 3D model in SketchUp Make, select Export > 3D Model from the File menu, and choose Collada (*.dae). Choose a name and location, and click Save. This will create a file and a folder for the 3D model. The file contains the data for the 3D object while the folder contains the model's textures. In the next step, we'll import the model into Unity.
3. Import Assets
Before we start coding, we need to add the assets to the Unity project. You can do this one of several ways:
- select Import New Asset from the Assets menu
- drag and drop the assets in the project window
- add the items to the project's assets folder
After completing this step, you should see the assets in your project's Assets folder in the Project panel.
4. Setting Up Camera & Lighting
Step 1: Setting Up the Camera
In this step, we position the main camera to create the view we want. Select the main camera from the Hierarchy panel and adjust the Transform values in the Inspector to match the ones shown below.
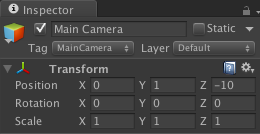
Don't worry if you don't see any changes. We haven't created anything for the camera to see yet.
Step 2: Setting Up the Light
For our objects to be visible in the 3D world, we need to add light to the scene. Select Create Other from the GameObject menu and select Directional Light. This will create an object that produces a beam of light. Change its Transform values as shown in the following screenshot to make it illuminate the scene.
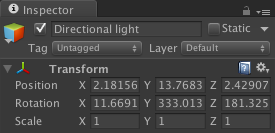
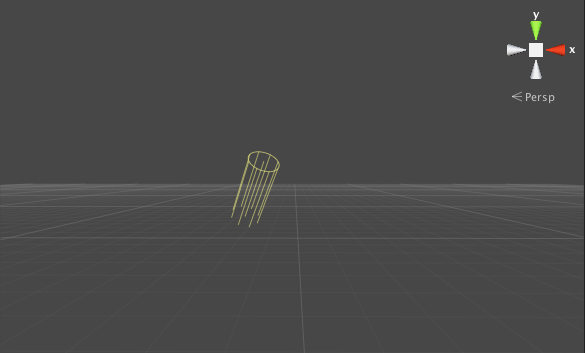
The light should be visible on the scene as shown in the following screenshot.
5. Add Background
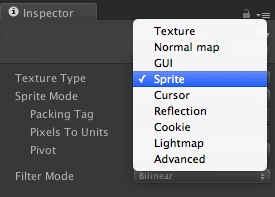
We'll use a Sprite texture as our background. By default, images imported to the Assets folder are converted to Texture instances that can be applied to 3D objects. We need to change these Texture instances to Sprite Texture instances for the image we want to use as the background.
Select the image you want to convert in the Assets panel and open the Inspector. Select Sprite from the Texture Type menu.
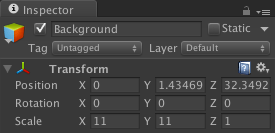
Drag and drop the background into the Hierarchy panel. It should automatically appear in the Scene panel. Adjust the Transform values in the Inspector as shown in the next screenshot.
6. Create the Score GUI
To display the game's score, we'll use Unity's GUI Text and an imported 3D model.
Step 1: Adding the Apple Model
Select the imported 3D model of your choice from the Assets panel and drag and drop it on the Scene. I'm going to use an apple model. Adjust the Transform values in the Inspector to match the ones shown below.
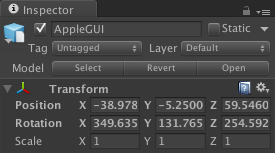
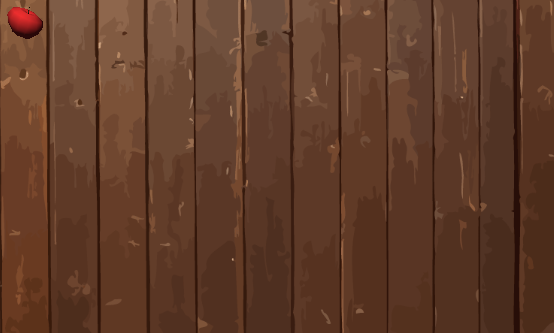
This will place the apple at the top left of the screen.
Step 2: Adding the GUI Text
Along with the apple model, we'll display a number indicating the player's score. This is the number of fruits the player has cut.
Select Create Other > GUI Text from the GameObject menu to create a text object, place it on the right of the apple model, and change the text in the Inspector panel to 0.
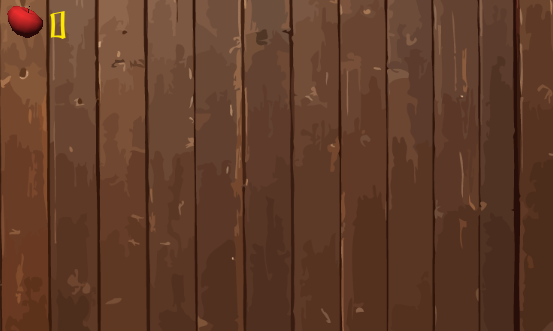
You can embed a custom font by importing it in the Assets folder and changing the Font property of the text in the Inspector.
7. Create the Timer GUI
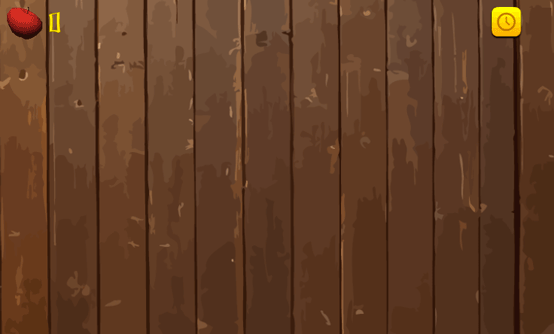
We'll use a timer to indicate when the game is over. It's composed of a GUI Texture showing an icon and a GUI Text displaying the remaining time.
Step 1: Adding the Clock Icon
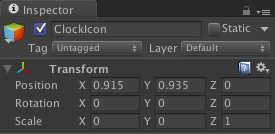
To add the clock icon, select the image you want to use in the Assets panel and open the Inspector. Select GUI from the Texture Type menu to convert it to a GUI Texture. Drag and drop the image to the Scene and change its transform values to the ones shown below.
The scene should now look like this.
Step 2: Adding the GUI Text
Repeat the steps for adding the score text to add the timer text. Don't forget to set the text to the correct time.

8. Alert Prefab
The alert is a GUI Texture that we'll show when the timer reaches 0. It will display a game over message at the center of the screen.

To create the alert, convert your alert image to a GUI Texture using the Inspector. Drag it from the Hierarchy panel to the Assets panel to convert it to a Prefab.
9. Timer Class
Let's now implement the Timer class. Select the Time GUI Text, click the Add Component button in the Inspector panel, and choose New Script. Name the script Timer and don't forget to change the language to C#. Open the newly created file and follow the next steps.
Step 1: Declare Variables
We start by creating a number of variables that we'll use in the Timer class.
private GUIText timeTF;
public GameObject alertReference
Let's take a look at each of the variables.
-
timeTF: a reference to the Time GUI Text -
alertReference: a reference to the alert prefab
We'll use these references to access the time and alert game objects and change their values. Set the alert prefab in the Inspector.
Step 2: Setup
With the variables declared, we set the timeTF value by accessing the guiText property of the current game object. This will let us modify the text value later.
We also call the InvokeRepeating method, which will invoke the ReduceTime method every second.
void Start()
{
    timeTF = gameObject.guiText;
    InvokeRepeating("ReduceTime", 1, 1);
}
Step 3: Implement ReduceTime
The ReduceTime method is in charge of updating the timer text and displaying the alert message. The game is over when the time reaches 0. Add the following code block to the Timer class.
void ReduceTime()
{
   if (timeTF.text == "1")
   {
        /* Alert */

        Time.timeScale = 0;
        Instantiate(alertReference, new Vector3(0.5f, 0.5f, 0), transform.rotation);
        audio.Play();
        GameObject.Find("AppleGUI").GetComponent<AudioSource>().Stop();
    }

        timeTF.text = (int.Parse(timeTF.text) - 1).ToString();
}
We start by testing if the time is about to end. If true, we pause the game by changing the timeScale property to 0, create an instance of the alert, and play the game over sound.
If the time is not about to end, we simply reduce its value by 1. To do this, we use the int.Parse method to convert the time string to a number, subtract 1, and call ToString on it to convert the result back to a string.
Step 4: Reload Method
This is the last part of the Timer class. In the Reload method, we call LoadLevel on the Application class and reload the current level, resetting every object and variable to its initial state.
void Reload()
{
    Application.LoadLevel (Application.loadedLevel);
}
This is what the complete class should look like when finished.
using UnityEngine;
using System.Collections;

public class Timer : MonoBehaviour
{
    private GUIText timeTF;
    public GameObject alertReference;

    void Start()
    {
        timeTF = gameObject.guiText;
        InvokeRepeating("ReduceTime", 1, 1);
    }

    void ReduceTime()
    {
        if (timeTF.text == "1")
        {
			/* Alert */

			Time.timeScale = 0;
			Instantiate(alertReference, new Vector3(0.5f, 0.5f, 0), transform.rotation);
			audio.Play();
			GameObject.Find("AppleGUI").GetComponent<AudioSource>().Stop();
		}

        timeTF.text = (int.Parse(timeTF.text) - 1).ToString();
    }

	void Reload()
	{
		Application.LoadLevel (Application.loadedLevel);
	}
}
10. Apple Prefab
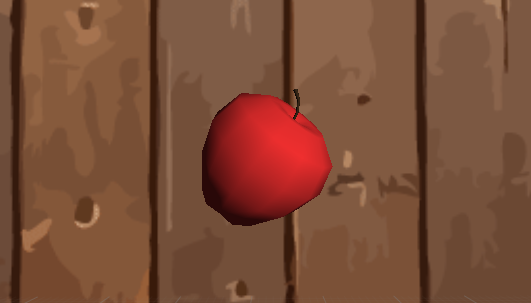
The apple is one of the most important elements of the game and it is one of the interactive objects of the screen. The player is able to use the device's touch screen to cut the apple, increasing their score.
Drag the apple from the Assets panel to the Scene. Don't worry about its position, because we'll convert it to a Prefab in a moment and remove it from the Hierarchy.
Step 1: Add Rigidbody
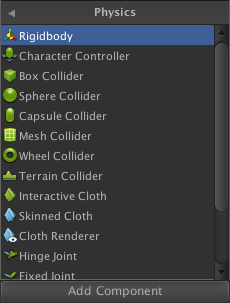
To detect a collision with the apple, we need to add a Rigidbody to it. To add one, select Add Component from the Inspector panel and choose Physics > Rigidbody. You can leave the settings at their defaults.
Step 2: Add Box Collider
We also need to add a box collider to the apple to detect collisions. This collider will define the apple's hit area. Click the Add Component button in the Inspector panel, choose Physics > Box Collider, and change its values as shown in the screenshot below.
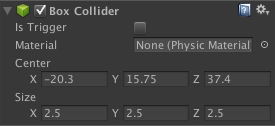
In the Scene panel, a green box should appear around the apple, representing the box collider we just added.

11. Splash Prefab
The splash prefab will be used as a visual effect for when the fruit is sliced by the player. It will appear on the stage for every fruit the player cuts and vanishes slowly over time. Convert the image to a Sprite as described earlier and add it to the Scene.
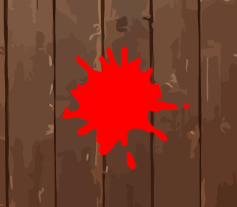
Add a script to it and drag it back to the Assets panel to create a Prefab. Open the newly created class.
12. Splash Class
The Splash class handles the images created when the fruit is sliced.
Step 1: Declare Variables
These variables are used to calculate and set an alpha value to the splash prefab. By changing its alpha property we can fade the prefab as time passes.
private Color randomAlpha;
private float currentAlpha;
Step 2: Setup
In this method we calculate a random alpha value from 0.3 to 0.5 and store that value in the randomAlpha variable. We then set the resulting alpha to the color property of the game object.
In the last line of code we invoke the method that will decrease that value every 300 milliseconds, creating a fading effect.
void Start()
{
    randomAlpha = new Color(1, 1, 1, Random.Range(0.3f, 0.5f));
    gameObject.renderer.material.color = randomAlpha;
    InvokeRepeating("ReduceAlpha", 0.3f, 0.3f);
}
Step 3: Reduce Alpha and Destroy
To reduce the alpha, we first need to obtain the current value. The currentAlpha variable stores this value. We then subtract 0.1 from that value and reassign the new alpha to the game object. The image is removed when it's almost invisible.
void ReduceAlpha()
{
    currentAlpha = gameObject.renderer.material.color.a;

    if (gameObject.renderer.material.color.a <= 0.1f)
    {
        Destroy(gameObject);
    } else
    {
        gameObject.renderer.material.color = new Color(1, 1, 1, currentAlpha - 0.1f);
    }
}
This is what the Splash class looks like.
using UnityEngine;
using System.Collections;

public class Splash : MonoBehaviour
{
    private Color randomAlpha;
    private float currentAlpha;

    void Start()
    {
        randomAlpha = new Color(1, 1, 1, Random.Range(0.3f, 0.5f));
        gameObject.renderer.material.color = randomAlpha;
        InvokeRepeating("ReduceAlpha", 0.3f, 0.3f);
    }

    void ReduceAlpha()
    {
        currentAlpha = gameObject.renderer.material.color.a;

        if (gameObject.renderer.material.color.a <= 0.1f)
        {
            Destroy(gameObject);
        } else
        {
            gameObject.renderer.material.color = new Color(1, 1, 1, currentAlpha - 0.1f);
        }
    }
}
13. Apple Class
With our splash prefab created, we can now continue with the Apple class. This class will handle actions, such as collision detection, updating the score, and removing the apple from the scene.
Step 1: Declare Variables
Three variables are declared in the Apple class:
-
splashReference: reference to the splash prefab -
randomPos: position for the splash prefab -
scoreReference: reference to the score GUI text
[SerializeField]
private GameObject splashReference;
private Vector3 randomPos = new Vector3(Random.Range(-1, 1), Random.Range(0.3f, 0.7f), Random.Range(-6.5f, -7.5f));
private GUIText scoreReference;
Step 2: Get Score Reference
To get a reference to the score text we use the Find method. This method searches the active game objects and returns the object we're looking for, the score GUI Text in this case.
void Start()
{
    scoreReference = GameObject.Find("Score").guiText;
}
With the scoreReference variable set, we are now able to increase its value when a fruit is sliced.
Step 3: Destroy When Offstage
In the Update method, we check if the fruit is no longer visible on the screen by accessing its y position and removing it if true. This helps us release memory by destroying unused game objects.
void Update()
{
    /* Remove fruit if out of view */
    if (gameObject.transform.position.y < -36)
    {
        Destroy(gameObject);
    }
}
Step 4: Handle Collisions
The next code uses the OnCollisionEnter method to detect when the fruit is sliced by the player. When this happens, we play the cut sound and remove the fruit. Next, we create a new instance of the splash prefab and update the score.
void OnCollisionEnter(Collision other)
{
    if(other.gameObject.name == "Line")
    {
    	Camera.main.GetComponent<AudioSource>().Play();
        Destroy(gameObject);

        Instantiate(splashReference, randomPos, transform.rotation);

        /* Update Score */

        scoreReference.text = (int.Parse(scoreReference.text) + 1).ToString();
    }
}
This is what the complete Apple class looks like.
using UnityEngine;
using System.Collections;

public class Apple : MonoBehaviour
{
    [SerializeField]
    private GameObject splashReference;
    private Vector3 randomPos = new Vector3(Random.Range(-1, 1), Random.Range(0.3f, 0.7f), Random.Range(-6.5f, -7.5f));
    private GUIText scoreReference;

    void Start()
    {
		scoreReference = GameObject.Find("Score").guiText;
    }

    void Update()
    {
        /* Remove fruit if out of view */
        if (gameObject.transform.position.y < -36)
        {
            Destroy(gameObject);
        }
    }

    void OnCollisionEnter(Collision other)
    {
        if(other.gameObject.name == "Line")
        {
			Camera.main.GetComponent<AudioSource>().Play();
			Destroy(gameObject);

            Instantiate(splashReference, randomPos, transform.rotation);

			/* Update Score */

			scoreReference.text = (int.Parse(scoreReference.text) + 1).ToString();
        }
    }
}
14. FruitSpawner Class
The FruitSpawner class instantiates and moves the fruits to the scene. It is attached to the main camera.
Step 1: Declare Variables
These are the variables declared in this class.
[SerializeField]
private GameObject appleReference;
private Vector3 throwForce = new Vector3(0, 18, 0);
-
appleReference: reference to the apple prefab -
throwForce: the force used to push the fruits upwards
Step 2: Invoke Spawn
In the next lines of code, we call the InvokeRepeating method to invoke the SpawnFruit method every six seconds. This will add new fruits to the scene every six seconds, giving the player time to slice them before the fruit drops to the bottom of the scene.
void Start()
{
    InvokeRepeating("SpawnFruit", 0.5f, 6);
}
Step 3: SpawnFruit Method
The SpawnFruit method creates the fruits and pushes them upwards for the player to cut. We use a for statement to instantiate the fruits, position them randomly on the scene and apply a physics force using the addForce method.
void SpawnFruit()
{
    for (byte i = 0; i < 4; i++)
    {
        GameObject fruit = Instantiate(appleReference, new Vector3(Random.Range(10, 30), Random.Range(-25, -35), -32), Quaternion.identity) as GameObject;
        fruit.rigidbody.AddForce(throwForce, ForceMode.Impulse);
    }
}
This is the complete FruitSpawner class.
using UnityEngine;
using System.Collections;

public class FruitSpawner : MonoBehaviour
{
    [SerializeField]
    private GameObject appleReference;
    private Vector3 throwForce = new Vector3(0, 18, 0);

    void Start()
    {
        InvokeRepeating("SpawnFruit", 0.5f, 6);
    }

    void SpawnFruit()
    {
        for (byte i = 0; i < 4; i++)
        {
            GameObject fruit = Instantiate(appleReference, new Vector3(Random.Range(10, 30), Random.Range(-25, -35), -32), Quaternion.identity) as GameObject;
            fruit.rigidbody.AddForce(throwForce, ForceMode.Impulse);
        }
    }
}
15. Touch Controls
Let's now implement the touch controls. The player will be able to use the touch screen to cut the fruits. We'll visualize this by drawing a line using the LineRenderer class and then checking if the fruit collides with the player's swipe gesture.
Step 1: Declare Variables
We start by creating some variables.
-
c1, c2: these variables set the color of the line -
lineGO: this game object will hold the line renderer -
lineRenderer: the line renderer instance -
i: an int value used to set the size and index of the line
public Color c1 = Color.yellow;
public Color c2 = Color.red;
private GameObject lineGO;
private LineRenderer lineRenderer;
private int i = 0;
Step 2: Setup
In the Start method, we set up the the necessary objects and properties for the line. We begin by creating a new GameObject instance containing the LineRenderer. We then use some of the line renderer methods to set the way it's going to look.
void Start()
{
    lineGO = new GameObject("Line");
    lineGO.AddComponent<LineRenderer>();
    lineRenderer = lineGO.GetComponent<LineRenderer>();
    lineRenderer.material = new Material(Shader.Find("Mobile/Particles/Additive"));
    lineRenderer.SetColors(c1, c2);
    lineRenderer.SetWidth(0.3F, 0);
    lineRenderer.SetVertexCount(0);
}
Most of the properties set in this block of code are easy to understand, SetColor changes the color of the line and SetWidth sets its width. Pay special attention to the SetVertexCount line. This method specifies the number of points of the line. By calling this method with a higher number of points, we can increase the size of the line. This will become clearer in the next step.
Step 3: Create Line
The line is created in the Update method. We first test if the player is touching the screen by retrieving the touchCount property of the Input class. If the property is greater that 0, it means there is at least one finger on the device's screen.
We keep a reference to the Touch object for easier access and check which phase it's currently in. We need it to be in the Moved phase to be able to create the line.
If the player is moving their finger across the screen, we can begin to create a line segment at that position. We invoke the SetVertexCount method again to increase the maximum number of segments of the line.
void Update()
{
    if (Input.touchCount > 0)
    {
        Touch touch = Input.GetTouch(0);

        if(touch.phase == TouchPhase.Moved)
        {
            lineRenderer.SetVertexCount(i+1);
            Vector3 mPosition = new Vector3(Input.mousePosition.x, Input.mousePosition.y, 15);
            lineRenderer.SetPosition(i, Camera.main.ScreenToWorldPoint(mPosition));
            i++;
        }
    }
}
Step 4: Add Colliders
With the line in place, we add a collider to it to help us detect a collision with any of the fruits. The following code snippet creates and adds a box collider to the line using the AddComponent method and sets its position to the lineRenderer's current position. The last line of code changes the default size of the collider to match the line's size.
BoxCollider bc = lineGO.AddComponent<BoxCollider>();
bc.transform.position = lineRenderer.transform.position;
bc.size = new Vector3(0.1f, 0.1f, 0.1f);
Step 5: Remove Line
We remove the line when the player is no longer touching the screen. This prevents any unwanted collisions with the apples.
In the next code snippet, we check if the current phase of the Touch object is Ended and set the vertex count of the lineRenderer to 0. This will remove the current line segments, but it doesn't destroy the object, allowing us to reuse it later. We also reset the i variable to allow for later use.
if(touch.phase == TouchPhase.Ended)
{
    /* Remove Line */

    lineRenderer.SetVertexCount(0);
    i = 0;
}
Step 6: Destroy Colliders
Once the line is removed, we no longer need the box colliders attached to it. We first create an array of BoxCollider objects, storing the box colliders of the line game object. We then loop over the array, destroying each box collider.
/* Remove Line Colliders */

BoxCollider[] lineColliders = lineGO.GetComponents<BoxCollider>();

foreach(BoxCollider b in lineColliders)
{
    Destroy(b);
}
Let's take a look the the complete implementation of the LinesHandler class.
using UnityEngine;
using System.Collections;

public class LinesHandler : MonoBehaviour
{
    public Color c1 = Color.yellow;
    public Color c2 = Color.red;

    private GameObject lineGO;
    private LineRenderer lineRenderer;
	private int i = 0;

    void Start()
    {
        lineGO = new GameObject("Line");
		lineGO.AddComponent<LineRenderer>();
        lineRenderer = lineGO.GetComponent<LineRenderer>();
		lineRenderer.material = new Material(Shader.Find("Mobile/Particles/Additive"));
		lineRenderer.SetColors(c1, c2);
		lineRenderer.SetWidth(0.3F, 0);
		lineRenderer.SetVertexCount(0);
	}

	void Update()
    {
		if (Input.touchCount > 0)
        {
            Touch touch = Input.GetTouch(0);

			if(touch.phase == TouchPhase.Moved)
			{
				lineRenderer.SetVertexCount(i+1);
				Vector3 mPosition = new Vector3(Input.mousePosition.x, Input.mousePosition.y, 15);
				lineRenderer.SetPosition(i, Camera.main.ScreenToWorldPoint(mPosition));
				i++;

				/* Add Collider */

				BoxCollider bc = lineGO.AddComponent<BoxCollider>();
				bc.transform.position = lineRenderer.transform.position;
				bc.size = new Vector3(0.1f, 0.1f, 0.1f);
			}

			if(touch.phase == TouchPhase.Ended)
			{
				/* Remove Line */

				lineRenderer.SetVertexCount(0);
				i = 0;

				/* Remove Line Colliders */

				BoxCollider[] lineColliders = lineGO.GetComponents<BoxCollider>();

				foreach(BoxCollider b in lineColliders)
				{
					Destroy(b);
				}
			}
		}
	}
}
16. Final Steps
Step 1: Testing
It's time to test the game. Press Command-P to play the game in Unity. If everything works as expected, then you're ready for the final steps.
Step 2: Player Settings
When you're happy with your game, it's time to select Build Settings from the File menu and click the Player Settings button. This should bring up the Player Settings in the Inspector panel where you can set the parameters for your application.
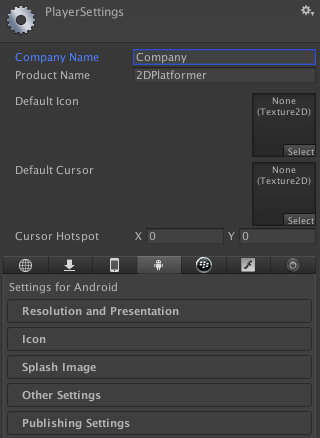
These settings are application specific data that includes the creator or company, app resolution and display mode, rendering mode (CPU, GPU), device OS compatibility, etc. Configure the settings according to the devices you're targeting and the store or market where you plan to publish the app.
Step 3: Icons and Splash Images
Using the graphics you created earlier, you can now create a nice icon and a splash image for your game. Unity shows you the required sizes, which depend on the platform you're building for.
Step 4: Build and Play
Once your project is properly configured, it's time to revisit the Build Settings and click the Build Button. That's all it takes to build your game for testing and/or distribution.

Conclusion
In this tutorial, we've learned how to use touch controls, physics forces, GUI Textures, and other aspects of game development in Unity. I encourage you to experiment with the result and customize the game to make it your own. I hope you liked this tutorial and found it helpful.


Comments