If you've been following along with this series, you should be familiar with the kind of file structure we set up for our custom payment method in the back-end. If you haven't gone through the earlier parts of this series, I strongly recommend that you read them before proceeding with this one.
We'll use a similar kind of file setup for the front-end section as well.
Controller Setup
Go ahead and create the controller file at catalog/controller/payment/custom.php. Paste the following contents in the newly created controller file custom.php.
<?php
class ControllerPaymentCustom extends Controller {
  protected function index() {
    $this->language->load('payment/custom');
    $this->data['button_confirm'] = $this->language->get('button_confirm');
    $this->data['action'] = 'https://yourpaymentgatewayurl';

    $this->load->model('checkout/order');
    $order_info = $this->model_checkout_order->getOrder($this->session->data['order_id']);

    if ($order_info) {
      $this->data['text_config_one'] = trim($this->config->get('text_config_one'));
      $this->data['text_config_two'] = trim($this->config->get('text_config_two'));
      $this->data['orderid'] = date('His') . $this->session->data['order_id'];
      $this->data['callbackurl'] = $this->url->link('payment/custom/callback');
      $this->data['orderdate'] = date('YmdHis');
      $this->data['currency'] = $order_info['currency_code'];
      $this->data['orderamount'] = $this->currency->format($order_info['total'], $this->data['currency'] , false, false);
      $this->data['billemail'] = $order_info['email'];
      $this->data['billphone'] = html_entity_decode($order_info['telephone'], ENT_QUOTES, 'UTF-8');
      $this->data['billaddress'] = html_entity_decode($order_info['payment_address_1'], ENT_QUOTES, 'UTF-8');
      $this->data['billcountry'] = html_entity_decode($order_info['payment_iso_code_2'], ENT_QUOTES, 'UTF-8');
      $this->data['billprovince'] = html_entity_decode($order_info['payment_zone'], ENT_QUOTES, 'UTF-8');;
      $this->data['billcity'] = html_entity_decode($order_info['payment_city'], ENT_QUOTES, 'UTF-8');
      $this->data['billpost'] = html_entity_decode($order_info['payment_postcode'], ENT_QUOTES, 'UTF-8');
      $this->data['deliveryname'] = html_entity_decode($order_info['shipping_firstname'] . $order_info['shipping_lastname'], ENT_QUOTES, 'UTF-8');
      $this->data['deliveryaddress'] = html_entity_decode($order_info['shipping_address_1'], ENT_QUOTES, 'UTF-8');
      $this->data['deliverycity'] = html_entity_decode($order_info['shipping_city'], ENT_QUOTES, 'UTF-8');
      $this->data['deliverycountry'] = html_entity_decode($order_info['shipping_iso_code_2'], ENT_QUOTES, 'UTF-8');
      $this->data['deliveryprovince'] = html_entity_decode($order_info['shipping_zone'], ENT_QUOTES, 'UTF-8');
      $this->data['deliveryemail'] = $order_info['email'];
      $this->data['deliveryphone'] = html_entity_decode($order_info['telephone'], ENT_QUOTES, 'UTF-8');
      $this->data['deliverypost'] = html_entity_decode($order_info['shipping_postcode'], ENT_QUOTES, 'UTF-8');

      if (file_exists(DIR_TEMPLATE . $this->config->get('config_template') . '/template/payment/custom.tpl')){
        $this->template = $this->config->get('config_template') . '/template/payment/custom.tpl';
      } else {
        $this->template = 'default/template/payment/custom.tpl';
      }

      $this->render();
    }
  }

  public function callback() {
    if (isset($this->request->post['orderid'])) {
      $order_id = trim(substr(($this->request->post['orderid']), 6));
    } else {
      die('Illegal Access');
    }

    $this->load->model('checkout/order');
    $order_info = $this->model_checkout_order->getOrder($order_id);

    if ($order_info) {
      $data = array_merge($this->request->post,$this->request->get);

      //payment was made successfully
      if ($data['status'] == 'Y' || $data['status'] == 'y') {
        // update the order status accordingly
      }
    }
  }
}
?>
As you can see, there are two different methods. The index method will be responsible for setting up the data when the form is submitted to the third party payment gateway, and the callback method is used to handle the response data from the payment gateway. Having said that, you can define more methods if it's required by your payment gateway. In this example we've kept the flow as simple as possible.
Let's go through each section in detail. We'll start with the index method.
First, we've loaded the language file and set the value of the Confirm button. We've also set up the action attribute which will be used by the payment submission form. You should change this as per your payment gateway.
$this->language->load('payment/custom');
$this->data['button_confirm'] = $this->language->get('button_confirm');
$this->data['action'] = 'https://yourpaymentgatewayurl';
Next, we've loaded the order information from the user's active session.
$this->load->model('checkout/order');
$order_info = $this->model_checkout_order->getOrder($this->session->data['order_id']);
If order information is available, we'll go ahead and set up the data for the hidden variables which will be used to submit the form to the payment gateway URL. If you follow the code closely, you'll notice that we've also used our custom parameters, text_config_one and text_config_two, which we set up in the admin configuration form in the previous part of this series.
The other important variable to note here is callbackurl, which holds the URL used by the payment gateway to redirect the user back to our store after the payment process. And yes, looking at the URL payment/custom/callback should indicate that it will call the callback method, as we'll see in the moment.
$this->data['text_config_one'] = trim($this->config->get('text_config_one'));
$this->data['text_config_two'] = trim($this->config->get('text_config_two'));
$this->data['orderid'] = date('His') . $this->session->data['order_id'];
$this->data['callbackurl'] = $this->url->link('payment/custom/callback');
$this->data['orderdate'] = date('YmdHis');
$this->data['currency'] = $order_info['currency_code'];
$this->data['orderamount'] = $this->currency->format($order_info['total'], $this->data['currency'] , false, false);
$this->data['billemail'] = $order_info['email'];
$this->data['billphone'] = html_entity_decode($order_info['telephone'], ENT_QUOTES, 'UTF-8');
$this->data['billaddress'] = html_entity_decode($order_info['payment_address_1'], ENT_QUOTES, 'UTF-8');
$this->data['billcountry'] = html_entity_decode($order_info['payment_iso_code_2'], ENT_QUOTES, 'UTF-8');
$this->data['billprovince'] = html_entity_decode($order_info['payment_zone'], ENT_QUOTES, 'UTF-8');;
$this->data['billcity'] = html_entity_decode($order_info['payment_city'], ENT_QUOTES, 'UTF-8');
$this->data['billpost'] = html_entity_decode($order_info['payment_postcode'], ENT_QUOTES, 'UTF-8');
$this->data['deliveryname'] = html_entity_decode($order_info['shipping_firstname'] . $order_info['shipping_lastname'], ENT_QUOTES, 'UTF-8');
$this->data['deliveryaddress'] = html_entity_decode($order_info['shipping_address_1'], ENT_QUOTES, 'UTF-8');
$this->data['deliverycity'] = html_entity_decode($order_info['shipping_city'], ENT_QUOTES, 'UTF-8');
$this->data['deliverycountry'] = html_entity_decode($order_info['shipping_iso_code_2'], ENT_QUOTES, 'UTF-8');
$this->data['deliveryprovince'] = html_entity_decode($order_info['shipping_zone'], ENT_QUOTES, 'UTF-8');
$this->data['deliveryemail'] = $order_info['email'];
$this->data['deliveryphone'] = html_entity_decode($order_info['telephone'], ENT_QUOTES, 'UTF-8');
$this->data['deliverypost'] = html_entity_decode($order_info['shipping_postcode'], ENT_QUOTES, 'UTF-8');
Finally, we assign our custom template file custom.tpl and render the view.
if (file_exists(DIR_TEMPLATE . $this->config->get('config_template') . '/template/payment/custom.tpl')){
  $this->template = $this->config->get('config_template') . '/template/payment/custom.tpl';
} else {
  $this->template = 'default/template/payment/custom.tpl';
}

$this->render();
Let's review the code of the callback method. This method will be called when the user comes back to the store from the payment gateway site.
First, we check if the orderid variable is available or not before proceeding further. If it's not available, we simply stop further processing.
if (isset($this->request->post['orderid'])) {
  $order_id = trim(substr(($this->request->post['orderid']), 6));
} else {
  die('Illegal Access');
}
Next, we load the order information from the database. And finally, we'll check if we've got the success indicator from the payment gateway response. If it's so, we'll go ahead and update the order status information accordingly.
$this->load->model('checkout/order');
$order_info = $this->model_checkout_order->getOrder($order_id);

if ($order_info) {
  $data = array_merge($this->request->post,$this->request->get);

  //payment was made succ
  if ($data['status'] == 'Y' || $data['status'] == 'y') {
    // update the order status accordingly
  }
}
That's the controller setup. Straightforward, isn't it?
Conventional Model
As you probably know, OpenCart has its own set of conventions and standards for dealing with the inner workings of the store. Such is the case with the model setup for the payment method detection. You just set it up as per the conventions, and it will be picked up automatically.
Go ahead and create the model file at catalog/model/payment/custom.php. Paste the following contents in the newly created model file custom.php.
<?php
class ModelPaymentCustom extends Model {
  public function getMethod($address, $total) {
    $this->load->language('payment/custom');

    $method_data = array(
      'code'     => 'custom',
      'title'    => $this->language->get('text_title'),
      'sort_order' => $this->config->get('custom_sort_order')
    );

    return $method_data;
  }
}
This class will be used by OpenCart when listing the active payment methods during the checkout process. During this process, OpenCart gathers the list of active payment methods from the back-end, and for each method it'll check if the appropriate model class is available or not. The payment method will be only listed if an associated model class is available.
The important thing in this setup is the value of the code variable. In our case, we've defined it to custom, which means that when you select the payment method and press Continue, it will call the payment/custom URL internally, which eventually sets up the form for our payment gateway.
In short, we can say that it's a mandatory file for the detection and proper working of the payment method in the front-end.
Language and Template Files
Now, we just need to create language and view files. Go ahead and create the language file at catalog/language/english/payment/custom.php. Paste the following contents in the newly created language file custom.php.
<?php
$_['text_title'] = 'Custom Payment Method';
$_['button_confirm'] = 'Confirm Order';
?>
Fairly easy to understand: we've just set up the labels which will be used in the front‑end during checkout.
Go ahead and create the template file at catalog/view/theme/default/template/payment/custom.tpl. Paste the following contents in the newly created template file custom.tpl.
<form action="<?php echo $action; ?>" method="post">
  <input type="hidden" name="text_config_one" value="<?php echo $text_config_one; ?>" />
  <input type="hidden" name="text_config_two" value="<?php echo $text_config_two; ?>" />
  <input type="hidden" name="orderid" value="<?php echo $orderid; ?>" />
  <input type="hidden" name="callbackurl" value="<?php echo $callbackurl; ?>" />
  <input type="hidden" name="orderdate" value="<?php echo $orderdate; ?>" />
  <input type="hidden" name="currency" value="<?php echo $currency; ?>" />
  <input type="hidden" name="orderamount" value="<?php echo $orderamount; ?>" />
  <input type="hidden" name="billemail" value="<?php echo $billemail; ?>" />
  <input type="hidden" name="billphone" value="<?php echo $billphone; ?>" />
  <input type="hidden" name="billaddress" value="<?php echo $billaddress; ?>" />
  <input type="hidden" name="billcountry" value="<?php echo $billcountry; ?>" />
  <input type="hidden" name="billprovince" value="<?php echo $billprovince; ?>" />
  <input type="hidden" name="billcity" value="<?php echo $billcity; ?>" />
  <input type="hidden" name="billpost" value="<?php echo $billpost; ?>" />
  <input type="hidden" name="deliveryname" value="<?php echo $deliveryname; ?>" />
  <input type="hidden" name="deliveryaddress" value="<?php echo $deliveryaddress; ?>" />
  <input type="hidden" name="deliverycity" value="<?php echo $deliverycity; ?>" />
  <input type="hidden" name="deliverycountry" value="<?php echo $deliverycountry; ?>" />
  <input type="hidden" name="deliveryprovince" value="<?php echo $deliveryprovince; ?>" />
  <input type="hidden" name="deliveryemail" value="<?php echo $deliveryemail; ?>" />
  <input type="hidden" name="deliveryphone" value="<?php echo $deliveryphone; ?>" />
  <input type="hidden" name="deliverypost" value="<?php echo $deliverypost; ?>" />

  <div class="buttons">
    <div class="right">
      <input type="submit" value="<?php echo $button_confirm; ?>" class="button" />
    </div>
  </div>
</form>
As you've probably guessed, this is the form that will be submitted when a user clicks on the Confirm Order button. We've just set up the hidden variables and their values which were earlier defined in the index method of the controller.
Let's see how things look on the front-end:
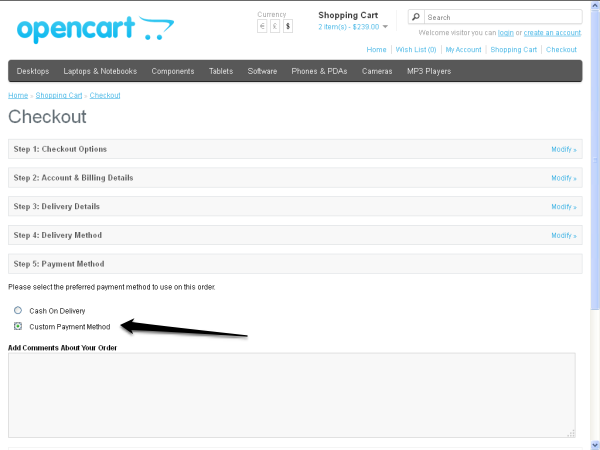
Let's quickly go through the overall flow:
- First, you must set up the model file for your payment method so that it can be listed in the Step 5: Payment Method tab.
- Next, when a user selects Custom Payment Method in the fifth tab and clicks on the Continue button, OpenCart internally calls the
payment/customURL, which calls theindexmethod eventually and renders thecustom.tplfile in the sixth tab.
- Finally, when a user clicks on the Confirm Order button, the form will be submitted and the user is taken to the payment gateway site where the payment process begins. Once the payment process is completed, the user will be redirected back to our site, thanks to the
callbackurlhidden variable. Of course, the order status will be updated as a part of thecallbackmethod if things have operated as expected.
Conclusion
In this series, I've explained how to set up almost any payment method by creating your own payment method module. I hope you've enjoyed this series and learned something useful.
It's always fun creating custom stuff for any framework, isn't it? Remember you can always provide comments and questions using the comment form below.

Comments