Introduction
In the first article of this series, we learned about the Core Data stack, the heart of a Core Data application. We explored the managed object context, the persistent store coordinator, and the managed object model.
This article focuses on the data model of a Core Data application. We zoom in on Xcode's data model editor and we take a look at entities, attributes, and relationships.
1. Data Model Editor
Start by downloading the project from the previous tutorial or clone the repository from GitHub. Open the project in Xcode and, in the Project Navigator, search for Core_Data.xcdatamodeld. Xcode automatically shows the data model editor when the project's data model is selected.

2. Entities
Before we explore the editor's user interface, we need to create an entity to work with. At the bottom of the data model editor, click the Add Entity button. This will add an entity with name Entity. It will show up in the Entities section on the left of the data model editor. Change the entity's name to Person by double-clicking it in the Entities section.

"What is an entity?" you may be wondering. To bring back the database analogy, an entity is comparable to a table in a database. When you select the Person entity, you see that an entity can have attributes, relationships, and fetched properties. Don't worry about fetched properties for now, they're a more advanced feature of the framework.
3. Attributes
Give the Person entity an attribute by clicking the plus button at the bottom of the Attributes table. Double-click the attribute's name and set it to first. From the Type drop-down menu, select String. If we compare this to a table in a database, the Person table now has a column first of type String.

Even though I don't want to confuse you by comparing entities with tables of a database, it makes it easier to understand what entities and attributes are. In fact, if you use a SQLite database as the backing store of your application, Core Data will create a table for you to store the data of the Person entity. However, this is something we don't have to and should not need to worry about. Remember that Core Data is not a database.
The same goes for relationships. How Core Data keeps track of relationships is something we don't need to worry about. In fact, Core Data makes sure relationships are only loaded when the application needs them. This is something we'll revisit later in this series.
Add two more attributes to the Person entity, last of type String and age of type Integer 16. The type you choose for numbers is not important at this point. It tells Core Data how it should structure the database and optimize for performance.
Attribute Options
The attribute of an entity can be configured through the Data Model Inspector. Select the first attribute of the Person entity and open the inspector on the right. The Data Model Inspector lets you configure the selected attribute. At this point, we're only interested in a few settings, Optional, Attribute Type, and Default Value.
Optional
Marking an attribute as optional means that the attribute can be empty or left blank for a record. In our example, however, we want to make sure every Person record has a first name. With the first attribute selected, uncheck Optional to mark it as required. New attributes are optional be default.
Marking an attribute as required has consequences though. If we save a Person record without a valid first name, Core Data will throw an error. This means that we need to make sure that the record's first attribute is set before saving it.
Attribute Type
The attribute type is important for several reasons. It tells Core Data in what format it should save the attribute and it will also return the attribute's data to us in the specified format. Each attribute type has a different set of configuration options. Change the attribute type of the first attribute to Date to see the configuration options for an attribute of type Date.
Default Value
Several attribute types, such as String and Date, have a Default Value field you can set. This is convenient, for example, if an attribute is required and you want to ensure the attribute for a record has a valid value when it's inserted in the database.
Note that the default value is only used when a new record is created. If an existing Person record, for example, is updated by setting the first attribute to nil, then Core Data won't populate the first attribute with the default value. Instead Core data would throw an error, because we marked the first attribute as required.
4. Relationships
Core Data really shines when you start working with relationships between entities. Let's see how this works by adding a second entity named Address. The Address entity has four attributes of type String, street, number, city, and country.
Relationship between entities have a number of defining characteristics, the name, the destination, the cardinality of the relationship, the inverse relationship, and the relationship's delete rule.
Let's explore relationships in more detail by creating a relationship between the Person and Address entities.
Name, Destination, and Optionality
Create a relationship by selecting the Person entity and clicking the plus button at the bottom of the Relationships table. Name the relationship address and set the Destination to the Address entity. This indicates that each person record can be associated with an address record.

As with attributes, relationships are optional by default. This means that no validation error will be thrown if a person record has no relationship with an address record. Let's change this by unchecking the Optional checkbox in the Data Model Inspector on the right.
Inverse Relationship
At the moment, the person can have a relationship with an address record. However, if the person has an address record associated with it, the address record does not know about the person record, because the relationship is uni-directional at the moment—from Person to Address. Most relationships in Core Data, however, are bi-directional, both entities know about the relationship.
Let's create the inverse relationship from the Address entity to the Person entity by selecting the Address entity and creating a relationship named person with the Person entity as its destination.
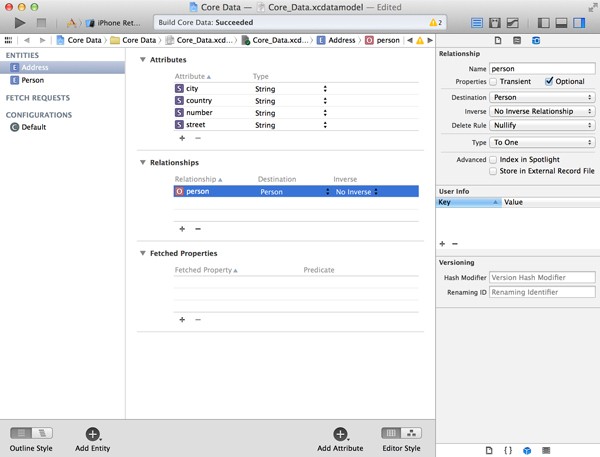
Even though we created the inverse relationship between Address and Person, Xcode gives us a few warnings telling us Person.address should have an inverse and Address.person should have an inverse. Did we do something wrong?
Core Data isn't clever enough to know which relationship is the inverse relationship of which relationship. This is easy to fix though. Select the Person entity and set the Inverse of the address relationship to person, the person relationship. If you now select the Address entity, you'll see that the inverse of the address relationship has already been set to the person relationship for you.
Data Model Graph
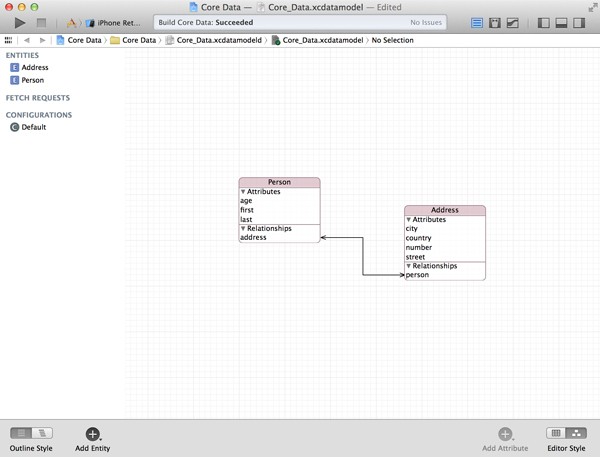
When the data model gains in complexity, relationships can become confusing and unclear. Xcode has your back covered though. The data model editor has two styles, table and graph. In the bottom right of the editor, you'll see a toggle that lets you switch between the two modes. Click the left button to switch to the graph style.
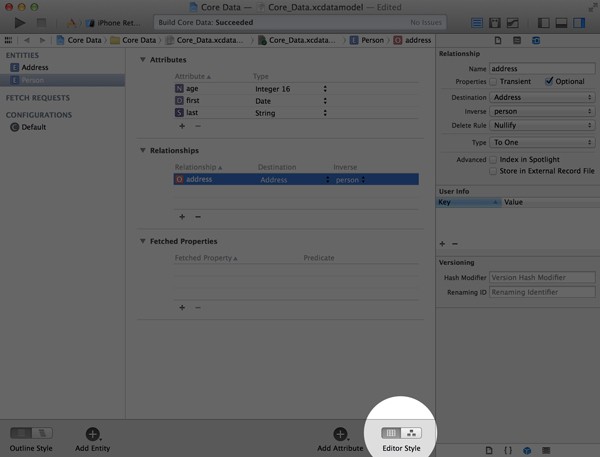
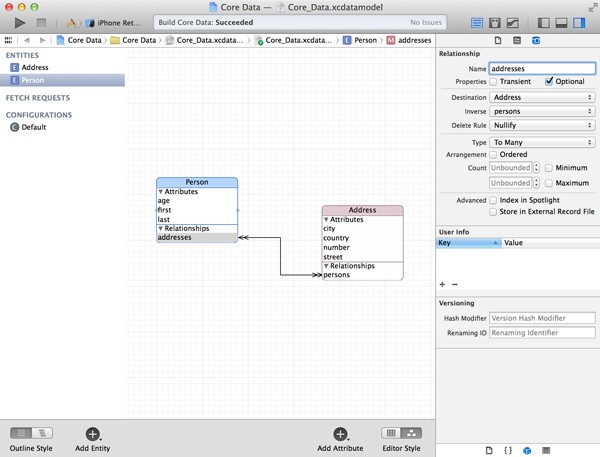
The graph style shows you the object graph we've created so far. It shows us the entities we've created, their attributes, and their relationships. One of the most useful feature, however, is the visual representation of the relationships between the data model's entities. A line with an arrow at each end connects Person and Address, signifying their bi-directional relationship.
To-Many Relationships
The relationships we've created so far are to-one relationships, a person can have one address and vice versa. However, it's perfectly possible that several people live at the same address. How would we include this extra information in our data model?
A relationship's cardinality specifies if it's a to-one or to-many relationship. Let's change the person relationship of the Address entity to make it a to-many relationship. Select the person relationship of the Address entity, change its name to persons to reflect the to-many relationship, and set the relationship Type to To Many in the inspector on the right.
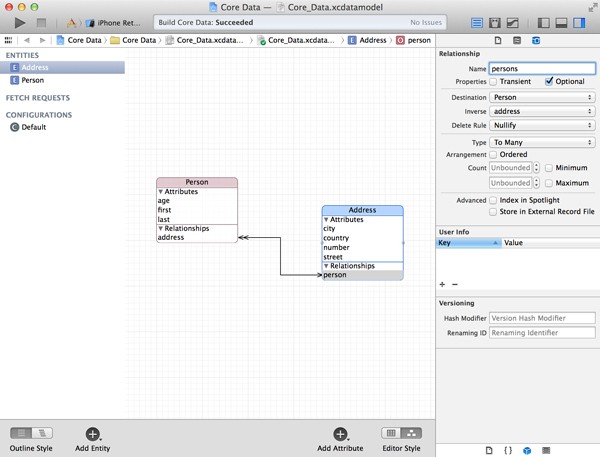
The name of the relationship isn't important, but it shows that its a to-many relationship. Did you notice that the data model graph updated as well? The relationship endpoint to the Person entity has two arrows to signify the to-many nature of the relationship.
Many-To-Many Relationships
Wait a minute. Isn't it possible that a person is associated with more than one address. A person can have a work address and a home address. Right? Core Data solves this by creating a many-to-many relationship. Select the address relationship of the Person entity, change its name to addresses, and set the relationship Type to To Many. The data model editor shows the updated relationship as a line with two arrows at each end.
Reflexive Relationships
The way Core Data implements relationships is very flexible. The destination entity of a relationship can even be the same as the source entity. This is known as a reflexive relationship. It's also possible to have multiple relationships of the same type with different names. A person, for example, can have a mother and a father. Both relationships are reflexive with the only difference being the name of the relationship.
Delete Rules
What happens when the record on one end of the relationship is deleted? If you were to think about Core Data as a database, then the answer would be obvious. Core Data, however, isn't a database.
Assume you have an Account entity with a to-many relationship to a User entity. In other words, an account can have many users and each user belongs to one account. What happens when you delete a user? What happens when you delete an account? In Core Data, each relationship has a delete rule that makes it clear what happens in these situations.
Delete rules make sure you don't have to worry about explicitly updating the backing store when a record is deleted. Core Data takes care of this to ensure the object graph remains in a consistent state.
Select the addresses relationship of the Person entity and open the inspector on the right. The Delete Rule menu has four options, No Action, Nullify, Cascade, and Deny.
No Action
If you select No Action, Core Data doesn't update or notify the source record of the relationship. This means that the source record of the relationship still thinks it has a relationship with the record that was deleted. Note that this is rarely what you want.
Nullify
This option sets the destination of the relationship to null when the destination record is deleted. This is the default delete rule of a relationship.
Cascade
If the relationship from Person to Address is set to Cascade, deleting a person record will also delete any address records that are associated with the person record. This is useful, for example, if a relationship is required and the record cannot or shouldn't exist without the relationship. A user, for example, shouldn't exist if it's not associated with an account.
Deny
In a sense, Deny is the inverse of Cascade. For example, if we have an Account entity that has a to-many relationship with a User entity with its delete rule set to Deny, an account record can only be deleted if it has no user records associated with it. This ensures that no user records exist without an account record. The result is similar to the Cascade delete rule, but the implementation differs.
Conclusion
In this tutorial, we've taken a closer look at the data model used by a Core Data application. You should now be familiar with entities, attributes, and relationships, and you should be able to create them using Xcode's data model editor.
Core Data is very good at managing relationships and Xcode's data model editor makes it easy to create and manage relationships between entities. Relationships between entities are powerful and easily configurable. Delete rules ensure that the object graph Core Data manages remains healthy and in a consistent state.
In the next article, we get our hands dirty and start working with Core Data. You'll learn how to create, read, update, and delete records, and become familiar with NSManagedObject and NSFetchRequest.


Comments