This tutorial is part of the Building Your Startup With PHP series on Tuts+. In this series, I'm guiding you through launching a startup from concept to reality using my Meeting Planner app as a real life example. Every step along the way, I'll release the Meeting Planner code as open source examples you can learn from. I'll also address startup-related business issues as they arise.
All of the code for Meeting Planner is written in the Yii2 Framework for PHP. If you'd like to learn more about Yii2, check out my parallel series Programming With Yii2 at Tuts+. You may also want to check out my knowledge base site for Yii2 questions, The Yii2 Developer Exchange.
The coding for the schedule meeting functionality stretches over at least four episodes. This is the second of these four episodes, which focuses on adding AJAX to the scheduling page to allow users to set their availability and choose places, dates and times. If you missed the prior tutorial on scheduling a meeting, please go back and read it before proceeding.
In the next tutorial, we'll cover delivering the meeting request via email. We'll return later to optimize and polish the user interface, because it's critical to the success of this product.
Displaying Availability From the Database

The meeting schedule view was relatively complex to code. The visual layout of the table columns doesn't directly relate to the way we store the related data in our database and schema. Fortunately, each meeting doesn't have a large data set of place and date time options, so this doesn't present a particular performance problem.
In our schema, the place availability for organizers and participants (i.e. whether a place is acceptable to them for this meeting) is stored in the MeetingPlaceChoice table. Using our relational model, each Meeting has many MeetingPlaces which has many MeetingPlaceChoices.
Don't confuse the MeetingPlaceChoice table with the final selection for a place stored in MeetingPlace->status.
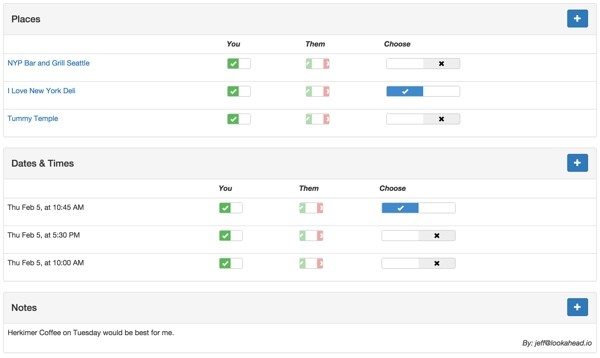
The table shown above will appear differently when the organizer views it:
- Place 1 | Organizer | Participant | MeetingPlace.choice
- Place 2 | Organizer | Participant | MeetingPlace.choice
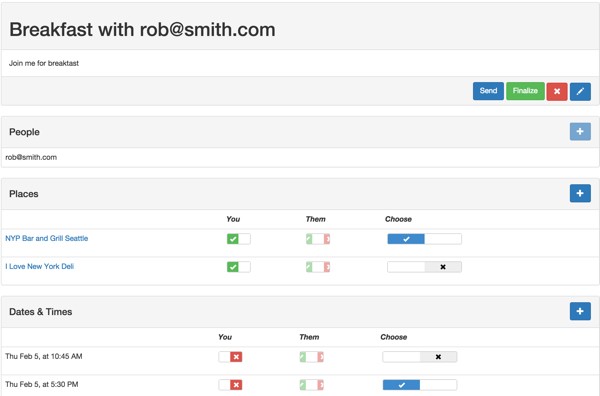
From when the participant views it:
- Place 1 | Participant | Organizer | (maybe can make MeetingPlace.choice)
- Place 2 | Participant | Organizer | (maybe can make MeetingPlace.choice)
Now let's discuss how to implement these tables in the views.
Displaying a Table With Bootstrap
For now, I chose to display each area, e.g. place or date and time, in its own Bootstrap panel with tables.
In \frontend\views\meeting\view.php, you'll see the inclusion for the Places panel like this:
<?= $this->render('../meeting-place/_panel', [
    'model'=>$model,
    'placeProvider' => $placeProvider,
]) ?>
Here's a portion of the meeting-place panel view file. This sets up the table grid and includes a list view widget to display the rows:
<?php
use yii\helpers\Html;
use yii\widgets\ListView;
?>
<div class="panel panel-default">
  <!-- Default panel contents -->
  <div class="panel-heading">
    <div class="row">
      <div class="col-lg-6"><h4><?= Yii::t('frontend','Places') ?></h4></div>
      <div class="col-lg-6" ><div style="float:right;"><?= Html::a('', ['meeting-place/create', 'meeting_id' => $model->id], ['class' => 'btn btn-primary glyphicon glyphicon-plus']) ?></div>
    </div>
  </div>
  </div>

  <?php
   if ($placeProvider->count>0):
  ?>
  <table class="table">
     <thead>
     <tr class="small-header">
       <td></td>
       <td ><?=Yii::t('frontend','You') ?></td>
        <td ><?=Yii::t('frontend','Them') ?></td>
        <td >
          <?php
           if ($placeProvider->count>1) echo Yii::t('frontend','Choose');
          ?>    </tr>
    </thead>
    <?= ListView::widget([
           'dataProvider' => $placeProvider,
           'itemOptions' => ['class' => 'item'],
           'layout' => '{items}',
           'itemView' => '_list',
           'viewParams' => ['placeCount'=>$placeProvider->count],
       ]) ?>
  </table>

  <?php else: ?>
  <?php endif; ?>

</div>
Let's take a closer look at the meeting-place list view.
Displaying the Rows With Bootstrap Switch Widgets
The Yii Listview will display a row of data for each Place. The code works nearly identically for date times.
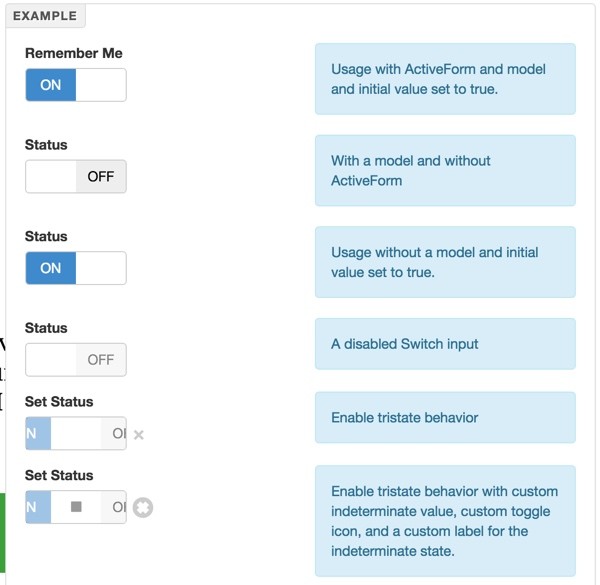
I'm using Krajee's Yii2 Switch Input Widget for the Bootstrap Switch in place of boring checkboxes and combo boxes:

I like the way the tri-state option allows us to show participants a unique state prior to them making a selection; it also allows us to show the organizer that the participant hasn't yet made a selection.
Let's walk through the code column by column. Here's the Place panel and table we're implementing:

The Place Column
In the first column, I use the Yii Html link helper to hotlink the name of the place to its own view page—notice how we're using the place slug.
<?php
use yii\helpers\Html;
use yii\helpers\BaseUrl;
use \kartik\switchinput\SwitchInput;

?>

<tr >
  <td style >
        <?= Html::a($model->place->name,BaseUrl::home().'/place/'.$model->place->slug) ?>
  </td>
The Organizer Column
To find the organizer's selections, we loop through the array of MeetingPlaceChoices, matching user_id to meeting->owner_id:
  <td style>
      <?
      foreach ($model->meetingPlaceChoices as $mpc) {
        if ($mpc->user_id == $model->meeting->owner_id) {
            if ($mpc->status == $mpc::STATUS_YES)
              $value = 1;
            else
              $value =0;
            echo SwitchInput::widget([
            'type'=>SwitchInput::CHECKBOX,
            'name' => 'meeting-place-choice',
            'id'=>'mpc-'.$mpc->id,
            'value' => $value,
            'pluginOptions' => ['size' => 'mini','onText' => '<i class="glyphicon glyphicon-ok"></i>','offText'=>'<i class="glyphicon glyphicon-remove"></i>','onColor' => 'success','offColor' => 'danger',],
            ]);
        }
      }
      ?>
     </td>
For selecting your availability at a specific place, we're using the switch input's checkbox mode, i.e. this place works for you (on) or it does not (off).
The value property sets the switch on load. The id corresponding to the MeetingPlaceChoice->id is used for AJAX below to identify this particular switch.
You may also notice that we're using glyphicons for yes and no in place of labels.
The Participant Column
The code for the participant implements tri-state switches. i.e. this place works for you (on), it does not (off) or you haven't indicated yet (indeterminate):
<td style>
    <?
  foreach ($model->meetingPlaceChoices as $mpc) {
    if (count($model->meeting->participants)==0) break;
    if ($mpc->user_id == $model->meeting->participants[0]->participant_id) {
        if ($mpc->status == $mpc::STATUS_YES)
          $value = 1;
        else if ($mpc->status == $mpc::STATUS_NO)
          $value =0;
        else if ($mpc->status == $mpc::STATUS_UNKNOWN)
          $value =-1;
        echo SwitchInput::widget([
          'type'=>SwitchInput::CHECKBOX,
          'name' => 'meeting-place-choice',
          'id'=>'mpc-'.$mpc->id,
          'tristate'=>true,
          'indeterminateValue'=>-1,
          'indeterminateToggle'=>false,
          'disabled'=>true,
          'value' => $value,
          'pluginOptions' => ['size' => 'mini','onText' => '<i class="glyphicon glyphicon-ok"></i>','offText'=>'<i class="glyphicon glyphicon-remove"></i>','onColor' => 'success','offColor' => 'danger'],
      ]);
    }
  }
    ?>
  </td>
When we add support for meetings that allow the participant to suggest places and date times, we'll add tri-state widgets to the organizer column as well.
Displaying the Choose Place and Date Time Switch
If the organizer is viewing the meeting, we'll allow them to choose the final meeting location and date time. Soon, we'll also add support for meetings to allow the participant to choose these.
In this case, the user is making a selection across rows (choosing one of the listed places). This requires we use the switch input in radio button mode. For the AJAX events for the choosers, we can just listen on the name property—no id is needed, because there is only one selection possible for the panel.
I also wanted the choice switch to appear different than the availability switches, so I made them wider and used different colors.
  <td style>
      <?
      if ($placeCount>1) {
        if ($model->status == $model::STATUS_SELECTED) {
            $value = $model->id;
        }    else {
          $value = 0;
        }
        echo SwitchInput::widget([
          'type' => SwitchInput::RADIO,
          'name' => 'place-chooser',
            'items' => [
                [ 'value' => $model->id],
            ],
            'value' => $value,
            'pluginOptions' => [  'size' => 'mini','handleWidth'=>60,'onText' => '<i class="glyphicon glyphicon-ok"></i>','offText'=>'<i class="glyphicon glyphicon-remove"></i>'],
            'labelOptions' => ['style' => 'font-size: 12px'],
        ]);
      }
      ?>
  </td>
</tr>
Now I'll walk you through how we implemented the AJAX support for all of these choosers.
Implementing AJAX Support
Obviously, I wanted to avoid requiring users to save changes to these forms. Instead, I wanted the switches to change state via AJAX without a page refresh.
The code is divided between setting up event listeners to react to state changes and controller actions to record the changes in our database. It's also slightly different for the checkbox switches versus the radio switches.
Building Event Listeners
We create event listeners to execute code whenever the state of a button is changed. The listen event is JavaScript code that is generated by PHP in the panel view (for the entire table of options).
Here's the code at the bottom of \frontend\views\meeting-place\_panel.php:
<?php
$script = <<< JS

// allows user to set the final place
$('input[name="place-chooser"]').on('switchChange.bootstrapSwitch', function(e, s) {
//  console.log(e.target.value); // true | false
  $.ajax({
     url: '/mp/meetingplace/choose',
     data: {id: $model->id, 'val': e.target.value},
     // e.target.value is selected MeetingPlaceChoice model
     success: function(data) {
       return true;
     }
  });
});
...
JS;
$position = \yii\web\View::POS_READY;
$this->registerJs($script, $position);
?>
By the way, if anyone can tell me the name of the JS block shorthand for PHP, post it in the comments section. I'd like to know. Some things are difficult to search for.
The registerJs function in Yii renders the script for a particular $position on the page. In this case, it is an on ready event.
The code above sets up listener events for all the place-chooser radio buttons for all the places by the name property. The event's target value will represent the chosen meeting place id. I'll talk more about the AJAX function in a moment.
In other words, the switch radio events respond to the organizer (generally) choosing a place or date time to finalize the meeting, transmitting the meeting-place id or meeting-time id.
Here's the code for listening to availability changes with the switch input checkboxes:
// users can say if a place is an option for them
$('input[name="meeting-place-choice"]').on('switchChange.bootstrapSwitch', function(e, s) {
  //console.log(e.target.id,s); // true | false
  // set intval to pass via AJAX from boolean state
  if (s)
    state = 1;
  else
    state =0;
  $.ajax({
     url: '/mp/meetingplacechoice/set',
     data: {id: e.target.id, 'state': state},
     success: function(data) {
       return true;
     }
  });
});
The listener is set up for all meeting-place-choice name properties but it must pass the id to indicate exactly which MeetingPlaceChoice is being changed.
To clarify, the event listeners for switch input checkboxes allow users to say they are available or not for a place or date time. They send meeting-place-choice id or meeting-place-time id.
Now, let's look more closely at how the AJAX events call our PHP-based controller actions to record state changes in the database.
Building the Controller Actions
Here's the code again for the meeting-place radio button chooser:
$.ajax({
     url: '/mp/meetingplace/choose',
     data: {id: $model->id, 'val': e.target.value},
     // e.target.value is selected MeetingPlaceChoice model
     success: function(data) {
       return true;
     }
  });
The URL indicates the path to the MeetingPlace controller's choose action:
public function actionChoose($id,$val) {
      // meeting_place_id needs to be set active
      // other meeting_place_id for this meeting need to be set inactive
      $meeting_id = intval($id);
      $mtg=Meeting::find()->where(['id'=>$meeting_id])->one();
      if (Yii::$app->user->getId()!=$mtg->owner_id) return false;
      // to do - also check participant id if participants allowed to choose
      foreach ($mtg->meetingPlaces as $mp) {
        if ($mp->id == intval($val)) {
          $mp->status = MeetingPlace::STATUS_SELECTED;
        }
        else {
          $mp->status = MeetingPlace::STATUS_SUGGESTED;
        }
        $mp->save();
      }
      return true;
    }
The inbound $id represents the meeting_id. The value represents the chosen MeetingPlace id. STATUS_SELECTED indicates that the place has been chosen, whereas STATUS_SUGGESTED indicates only that's it's been suggested (not chosen).
This code loops through each meeting's meeting places and updates the state of the selected place.
Let's look at the code for the switch input checkboxes again that determine whether someone is available for a specific place:
$.ajax({
     url: '/mp/meetingplacechoice/set',
     data: {id: e.target.id, 'state': state},
     success: function(data) {
       return true;
     }
  });
These events call the MeetingPlaceChoice controller's set action with a string whose suffix contains the id of the MeetingPlaceChoice record that needs to be updated:
public function actionSet($id,$state)
    {
      // caution - incoming AJAX type issues with val
      $id=str_replace('mpc-','',$id);
      $mpc = $this->findModel($id);
      if (Yii::$app->user->getId()!=$mpc->user_id) return false;
      if (intval($state) == 0 or $state=='false')
        $mpc->status = MeetingPlaceChoice::STATUS_NO;
      else
        $mpc->status = MeetingPlaceChoice::STATUS_YES;
      $mpc->save();
      return $mpc->id;
    }
Securing AJAX Requests
For security reasons, we need to verify that the AJAX request has been initiated by the actual user who can make these changes. This code does that:
if (Yii::$app->user->getId()!=$mtg->owner_id) return false;
and
if (Yii::$app->user->getId()!=$mpc->user_id) return false;
Without these checks, it would be easy for a hacker to write a script to modify meeting settings for anyone and everyone.
The AJAX code for indicating availability for date times and making choices is nearly identical.
Supporting Availability Settings
In order to support all of the above features, we also need to add code which adds records to the MeetingPlaceChoice and MeetingTimeChoice tables whenever participants, places and date times are added. For this, we use Yii's afterSave events.
When a participant is added, we need to add new MeetingPlaceChoice rows for every MeetingPlace and new MeetingTimeChoice rows for every MeetingTime. Here's the code in the Participate model that handles this automatically for us:
    public function afterSave($insert,$changedAttributes)
    {
        parent::afterSave($insert,$changedAttributes);
        if ($insert) {
          // if Participant is added
          // add MeetingPlaceChoice & MeetingTimeChoice this participant
          $mt = new MeetingTime;
          $mt->addChoices($this->meeting_id,$this->participant_id);
          $mp = new MeetingPlace;
          $mp->addChoices($this->meeting_id,$this->participant_id);
        }
    }
When a new place is added, new MeetingPlaceChoices are needed for every attendee:
public function afterSave($insert,$changedAttributes)
    {
        parent::afterSave($insert,$changedAttributes);
        if ($insert) {
          // if MeetingPlace is added
          // add MeetingPlaceChoice for owner and participants
          $mpc = new MeetingPlaceChoice;
          $mpc->addForNewMeetingPlace($this->meeting_id,$this->suggested_by,$this->id);
        }
    }
Similarly, when a new date time is added, new entries are needed for MeetingTimeChoice for every attendee:
public function afterSave($insert,$changedAttributes)
    {
        parent::afterSave($insert,$changedAttributes);
        if ($insert) {
          // if MeetingTime is added
          // add MeetingTimeChoice for owner and participants
          $mtc = new MeetingTimeChoice;
          $mtc->addForNewMeetingTime($this->meeting_id,$this->suggested_by,$this->id);
        }
    }
It's assumed that when the meeting organizer adds a place or date time, that it works for them initially.
Choosing the Final Place, Date and Time
Once there's at least one invited participant, one place and one time, the meeting organizer can finalize the meeting. In the future, we'll also allow participants to finalize the meeting.
While this code will change a bit going forward, there's a function in the Meeting model that tells the view whether to enable the Finalize button:
public function canFinalize() {
        // check if meeting can be finalized by viewer
        if ($this->canSend()) {
          // organizer can always finalize
          if ($this->viewer == Meeting::VIEWER_ORGANIZER) {
            $this->isReadyToFinalize = true;
          } else {
            // viewer is a participant
            // has participant responded to one time or is there only one time
            // has participant responded to one place or is there only one place

          }
        }
Here's the view code:
<?= Html::a(Yii::t('frontend', 'Finalize'), ['finalize', 'id' => $model->id], ['class' => 'btn btn-success '.(!$model->isReadyToFinalize?'disabled':'')]) ?>
Once the meeting is finalized, MeetingPlanner will change mode from supporting planning to facilitating the participants' attendance through a variety of cool features which we'll cover in future tutorials.
Coding Problems I Encountered
I wanted to mention a few problems I ran into while writing the code for this relatively intricate section.
AJAX Types
The SwitchInput states were sent via JavaScript as boolean types, e.g. true or false, but I needed to convert these to integer values to successfully transmit them via AJAX to the controllers.
// users can say if a place is an option for them
$('input[name="meeting-place-choice"]').on('switchChange.bootstrapSwitch', function(e, s) {
  //console.log(e.target.id,s); // true | false
  // set intval to pass via AJAX from boolean state
  if (s)
    state = 1;
  else
    state =0;
Overlapping IDs
The numeric IDs of the MeetingPlaceChoice and MeetingTimeChoice widgets overlapped. It took me a while to figure out why the switch widgets stopped rendering properly for me when I added the choice capabilities. Because there were overlapping ids, the switch widgets rendered for only the first object.
It was necessary to add prefixes such as mpc- or mtc- to the ids and strip these out in the controller actions.
 echo SwitchInput::widget([
          'type'=>SwitchInput::CHECKBOX,
          'name' => 'meeting-place-choice',
          'id'=>'mpc-'.$mpc->id,
          'tristate'=>true,
Here's where we strip that prefix out in the controller to load the model:
    public function actionSet($id,$state)
    {
      // caution - incoming AJAX type issues with val
      $id=str_replace('mpc-','',$id);
      $mpc = $this->findModel($id);
Swith Input Widget Radio Button Loading State
It took me a while to discover how to set the initial load state/value for the switch input widget in radio button mode. There wasn't documentation showing how to do this. I finally wrote up an explainer here for others: Setting the State of the Switch Input Widget Radio Button.
What's Next?
Now that all of the AJAX is in place and working, it's time to finish some of the remaining areas of the meeting planning view to prepare for invitations that have been delivered and need to be viewed by participants.
For example, the view of the meeting schedule that participants see will be different in layout than the organizer, and it will differ depending on what powers the organizer has delegated.
For example, the you and them columns will need to change from their current implementation. There will need to be expanded Meeting model settings that determine whether participants can suggest places and date times and finalize the meeting.
Further into the future, I may want to allow multiple participants and need to display more columns of availability for the organizing view—this functionality isn't part of our minimum viable product (MVP).
I also need to finish implementation of the MeetingLog which will record every change made to a meeting during the planning process. This will provide a sort of history of planning for each meeting. I can use afterSave() events for this as well.
Watch for upcoming tutorials in our Building Your Startup With PHP series—a list of upcoming topics is now posted in our Table of Contents.
Please feel free to add your questions and comments below; I generally participate in the discussions. You can also reach me on Twitter @reifman or email me directly.


Comments