This is part three of the Building Your Startup With PHP series on Tuts+. In this series, I'm guiding you through launching a startup from concept to reality using my Meeting Planner app as a real life example. Every step along the way, we'll release the Meeting Planner code as open source examples you can learn from.
In this part, we're going to build some of the underlying infrastructure for the concept of Places where people can schedule meetings. We'll cover the basics of working with Places, building on our database schema, integrating HTML5 Geolocation and APIs for Google Maps and Google Places. The idea is to use these features to make choosing the location for your meetings quick and easy. We con't cover all of the fit and finish in this episode—but we'll cover more of that in an upcoming tutorial.
All of the code for Meeting Planner is written in the Yii2 Framework for PHP and leverages Bootstrap and JavaScript. If you'd like to learn more about Yii2, check out our parallel series Programming With Yii2 at Tuts+.
Just a reminder, I do participate in the comment threads below. I'm especially interested if you have different approaches or additional ideas, or want to suggest topics for future tutorials. Feature requests for Meeting Planner are welcome as well.
Building the Places Functionality
Before users can schedule meetings, we need them to be able to find and suggest their favorite places. Initially, for simplicity, we'll build Place searching and creation functionality separately from the scheduling feature.
There are three ways for users to add places:
- Using HTML5 Geolocation, they can look up their current location via WiFi and add this as a place.
- Using the Google Places API, they can search for a place in the Places database using the autocomplete. Eventually, when we know their current location, we can restrict the search results to nearby places.
- Manual entry. Users can enter an address and description for their own place, like an office or home.
Extending the Place Schema
Here's the schema for Places we developed in Part Two:
$tableOptions = null;
      if ($this->db->driverName === 'mysql') {
          $tableOptions = 'CHARACTER SET utf8 COLLATE utf8_unicode_ci ENGINE=InnoDB';
      }

      $this->createTable('{{%place}}', [
          'id' => Schema::TYPE_PK,
          'name' => Schema::TYPE_STRING.' NOT NULL',
          'place_type' => Schema::TYPE_SMALLINT.' NOT NULL DEFAULT 0',
          'status' => Schema::TYPE_SMALLINT . ' NOT NULL DEFAULT 0',
          'google_place_id' => Schema::TYPE_STRING.' NOT NULL', // e.g. google places id
          'created_by' => Schema::TYPE_BIGINT.' NOT NULL',
          'created_at' => Schema::TYPE_INTEGER . ' NOT NULL',
          'updated_at' => Schema::TYPE_INTEGER . ' NOT NULL',
      ], $tableOptions);
      $this->addForeignKey('fk_place_created_by', '{{%place}}', 'created_by', '{{%user}}', 'id', 'CASCADE', 'CASCADE');
Note, there isn't any geolocation associated with a Place in this table. That's because the MySQL InnoDB engine doesn't support spatial indexes. So I've created a secondary table using the MyISAM table for Places' geolocation coordinates. It's the Place_GPS table:
class m141025_213611_create_place_gps_table extends Migration
{
  public function up()
  {
      $tableOptions = null;
      if ($this->db->driverName === 'mysql') {
          $tableOptions = 'CHARACTER SET utf8 COLLATE utf8_unicode_ci ENGINE=MyISAM';
      }

      $this->createTable('{{%place_gps}}', [
          'id' => Schema::TYPE_PK,
          'place_id' => Schema::TYPE_INTEGER.' NOT NULL',
          'gps'=>'POINT NOT NULL',
      ], $tableOptions);
      $this->execute('create spatial index place_gps_gps on '.'{{%place_gps}}(gps);');
      $this->addForeignKey('fk_place_gps','{{%place_gps}}' , 'place_id', '{{%place}}', 'id', 'CASCADE', 'CASCADE');
  }
As I'm in rapid prototyping mode, I'm going to extend the schema using Yii's migrations and I may ultimately make future adjustments as well.
To extend the schema, we create a new migration in Yii:
./yii migrate/create extend_place_table
And provide the following code:
<?php

use yii\db\Schema;
use yii\db\Migration;

class m150114_202542_extend_place_table extends Migration
{
    public function up()
    {
      $tableOptions = null;
      if ($this->db->driverName === 'mysql') {
          $tableOptions = 'CHARACTER SET utf8 COLLATE utf8_unicode_ci ENGINE=InnoDB';
      }
      $this->addColumn('{{%place}}','slug','string NOT NULL');
      $this->addColumn('{{%place}}','website','string NOT NULL');
      $this->addColumn('{{%place}}','full_address','string NOT NULL');
      $this->addColumn('{{%place}}','vicinity','string NOT NULL');
      $this->addColumn('{{%place}}','notes','text');
    }

    public function down()
    {
      $this->dropColumn('{{%place}}','slug');
      $this->dropColumn('{{%place}}','website');
      $this->dropColumn('{{%place}}','full_address');
      $this->dropColumn('{{%place}}','vicinity');
      $this->dropColumn('{{%place}}','notes');
    }
}
This will add columns for slug, website, full_address, vicinity, and notes. The slug is a URL-friendly address for displaying the Place view page which Yii can generate for us automatically. The other fields will sometimes be updated by users and other times populated from the Google Places API.
To run the migration, we enter the following:
./yii migrate/up
You should see the following:
Yii Migration Tool (based on Yii v2.0.0)

Total 1 new migration to be applied:
    m150114_202542_extend_place_table

Apply the above migration? (yes|no) [no]:yes
*** applying m150114_202542_extend_place_table
    > add column slug string NOT NULL to table {{%place}} ... done (time: 0.011s)
    > add column website string NOT NULL to table {{%place}} ... done (time: 0.010s)
    > add column full_address string NOT NULL to table {{%place}} ... done (time: 0.010s)
    > add column vicinity string NOT NULL to table {{%place}} ... done (time: 0.011s)
    > add column notes text to table {{%place}} ... done (time: 0.011s)
*** applied m150114_202542_extend_place_table (time: 0.055s)


Migrated up successfully.
Updating the CRUD Code
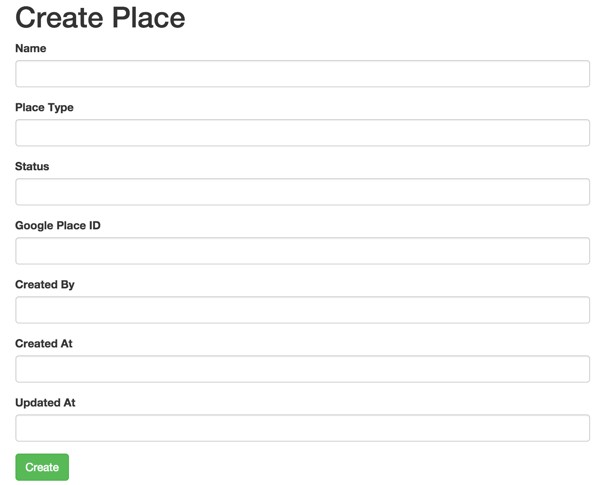
If you visit the Places page, e.g. http://localhost:8888/mp/index.php/place/create, you'll see the default Yii2 auto-generated form with all of our schema fields:
For this tutorial, I re-ran Yii's code generator, Gii, using the steps from Part Two to build code for the new database schema. I instructed Gii to overwrite the CRUD code from earlier.
Note: It may be easiest for you to replace your sample source from part two with sample source from this part. See the Github link to the upper right.
You also will need to update our vendor libraries with composer to integrate support for the 2amigOS Yii2 Google Maps and Places libraries. Here's a portion of our composer.json file:
    "minimum-stability": "stable",
    "require": {
        "php": ">=5.4.0",
        "yiisoft/yii2": "*",
        "yiisoft/yii2-bootstrap": "*",
        "yiisoft/yii2-swiftmailer": "*",
        "2amigos/yii2-google-maps-library": "*",
        "2amigos/yii2-google-places-library": "*"
Then, run composer update to download the files:
sudo composer update
Three Different Ways to Add Places
We're actually going to build three different controller actions and forms for each of these types of places. Remember that we must also integrate the related model, PlaceGPS, to store the GPS coordinates for each place no matter how the user adds it.
Adding Places to the Navigation Bar
To add a Places link to the navigation bar, edit /views/layouts/main.php. This is the default page layout which Yii wraps all of our view files with. It includes the header, Bootstrap navigation bar, and footer.
Below in $menuItems, I add an array entry for the Place menu:
            NavBar::begin([
                'brandLabel' => 'MeetingPlanner.io', //
                'brandUrl' => Yii::$app->homeUrl,
                'options' => [
                    'class' => 'navbar-inverse navbar-fixed-top',
                ],
            ]);
            $menuItems = [
                ['label' => 'Home', 'url' => ['/site/index']],
                ['label' => 'Places', 'url' => ['/place']],
                ['label' => 'About', 'url' => ['/site/about']],
                ['label' => 'Contact', 'url' => ['/site/contact']],
            ];
            if (Yii::$app->user->isGuest) {
                $menuItems[] = ['label' => 'Signup', 'url' => ['/site/signup']];
                $menuItems[] = ['label' => 'Login', 'url' => ['/site/login']];
            } else {
                $menuItems[] = [
                    'label' => 'Logout (' . Yii::$app->user->identity->username . ')',
                    'url' => ['/site/logout'],
                    'linkOptions' => ['data-method' => 'post']
                ];
            }
            echo Nav::widget([
                'options' => ['class' => 'navbar-nav navbar-right'],
                'items' => $menuItems,
            ]);
            NavBar::end();
        ?>
The Place Index View
The Place Index View will look like this after we add buttons for the three ways to add Places:
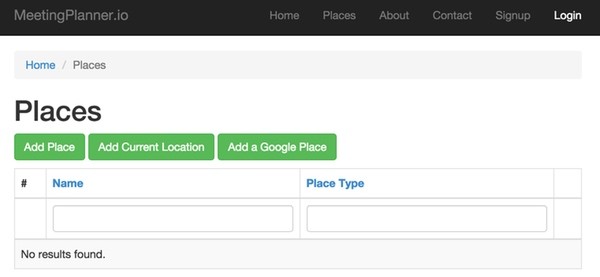
In /views/place/index.php, we can add the three add place buttons:
    <p>
        <?= Html::a('Add Place', ['create'], ['class' => 'btn btn-success']) ?>
        <?= Html::a('Add Current Location', ['create_geo'], ['class' => 'btn btn-success']) ?>
        <?= Html::a('Add a Google Place', ['create_place_google'], ['class' => 'btn btn-success']) ?>
    </p>
And, we can customize the columns that appear in the view, including building a custom column to a Place method that displays the friendly name for Place Type:
<?= GridView::widget([
        'dataProvider' => $dataProvider,
        'filterModel' => $searchModel,
        'columns' => [
            ['class' => 'yii\grid\SerialColumn'],
            'name',
            [
                'attribute' => 'place_type',
                'format' => 'raw',
                'value' => function ($model) {
                            return '<div>'.$model->getPlaceType($model->place_type).'</div>';
                    },
            ],
            ['class' => 'yii\grid\ActionColumn'],
        ],
    ]); ?>
Here's a subset of the Place Type methods in /models/Place.php:
    const TYPE_OTHER = 0;
    const TYPE_RESTAURANT = 10;
    const TYPE_COFFEESHOP = 20;
    const TYPE_RESIDENCE = 30;
    const TYPE_OFFICE = 40;
    const TYPE_BAR = 50;

    ...

    public function getPlaceType($data) {
      $options = $this->getPlaceTypeOptions();
      return $options[$data];
    }

    public function getPlaceTypeOptions()
    {
      return array(
          self::TYPE_RESTAURANT => 'Restaurant',
          self::TYPE_COFFEESHOP => 'Coffeeshop',
          self::TYPE_RESIDENCE => 'Residence',
          self::TYPE_OFFICE => 'Office',
          self::TYPE_BAR => 'Bar',
            self::TYPE_OTHER => 'Other'
         );
     }
Notice, we've not yet addressed login state or user ownership of places. We'll revisit this in the next tutorial. Because of the complexity and scope of this stage, we'll leave a handful of finish items for a later tutorial.
Adding Places With HTML5 Geolocation
One scenario for adding places is to create a place for your home or office. Rather than require that users type this information in by hand, we can often automatically generate this with HTML5 Geolocation.
HTML5 Geolocation uses your WiFi address to determine GPS points for your current location. It does not work with cellular / mobile connections and it's not foolproof.
The user will likely need to grant permission to their browser for geolocation for this feature to work. Look for a popup below the address bar as shown below:

I'm using the geoposition script from estebanav to support HTML5 Geolocation with the widest possible browser support.
Adding the Place Controller Action for Geolocation
In frontend/controllers/PlaceController.php, we'll create a new method for the Create_geo action:
     /**
      * Creates a new Place model via Geolocation
      */
     public function actionCreate_geo()
     {
         $model = new Place();
         if ($model->load(Yii::$app->request->post())) {
            ... to be explained below...
        } else {
             return $this->render('create_geo', [
                 'model' => $model,
             ]);
         }
Because the form is not yet being submitted, Yii will render the create_geo view to display the form.
In frontend/views/place/create_geo.php, we'll include _formGeolocate.php:
<?php

use yii\helpers\Html;


/* @var $this yii\web\View */
/* @var $model frontend\models\Place */

$this->title = 'Create Place By Geolocation';
$this->params['breadcrumbs'][] = ['label' => 'Places', 'url' => ['index']];
$this->params['breadcrumbs'][] = $this->title;
?>
<div class="place-create">

    <h1><?= Html::encode($this->title) ?></h1>

    <?= $this->render('_formGeolocate', [
        'model' => $model,
    ]) ?>

</div>
Let's look at the first part of _formGeolocate. We have to include the JavaScript for Geoposition.js as well as our own custom geolocation code to integrate geoposition with our form. The way Yii does this is with Asset Bundles. You define an Asset Bundle for different pages and this allows you to optimize which JS and CSS is loaded on different areas of your application. We'll create LocateAsset first:
?php

use yii\helpers\Html;
use yii\helpers\BaseHtml;
use yii\widgets\ActiveForm;

use frontend\assets\LocateAsset;
LocateAsset::register($this);
In frontend/assets/LocateAsset.php, we'll define the JavaScript we need to include:
<?php

namespace frontend\assets;

use yii\web\AssetBundle;

class LocateAsset extends AssetBundle
{
    public $basePath = '@webroot';
    public $baseUrl = '@web';
    public $css = [
    ];
    public $js = [
      'js/locate.js',
      'js/geoPosition.js',
      'http://maps.google.com/maps/api/js?sensor=false',
    ];
    public $depends = [
    ];
}
LocateAsset preloads the Google Maps API, the geoPosition library and our custom Locate.js code which is shown below:
function beginSearch() {
  $('#preSearch').hide();
  $('#searchArea').removeClass('hidden');
  //if (navigator.geolocation) { //navigator.
  if (geoPosition.init()) {
    geoPosition.getCurrentPosition(success, errorHandler, {timeout:5000});
  } else {
    error('Sorry, we are not able to use browser geolocation to find you.');
  }
}

function success(position) {
  $('#actionBar').removeClass('hidden');
  $('#autolocateAlert').addClass('hidden');
  var s = document.querySelector('#status');
  //var buttons = document.querySelector('#locate_actions');
  if (s.className == 'success') {
    // not sure why we're hitting this twice in FF, I think it's to do with a cached result coming back
    return;
  }

  s.innerHTML = "You are here:";
  s.className = 'success';

  var mapcanvas = document.createElement('div');
  mapcanvas.id = 'mapcanvas';
  mapcanvas.style.height = '300px';
  mapcanvas.style.width = '300px';
  mapcanvas.style.border = '1px solid black';

  document.querySelector('article').appendChild(mapcanvas);

  var latlng = new google.maps.LatLng(position.coords.latitude, position.coords.longitude);
  var myOptions = {
    zoom: 16,
    center: latlng,
    mapTypeControl: false,
    navigationControlOptions: {style: google.maps.NavigationControlStyle.SMALL},
    mapTypeId: google.maps.MapTypeId.ROADMAP
  };
  var map = new google.maps.Map(document.getElementById("mapcanvas"), myOptions);

  var marker = new google.maps.Marker({
      position: latlng,
      map: map,
      title:"You are here! (at least within a "+position.coords.accuracy+" meter radius)"
  });
  $('#locate_actionbar').removeClass('hidden');
  $('#place-lat').val(position.coords.latitude);
  $('#place-lng').val(position.coords.longitude);
}

function errorHandler(err) {
  var s = document.querySelector('#status');
  s.innerHTML = typeof msg == 'string' ? msg : "failed";
  s.className = 'fail';
  //if (err.code == 1) {} // user said no!
  document.location.href='/place/index?errorLocate';
}
Basically, geolocation is initiated when the user triggers beginSearch. The Geoposition code calls the success function when it returns with the user's location. We customize the success function to display a map at the location and to populate our hidden form fields with the latitude and longitude returned. When the user posts the form, the location coordinates will be available to our Web app.
Here's the code within Success() which populates the form fields with the location coordinates:
$('#place-lat').val(position.coords.latitude);
$('#place-lng').val(position.coords.longitude);
The rest of _formGeolocate.php is split into two equal halves. On the left side, we provide the form fields for the user to enter in with the Geolocation data and the hidden fields we need to support the JavaScript. On the right side, we leave space for a button to trigger Geolocation and for displaying the Map. The success() function fills the <article> tag with the map.
<div class="place-form">
  <?php $form = ActiveForm::begin(); ?>
<div class="col-md-6">

    <?= $form->field($model, 'name')->textInput(['maxlength' => 255]) ?>

    <?= $form->field($model, 'website')->textInput(['maxlength' => 255]) ?>

    <?= $form->field($model, 'place_type')
            ->dropDownList(
                $model->getPlaceTypeOptions(),
                ['prompt'=>'What type of place is this?']
            )->label('Type of Place') ?>

    <?= $form->field($model, 'notes')->textArea() ?>

    <?= BaseHtml::activeHiddenInput($model, 'lat'); ?>
    <?= BaseHtml::activeHiddenInput($model, 'lng'); ?>

    <div class="form-group">
        <?= Html::submitButton($model->isNewRecord ? 'Create' : 'Update', ['class' => $model->isNewRecord ? 'btn btn-success' : 'btn btn-primary']) ?>
    </div>

</div> <!-- end col 1 --><div class="col-md-6">
<div id="preSearch" class="center">
<p><br /></p>    <?= Html::a('Lookup Location', ['lookup'], ['class' => 'btn btn-success', 'onclick' => "javascript:beginSearch();return false;"]) ?>
</div>

  <div id="searchArea" class="hidden">
    <div id="autolocateAlert">
    </div> <!-- end autolocateAlert -->
    <p>Searching for your current location...<span id="status"></span></p>
    <article>
    </article>
    <div class="form-actions hidden" id="actionBar">
      </div> <!-- end action Bar-->
  </div>   <!-- end searchArea -->
  </div> <!-- end col 2 -->
      <?php ActiveForm::end(); ?>

  </div>
Here's what the form looks like initially:
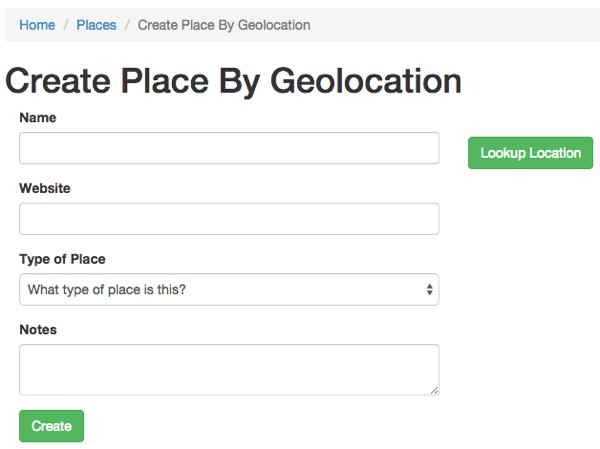
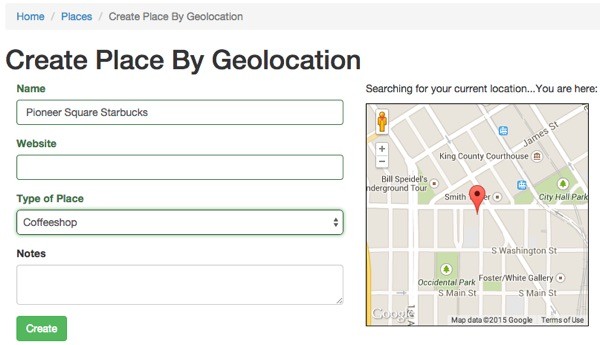
Click on the Lookup Location button to initiate geolocation. Again, look for a permissions request in the browser navigation bar.
Once your location is found, we'll show your location on a map:

Note: I've set the delay for Geolocation to five seconds, but sometimes you'll need to reload the page to get the correct response after granting permission. Certain WiFi locations are less determinate than others.
Let's take a look at the Meeting Controller form submit code:
     public function actionCreate_geo()
     {
         $model = new Place();
         if ($model->load(Yii::$app->request->post())) {
             if (Yii::$app->user->getIsGuest()) {
               $model->created_by = 1;
             } else {
               $model->created_by= Yii::$app->user->getId();
             }
             $form = Yii::$app->request->post();
             $model->save();
             // add GPS entry in PlaceGeometry
             $model->addGeometryByPoint($model,$form['Place']['lat'],$form['Place']['lng']);
             return $this->redirect(['view', 'id' => $model->id]);
For now, we're just putting in a placeholder for the created_by user and leaving error handling for later (sorry purists, that's not the focus of this tutorial at the moment).
When the form posts and a Place is created, we'll grab the geolocation point from the form (those hidden fields filled by the Locate.js script) and add a row to the related Place table PlaceGPS.
As I mentioned in part two, we separate the geolocation data in a different table because the MySQL InnoDB engine doesn't support spatial indexes. This will also improve the performance of queries to find the closest meeting places between two users.
Here's the addGeometryByPoint method in the Place.php model:
 public function addGeometryByPoint($model,$lat,$lon) {
         $pg = new PlaceGPS;
         $pg->place_id=$model->id;
         $pg->gps = new \yii\db\Expression("GeomFromText('Point(".$lat." ".$lon.")')");
         $pg->save();
     }
Here's what the Place Index page should look like after the record is saved:

If you'd like to see another implementation of HTML5 Geolocation for Yii 1.x, check out How to Use Zillow Neighborhood Maps and HTML5 Geolocation.
Displaying Places on Google Maps
If you click the view command icon associated with our new place in the index view above, you'll see this:
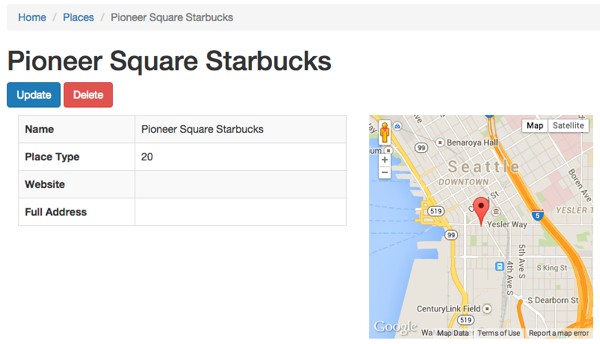
We've customized the Gii-generated view page and added code to draw the Google Map using the Yii2 Google Maps extension.
Here's the View action in PlaceController.php:
    /**
     * Displays a single Place model.
     * @param integer $id
     * @return mixed
     */
    public function actionView($id)
    {
        $model = $this->findModel($id);
        $gps = $model->getLocation($id);
        return $this->render('view', [
            'model' => $model,
            'gps'=> $gps,
        ]);
    }
Here's the getLocation method in the Place.php model. It fetches the location coordinates from the PlaceGPS table:
public function getLocation($place_id) {
      $sql = 'Select AsText(gps) as gps from {{%place_gps}} where place_id = '.$place_id;
      $model = PlaceGPS::findBySql($sql)->one();
      $gps = new \stdClass;
      if (is_null($model)) {
        return false;
      } else {
        list($gps->lat, $gps->lng) = $this->string_to_lat_lon($model->gps);
      }
      return $gps;
    }
Here's a portion of the view file which renders the page. The left side consists of a standard Yii2 DetailView widget for now. The right side generates the code which draws the map:
<div class="col-md-6">
<div class="place-view">

    <?= DetailView::widget([
        'model' => $model,
        'attributes' => [
            'name',
            'place_type',
            'website',
            'full_address',
        ],
    ]) ?>

</div>
</div> <!-- end first col -->
<div class="col-md-6">
  <?
  if ($gps!==false) {
    $coord = new LatLng(['lat' => $gps->lat, 'lng' => $gps->lng]);
    $map = new Map([
        'center' => $coord,
        'zoom' => 14,
        'width'=>300,
        'height'=>300,
    ]);
    $marker = new Marker([
        'position' => $coord,
        'title' => $model->name,
    ]);
    // Add marker to the map
    $map->addOverlay($marker);
    echo $map->display();
  } else {
    echo 'No location coordinates for this place could be found.';
  }
  ?>

</div> <!-- end second col -->
Adding From the Google Places API
The Google Places autocomplete feature is an incredibly fast and simple way for users to add meeting places. I'm using the Yii2 Google Places extension by 2amigOS.
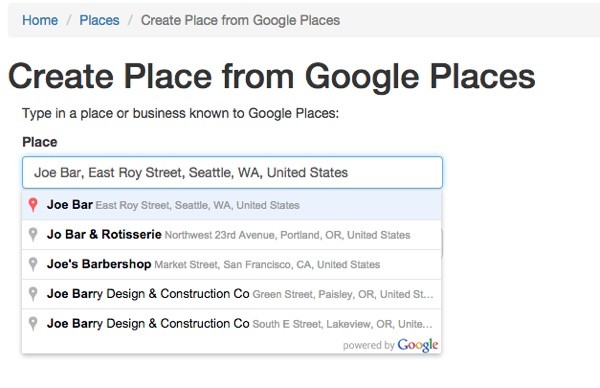
In PlaceController.php, we'll add an action for Create_place_google:
/**
    * Creates a new Place model from Google Place
    * If creation is successful, the browser will be redirected to the 'view' page.
    * @return mixed
    */
   public function actionCreate_place_google()
   {
     $model = new Place();
     if ($model->load(Yii::$app->request->post())) {
    	... to be explained further below...
     } else {
         return $this->render('create_place_google', [
             'model' => $model,
         ]);
     }
   }
The /frontend/views/place/create_place_google.php file will display the form and initialize the JavaScript needed to support autocomplete:
<div class="place-create">

    <h1><?= Html::encode($this->title) ?></h1>
    <?= $this->render('_formPlaceGoogle', [
        'model' => $model,
    ]) ?>

</div>

<?

  $gpJsLink= 'http://maps.googleapis.com/maps/api/js?' . http_build_query(array(
                          'libraries' => 'places',
                          'sensor' => 'false',
                  ));
  echo $this->registerJsFile($gpJsLink);

  $options = '{"types":["establishment"],"componentRestrictions":{"country":"us"}}';
  echo $this->registerJs("(function(){
        var input = document.getElementById('place-searchbox');
        var options = $options;
        searchbox = new google.maps.places.Autocomplete(input, options);
        setupListeners();
})();" , \yii\web\View::POS_END );
// 'setupBounds('.$bound_bl.','.$bound_tr.');
?>
Developer Petra Barus provided a Google Places extension for Yii1.x. For this tutorial, I hand coded the basic support for Yii2. However, Barus was kind enough to release a Yii2 extension just a few days afterwards. I haven't yet integrated his code. Here's his latest Yii2 Google Places Autocomplete extension.
Here's the MapAsset bundle I'm creating for the associated JavaScript that will be needed:
<?php

namespace frontend\assets;

use yii\web\AssetBundle;

class MapAsset extends AssetBundle
{
    public $basePath = '@webroot';
    public $baseUrl = '@web';
    public $css = [
    ];
    public $js = [
      'js/create_place.js',
    ];
    public $depends = [
    ];
}
Here's the _formPlaceGoogle.php form code:
<?php

use yii\helpers\Html;
use yii\helpers\BaseHtml;
use yii\widgets\ActiveForm;

use frontend\assets\MapAsset;
MapAsset::register($this);

/* @var $this yii\web\View */
/* @var $model frontend\models\Place */
/* @var $form yii\widgets\ActiveForm */
?>
<div class="col-md-6">

<div class="placegoogle-form">
  <p>Type in a place or business known to Google Places:</p>

    <?php $form = ActiveForm::begin(); ?>
    <?= $form->field($model, 'searchbox')->textInput(['maxlength' => 255])->label('Place') ?>

    <?= BaseHtml::activeHiddenInput($model, 'name'); ?>
    <?= BaseHtml::activeHiddenInput($model, 'google_place_id'); ?>
    <?= BaseHtml::activeHiddenInput($model, 'location'); ?>
    <?= BaseHtml::activeHiddenInput($model, 'website'); ?>
    <?= BaseHtml::activeHiddenInput($model, 'vicinity'); ?>
    <?= BaseHtml::activeHiddenInput($model, 'full_address'); ?>

    <?= $form->field($model, 'place_type')
            ->dropDownList(
                $model->getPlaceTypeOptions(),
                ['prompt'=>'What type of place is this?']
            )->label('Type of Place') ?>

    <div class="form-group">
        <?= Html::submitButton($model->isNewRecord ? 'Create' : 'Update', ['class' => $model->isNewRecord ? 'btn btn-success' : 'btn btn-primary']) ?>
    </div>

    <?php ActiveForm::end(); ?>

</div>
</div> <!-- end col1 -->
<div class="col-md-6">
<div id="map-canvas">
  <article></article>
</div>
</div> <!-- end col2 -->
There is a searchbox field which will accept the user's autocompletion input. There are also a variety of hidden fields which our JavaScript will load with the results from the Google Places service.
Here is the create_place.js which accomplishes all the "magic":
function setupListeners() {
//  google.maps.event.addDomListener(window, 'load', initialize);
    // searchbox is the var for the google places object created on the page
    google.maps.event.addListener(searchbox, 'place_changed', function() {
      var place = searchbox.getPlace();
      if (!place.geometry) {
        // Inform the user that a place was not found and return.
        return;
      }  else {
        // migrates JSON data from Google to hidden form fields
        populateResult(place);
      }
  });
}

function populateResult(place) {
  // moves JSON data retrieve from Google to hidden form fields
  // so Yii2 can post the data
  $('#place-location').val(JSON.stringify(place['geometry']['location']));
  $('#place-google_place_id').val(place['place_id']);
  $('#place-full_address').val(place['formatted_address']);
  $('#place-website').val(place['website']);
  $('#place-vicinity').val(place['vicinity']);
  $('#place-name').val(place['name']);
  loadMap(place['geometry']['location'],place['name']);
}

function loadMap(gps,name) {
  var mapcanvas = document.createElement('div');
  mapcanvas.id = 'mapcanvas';
  mapcanvas.style.height = '300px';
  mapcanvas.style.width = '300px';
  mapcanvas.style.border = '1px solid black';

  document.querySelector('article').appendChild(mapcanvas);

  var latlng = new google.maps.LatLng(gps['k'], gps['D']);
  var myOptions = {
    zoom: 16,
    center: latlng,
    mapTypeControl: false,
    navigationControlOptions: {style: google.maps.NavigationControlStyle.SMALL},
    mapTypeId: google.maps.MapTypeId.ROADMAP
  };
  var map = new google.maps.Map(document.getElementById("mapcanvas"), myOptions);

  var marker = new google.maps.Marker({
      position: latlng,
      map: map,
      title:name
  });
}
The setupListeners() method links our searchbox field to the Google Places autocomplete service. When a place_changed event occurs, populateResult() is called to fill the hidden fields on the form with data from Google and load the map which is displayed in the right half of the form.
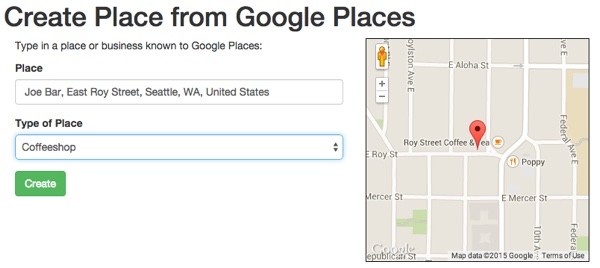
You can use the browser debugger to inspect the hidden fields after they've been filled in with form data via JavaScript. This data will be posted with the form on submission so we can add them to the Place database.

Here's the remaining element of the PlaceController Create_place_google save action:
     public function actionCreate_place_google()
     {
       $model = new Place();
       if ($model->load(Yii::$app->request->post())) {
           if (Yii::$app->user->getIsGuest()) {
             $model->created_by = 1;
           } else {
             $model->created_by= Yii::$app->user->getId();
           }
           $form = Yii::$app->request->post();
           $model->save();
           // add GPS entry in PlaceGeometry
           $model->addGeometry($model,$form['Place']['location']);
           return $this->redirect(['view', 'id' => $model->id]);
It's quite similar to the Create_geo action. We have a separate Place.php model method to simplify the location data collection. Here's addGeometry():
public function addGeometry($model,$location) {
        	$x = json_decode($location,true);
    		reset($x);
    		$lat = current($x);
    		$lon = next($x);
        $pg = new PlaceGPS;
        $pg->place_id=$model->id;
        $pg->gps = new \yii\db\Expression("GeomFromText('Point(".$lat." ".$lon.")')");
        $pg->save();
    }
Setting Geographic Boundary Filters for Autocomplete Search
The Places Autocomplete service also allows you to setup a geographic bounding rectangle to filter your search within. When the user begins to type, the autocomplete will only use places within ten miles of them. Since we haven't set up the user's current location as a session variable, I'm not implementing the bounding rectangle at the moment. But we can do this later. Here's an example of setupBounds():
function setupBounds(pt1, pt2, pt3, pt4) {
    defaultBounds = new google.maps.LatLngBounds(
    new google.maps.LatLng(pt1, pt2),
    new google.maps.LatLng(pt3, pt4));
    searchbox.setBounds(defaultBounds);
}
Manually Adding Places
The third way users can add places is by manually providing details and address information. When they submit the form, we'll try to look up the address and obtain the geolocation data, but it's okay if we can't find that. The manual approach will allow users to add places such as their house or an office which they may not want to associate with Google mapping data.
Here's what the form looks like:
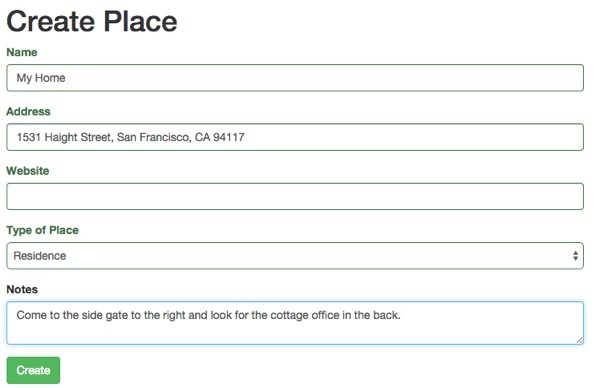
Here's what the PlaceController.php submission action code looks like. We're using the 2Amigos Maps Geocoding client to look up the location from full_address. There are obviously a lot of improvements we can make to encourage the user to enter in the full address or perhaps lets them connect a Google Places location at a later date.
$model = new Place();
        if ($model->load(Yii::$app->request->post())) {
    		$form = Yii::$app->request->post();
            if (Yii::$app->user->getIsGuest()) {
              $model->created_by = 1;
            } else {
              $model->created_by= Yii::$app->user->getId();
            }
            $model->save();
            $gc = new GeocodingClient();
            $result = $gc->lookup(array('address'=>$form['Place']['full_address'],'components'=>1));
			$location = $result['results'][0]['geometry']['location'];
            if (!is_null($location)) {
				$lat = $location['lat'];
				$lng = $location['lng'];
				var_dump($lat);
				var_dump($lng);
             // add GPS entry in PlaceGeometry
             $model->addGeometryByPoint($model,$lat,$lng);
			}
            return $this->redirect(['view', 'id' => $model->id]);
        }
What's Next?
The scope of this tutorial proved quite large. I wanted to show you various components involved in geolocation and map usage without skipping over too many elements of the coding process. So, obviously, there are a lot of shortcuts at the moment. In the next tutorial, we'll continue to refine Places within the overall system, focusing on user permissions, access controls, adding support for the user's favorite places, and other refinements.
Please feel free to post your questions and comments below. I'm especially interested if you have different approaches or additional ideas, or want to suggest topics for future tutorials. You can also reach me on Twitter @reifman or email me directly. Follow my Tuts+ instructor page to see future articles in this series.


Comments