The second tutorial in this three-part series started with "Game Geometry", which was focused on the underlying geometric aspects of the game, and also began demonstrating the steps necessary to build the game in the ShiVa Editor. This final tutorial installment will continue where the prior ShiVa Editor steps left off. It will then demonstrate how to export the game to the iOS or Android platforms.
Also Available in This Series:
This tutorial will continue the discussion started in the previous section entitled "Developing Puzzle with the ShiVa Editor". Here, we will describe importing the HUD components and making the final adjustments on the game progress so far. Then, we will conclude the "Developing Puzzle with the ShiVa Editor" section via a unit test. In the "Authoring Tool" section, we will show how to use the ShiVa Authoring Tool to convert the Puzzle into two different applications, one for Android OS and one for iPad. We will wrap up the series in the section titled "Conclusions".
Step-By-Step Instructions Continued
Import the HUD
Now, we will import the HUD components including fonts, buttons, labels, etc. Proceed to your local directory where you have stored the download archive accompanying this article. Select PuzzleHUD.ste and press Import. When the import is completed, you should see Bell_Gothic_Std_Light and Arial_Unicode_MS in Data Explorer under Puzzle - Resources - Fonts.
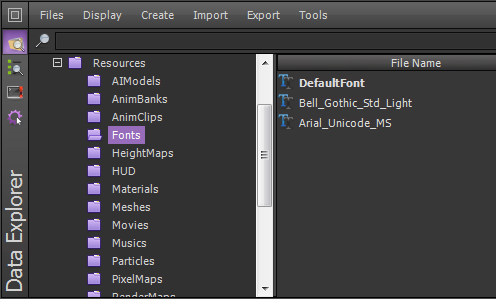
Also, in Data Explorer under Puzzle - Resources - Textures, you will see the textures named Bell_Gothic_Std_Light and Arial_Unicode_MS.
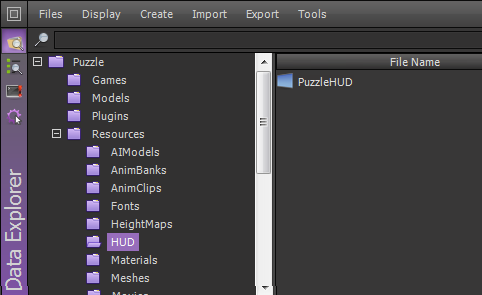
At the same time, you should be seeing the HUD components imported via PuzzleHUD.ste. First, under Puzzle - Resources - HUD, observe that you have PuzzleHUD.
Second, bring up the HUD Editor and the Data Explorer side-by-side. In Data Explorer, double click on PuzzleHUD, which is under Puzzle - Resources - HUD. In the HUD Editor, you will be seeing the following.
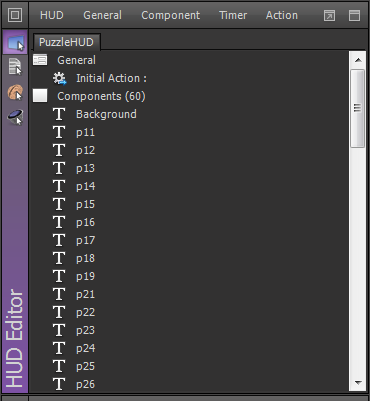
If you scroll down in the HUD Editor, it should look like this:
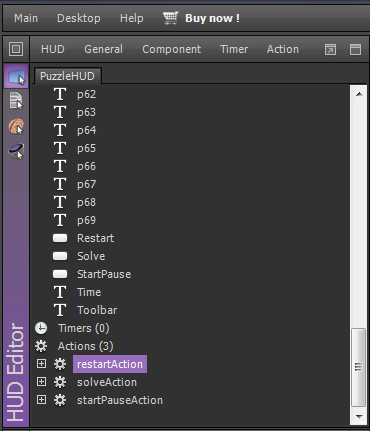
A brief explanation of the HUD components is given below. For more details, see the section "Head-Up Display" in the second tutorial of this series.
-
Background,TimeandToolbarare the labels for background color, timer, and toolbar. -
p11throughp69are the labels representing the puzzle pieces. -
Restart,SolveandStartPauseare the buttons with labels "New", "Solve" and "Start" (or "Pause", depending on state), respectively. -
restartAction,solveActionandstartPauseActionare the actions triggered upon pressingRestart,SolveandStartPause, respectively. - Although we have focused on tablets, the ShiVa3D Suite can be used for developing games for devices with a smaller screen size as well, such as Android phones, iPod touch devices, and the iPhone. For Android phones with an OS version 2.2 or above, the process described for the Authoring Tool would apply without any changes. For the iPod touch and iPhone, choose iPhone instead of iPad when you start the Authoring Tool. The Puzzle game is more suited to tablets because the puzzle pieces appear too small making it difficult to play the game in phones.
- While authoring the game for the Android platform via the Authoring Tool, we set the Authoring type as an APK Package in Step 2. Instead, if we had set the Authoring type as Project, the tool would generate an Eclipse project for further customization. For example, in Step 1 of the Authoring Tool, the allowed dimensions for the Android launch icon and splash screen images are 48x48 pixels and 480x800 pixels, respectively. By creating an Eclipse project, one could replace those images with ones better suited for tablets. In the Eclipse project created by the Authoring Tool, those images files can be found in
resandres/drawablefolders. - The Puzzle can be enhanced in several different ways. For example, instead of a single image with 6x9=54 pieces, include different images with varying number of puzzle pieces (e.g. one with low difficulty consisting of 4x5=20 pieces and another one with medium difficulty consisting of 5x7=35 pieces). Add an initial screen to let the user choose which image (and thus the difficulty level) they want to play.
- Recall that you can download entire ShiVa3D Suite freely and develop games for self-learning. However, the free edition is not licensed for commercial purposes and will contain water marks.
Perform Adjustments
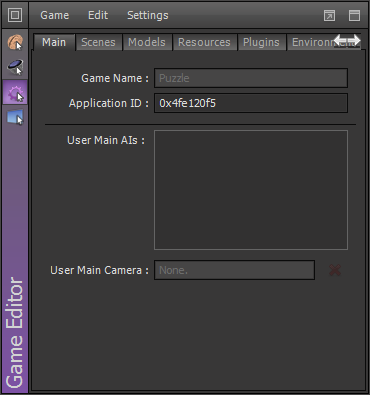
Having imported all the needed resources, we will now perform some adjustments. Bring up Game Editor and Data Explorer side-by-side. In Data Explorer, under Puzzle - Games, double click Puzzle. The Game Editor should now have the Puzzle game loaded. Notice that the User's Main AIs section is empty under Main tab.
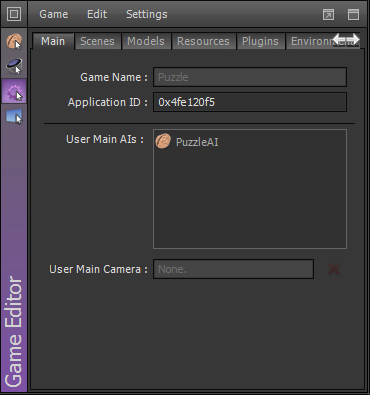
In the Data Explorer, under Puzzle - Resources - AIModels, select PuzzleAI. Drag-and-Drop it to the "User Main AIs" section in the Game Editor, under the Main tab. The User Main AIs section now has PuzzleAI listed.
In the Game Editor, click on the Resources tab. It will look empty. In Data Explorer, under Puzzle - Resources - HUD, select PuzzleHUD and then drag-and-drop it in the Resources section in Game Editor. Similarly, in Data Explorer, under Puzzle - Resources - SoundBanks, select PuzzleSoundBank and drag-and-drop it in the Resources section. The resources tab should look like this.

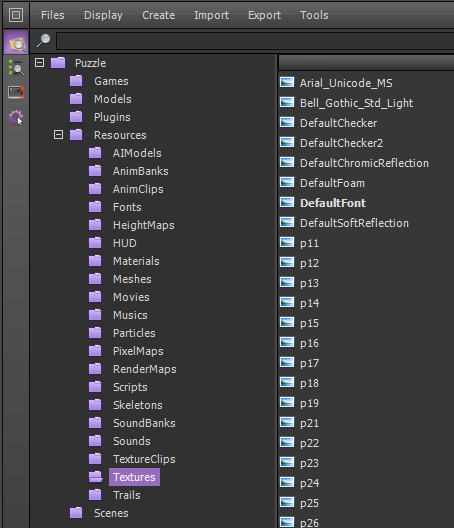
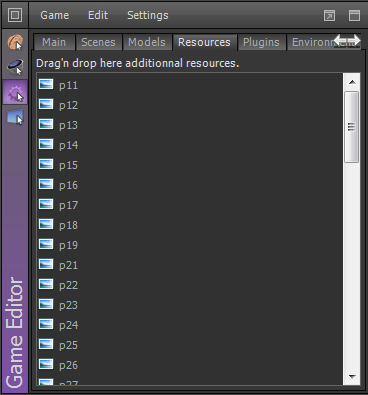
In Data Explorer, under Puzzle - Resources - Textures, select textures p11 through p69 and drag-and-drop them in the Resources section in Game Editor. The resources tab should look like this.
Perform Unit Testing
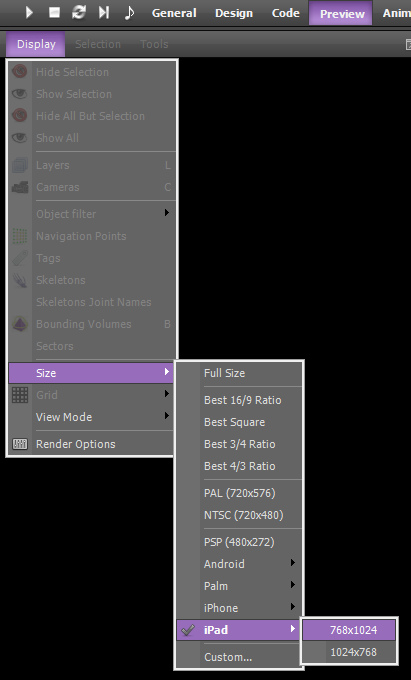
We are now all set. In order to test our game, click on the Preview button in the ShiVa Editor toolbar. From the menu, select Display > Size > iPad > 768x1024.
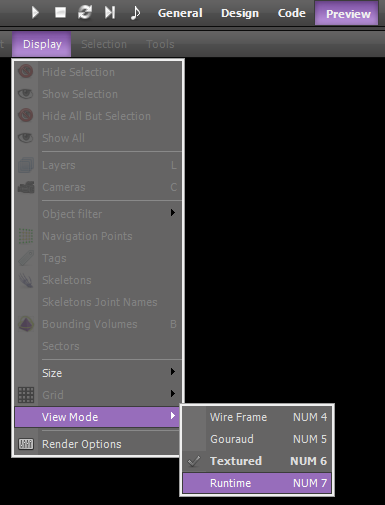
Also, from the menu select Display > View Mode > Runtime.
Now, in the menu, press Play. You should see the game starting.
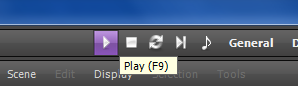
Now, you can play the game using mouse-clicks emulating touch events on the screen.
Exporting The Game For Authoring
In this section, we will discuss how to export the game from the ShiVa Editor for importing into the ShiVa Authoring Tool.
Exporting for Android OS
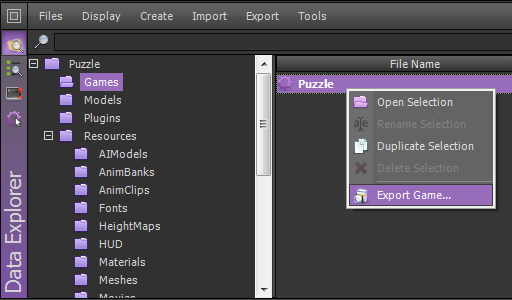
In the Data Explorer, from Puzzle - Resources - Game, select Puzzle and from right click menu select Export Game.
For the "Export name" field, type Puzzle. Choose a local folder to generate the export file (e.g. C:\exports\). Make sure you also select "Runtime Package (.stk)" and Android.
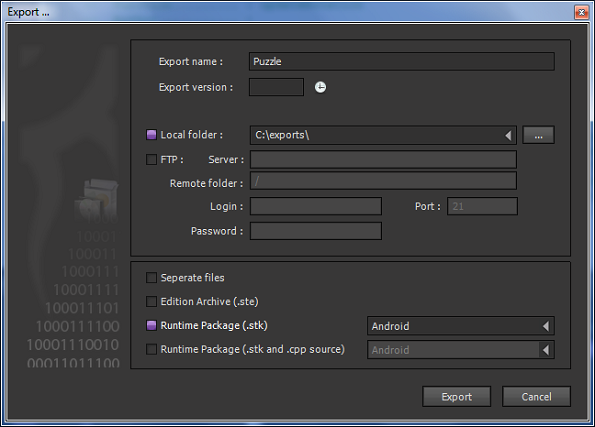
Finally, press Export. If you are exporting an archive for the first time from a project, it may take several minutes to complete. When the export has completed, you can press OK to dismiss the dialog.

Exporting for iOS
Exporting for iOS is very similar. In Data Explorer, from Puzzle - Resources - Game, select Puzzle and from the right click menu, select Export Game. For the "Export name" field, type Puzzle. Choose a local folder to generate the export file (e.g. C:\exports\). Make sure you also select "Runtime Package (.stk)" and iOS (Note: If you intend to use the same folder and export file names for Android OS and iOS exports, make sure that those exports do not overwrite each other.).
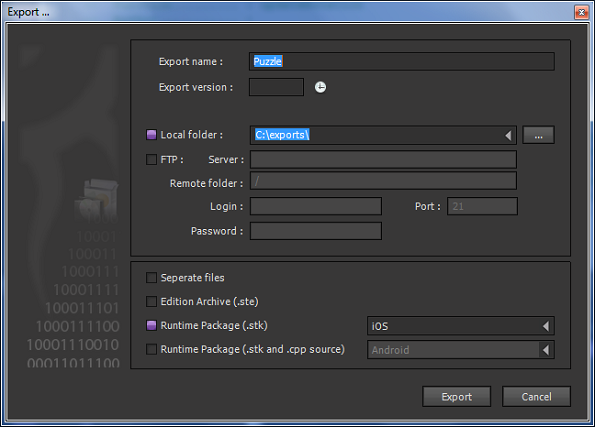
Finally, press Export. When the export has been completed, you can press OK to dismiss the dialog.
Additional Information
Due to space considerations, we do not provide an explicit code review for the Puzzle application. All the functions and handlers that come as part of PuzzleAI.ste have detailed comments to describe their particular functionality. The interested reader is referred to those scripts for further details of the code.
Authoring Tool
We have developed the Puzzle game without writing any code specific to iOS or Android platforms. We will now use the ShiVa Authoring tool to convert the Puzzle into two different applications, one for Android OS and one for iPad.
Pre-requisite Files From Download Archive
In order to follow the instructions below you will need ios-icon-72-72.png, ios-splash-768-1024.png, android-icon-48-48.png and android-splash-480-800.png that are part of the download archive accompanying this article.
Android Platform
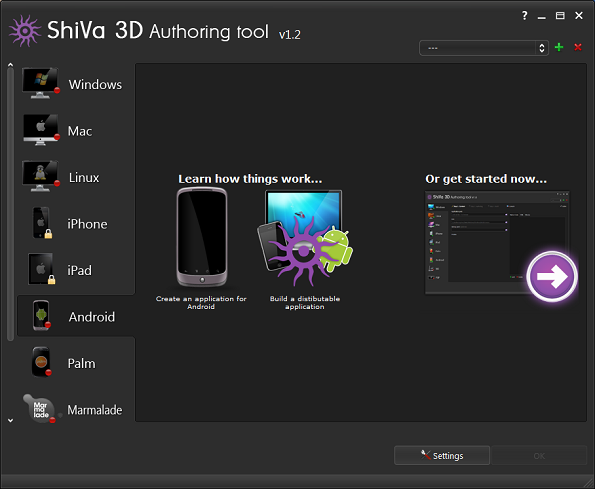
Bring up the ShiVa Authoring Tool. Select Android tab. Press on the arrow under 'Or get started now...'.
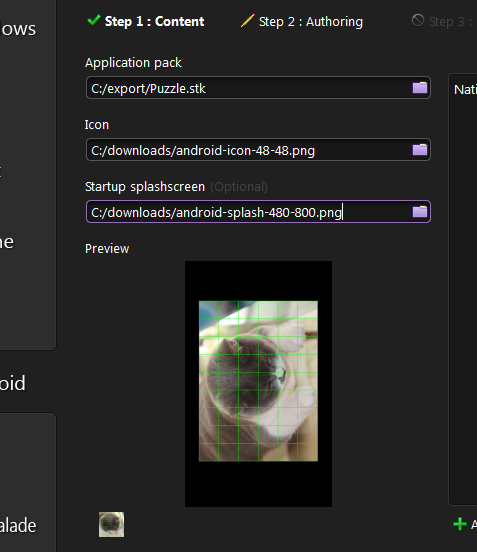
Step 1 of the Authoring Tool is displayed. For "Application pack", select from your file system the Puzzle.stk file exported from the ShiVa Editor for Android. For "Icon", select the android-icon-48-48.png, which is part of the source archive accompanying this article. For "Startup splashscreen", select the android-splash-480-800.png which is also part of the source archive accompanying this article. Observe that the ShiVa Authoring Tool displays a preview of the image files specified in "Icon" and "Startup splashscreen" selections. Press "Step 2: Authoring" atop the screen.
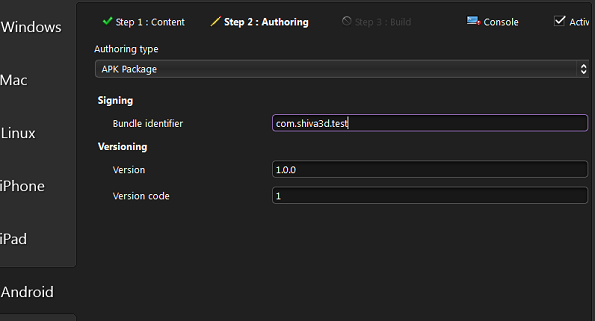
Step 2 of the Authoring Tool is displayed. Here, we will create an Android executable file that can be directly installed in an Android device. Select "Authoring type" as "APK Package" (if you want an Eclipse project to be created instead of an executable, select "Project" instead. The Project option has not been tested in this article). For "Bundle identifier", enter com.shiva3d.test. Let "Version" and "Version code" be 1.0.0 and 1, respectively. Press on "Step 3: Build" atop the screen.
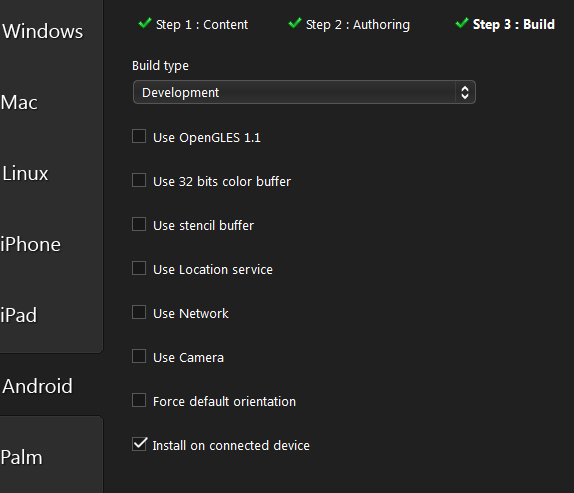
Step 3 of the Authoring Tool is displayed. Select "Build type" as "Development". Since I would like to install the Puzzle into my Android device as part of the build, I've checked the "Install on connected device" checkbox.
For that option to work, you must have completed the steps in "Prepare The Android Device for Installation" below. If the "Install on connected device" checkbox is not checked, the Authoring Tool will create the Android executable for the Puzzle application in "Output folder", which can be installed later on using the ADB tool in Android.
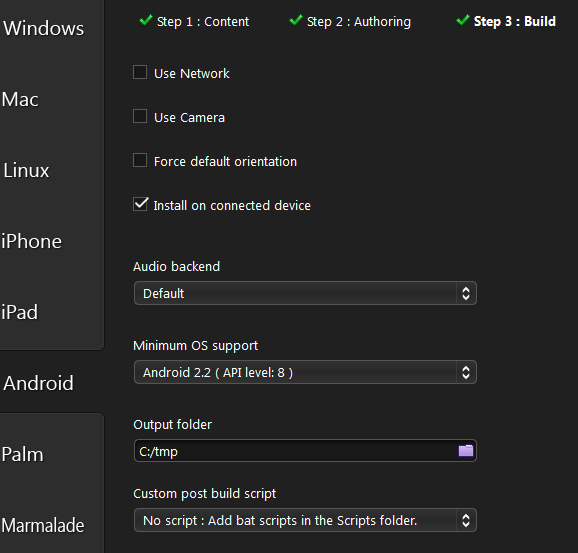
Leave "Audio backend" set to "Default". Select "Minimum OS support" as "Android 2.2 (API level: 8)". Define an output folder for the Authoring Tool to store the files it generates during the build process. Let the "Custom post build script" selection remain as the "No script" option. Press the Build button.
It will take a while to complete the build. Once the build is completed, you will see a confirmation in the console stating that the build completed successfully.
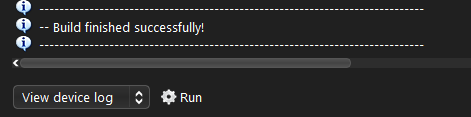
If you have selected the "Install on a connected device" option, at this point the Puzzle application has been installed on the connected device. Regardless of whether that option has been checked or not, an Android executable called Puzzle-debug.apk has been created in the output folder you have defined in Step 3.
iPad Platform
Bring up the ShiVa Authoring Tool. Select the iPad tab. Press on the arrow under "Or get started now...".

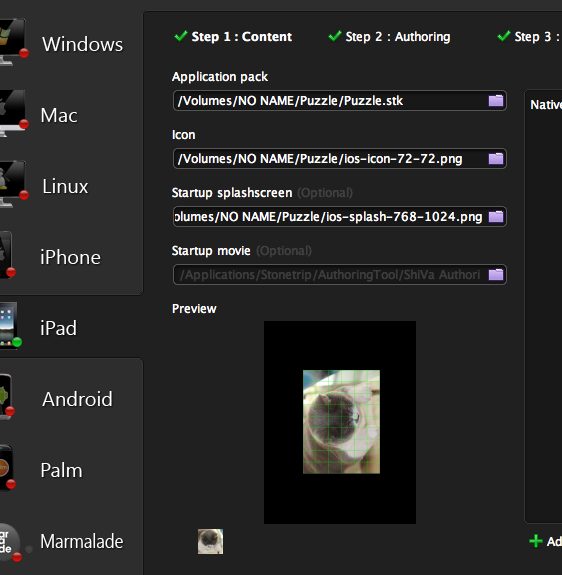
Step 1 of the Authoring Tool is displayed. For the Application pack, select from your file system the Puuzle.stk file exported from ShiVa Editor for iOS. For Icon, select the ios-icon-72-72.png which is part of the source archive accompanying this tutorial. For Startup splashscreen, select the ios-splash-768-1024.png which is also part of the source archive accompanying this tutorial. Press Step 2: Authoring atop the screen.
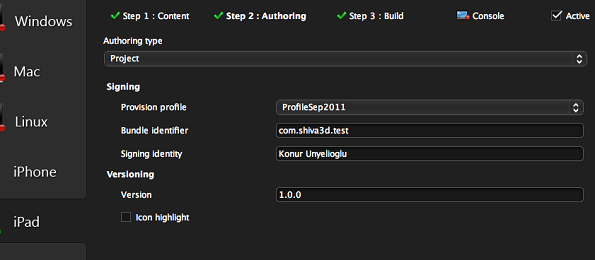
Step 2 of the Authoring Tool is displayed. Here, we will create an Xcode project that can be used for building and installing the application on your iPad device. Select Authoring type as Project. For Bundle identifier, enter com.shiva3d.test. For Provision profile provide the development provisioning profile from Apple Provisioning Portal. For Signing identity provide the developer (or organization) name in the keychain associated with the certificate in your Mac OS development machine. Let Version be 1.0.0. Press on Step 3: Build atop the screen.
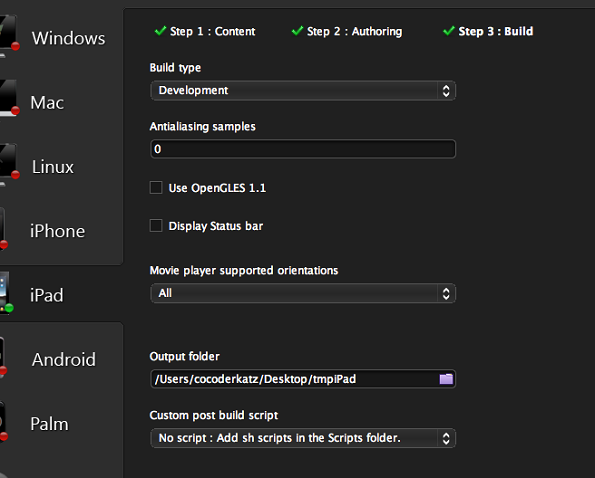
Step 3 of the Authoring Tool is displayed. Select Development as the Build type. Provide an output folder for the Authoring Tool to create an xCode project folder. For example, we define the output folder to be /Users/cocoderkatz/Desktop/tmpiPad. Then, the Authoring Tool will create a folder named /Users/cocoderkatz/Desktop/tmpiPad/Puzzle_iPad.s3dxproj and copy the Xcode project files/folders under that folder. Do not change other options. Press the Build button.
Once the build is completed, you will see a message in the console that the Authoring tool has created an Xcode project folder and copied the related files in that folder. Now, you can use Xcode to build and run the Puzzle game in an iPad device as you would normally do with other Xcode projects.

Conclusions
In this article, we discussed cross-platform game development for Android tablets and iPad using the ShiVa3D Suite. Although mainly for 3D game development, the ShiVa3D Suite can be used for creating 2D games as well. The sample application studied in this tutorial is a 2D game that is built using HUD (Head Up Display) elements of ShiVa3D.

Comments