Ok, so your site is up and running and you're probably starting to get itchy to make some changes, and not just changes to the content, right?
You may well be wanting to change some elements of what your theme actually looks like, and maybe even change how it behaves. So, as we keep moving through these tutorials we're heading towards being able to better customise your theme and we'll actually be getting more into what goes into theme tweaking and development. However, before we go there we've a couple of last things to do to finish off the site set up then we'll set up so you can begin to make some code changes.
What we'll cover today:
Final Site Set Up Tweaks
- Turning off comments on pages
- Setting up the menus
Preparing for Theme Editing by Creating a Child Theme
A quick look at what makes your theme:
- Using a text editor to edit theme templates/files
- Child themes - why we use them
- Child themes - how to make one and activate it on your site
You'll need:
- An understanding of HTML and CSS (if you are an absolute beginner on that front you could start here with Tuts+ Premium's free course: 30 Days to Learn HTML & CSS)
- Your working WordPress installation
- FTP client
- Text editing software
- Web browser
Final Site Editing Tweaks
Ok, just quickly, before we get into the beginnings of tweaking your theme, let's finish off those last couple of site settings, starting with turning off comments on pages.
Turning Comments Off on Pages
By default the discussion settings for WordPress allow for commenting on your site and adds the comments field both to Posts and Pages. More often than not, when I'm in a training class people will ask to turn comments on pages off. You can do that in one of two ways.
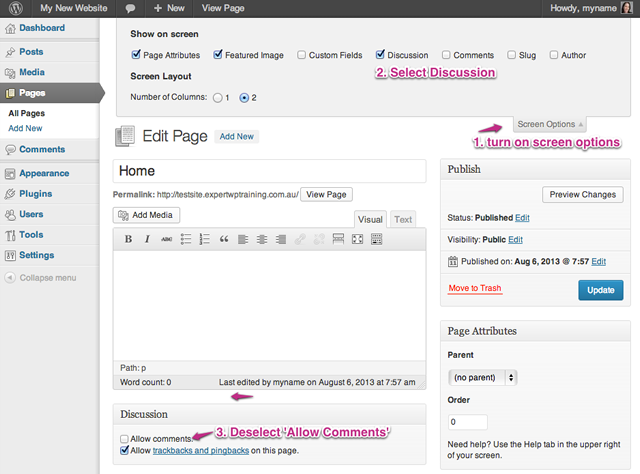
The first way to turn off discussion/commenting is on a page by page basis, so go to Edit Page and hit the Screen Options button in the top right of the page.
Select the Discussion checkbox. This makes the Discussion options panel show up in your page editor.
Now, underneath the content editor box you'll now see the Discussion options… go ahead and deselect the Allow Comments checkbox, then update your page. Job done!
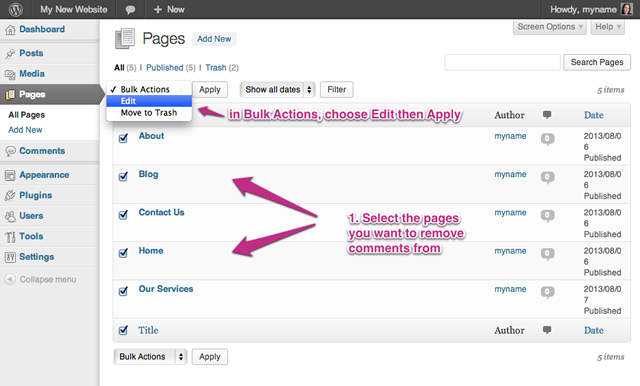
Alternatively, you may want to save some time and turn off comments on more than one page at a time… so head over to the All Pages listing and select the pages on which you want to remove comments.
Then go up to the Bulk Actions drop down and choose Edit and hit the Apply button.
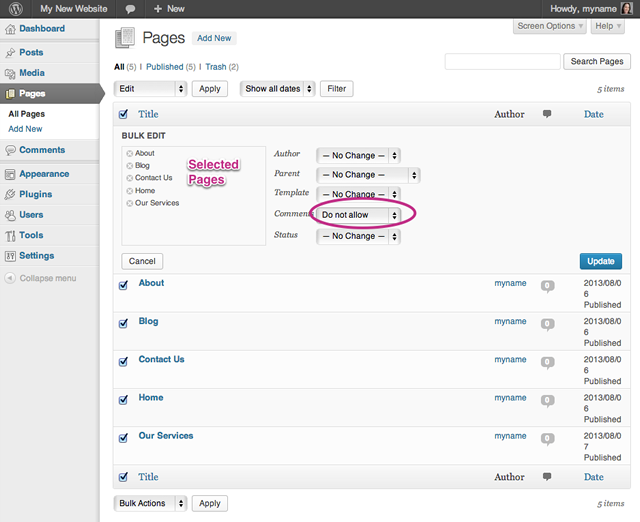
This will bring up the Bulk Edit panel. On the left of that panel will be the listing of pages you're editing, if there's one there you don't want to edit, hit the 'x' next to it to remove it from the listing.
On the right are the elements available for bulk editing pages. Predictably, one is comments so change that select item to 'Do Not Allow' and then hit Update. Job done, again!
Setting Up Our Menu
Navigate to Appearance » Menus in the sidebar.
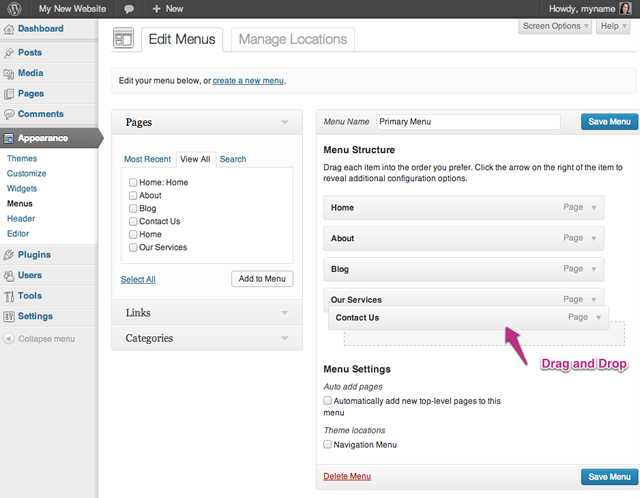
This is the area in which you can set just how the navigation of your site is structured - you will be able to see a couple of main areas; the column on the left in which you select your menu items, and the panel on the right where you structure the menu.
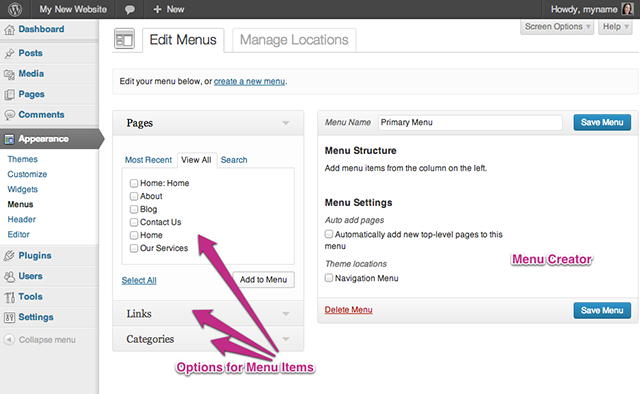
1. Create your menu, and you'l see above that we've created a menu, in this case called Primary Menu.
(In the above example I've chosen the View All tab so that I can see all the pages I have to choose from.)
2. Select the pages in the left hand panel list that you want to add to your menu and hit the Add to Menu button.
3. You'll now see the menu items listed in your menu structure that you may drag and drop into your desired order.
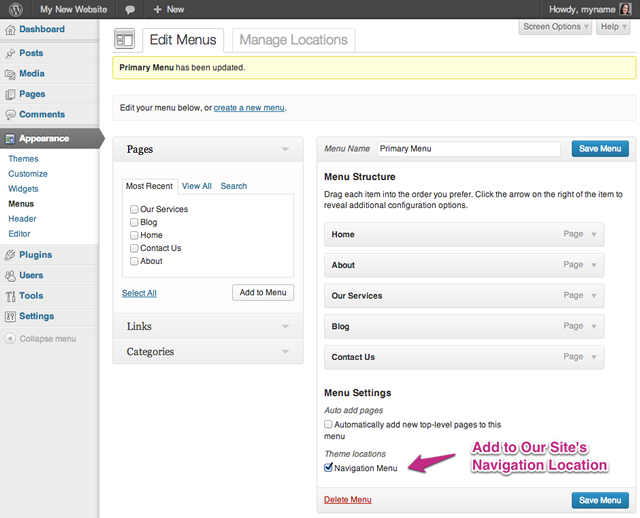
4. Add the menu to your Navigation Menu. This will put our listing in the place that the theme developer has chosen for the main navigation. Actually, the options appearing on the menu locations are theme specific. Our current theme, Twenty Thirteen, offers one menu location called Navigation Menu, the options available here may differ according to your theme. Select that check box and hit Save Menu.
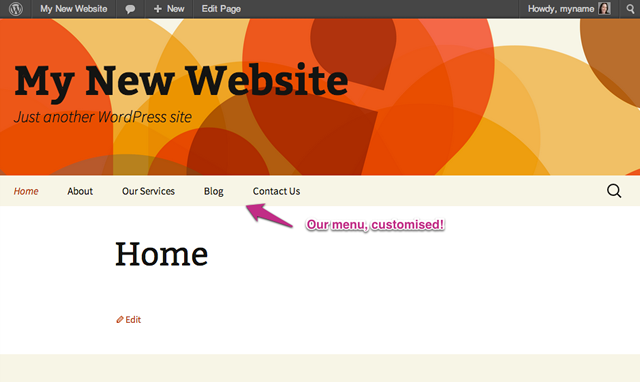
5. Navigate to the front of your site to see your new menu in action.
OK, that's enough of the basic site set up… now let's roll up our sleeves to start really getting ready for some customisation.
Preparing for Theme Customisation - Setting Up a Child Theme
First grab yourself some text editing software. There are a bunch of free text editors out there which at their most basic could include Notepad on Windows or Text Edit on Mac (make sure you change the Text Edit preferences to Plain Text if you're using this), but the thing with these editors is that they're not really made for developers. Developer-specific text editors give you the added benefit of line numbers and syntax highlighting (colour coding) which make the whole process a lot less complicated.
For this exercise I suggest getting a developer text editor, and to make it easy, I suggest going with one of the free editors out there, here are a couple of suggestions:
- Mac - Text Wrangler
- PC - Notepad++ or Programmer's Notepad
- Linux - Kate appears to be popular (the editor, not your friend Kate, though she seems very nice)
(I'm using Text Wrangler in all these examples. The layout will be different in other editors, but you should find the essentials are the same.)
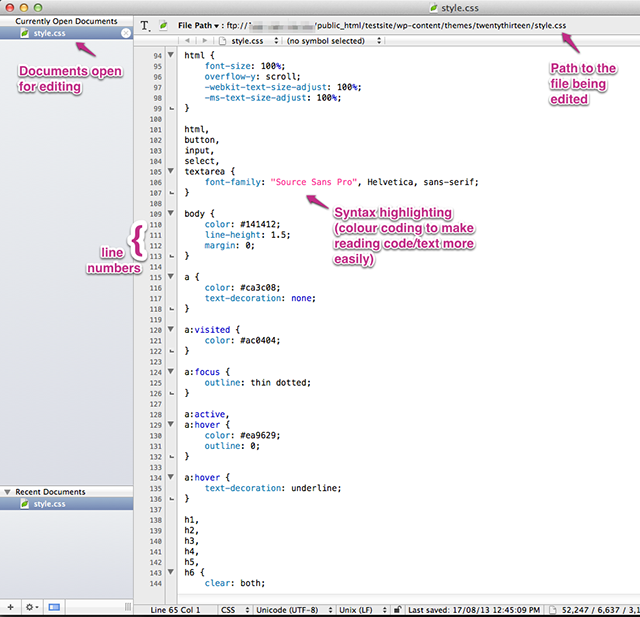
Here's a quick rundown of what you'll see when you're looking at a CSS file in Text Wrangler.
- A list of the open documents, so you can navigate through the files you're wanting to edit
- Line numbers to help you find your way through your file (particularly useful if you see errors that refer to a line of code)
- Syntax highlighting which gives you coloured text according to that part of the code's function in that file
Once you've got that set up we'll get into the bulk of our tutorial, we'll come back to the text editor shortly.
Looking at Your Theme Files
The WordPress install we're currently using by default uses the Twenty Thirteen theme, a collection of PHP templates, CSS, Javascript and image files that all work together to make your site look the way it does. Let's have a quick look at where to find those theme files, because changing the look and feel of your theme requires editing some of these files.
Crank up your FTP client (remember Filezilla? We set that up in Part 3 - Installing WordPress Manually) and open up a connection to your website and in the remote pane navigate to the wp-content directory.
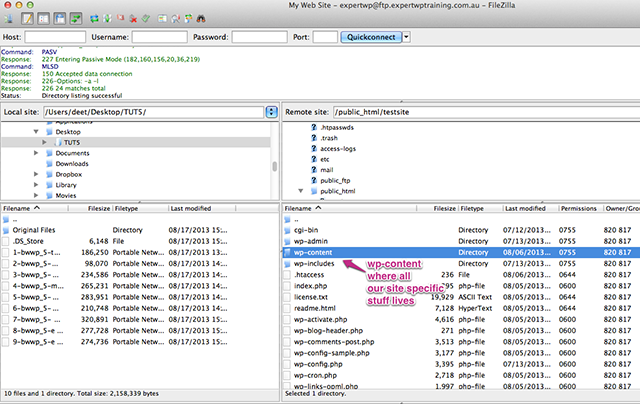
As you drill down through the directory you'll find a structure of folders something like this:
wp-content
	- plugins
	- themes
		- twentytwelve
		- twentythirteen
	- upgrade
	- uploads
Predictably, the directory we're interested in is twentythirteen, open that up and you'll get a view like this (In the example image I'm sorting by File Type so the order of files may be different to yours).
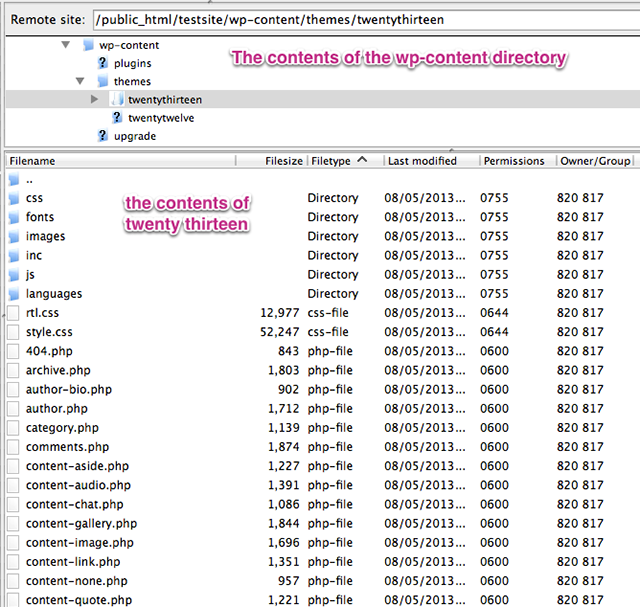
At this point don't panic about the sheer volume of files. It can be overwhelming; however, when we get to the point of editing our theme we're going to make changes using a Child Theme which will reduce some of the 'noise' and make things a bit less cluttered.
What Are, and Why Would We Use, Child Themes?
One of the things you'll notice as you spend any time with WordPress and or web development is that it's an environment of constant change. There are always updates to code, or plugins and themes which of course, is one of the great things about the WordPress project. But it also mean that at some point it's quite likely to be changes to the theme you're using when the developer pushes out updates for performance, security and functionality.
Here's the thing… If you've used a theme as the starter theme for your site and have customised it to suit your particular design and site needs, and the original developers push out an update to the theme, any changes you've made would be overwritten if you press that update button. But if the update is for security, what are you going to do? Leave your site as is and take the risk with insecure code? EEK! You don't want to do that.
So, what we want is a system that allows us to update our theme without overwriting customisations.
Enter the humble Child Theme.
Child themes allow you to create a new theme that uses another theme as its parent. All of the styles and functionality of the parent are used as your site's template but any changed and customised files are kept in their own directory, completely separate from the parent. So in the case of a parent theme being updated, because your child theme is separate, there's no risk of its files getting overwritten. Using child themes is also a great way to get started with WordPress development with a real head start rather than beginning from absolute scratch.
So That's Why, Here's How
First of all here's the reference for child themes from WordPress.org itself, it's a great reference http://codex.wordpress.org/Child_Themes.
Here's where we start actually creating some files of our own with our text editor. So open up your editor and copy this code into the top of your new document:
/*
Theme Name:Twenty Thirteen Child
Theme URI: http://example.com/
Description: Child theme for the Twenty Thirteen theme
Author: Your name here
Author URI: http://example.com/about/
Template:  twentythirteen
Version: 0.1.0
*/
Before you save the file you can edit some of these fields to make the theme your own, so go ahead and edit the theme name and URLs and the description and author fields, but don't edit the Template, that's the important line that tells WordPress that this theme relies on a parent theme, in this case, twentythirteen.
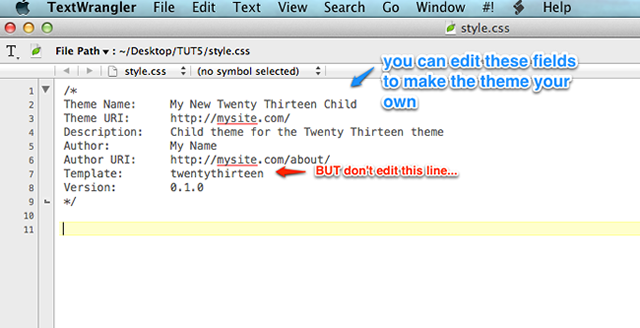
The 2nd thing we have to do is paste in a line that tells WordPress where to find the stylesheet (the CSS file that dictates all the styles that make the theme look like it does)
So copy this line into your file:
@import url("../twentythirteen/style.css");
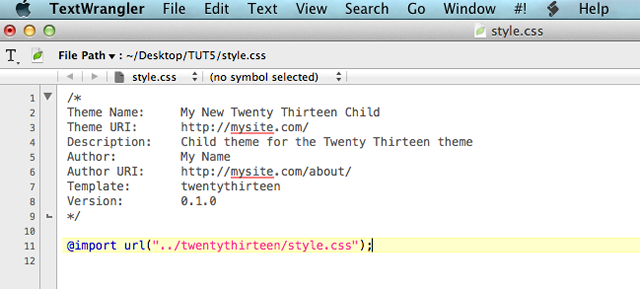
Save the file with the name style.css (this name is important, don't name it anything else, WordPress specifically looks for this file) to your desktop (or somewhere you'll be able to find it).
Moving the File From Our Local Machine to the Server
The next thing we need to do is send this file up to the server, but we need to create a directory in our wp-content folder for our new child theme first. So head back to your FTP program and in the remote server window expand the file tree so you can see the themes directory and right click on it and choose Create Directory from the pop up menu.
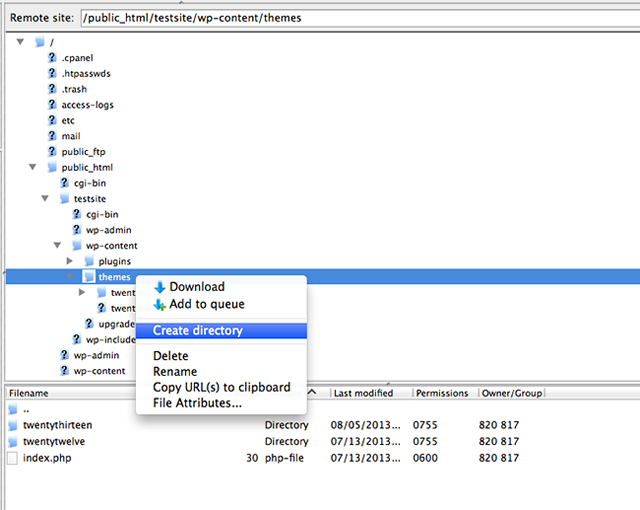
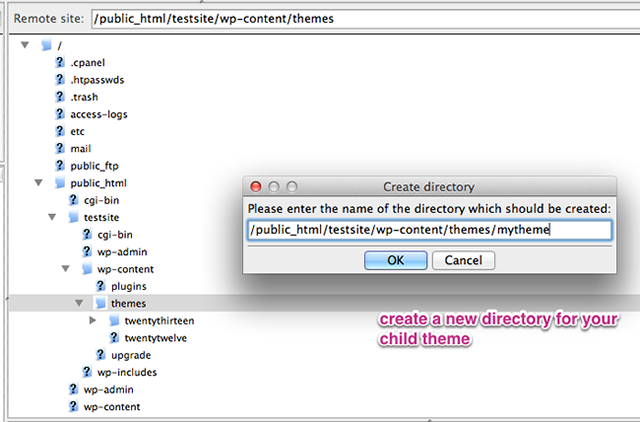
Click to create a directory, and enter a name in the window for our theme (name the directory the same as your theme to make it easy on yourself) and click ok.
Then double click on your new theme directory so that on the remote side of your FTP window you are in the empty new theme directory and navigate on the local side of your FTP window so that your desktop, or the directory where you put your style.css sheet, is the one that's selected.
When you've done that, drag your style.css file from the Local Desktop panel into the remote theme directory.
Now, go back to your browser and your WordPress site and navigate to Appearance » Themes. Notice that there's a new theme there with your name on it! (Assuming you changed the author name to your own when we edited the stylesheet header).
Go ahead and Activate it…
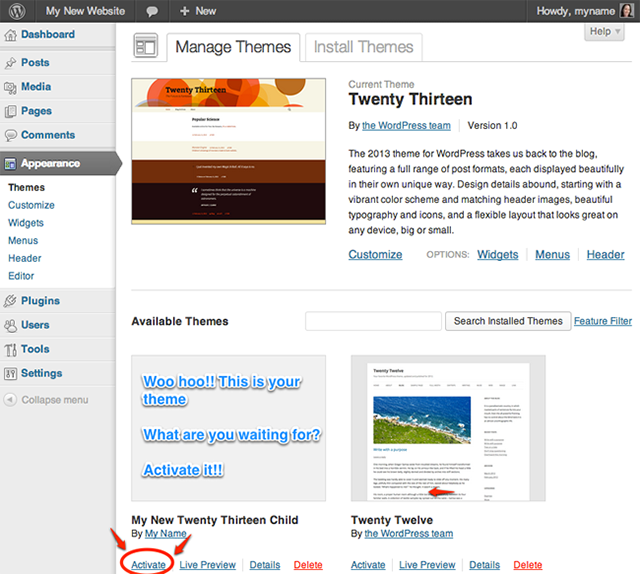
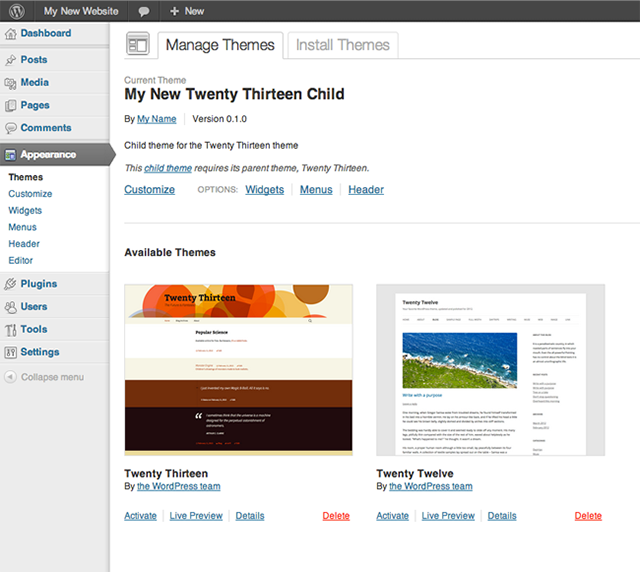
You should now see that your theme is the current one - you may notice that the details in the Current Theme panel reflect the information you edited in the header of the stylesheet we made.
Finally, navigate to the front of the website and observe…
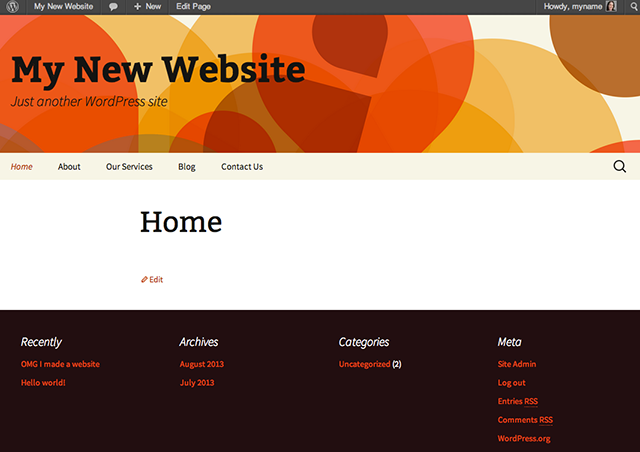
Yep, even though you've a new theme, your site doesn't look any different… remember we're basically still looking at the Twenty Thirteen theme. But take heart, in our next tutorial we'll take a look at how to start making some simple changes to make this theme much more your own!
Conclusion
Once you've got your site up and running, the pages and menus all set, you may be starting to think about how you can actually get the theme looking more 'you'. The best and most expedient way to do that is start with an existing theme and set up your very own child theme using the existing theme as its template. This not only speeds up development time, (standing on the shoulders of giants, as it were), helps us to learn how themes are put together as well, but above all, it protects our changes against such a time as the original theme developer updates the theme.


Comments