Curious about 3D game development? Now is the time to learn! This five-part tutorial series will demonstrate how to build a simple game with ShiVa3D Suite, a cross-platform 3D game engine and authoring tool. This is the third installment of the series, where you will learn how to edit the scenes of a game and begin coding AI Models.
Developing the Game in the ShiVa Editor - Continued
In part 2, we started by describing how to develop the game using ShiVa Editor. We introduced the ShiVa Editor modules used in developing the tutorial application, and we talked about the Collada model files representing the main characters in the application. We then discussed some initial steps necessary to create the application, such as creating the game and the scene and importing the Collada models. In part 3, we will show how to edit the scene of our application. We will also start entering the code for the AIModels of the game. In particular, we will enter the code for the DuckAI.
Edit the Scene
We will now set various properties of the scene.
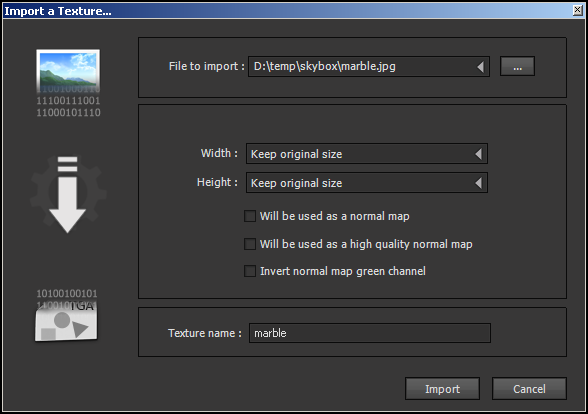
We assume that the image file marble.jpg has been copied under the folder named D:\temp\skybox. In your environment, if you copy the file to another location be sure to change the instructions below accordingly.
In the DataExplorer, go to Import -> Texture. In the dialog, select the file as shown below and click Import.
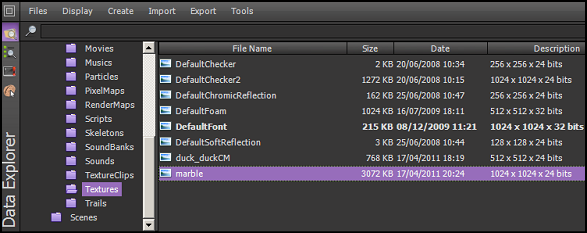
Now, in the DataExplorer's Textures folder, you should see a texture named marble.
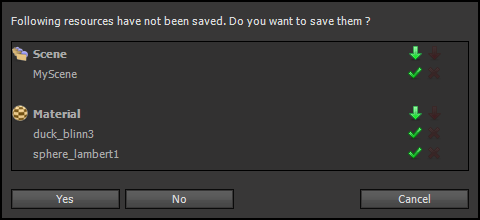
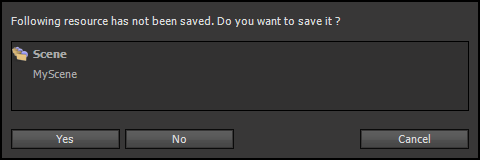
Let's edit various attributes of the scene using the Ambience Editor. Bring up Ambience Editor and Data Explorer side by side and double click on MyScene in the Scenes folder. At this point, you may be prompted to save the scene, as shown below. Click yes and dismiss the dialog.
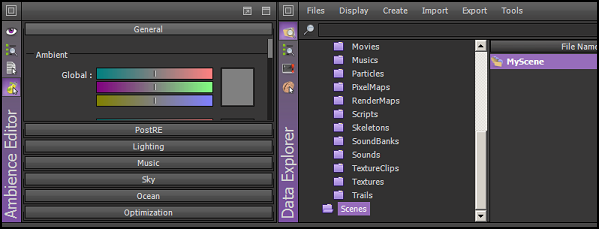
Now, the Ambience Editor and Data Explorer should look side by side as follows.
In Lighting section, adjust the Skylight color to obtain a fading yellow tone as shown below.
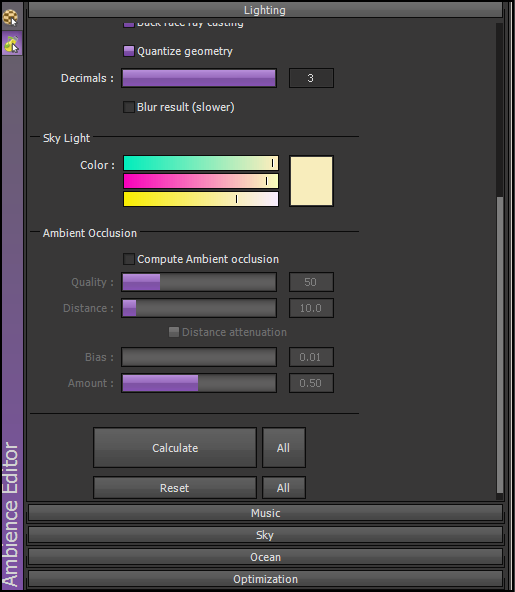
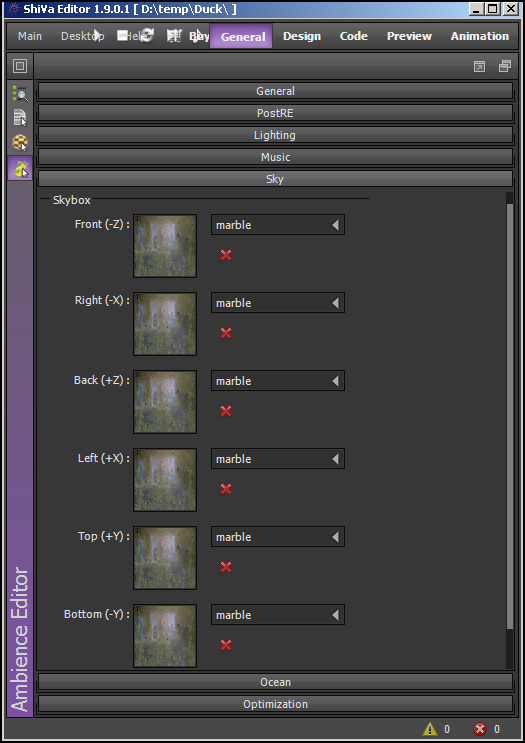
For each of the skybox elements in the Sky section, select the marble.
Bring Game Editor and Data Explorer side by side. Select Duck -> Games in Data Explorer and double-click on Duck. This will bring up the game in the Game Editor. Select Resources -> Fonts in the Data Explorer. In the Game Editor, press the Resources tab. Drag and drop the Default Font from the Data Explorer into the Resources tab (see below).

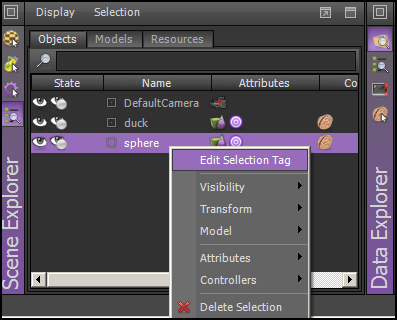
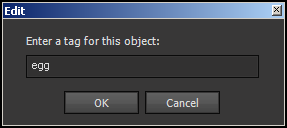
We will now add a tag to egg. (An object can be searched and located in a game programmatically based on its tag.) Bring Scene Explorer and Data Explorer side by side. On Data Explorer, select Duck -> Scenes -> MyScene and double click. At this point, you may be prompted to save MyScene as follows. Click yes and dismiss the dialog.
In the Scene Explorer, highlight the sphere and from the right-click menu select the Edit Selection Tag. In the dialog, type 'egg' for the tag. Those steps are shown in the two consecutive images below.
AIModels and the Code
We will now create the AIModels and the associated code for our game. Recall from previous discussion that the AIModels represent the behavior of the objects in a game. The Duck and the Egg will each have their own AIModels, DuckAI and EggAI respectively. In addition, the game itself will have its own AIModel, called MainAI. The MainAI will be responsible for initializing the camera and the scene as well as processing and dispatching user events.
Let us first review some of the concepts pertaining to AIModels, borrowing information from the ShiVa Editor help documentation.
- A handler contains code to process a particular event. In addition to a pre-defined set of handlers, one can also define custom handlers. We will be implementing only a subset of the pre-defined handlers, as listed below.
- onInit: This handler is called when the object associated with the AIModel is created; typically used for initialization tasks.
- onEnterFrame: A game is a loop of frames. This handler is called on each frame. You would mainly use this handler to define the motion of an object.
- onTouchSequenceBegin: This handler is called when the user starts touching the screen of the device. This event handler is a way to notify the AIModel code that a sequence of touch events is starting.
- onTouchSequenceChange: This handler is called for each touch event in the touch sequence, passing the number of touches and coordinates of each touch.
- onTouchSequenceEnd: This handler is called when user stops touching screen of the device. This event handler is a way to notify the AIModel code that the sequence of touch events has ended. The touch events to be processed by onTouchSequenceBegin, onTouchSequenceChange and onTouchSequenceEnd are available only for a multitouch compatible device.
- onSensorCollisionBegin: This event handler is called when a sensor associated with the object collides with another sensor.
- A function contains code for processing specific tasks. Functions are not predefined, you would define and implement them as you need. A function can send or post events to a handler. (The basic difference between sending and posting an event is that the execution of a sendEvent is instantaneous, whereas the execution of a postEvent is performed after a requested delay.) A function can be directly called from another function or handler. In addition, a function can be the target of a sendEvent or a postEvent.
- A variable can be globally accessed from the functions and handlers in a particular AIModel.
- AIModels also support the concept of state which is not used in this tutorial.
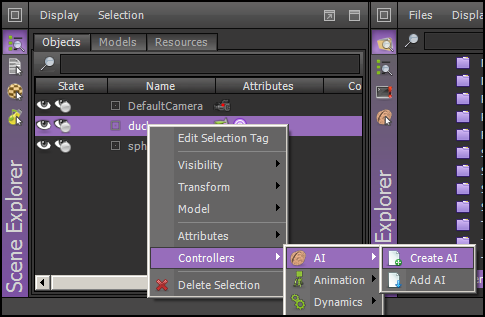
Let us now start defining the AIModels in our game. Bring up the Scene Explorer and the Data Explorer side by side and double click on MyScene in the Data Explorer under the Scenes folder. (If you are prompted, save MyScene and dismiss the dialog.) On the Scene Explorer, select the Objects tab and select duck, then right-click menu Controllers -> AI -> Create AI. This is shown below.
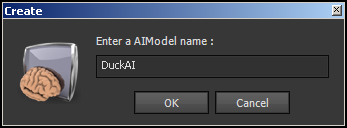
Name the AI as DuckAI in the dialog as shown below and press OK.
Similarly, on the Scene Explorer's Objects tab, select sphere, then right-click menu Controllers -> AI -> Create AI. Name the AI as EggAI in the dialog and click OK.
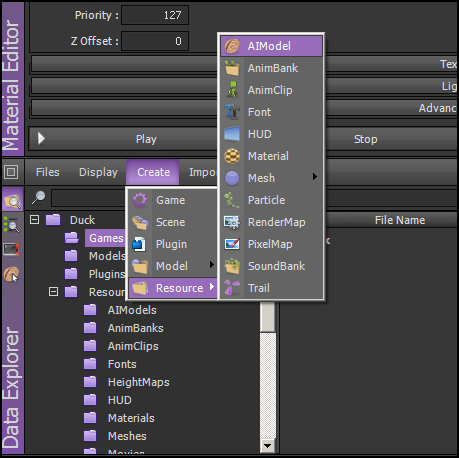
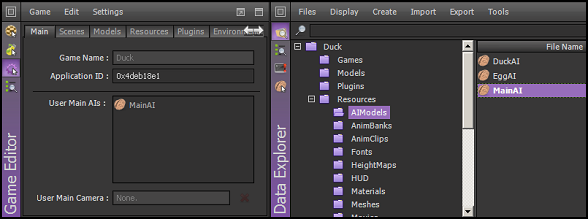
In Data Explorer, select Create -> Resource -> AIModel (see below). Name it MainAI.
In Data Explorer, you should now see three AIModels in the Resources -> AIModels folder: DuckAI, EggAI, MainAI. Open the Game Editor and the Data Explorer side by side. In Game Editor, select the Main tab. From Resources -> AIModels folder, drag and drop MainAI into the User MainAI's text area in Game Editor (see below).
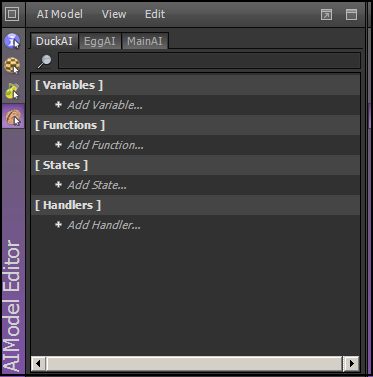
Now, open the AIModel Editor and Data Explorer side by side. Double click on the DuckAI, EggAI and MainAI. You should see a separate tab for each of the AIModels in AIModel Editor as shown below.
Enter Variables and Code for the DuckAI
On the DuckAI tab, click Add Variable and add a variable of type boolean. Name it isPositive with true being the initial value (shown below). Click OK to dismiss the dialog.

Similarly, add a variable named 'score' where the type is 'number' and the initial value is 0. Even if you type it as 0, the variable will be initialized as a float, i.e. 0.000.
Still on DuckAI tab, click Add Handler -> onEnterFrame, as shown below.
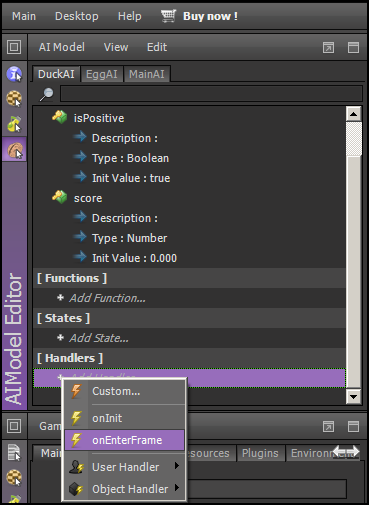
Similarly, click Add Handler -> onInit. Finally, click Add Handler -> Object Handler -> onSensorCollisionBegin (see below).

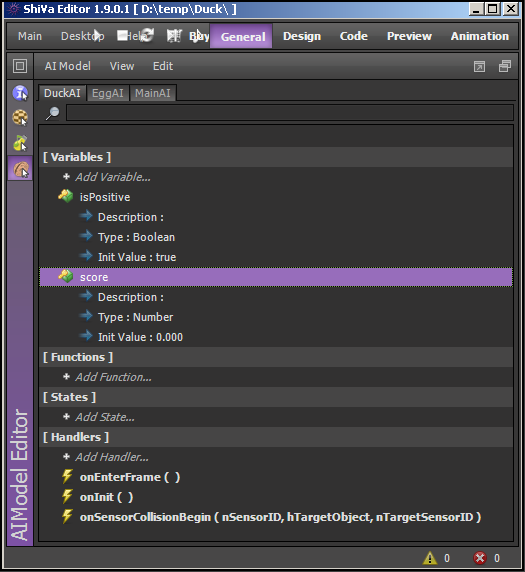
Now, the DuckAI tab will look like the following.
Bring the AIModel Editor and the Script Editor side by side. On the AIModel Editor's DuckAI tab, double-click onInit(). A skeleton code for this will be opened in the Script Editor as shown below.
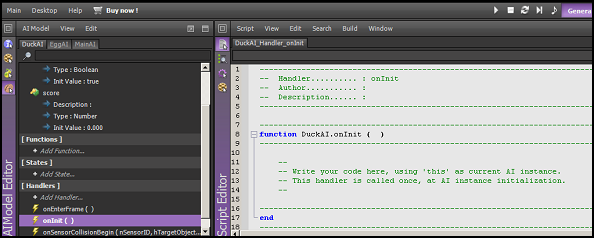
Copy and paste the following in the script editor, completely replacing the existing code (a review of the code will be given in a later section). In the Script Editor click Control+S to save the script.
function DuckAI.onInit (  )
--------------------------------------------------------------------------------
    object.setTranslation ( this.getObject ( ), 2, 3, 2, object.kGlobalSpace )
    local lUser = application.getCurrentUser ( )
	local lComp = hud.newComponent (lUser, hud.kComponentTypeLabel, "HUD.disp" )
    if ( lComp ~= nil )
    then
        hud.setComponentPosition ( lComp, 75, 7 )
        hud.setComponentSize ( lComp, 30, 10 )
        hud.setComponentBackgroundColor ( lComp, 0, 0, 0, 0 )
        hud.setComponentBorderColor ( lComp, 0, 0, 0, 0 )
        hud.setComponentVisible ( lComp, true )
        hud.setComponentZOrder ( lComp, 255 )
        hud.setLabelText ( lComp, string.format ("Score: %2i",this.score ( )  ) )
        hud.setDefaultFont ( lUser, "DefaultFont" )
        hud.setLabelTextHeight ( lComp, 100 )
        hud.setLabelTextAlignment ( lComp, hud.kAlignCenter, hud.kAlignCenter )
    end
--------------------------------------------------------------------------------
end
--------------------------------------------------------------------------------
In a similar way, replace the code for onEnterFrame as follows.
function DuckAI.onEnterFrame (  )
--------------------------------------------------------------------------------
    local lObject = this.getObject ( )
    if(this.isPositive ( ))
    then
        object.rotateAroundTo( lObject, 0,0,0,0,0.75,0, object.kGlobalSpace,0.5)
    else
        object.rotateAroundTo( lObject, 0,0,0,0,-0.75,0, object.kGlobalSpace,0.5)
    end

    local x,y,z = object.getRotation(lObject,object.kLocalSpace)
    object.setRotation (lObject,x+0.3,y+0.5,z+1, object.kLocalSpace  )
--------------------------------------------------------------------------------
end
--------------------------------------------------------------------------------
Then, replace the code for onSensorCollisionBegin with the following:
function DuckAI.onSensorCollisionBegin ( nSensorID, hTargetObject, nTargetSensorID )
--------------------------------------------------------------------------------
    this.score ( this.score ( )+1)
    local lComp = hud.getComponent (application.getCurrentUser ( ) , "HUD.disp" )
    if(lComp)
    then
        hud.setLabelText (lComp,  string.format ("Score: %2i",this.score ( )  ) )
    end
	if(this.isPositive ( ))
    then
        this.isPositive (false )
    else
        this.isPositive (true )
    end

    system.openURL ("http://www.stonetrip.com","")
--------------------------------------------------------------------------------
end
--------------------------------------------------------------------------------
Now we're finished with the variables and code for DuckAI.
Closing Remarks for Part 3
In part 3, we showed how to edit the scene of our application. We also started entering the code for the AIModels of the game. So far, we have completed the code for the DuckAI. In part 4, we will finish coding for the remaining AIModels, EggAI and the MainAI, and perform unit testing by animating the game. We will then export the game from the ShiVa Editor for importing into the Shiva Authoring Tool. Finally, we will discuss two different authoring options in the Shiva Authoring Tool, one for generating an Android executable and another one for generating an Eclipse project.

Comments