In the previous part of the series, we learned about creating, updating, and deleting content remotely through the WP REST API. It allows us to create platform-independent applications that work seamlessly with a WordPress powered back-end, providing a rich experience to the user.
In the current part of the series, we will take a look at the internals of the WP REST API and how they work together to power the API. After that, we will learn to modify server responses for the default endpoints to include custom fields.
To be specific, in the current article, we will:
- learn about the internal classes and methods of the WP REST API
- modify the server response for default endpoints
- learn how to make custom fields editable
So let’s begin by taking a look at the internals of the WP REST API.
Internal Classes and Methods of the WP REST API
Classes in the WP REST API can be divided into the following two categories:
- Infrastructure classes: These are the fundamental classes responsible for holding together the API. They don’t perform any data transformation.
- Endpoint classes: These classes are responsible for performing CRUD operations on resources like posts, pages, users, comments, etc.
Let’s take a look at the individual classes of each of the above two categories.
Infrastructure Classes
The three infrastructure classes that together power the REST API are as follows:
-
WP_REST_Server
-
WP_REST_Request
-
WP_REST_Response
WP_REST_Server
This is the core class of the WP REST API which implements the REST server by registering routes, serving requests, and preparing responses. It formats the data to be passed to the client and in case of an error, it prepares the error by including the error code and message body. It also checks for authentication.
We have been working quite a lot with the /wp-json index endpoint for checking all the capabilities and supported routes for a site. The method get_index(), which is responsible for retrieving the site index, is also located in this class.
For serving requests and preparing responses, the WP_REST_Server class uses the WP_REST_Request and WP_REST_Response classes respectively.
WP_REST_Request
The WP_REST_Request class implements the request object for the WP REST API. It contains data from the request like headers and request body, and is passed to the callback function by the WP_REST_Server class. It also checks if the parameters that are passed along the request are valid and performs data sanitization when necessary.
WP_REST_Response
The WP_REST_Response class, as the name implies, implements the response object. It contains necessary data such as response status code and response body.
Let’s now take a look at the endpoint classes.
Endpoint Classes
The endpoint classes in the WP REST API are responsible for performing CRUD operations. These classes include WP_REST_Posts_Controller, WP_REST_Taxonomies_Controller, WP_REST_Users_Controller, etc. All of these endpoint classes extend a single abstract class WP_REST_Controller that provides a consistent pattern for modifying data.
The WP_REST_Controller class includes methods such as get_item(), create_item(), update_item(), delete_item(), etc., for performing CRUD operations. These methods must be overridden by sub-classes by implementing their own abstraction for retrieving, creating, updating, and modifying data.
You can find more about these classes and their internal methods in the official documentation.
Having learned about the internal classes of the WP REST API, let’s take a look at how we can modify server responses for default endpoints to include custom fields.
Modifying Server Responses
In the previous section, we looked at the internal classes and methods that the API is built upon. Together these classes and methods drive the API as a whole and provide a way for developers to extend the API to account for different scenarios and use cases.
The WP REST API exposes data in a predictable manner. This includes various resources like posts, post meta, pages, and users, along with their standard properties. But this data can’t always conform to the needs of every single WordPress site or user. Therefore, the WP REST API provides a way of modifying the data that the server returns for each of the default routes.
The register_rest_field() method provides a way to add or update fields in the response for an object. However, changing a field from a response is never encouraged by the API since it might introduce compatibility issues for clients that expect a standard response from the server. So, if you need to change a field, you should consider duplicating the field with the desired value.
Similarly, deleting a default field is highly discouraged for the reason that a client might be expecting it. If you need a smaller subset of the response returned by the server, you should create additional contexts in addition to the default contexts like view or edit.
We can, however, safely add a field to the response returned by the server for one or multiple objects. These fields can contain any value ranging from post or user meta to any other arbitrary value.
In the next section, we will be working with the register_rest_field() method to add custom fields to the response returned by the server for the post object.
Working With the register_rest_field() Method
As mentioned previously, the register_rest_field() method can be used to add or update fields in the response returned by the server. This method accepts three arguments:
-
$object_type
-
$attribute
-
$args
The $object_type argument can either be a string or an array containing the names of all the objects that we want to add the field for. These objects can be post, term, comment, user, etc. If we need to add a custom field to a custom post type, then the $object_type argument would be the name of the post type.
The $attribute argument is the name of the custom field. This name would appear in the server response as a key along with its value.
The $args array is an associative array that can contain the following three keys:
-
$get_callback
-
$update_callback
-
$schema
The values of the first two keys are the names of the methods that are used to get or update the value of the custom field. The last $schema key defines the method or the variable that is used to define the schema for the custom field.
All of the above keys are optional, but if they are not added, the capability will not be added. For instance, if you define the $get_callback key but not the $update_callback key, the retrieval functionality will be added but the update functionality won’t be added. If you omit the $get_callback key, the field won't be added to the response at all.
The register_rest_field() method works by modifying the $wp_rest_additional_fields variable. This array variable holds registered fields by object types to be returned in the response by the server. Whenever a field is registered by the register_rest_field() method, it gets added to the $wp_rest_additional_fields variable. However, modifying the $wp_rest_additional_fields variable manually is strongly discouraged.
Adding Custom Fields to the Response
Having familiarized ourselves with the register_rest_field() method, we can now modify the response for the post object. A typical use case here would be the addition of an author display name field, which is commonly needed when listing posts on an index page. Since the standard response doesn’t include this field, we can use the register_rest_field() method to include it in the response.
We begin by creating a simple plugin. So create a new folder named rest-response-modifier in your /wp-content/plugins directory. Create an empty index.php file and paste in the following plugin definition:
<?php
/**
 * Plugin Name: REST Response Modifier
 * Description: A very simple plugin for development and testing purpose to modify the response of the REST API plugin.
 * Author: Bilal Shahid
 * Author URI: http://imbilal.com
 */
The register_rest_field() method should be registered in the rest_api_init action. Hence, we create a function named bs_add_custom_rest_fields() and bind it to the rest_api_init hook:
<?php
add_action( 'rest_api_init', 'bs_add_custom_rest_fields' );

function bs_add_custom_rest_fields() {

}
Note that the opening PHP tags <?php are not required here, but I've included them so the syntax is highlighted correctly.
Inside the bs_add_custom_rest_fields() function, we can use the register_rest_field() method to include a field for author name:
function bs_add_custom_rest_fields() {
    // schema for the bs_author_name field
    $bs_author_name_schema = array(
        'description'   => 'Name of the post author',
        'type'          => 'string',
        'context'       =>	array( 'view' )
    );

    // registering the bs_author_name field
    register_rest_field(
        'post',
        'bs_author_name',
        array(
            'get_callback'      => 'bs_get_author_name',
            'update_callback'   => null,
            'schema'            => $bs_author_name_schema
        )
    );
}
As mentioned in the previous section, the first argument in the register_rest_field() method is the name of the object for which we are modifying the response. Since we need to modify the response for the post object, we pass the same as the first argument.
The second argument in the above code is the name of the field which will appear in the response. It’s always a good practice to prefix the name of a custom field in the response to ensure maximum forward compatibility and that it doesn’t get overridden in the future by other plugins. Hence, we pass bs_author_name in the second argument as the $attribute of the custom field.
The third and last argument in the above code is an array for callback methods and the schema. This array holds the name of the callback methods for the retrieval and update of the custom field in the $get_callback and $update_callback keys respectively. We pass the bs_get_author_name function as the retrieval callback method. We will define this function shortly.
For the $update_callback key, we pass null since this is a read-only field and we don’t need to update the author name for a post.
For the $schema key, we pass an array named $bs_author_name_schema. This array holds various properties for the field like the data type, the context, and the description.
The only thing we need to define now is the bs_get_author_name() function that will act as the $get_callback method for our custom field. Below is the code for this function:
/**
 * Callback for retrieving author name
 * @param  array            $object         The current post object
 * @param  string           $field_name     The name of the field
 * @param  WP_REST_request  $request        The current request
 * @return string                           The name of the author
 */
function bs_get_author_name( $object, $field_name, $request ) {
    return get_the_author_meta( 'display_name', $object['author'] );
}
The $get_callback method receives three arguments for the following:
-
$object: The current object. In our case, it’s the current post. -
$field_name: The name of the custom field being added. -
$request: The request object.
We are using the $author property of the $object argument which holds the id of the post author. And by using the get_the_author_meta() function, we retrieve and return the display name of the author for the current post.
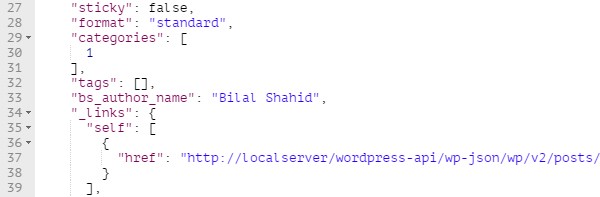
Now that the field is registered, we can send a GET request to the /wp/v2/posts route to see if it works properly:
Here is the response in Postman:
This newly registered custom field will also appear in the server response, along with its schema, when we send an OPTIONS request to the /wp/v2/posts route:
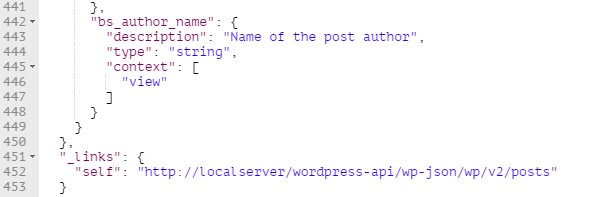
Hence a custom field for the author name property has been successfully registered. But this field is read-only as we can’t update it by sending a POST request. In the following section, we will register an editable field for post views count.
Registering an Editable Field
We will now register a custom field for the post views count. We will only deal with the actual registration of the field with WP REST API, leaving out the implementation for incrementing the count number.
Below is the code for bs_post_views custom field registration along with its schema:
// schema for bs_post_views field
$bs_post_views_schema = array(
    'description'   => 'Post views count',
    'type'          => 'integer',
    'context'       =>	array( 'view', 'edit' )
);

// registering the bs_post_views field
register_rest_field(
    'post',
    'bs_post_views',
    array(
        'get_callback'      => 'bs_get_post_views',
        'update_callback'   => 'bs_update_post_views',
        'schema'            => $bs_post_views_schema
    )
);
The code is similar to the one we wrote in the previous section except that it now includes a callback method bs_update_post_views for the $update_callback key. This function is responsible for updating the value of the field.
The $context property in the $bs_post_views_schema schema array includes two values for view and edit. Inclusion of edit value in the $context argument ensures that the bs_post_views field is returned in the server response after it has been updated.
The retrieval and update callback methods are as follows:
/**
* Callback for retrieving post views count
* @param  array             $object         The current post object
* @param  string            $field_name     The name of the field
* @param  WP_REST_request   $request        The current request
* @return integer                           Post views count
*/
function bs_get_post_views( $object, $field_name, $request ) {
    return (int) get_post_meta( $object['id'], $field_name, true );
}

/**
* Callback for updating post views count
* @param  mixed     $value          Post views count
* @param  object    $object         The object from the response
* @param  string    $field_name     Name of the current field
* @return bool|int
*/
function bs_update_post_views( $value, $object, $field_name ) {
    if ( ! $value || ! is_numeric( $value ) ) {
        return;
    }

    return update_post_meta( $object->ID, $field_name, (int) $value );
}
The code is pretty simple as it uses the get_post_meta() and update_post_meta() methods for retrieving and updating the values respectively.
The bs_get_post_views() method first retrieves the meta value for the bs_post_views meta key and casts it into an integer before returning it.
The callback method passed in $update_callback receives three arguments for the following:
-
$value: The new value for the field. -
$object: Current object from the response. -
$field_name: The name of the field being updated.
In the bs_update_post_views() method, we first check if the value being passed is not empty and is a numeric value. If not, we return without doing anything.
If the value is numeric, we pass it to the update_post_meta() function which saves it to the database after type casting it into a valid integer.
Having registered the field successfully, let’s test it by sending a GET request:
$ GET /wp/v2/posts
Below is a sample response for the above request:
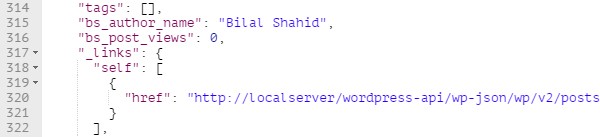
As we can see in the image above, the current value of the bs_post_views field is 0 for a given post. This is because the get_post_meta() method is returning an empty string since it couldn’t find a meta value for the bs_post_views meta key and type-casting an empty string into an integer in PHP results in 0.
We can update the bs_post_views field by sending a POST request to the /wp/v2/posts/<id> endpoint. The JSON body for the request is as follows:
{
    "bs_post_views": 4050
}
If the request is successful, the server returns a 200 - OK status code along with the updated post object that also includes the bs_post_views field:
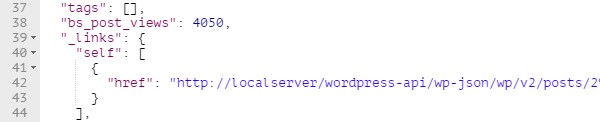
The bs_post_views custom field is now updated.
Note that we sent a JSON body along the request to update the field. The JSON body included the field name—bs_post_views—with an integer value of 4050. If we try to send a non-numeric value, say “abc1234”, the field will not be updated since we have a condition checking for a numeric value in the bs_update_post_views() callback method.
Below is the full source code for the plugin:
<?php
/**
 * Plugin Name: REST Response Modifier
 * Description: A very simple plugin for development and testing purpose to modify the response of the REST API plugin.
 * Author: Bilal Shahid
 * Author URI: http://imbilal.com
 */

add_action( 'rest_api_init', 'bs_add_custom_rest_fields' );

/**
 * Function for registering custom fields
 */
function bs_add_custom_rest_fields() {
    // schema for the bs_author_name field
    $bs_author_name_schema = array(
        'description'   => 'Name of the post author',
        'type'          => 'string',
        'context'       =>	array( 'view' )
    );

    // registering the bs_author_name field
    register_rest_field(
        'post',
        'bs_author_name',
        array(
            'get_callback'      => 'bs_get_author_name',
            'update_callback'   => null,
            'schema'            => $bs_author_name_schema
        )
    );

    // schema for bs_post_views field
    $bs_post_views_schema = array(
        'description'   => 'Post views count',
        'type'          => 'integer',
        'context'       =>	array( 'view', 'edit' )
    );

    // registering the bs_post_views field
    register_rest_field(
        'post',
        'bs_post_views',
        array(
            'get_callback'      => 'bs_get_post_views',
            'update_callback'   => 'bs_update_post_views',
            'schema'            => $bs_post_views_schema
        )
    );
}

/**
 * Callback for retrieving author name
 * @param  array            $object         The current post object
 * @param  string           $field_name     The name of the field
 * @param  WP_REST_request  $request        The current request
 * @return string                           The name of the author
 */
function bs_get_author_name( $object, $field_name, $request ) {
    return get_the_author_meta( 'display_name', $object['author'] );
}

/**
 * Callback for retrieving post views count
 * @param  array            $object         The current post object
 * @param  string           $field_name     The name of the field
 * @param  WP_REST_request  $request        The current request
 * @return integer                          Post views count
 */
function bs_get_post_views( $object, $field_name, $request ) {
    return (int) get_post_meta( $object['id'], $field_name, true );
}
/**
 * Callback for updating post views count
 * @param  mixed    $value          Post views count
 * @param  object   $object         The object from the response
 * @param  string   $field_name     Name of the current field
 * @return bool|int
 */
function bs_update_post_views( $value, $object, $field_name ) {
    if ( ! $value || ! is_numeric( $value ) ) {
        return;
    }

    return update_post_meta( $object->ID, $field_name, (int) $value );
}
That’s all for modifying server responses for the default API endpoints. We have barely scratched the surface for modifying the REST API since it provides much more flexibility than just modifying server responses. This includes adding support for the custom content type via custom controllers and namespaces, and registering custom routes for exposing and modifying data. We will try to cover these advanced topics in future articles.
Just the Beginning...
Here we conclude our journey of introducing ourselves to the WP REST API. In this series, we have covered pretty basic concepts like authentication methods and retrieving, creating, and updating data. In this last part of the series, we briefly looked at the internal classes of the WP REST API and then learned to modify server responses for the default endpoints.
It was never the purpose of this series to cover each and every aspect of the WP REST API—in fact, it can never be achieved in a single series. But rather, the purpose of this series was to get you up and running with this new fantastic addition and to encourage you to play around and experiment on your own. I hope that you have found this series fulfilling its ultimate objective.
![Quick Tip: Integrating Colorbox Into the Native [gallery] Shortcode](themes/nongdanviet/images/img-size/news.png)
Comments