A helpful feature of WordPress is the way it generates classes and IDs. Some of these are generated by the system itself, while in other cases you insert some PHP in your theme and WordPress uses that to add classes and IDs to the page markup.
In this tutorial, I'll demonstrate three ways in which WordPress does this and provide practical applications and examples for each. The three areas I'll deal with are as follows:
- Classes and IDs generated for images which you upload to WordPress via the media uploader
- Template tags which are used in a theme's template files to generate classes and IDs based on the content and page being viewed
- Parameters you can set when registering widgets and menus (or which will already be set in a well written theme), which will generate classes and IDs relevant to specific types of widget, individual widgets and menu items
For each of these, I'll explain how they work and then demonstrate each with some examples.
What You'll Need to Complete This Tutorial
To follow the practical examples in this tutorial, you'll need:
- A development installation of WordPress
- A theme which you can edit
I'll be working with a child theme of Twenty Twelve - you can access the theme files in the code bundle.
Classes and IDS Generated for Images by the Media Uploader
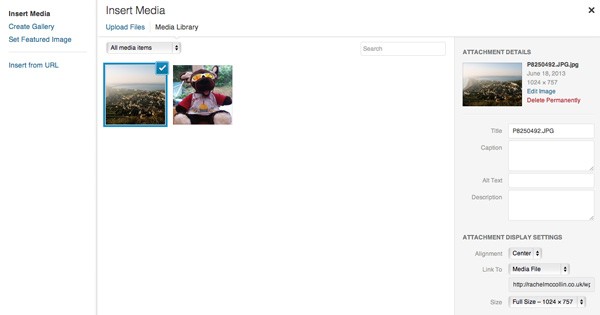
When you upload images via the Media Uploader, you're given the option to specify how the image should be aligned, as shown in the screenshot. You're also asked to choose which image size you want to display: thumbnail, medium, large or full size.
Based on your selection, WordPress assigns the <img> tag for your uploaded images a number of classes. The classes for alignment are as follows:
.alignnone.aligncenter.alignright.alignleft
In addition, WordPress assigns the .wpcaption class to any caption that you add to an image. Captions will have this class as well as one of the alignment classes above, based on how you choose to align the image.
WordPress also adds classes for each image size:
.size-full.size-large.size-medium.size-thumbnail
You can use these to style images of each file size.
Most themes will include CSS to style each of these classes appropriately, for example the Twenty Twelve theme includes the following:
.alignleft {
	float: left;
}
.alignright {
	float: right;
}
.aligncenter {
	display: block;
	margin-left: auto;
	margin-right: auto;
}
img.alignleft {
	margin: 12px 24px 12px 0;
	margin: 0.857142857rem 1.714285714rem 0.857142857rem 0;
}
img.alignright {
	margin: 12px 0 12px 24px;
	margin: 0.857142857rem 0 0.857142857rem 1.714285714rem;
}
img.aligncenter {
	margin-top: 12px;
	margin-top: 0.857142857rem;
	margin-bottom: 12px;
	margin-bottom: 0.857142857rem;
}
img.size-full,
img.size-large,
img.header-image,
img.wp-post-image {
	max-width: 100%;
	height: auto;
}
The CSS above aligns any element (not just images) with the .alignleft, .alignright or .aligncenter class, meaning you can also use these classes to style content other than images if you want.
It also adds margins to images which have these classes and ensures that full and large size images don't stray outside their containing element, using max-width: 100%.
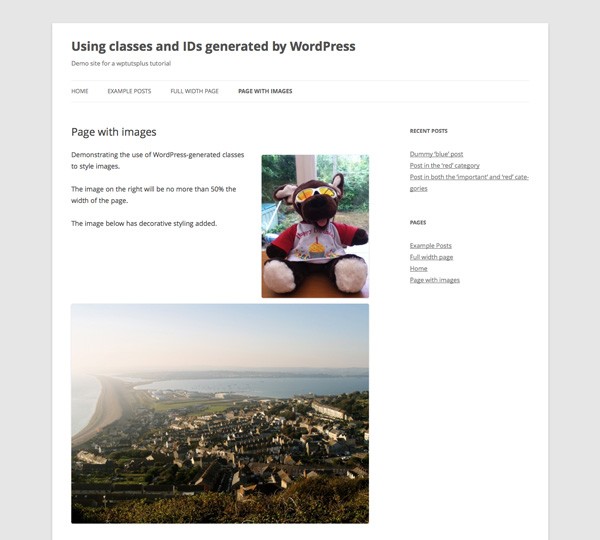
You can see the effect of this in the screenshot below. The first image is aligned right and the second is centered and full size.
Add Your Own Styling Using These Classes and IDs
As well as setting alignment and margins for each of these classes, you can use them to add additional styling.
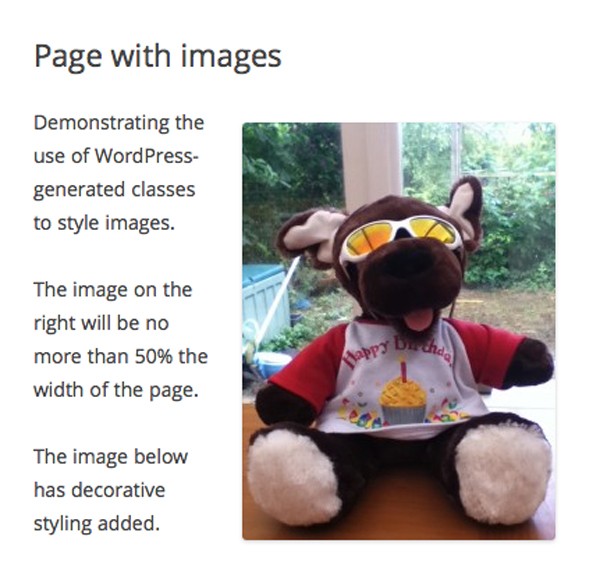
The first image in the screenshot above is right-aligned. If the screen is resized, it stays the same size and the text wraps messily around it:
You can add styling to ensure that any right-aligned image takes up no more than 50% of the width of the screen, so that text will wrap more neatly, by adding the following CSS to your stylesheet:
img.alignright {
	max-width: 50%;
}
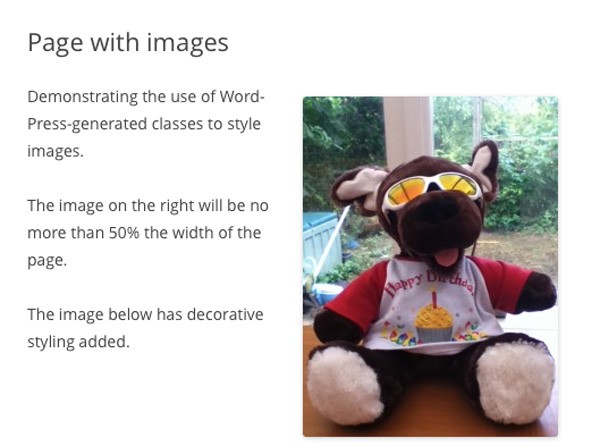
Now when the page is viewed on a narrow screen, the image is less dominant:
As well as adding CSS for layout or sizing, you can add decorative styling to images which are aligned in a certain way. To add decorative styling to centered full size images, add the following to your stylesheet:
img.size-full.aligncenter {
	width: 75%;
	padding: 5px;
	border: 2px dotted #ccc;
}
This adds a border to the image and reduces its size:
Template Tags for Adding Classes and IDs
The classes and IDs we've looked at for images are generated by WordPress itself. Other classes and IDs can be generated by template tags in your theme.
Note: If you're not familiar with template tags, have a look at the Codex's Template Tags article.
There are two sets of template tags: one which applies to the <body> HTML tag and two which apply to individual posts.
The body_class() Template Tag
A well-written theme will have the following tag in its header.php file:
<body <?php body_class(); ?>>
This replaces the normal <body> tag. The body_class() template tag tells WordPress to assign classes to the <body> tag based on the page being viewed and the template file it's using from the active theme.
The list of classes which can be generated is long and you can find it in the WordPress Codex.
Some examples include:
-
.homefor the home page -
.single-postid-{ID}when a single post is being viewed, where ID is that post's numerical ID -
.archivefor any archive page -
.page-template-{filename}-phpwhen a custom page template is being used
If you want to add additional classes to the <body> tag which aren't generated by WordPress, you can. For example to add the class "hello", the code is:
<body <?php body_class( 'hello' ); ?>>
You can add as many classes as you want in this way, separating them with spaces.
You can use the classes generated by the body_class() tag to add styling which is specific to a certain location in the site or a template file, or to elements within that template file.
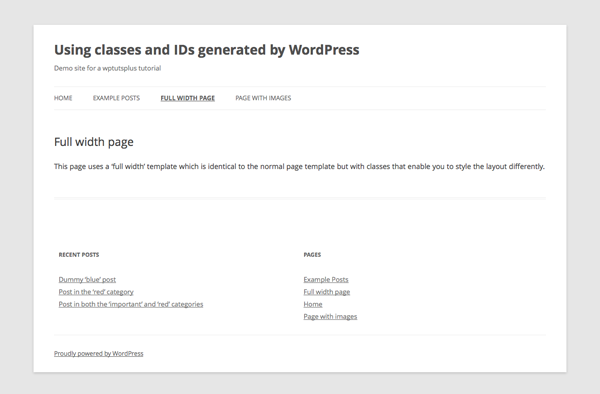
For example, in my child theme I've created a page template called page-full-width-with-sidebar.php, which is designed to display pages with the content full width and the sidebar below the content instead of to its right. You can find this page template in the code bundle.
Using the body_class() tag, WordPress generates a .page-template-page-full-width-with-sidebar-php class for the <body> tag (among other classes).
So to style elements on a page using this template, you add the following to your stylesheet:
/* style layout for full page template with sidebar */
.page-template-page-full-width-with-sidebar-php .site-content,
.page-template-page-full-width-with-sidebar-php .widget-area {
	width: 100%;
	clear: both;
}
.page-template-page-full-width-with-sidebar-php #secondary.widget-area .widget {
	width: 48%;
	margin: 0 1%;
	float: left;
}
This sets the width of the main content and the sidebar (#secondary) to 100%, and also aligns the widgets in the sidebar next to each other. You can see the effect in the screenshot:
Note: If your theme is responsive, make sure you make any adjustments to the width of the widgets on narrow screens in your media queries.
The post_class() and post_ID() Template Tags
These tags work in a similar way to the body_class() tag, but you use them with individual posts in the loop instead of the <body> element.
For example, in the Twenty Twelve theme, each post in the loop is wrapped in a <article> element with these tags applied:
<article id="post-<?php the_ID(); ?>" <?php post_class(); ?>>
// content here
</article>
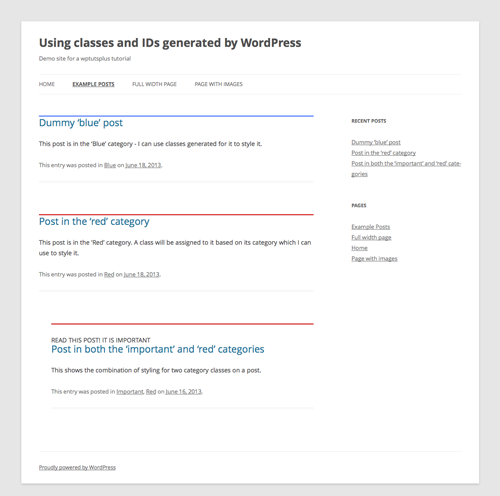
This generates a number of classes based on the post's category and type and an ID based on the post's numerical ID. For example, a post in my demo site with the category of 'red' will have the following classes and ID generated:
<article id="post-10" class="post-10 post type-post status-publish format-standard hentry category-red">
// content
</article>
You can use these classes to style posts from individual categories differently. In the demo site there are three categories set up: 'red', 'blue' and 'important'.
To style these, add the following CSS to the theme's stylesheet:
/* style posts in 'red' category */
.category-red {
	border-top: 2px solid #cc0000;
}

/* style posts in 'blue' category */
.category-blue {
	border-top: 2px solid #3366ff;
}

/* style posts in 'important' category */
.blog .category-important {
	padding-top: 2em;
	margin-left: 2em;
}
.category-important:before {
	content: 'READ THIS POST! IT IS IMPORTANT';
}
This adds styling for each of the categories: a colored border for each of the colour categories and an extra margin for the 'important' category. It also uses a pseudo-element to insert additional content before each post in the 'important' category.
The result is shown in the screenshot.
Using Classes and IDs With Widgets and Menus
When widgets are registered in a theme (or sometimes a plugin), the functions used can include code which tells WordPress to generate classes and IDs based on the widget's name, type and ID.
When menus are registered, WordPress can generate classes based on the menu's name, the position of items within the menu and the location in the site. You can use all of these to style your widgets and menus.
Classes and IDs for Widgets
To register a widget area, you use the register_sidebar() function in your theme's functions.php file. This takes the following parameters:
<?php register_sidebar = array(
	'name'          => __( 'Sidebar name', 'theme_text_domain' ),
	'id'            => 'unique-sidebar-id',
	'description'   => ' ',
	'class'         => ' ',
	'before_widget' => '<li id="%1$s" class="widget %2$s">',
	'after_widget'  => '</li>',
	'before_title'  => '<h2 class="widgettitle">',
	'after_title'   => '</h2>' );
?>
There are two parameters which generate classes and/or IDs:
'class' => ' ''before_widget' => '<li id="%1$s">'
The 'class' parameter allows you to manually specify a class for the widget area. The settings for the 'before_widget' parameter tell WordPress to generate a unique ID for each widget in the widget area and a number of classes for it as well, which will be based on the type of widget it is.
For example in the demo site I've added two widgets - a list of posts and a list of pages. For the list of posts the following HTML is output:
<aside id="recent-posts-2" class="widget widget_recent_entries">
// widget contents
</aside>
For the list of pages the following HTML is output:
<aside id="pages-2" class="widget widget_pages"><h3 class="widget-title">
// widget contents
</aside>
You can use this to style widgets which list posts, by adding the following CSS to the theme's stylesheet:
/* style specific widget */
aside.widget_pages {
	border: 1px solid #3366ff;
	padding: 5px;
}
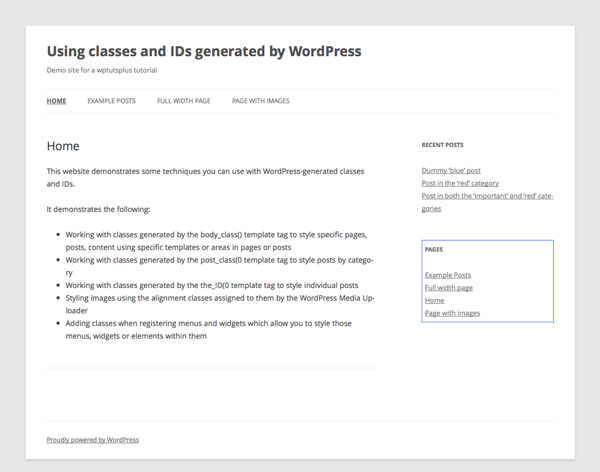
This adds a border to widgets listing pages, as shown in the screenshot:
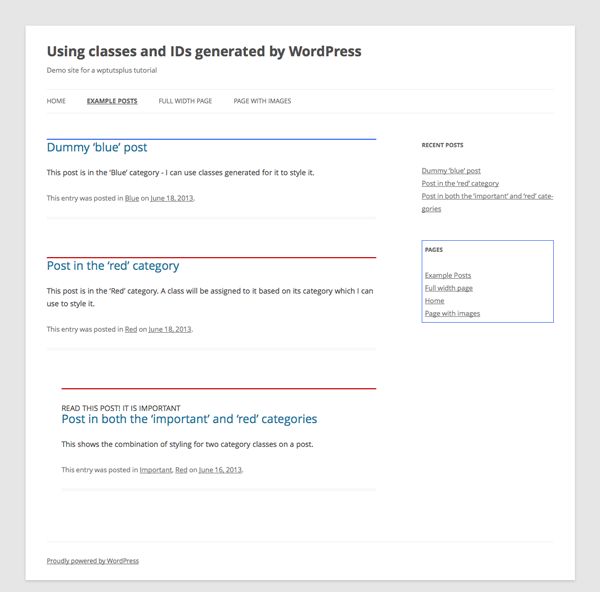
Note: This works in the demo site because it uses a child theme of the twenty twelve theme, which has sidebars registered correctly. If you're building your own theme, you will have to add the register_sidebar() tag with the parameters above. Find out how to do this in the associated Codex article.
Classes and IDs for Menus
Navigation menus are displayed using the wp_nav_menu() tag in your theme's header.php file. This takes a number of parameters, as detailed in the wp_nav_menu article.
One of these adds classes and IDs to each items in the menu:
'items_wrap' => '<ul id="%1$s" class="%2$s">%3$s</ul>'
This adds an ID and a number of classes to each item. The classes are based on the class for the menu itself and the location in the site. For example, when the user is on a page in the site, its entry in the navigation menu will have the .current_page_item class.
You can use this to add styling to the current page's entry in the menu. For example, to add an underline to the current page, add the following to your stylesheet:
/* style active page link in navigation */
.main-navigation .current_page_item a {
	text-decoration: underline;
}
The resulting underline can be seen in the screenshot (as well as the colour change which is already in the parent theme's stylesheet):
Note: As I'm using a child theme of the twenty twelve theme, I don't need to add the wp_nav_menu() tag, as this is already present in the parent theme.
Summary
As we've explored above, there are a number of ways in which WordPress will generate classes and IDs on elements in a site. Some of these are generated by WordPress itself and others use template tags or function parameters to tell WordPress to output the classes and IDs. You can use these to style pages, menus, widgets, post listings and other elements in your design.
There are many other ways in which you can use these classes and IDs to style your projects. For example:
- You could create a site with a number of distinct sections, using classes generated by the
body_class()tag to make content in each section look very distinct - You could style individual post listings differently in an archive page by targeting the ID generated by the
the_ID()tag - You could highlight current menu items in your navigation, creating a button-like effect and using images, backgrounds, gradients and more
- You could use a combination of the above, for example styling certain widgets differently in different areas of the site
The possibilities are limited only by your imagination!
Resources
Some useful Codex pages on the topics covered in this tutorial:
- Classes generated for images: http://codex.wordpress.org/CSS#WordPress_Generated_Classes
- The
body_class()tag: http://codex.wordpress.org/Function_Reference/body_class - The
post_class()tag: http://codex.wordpress.org/Function_Reference/post_class - The
the_ID()tag: http://codex.wordpress.org/Function_Reference/the_ID - The
wp_register_sidebar() function: http://codex.wordpress.org/Function_Reference/register_sidebar - The
wp_nav_menu()tag: http://codex.wordpress.org/Function_Reference/wp_nav_menu - A guide to template tags: http://codex.wordpress.org/Template_Tags

Comments