Animation is an important part of user experience design. It serves as feedback on user actions, informs users of system status, and guides them on how to interact with the interface.
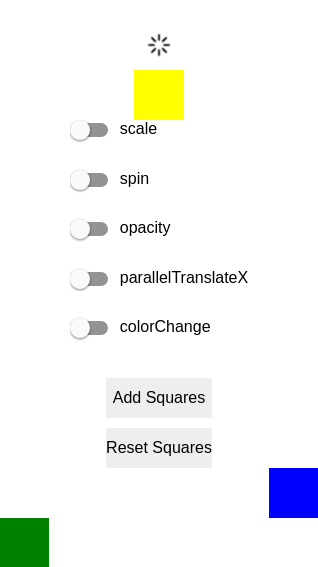
One of the tools that I'm using to create cross-platform mobile apps is React Native, so in this tutorial I'll walk you through how to implement animations in this platform. The final output for this tutorial will be a kitchen sink app that implements different kinds of animations. Here's how it will look:
I'll be assuming that you already know the basics of working with React Native, so I won't be delving too much into the code that doesn't have something to do with animations. For more background on React Native, check out some of my other tutorials.
 ReactHow to Create a News Reader With React Native: Setup and News Item Component
 ReactHow to Create a News Reader With React Native: Web Page Component
 React NativeHow to Create a Face Detection App With React Native
We will be specifically working on the Android platform, but the code used in this tutorial should work on iOS as well. In fact, if you don't want to deal with the pain of setting up a new React Native project, I recommend that you check out React Native Web Starter. This allows you to create a new React Native project that you can preview in the browser. This comes with the benefit of not having to set up a device, and faster hot reloading so you can preview your changes faster.
Your First Animation App
If you haven't done so already, create a new React Native project:
react-native init RNAnimation
If you're using React Native Web Starter, here's how you create a new project:
git clone https://github.com/grabcode/react-native-web-starter.git RNAnimation
cd RNAnimation
rm -rf .git
npm install
Open the index.android.js (or index.web.js) file, remove the default code, and add the following:
import React, { Component } from 'react';
import { App } from './app/components/App';

import {
  AppRegistry,
  View
} from 'react-native';

class RNAnimation extends Component {
  render() {
    return (
      <View>
        <App />
      </View>
    );
  }
}

AppRegistry.registerComponent('RNAnimation', () => RNAnimation);
If you're on React Native for Web, you can skip the above step as the default code is already set up to use the App component.
Create an app/components folder and inside create an App.js file. This will be the primary file that we're going to work with. Once you've created the file, you can go ahead and import the packages that you will need for the whole project.
import React, { Component } from 'react';

import {
  Platform,
  StyleSheet,
  Text,
  ScrollView,
  View,
  Image,
  TouchableHighlight,
  Switch,
  Dimensions,
  Animated,
  Easing,
  LayoutAnimation,
  UIManager
} from 'react-native';
If you've done any sort of React Native development before, you should already be pretty familiar with the following components. If not, take a look at the React Native API docs.
Platform,
StyleSheet,
Text,
ScrollView,
View,
Image,
TouchableHighlight,
Switch,
Dimensions,
These are the packages that are specifically used for implementing animations:
Animated,
Easing,
LayoutAnimation,
UIManager
Here's a brief overview of each one:
-
Animated: allows us to create animated components. React Native has a clear separation between animated and static components. Specifically, you can create animated views (
<Animated.View>), text (<Animated.Text>), and images (<Animated.Image>). - Easing: a general container of constant values for easing animations.
- LayoutAnimation: for executing different kinds of animations whenever the layout changes (e.g. when the state is updated).
-
UIManager: currently, LayoutAnimation is still an experimental feature on Android. Importing UIManager allows us to enable it. For iOS, LayoutAnimation works by default, so you don't need to import
UIManager.
Rotate Animation
The first step in creating an animation is to define an animated value. This is commonly done inside the component constructor. In the code below, we're defining a new animated value for the App component constructor. Note that the name of this value can be anything as long as it describes the animation that you want to create.
In React Native, you can create a new animated value by calling the Value() method in the Animated class. Then supply the initial animated value as the argument.
constructor(props){
    super(props);
    this.spinValue = new Animated.Value(0);
}
Next, create the function that will execute the rotate animation.
On the first line, we need to set the initial value of the animated value that we want to work with. In this case, we're setting it to 0.
Next, we create a new timing animation by calling the Animated.timing() function. This accepts the current animated value as its first argument and an object containing the animation config as its second. The object should contain the final value for the animated value, the duration (in milliseconds), and the type of easing animation.
Finally, call the start() method to start the animation.
spin() {
  this.spinValue.setValue(0);
  Animated.timing(
    this.spinValue,
    {
      toValue: 1,
      duration: 1500,
      easing: Easing.linear
    }
  ).start();
}
The final step is to actually implement the animation. Inside your render() method, define how the rotation value will be changed. This can be done by calling the interpolate() function. It accepts an object containing an inputRange and outputRange. inputRange is an array containing the initial and final rotation value. outputRange is an array containing the actual rotation values.
So initially the object to be animated will be at 0 degrees rotation, and the final value will be 360 degrees. This rotation is done over the course of 1,500 milliseconds, as defined earlier in the animation config.
const spin = this.spinValue.interpolate({
  inputRange: [0, 1],
  outputRange: ['0deg', '360deg']
});
When you render the component, the rotation value is added as a transform in the styles. So if you're familiar with CSS animations, this is the equivalent implementation in React Native.
return (
    <Animated.Image
      style={[
        styles.spinner,
        {
          transform: [
            {rotate: spin}
          ]
        }
      ]}
      source={{uri: '../../img/loading.png'}}
    />
);
Now that you know the basics of creating animations, let's create a few more so you know how to implement different kinds. Inside your constructor(), create an object containing the animations that we'll implement:
var animations = [
  {
    animation: 'spin',
    enabled: false
  },
  {
    animation: 'scale',
    enabled: false
  },
  {
    animation: 'opacity',
    enabled: false
  },
  {
    animation: 'colorChange',
    enabled: false
  },
  {
    animation: 'parallelTranslateX',
    enabled: false
  }
];
Don't worry if you don't know what each one does—I'm going to walk you through them all. All you need to know for now is that this configuration states whether an animation is currently enabled or not. Once it's been initialized, add the animations array to the state:
this.state = {
    animations: animations
};
In your render() function, add the components that we'll be animating as well as the list of animations.
return (
  <View style={styles.container}>

    <Animated.Image
      style={[
        styles.spinner,
        {
          transform: [
            {rotate: spin}
          ]
        }
      ]}
      source={{uri: '../../img/loading.png'}}
    />

    <Animated.View />

    <ScrollView>
    {this.renderAnimationsList()}
    </ScrollView>

    <Animated.View />

    <Animated.View />
  </View>
);
The renderAnimationsList() function renders the list of animations using Switch and Text components.
renderAnimationsList() {
  return this.state.animations.map((item) => {
    return (
      <View style={styles.item} key={item.animation}>
        <Switch
          onValueChange={(value) => this.toggleAnimation(item.animation, value)}
          style={styles.switch}
          value={item.enabled} />
        <Text style={styles.animation_type}>{item.animation}</Text>
      </View>
    );
  });
}
Switch allows the user to toggle animations on and off. Every time the user flips the switch, the toggleAnimation() function gets executed. All it does is find the animation in question and update the value of the enabled property to the selected value. It then updates the state with the updated values and loops through all the animations, executing only the enabled ones.
toggleAnimation(animation, value) {
  var animations = this.state.animations;
  var index = animations.findIndex((obj) => {
    return obj.animation == animation;
  });

  animations[index].enabled = value;

  this.setState({
    animations: animations
  });

  animations.forEach((item) => {
    if(item.enabled){
      this[item.animation]();
    }
  });
}
Also add the styles that will be used throughout the app.
const styles = StyleSheet.create({
 container: {
    flex: 1,
    alignItems: 'center',
    flexDirection: 'column'
  },
  button: {
    height: 40,
    backgroundColor: '#eee',
    justifyContent: 'center',
    alignItems: 'center',
    marginTop: 10
  },
  item: {
    flex: 2,
    flexDirection: 'row',
    height: 50,
  },
  switch: {
    marginBottom: 10
  },
  animation_type: {
    marginLeft: 10
  },
  spinner: {
    marginTop: 20,
    alignSelf: 'center',
    width: 50,
    height: 50
  },
  box: {
    width: 50,
    height: 50,
    zIndex: 100
  },
  red_box: {
    backgroundColor: 'red',
    marginBottom: 20
  },
  blue_box: {
    alignSelf: 'flex-start',
    backgroundColor: 'blue'
  },
  green_box: {
    alignSelf: 'flex-end',
    backgroundColor: 'green'
  },
  squares_container: {
    flexDirection: 'row',
    flex: 1,
    flexWrap: 'wrap'
  },
  square: {
    width: 35,
    height: 35,
    backgroundColor: 'lightblue',
    margin: 10
  },
  number: {
    fontSize: 20,
    fontWeight: 'bold'
  }
});
Scale Animation
Scale animation is where you make an object bigger or smaller than its original size. Start by creating a new animated value inside the constructor:
this.scaleValue = new Animated.Value(0);
Create the function for animating the scale. This looks similar to the spin() function; the only difference is the easing function that we're using. Here we're using easeOutBack to make the scaling more fluid. This is useful especially if this animation is executed repeatedly. If you want to know what other easing functions you can use, check out easings.net. All of the easings listed there can be used in React Native.
scale () {
  this.scaleValue.setValue(0);
  Animated.timing(
    this.scaleValue,
    {
      toValue: 1,
      duration: 1500,
      easing: Easing.easeOutBack
    }
  ).start(() => {
    if(this.state.animations[0].enabled){
      this.scale();
    }
  });
}
The other thing that's new in the function above is that we're passing in a function as an argument to the start() function. This function gets executed when the animation is done. Here we're checking if the animation is enabled, and if it is, we call the same function again. This allows us to execute the animation repeatedly as long as it's enabled.
() => {
    if(this.state.animations[0].enabled){
      this.scale();
    }
}
Then, in your render() function, configure the scaling interpolation. This time, we have three values for the input and output range to create a pulsing effect, like a heartbeat. This allows us to create a scale animation that doesn't abruptly make an object bigger or smaller. The highest output range is 7, so the object will be seven times bigger than its original size.
const nearFar = this.scaleValue.interpolate({
  inputRange: [0, 0.5, 1],
  outputRange: [1, 7, 1]
});
To conserve space, just add the scale transform on the same component that we used earlier:
<Animated.Image
  style={[
    styles.spinner,
    {
      transform: [
        {rotate: spin},
        {scale: nearFar}
      ]
    }
  ]}
  source={{uri: '../../img/loading.png'}}
/>
With those two transforms added, you can now enable both the spin and scale animation to execute them at the same time.
By now you should have noticed the patterns that allow us to create animations. Lots of code is repeated when doing animations. Best practice would be to create functions that encapsulate repeated code, but to keep things simple and easy to understand, let's stick with the raw code for the rest of the animations.
Opacity Animation
Now let's try to animate the opacity of a component. By now you should be pretty familiar with where each piece of code goes, so I'm no longer going to mention where you will place each one. But in case you get confused, you can simply look at the code on GitHub:
this.opacityValue = new Animated.Value(0);
Create a function for changing the opacity. When changing the opacity, a linear easing function is the best fit since it's the most straightforward one.
opacity() {
  this.opacityValue.setValue(0);
  Animated.timing(
    this.opacityValue,
    {
      toValue: 1,
      duration: 3000,
      easing: Easing.linear
    }
  ).start(() => {
    if(this.state.animations[2].enabled){
      this.opacity();
    }
  });
}
Change the opacity from visible to transparent and then visible again over the course of three seconds.
const opacity = this.opacityValue.interpolate({
  inputRange: [0, 0.5, 1],
  outputRange: [1, 0, 1]
});
Create a new component whose opacity will be controlled:
<Animated.View style={[
  styles.box, {opacity}
  ]}
/>
Color Value
Next, let's try to animate the background color of a component:
this.colorValue = new Animated.Value(0);
This time, we're animating over the course of five seconds:
colorChange() {
  this.colorValue.setValue(0);
  Animated.timing(this.colorValue, {
    toValue: 100,
    duration: 5000
  }).start(() => {
    if(this.state.animations[3].enabled){
        this.colorChange();
    }
  });
}
We have three colors to work with. The initial color is yellow, and then after a few seconds, it will completely turn to orange, and then to red. Note that the colors won't abruptly change; all the colors between the colors that you specified will be shown as well. React Native automatically computes the color values between the ones that you specified. You can make the duration longer if you want to see how the color changes over time.
const colorAnimation = this.colorValue.interpolate({
  inputRange: [0, 50, 100],
  outputRange: ['yellow', 'orange', 'red']
});
Just like the opacity, the interpolated value is added as a style:
<Animated.View style={[
  styles.box, {opacity},
  {backgroundColor: colorAnimation},
  ]}
/>
Parallel Animations
You can say that we've already executed animations in parallel. But that's just a side effect of having different transforms attached to a single component. If you want to execute multiple animations all at the same time, you need to use the parallel() function from the Animated API. This accepts an array of animation functions to execute. In the example below, we have two animated values, one for each component that we want to animate.
this.blue_box_X = new Animated.Value(0);
this.green_box_X = new Animated.Value(0);
In the animation function, we set the initial animated values as usual. But below it, we're using Animated.parallel() to group all the animations that we want to perform. In this case, we only have two timing animations, which execute for two seconds. Also notice that we're not calling the start() method on each animation. Instead, we're using it after declaring the parallel animation. This allows us to start the animations simultaneously.
parallelTranslateX() {
  this.blue_box_X.setValue(0);
  this.green_box_X.setValue(0);
  Animated.parallel([
      Animated.timing(
        this.blue_box_X,
        {
          toValue: 1,
          duration: 2000,
          easing: Easing.linear
        }
      ),
      Animated.timing(
        this.green_box_X,
        {
          toValue: 1,
          duration: 2000,
          easing: Easing.linear
        }
      )
  ]).start(() => {
    if(this.state.animations[4].enabled){
      this.parallelTranslateX();
    }
  });
}
For the interpolation to make sense, first check the style that we added for the two boxes earlier:
blue_box: {
  alignSelf: 'flex-start',
  backgroundColor: 'blue'
},
green_box: {
  alignSelf: 'flex-end',
  backgroundColor: 'green'
},
The blue box is aligned using flex-start, which means that it's aligned to the left. The green box is flex-end, which is aligned to the right. (At least, this is how they work if the container has a flexDirection of column. Otherwise, it's a different story.)
With this knowledge, we can now move the boxes anywhere we want. But for this tutorial, all we want to do is move the boxes to the opposite of their initial positions. So the blue box moves to the right, and the green box moves to the left. This is where the device dimension data comes in. We're using the width of the device to calculate the final interpolation value so that the box won't go out of bounds.
var {width} = Dimensions.get('window');
In this case, we're simply subtracting 50 from the device width to make the blue box go to the right. And for the green box, we're converting the device width to its negative equivalent so it moves to the left. You might be wondering, why 50? This is because the size of each box is 50. The box will still go out of bounds if we don't subtract its own size from the device width.
const blue_box_translateX = this.blue_box_X.interpolate({
  inputRange: [0, 1],
  outputRange: [0, width - 50],
});

const green_box_translateX = this.green_box_X.interpolate({
  inputRange: [0, 1],
  outputRange: [0, -width + 50],
});
Lastly, add the components to be animated. The transform in question is translateX, which allows us to change the position of an object in the X-axis in order to move it horizontally.
<Animated.View style={[
  styles.box,
  styles.blue_box,
  {
    transform: [
      {
        translateX: blue_box_translateX
      }
    ]
  }
  ]}
/>

<Animated.View style={[
  styles.box,
  styles.green_box,
  {
    transform: [
      {
        translateX: green_box_translateX
      }
    ]
  }
  ]}
/>
Aside from parallel animations, there are also the sequence and stagger animations.
The implementation of these is similar to parallel animations in the sense that they all accept an array of animations to be executed. But the defining factor for sequence animations is that the animations you've supplied in the array will be executed in sequence. You can also add optional delays to each animation if you want.
On the other hand, a stagger animation is a combination of parallel and sequence animations. This is because it allows you to run animations both in parallel and in sequence. Here's a pen which demonstrates stagger animations.
Layout Animation
Another tool that React Native provides for implementing animations is LayoutAnimation. This allows you to animate views into their new positions when the next layout happens. Layout changes usually happen when you update the state. This results in having a specific UI component either be added, updated, or removed from the screen.
When these events happen, LayoutAnimation takes care of animating the component concerned. For example, in a to-do list app, when you add a new to-do item, it will automatically add a spring animation to spring the new item into existence.
Let's add a LayoutAnimation into the kitchen sink app. As mentioned earlier, you'll need to import LayoutAnimation, Platform, and UIManager into the app. Then, in your constructor(), add the code for enabling LayoutAnimation on Android:
if (Platform.OS === 'android'){
  UIManager.setLayoutAnimationEnabledExperimental(true);
}
(On iOS, LayoutAnimation should work by default. If you're using React Native for Web, LayoutAnimation is not supported, so you'll need to have the app exported to either Android or iOS, and try it from there.)
Next, right below the ScrollView that contains the animations list, add a button for generating squares that will be shown on the screen:
<View>
  <TouchableHighlight style={[styles.button]}  onPress={this.addSquares.bind(this)}>
    <Text>Add Squares</Text>
  </TouchableHighlight>
</View>
Basically what this will do is to generate three small squares every time the user taps on the Add Squares button.
Here's the function for adding squares:
addSquares() {
  LayoutAnimation.configureNext(LayoutAnimation.Presets.spring);
  var squares = this.state.squares;
  this.setState({
    squares: squares + 3
  });
}
The idea is to call the LayoutAnimation.configureNext() before you update the state. This accepts the animation that you want to use. Out of the box, LayoutAnimation comes with three presets: linear, spring, and easeInEaseOut. These should work for most cases, but if you need to customize the animations, you can read the documentation on LayoutAnimation to learn how to create your own.
Inside the render() function, create a for loop that will render the squares. The number of squares to be generated depends on the current value of squares in the state.
var squares = [];
for(var i = 0; i < this.state.squares; i++){
  squares.push(this.renderSquare(i));
}
The renderSquare() function is the one that's actually rendering the squares:
renderSquare(key) {
  return (
    <Animated.View key={key} style={styles.square} />
  );
}
Third-Party Libraries
React Native's Animated API is very robust and customizable, but as you have seen so far, this comes with the disadvantage of having to write a lot of code just to implement very simple animations. So in this final section, I'll introduce you to two third-party libraries that will allow you to implement common animations with less code.
Animating Numbers
If you're creating an app which needs to animate numbers (e.g. a stopwatch or counter app), you can use the built-in setInterval() function to update the state on a set interval and then implement the animations yourself.
Or if you want, you can use the Animate Number library. This allows you to easily implement number animations, such as customizing the transition every time the number is updated. You can install it with the following command:
npm install react-native-animate-number --save
Once installed, import it into your app:
import AnimateNumber from 'react-native-animate-number';
Then use it as a component:
<AnimateNumber style={styles.number} value={100} countBy={1} />
What the above code does is count up to 100 starting from 0.
General-Purpose Animations
If you want to implement general-purpose animations such as the ones offered by the animate.css library, there's an equivalent library for React Native called Animatable. You can install it with the following command:
npm install react-native-animatable --save
Once installed, import it with the following code:
import * as Animatable from 'react-native-animatable';
Here's an example using the code that we added earlier for our layout animation. All you have to do is use <Animatable.View> instead of <Animated.View> and then add a ref so we can refer to this component using JavaScript code.
<Animatable.View style={styles.squares_container} ref="squares">
{squares}
</Animatable.View>
Next, create a resetSquares() method. This will remove all the squares that are currently on the screen. Use this.refs.squares to refer to the squares container, and then call the zoomOutUp() function to animate it out of view using a zoom out animation with the up direction. And don't forget to update the state after the animation has completed. This is a common pattern when implementing animations. Do the animation before updating the state.
resetSquares() {
  this.refs.squares.zoomOutUp(1500).then(() => {
    this.setState({
      squares: 0
    });
  });
}
The same is true with the addSquares() method. But this time, we're animating the squares container back in. And instead of executing the animation first, we're doing it right after the state has been updated. This is because the squares container isn't really displayed unless it has a child. So here we're breaking the rule that the animation should be executed first.
addSquares() {
  LayoutAnimation.configureNext(LayoutAnimation.Presets.spring);
  var squares = this.state.squares;

  if(squares == 0){
    this.setState({
      squares: squares + 3
    }, () => {
      this.refs.squares.zoomInDown(1);
    });
  }else{
    this.setState({
      squares: squares + 3
    });
  }
}
Conclusion
That's it! In this article, you've learned the basics of creating animations in React Native. Animations can be implemented using the Animated API, LayoutAnimations, and third-party libraries.
As you have seen, creating animations can take a considerable amount of code, even for simple ones such as a scaling animation. This comes with the benefit of allowing you to customize the animations any way you want.
However, if you don't want to deal with too much code, you can always use third-party React Native libraries specifically created for easily implementing animations. You can find the full source code used in this tutorial on GitHub.
Further Reading
- React Native Animations Using the Animated API: a beginner-friendly guide on implementing different kinds of animations in React Native. This tutorial covers sequence and stagger animations if you want to know more about them.
- React Native Animation Book: still a work in progress but nevertheless a valuable resource. It has almost anything you want to know about animations in React Native—for example, if you want to animate something on user scroll, or if you want to drag objects around.
- React Native Docs - Animations: if you want to know the specific details of how to implement animations in React Native.
- Animation in Mobile UX Design: not exactly related to React Native, but to mobile app animation in general. This is a good read for both UX designers and developers, to have a general idea on how to show meaningful animations to users.
Finally, if you want to learn more about CSS animation, check out some of our video courses.


Comments