This tutorial will teach you how to use Background Fetch, a multitasking API provided with the iOS 7 SDK. To do so, we'll create a simple list of delicious dishes that are automatically fetched in the background. Read on!
Project Overview
Background Fetch is an awesome feature released with iOS 7. Today, we live in a social world, and most of our users have several social network apps on their mobile devices. However, every time the user opens each app, they typically must wait until the app updates to view more recent content. This can be painful if several apps and profiles are used. Now, with background fetch, all content can be automatically fetched and updated before the user loads the app.
The default Traffic application is a simple example of how Background Fetch works in action. If you check it every morning, let's say at 8:20 AM, your iOS app must get that information at that time. Now, if the operating system knows you will access the app around 8:20 AM, it can fetch the data beforehand and have it ready when desired.
For a more comprehensive overview of the new multitasking features, be sure to read our introduction to this topic. The rest of this tutorial will be dedicated to a practical project that demonstrates how to implement Background Fetch.
1. Project Setup
The first step is to create an iOS 7 project and choose single view app. Next let's add some properties which will be useful along the tutorial:
@property (nonatomic) NSMutableArray *objects;
@property (nonatomic) NSArray *possibleTableData;
@property (nonatomic) int numberOfnewPosts;
@property (nonatomic) UIRefreshControl *refreshControl;
The NSMutablearray objects will be used to save the objects listed within the TableView. Note that, in this tutorial, you will not call any service to obtain data. Instead, you will use the possibleTableData array and randomly choose several objects from it. However, the app can easily be improved to fetch data from a server if you'd like.
The integer numberOfnewPosts represent the new posts that are available every time you will pull a request or receive a background fetch. The refrestControl is a control that is used when updating tasks. Since it is out of the tutorial context we will not cover it. However, you should look at this Mobiletuts+ tutorial if you'd like to learn more.
In the Main.storyboard, change the ViewController to a UITableViewController. Next, click on the UITableViewController and go to Editor > Embed in > Navigation Controller. Don't forget to set the Custom Class to ViewController.
Now, move to ViewController.m. the first step is to load some data. The following code will alloc and create the data object, create a title, and initialize the refreshControl:
    self.possibleTableData = [NSArray arrayWithObjects:@"Spicy garlic Lime Chicken",@"Apple Crisp II",@"Eggplant Parmesan II",@"Pumpkin Ginger Cupcakes",@"Easy Lasagna", @"Puttanesca", @"Alfredo Sauce", nil];

    self.navigationItem.title = @"Delicious Dishes";

    self.refreshControl = [[UIRefreshControl alloc] init];
    [self.refreshControl addTarget:self action:@selector(insertNewObject:) forControlEvents:UIControlEventValueChanged];

    [self.tableView addSubview:self.refreshControl];
The above code will generate a warning because the insertNewObject method is missing. Let's resolve that!
The method will generate a random number and will get that exact same number of objects from the data array. Then, it will update the tableview with new values.
- (void)insertNewObject:(id)sender
{
    self.numberOfnewPosts = [self getRandomNumberBetween:0 to:4];
    NSLog(@"%d new fetched objects",self.numberOfnewPosts);

    for(int i = 0; i < self.numberOfnewPosts; i++){
        int addPost = [self getRandomNumberBetween:0 to:(int)([self.possibleTableData count]-1)];
        [self insertObject:[self.possibleTableData objectAtIndex:addPost]];
    }
    [self.refreshControl endRefreshing];

}
The getRandomNumberBetween warning will be suppressed when you add the following method:
-(int)getRandomNumberBetween:(int)from to:(int)to {
    return (int)from + arc4random() % (to-from+1);
}
To load the objects on the NSArray object, we need to implement the delegate methods of the TableView.
- (NSInteger)numberOfSectionsInTableView:(UITableView *)tableView {
    return 1;
}

- (NSInteger)tableView:(UITableView *)tableView numberOfRowsInSection:(NSInteger)section {
    return self.objects.count;
}


- (UITableViewCell *)tableView:(UITableView *)tableView cellForRowAtIndexPath:(NSIndexPath *)indexPath {
    UITableViewCell *cell = [tableView dequeueReusableCellWithIdentifier:@"Cell" forIndexPath:indexPath];

    cell.textLabel.text = self.objects[indexPath.row];

    if(indexPath.row < self.numberOfnewPosts){
        cell.backgroundColor = [UIColor yellowColor];
    }
    else
        cell.backgroundColor = [UIColor whiteColor];

    return cell;
}
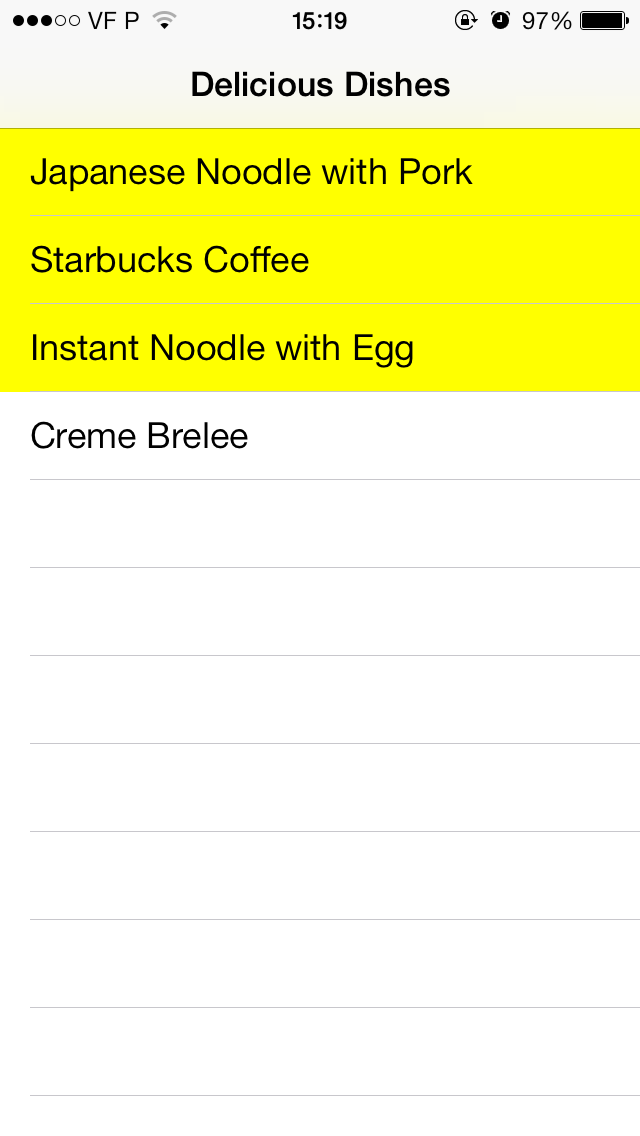
Pretty simple, right? If you Run the project you will have an interface similar to the following image:

2. Background Fetch
Now, you want to create the Background Fetch feature. To make the background fetch available, you need to go to Project > Capabilities > Put Background Modes ON and then select Background Fetch, as presented in the next figure:

However, doing this alone is not enough. By default, the app will never call the background API, so you need to add the following line to the -(BOOL)application:(UIApplication *)application didFinishLaunchingWithOptions:(NSDictionary *)launchOptions method within the AppDelegate.m file:
[[UIApplication sharedApplication] setMinimumBackgroundFetchInterval:UIApplicationBackgroundFetchIntervalMinimum];
This will allow the system to decide when it should get new content.
Now that your app already knows to initiate background fetch, let's tell it what to do. The method -(void)application:(UIApplication *)application performFetchWithCompletionHandler:(void (^)(UIBackgroundFetchResult))completionHandler will assist in doing so. This method is called every time that a background fetch is performed, and should be included in the AppDelegate.m file. The complete version is provided below:
-(void)application:(UIApplication *)application performFetchWithCompletionHandler:(void (^)(UIBackgroundFetchResult))completionHandler {

    UINavigationController *navigationController = (UINavigationController*)self.window.rootViewController;

    id topViewController = navigationController.topViewController;
    if ([topViewController isKindOfClass:[ViewController class]]) {
        [(ViewController*)topViewController insertNewObjectForFetchWithCompletionHandler:completionHandler];
    } else {
        NSLog(@"Not the right class %@.", [topViewController class]);
        completionHandler(UIBackgroundFetchResultFailed);
    }
}
Next you should also import the ViewController header file into the AppDelegate.m class.
#import "ViewController.h"
Note that, the insertNewObjectForFetchWithCompletionHandler was not yet created. So, move to the ViewController.h and declare it.
- (void)insertNewObjectForFetchWithCompletionHandler:(void (^)(UIBackgroundFetchResult))completionHandler;
Now focus your attention on the implementation file. The implementation is very similar to the insertNewObject call added before. However, we use the completionHandler to talk to the system and tell us if the app fetched new data, or if no data was available.
- (void)insertNewObjectForFetchWithCompletionHandler:(void (^)(UIBackgroundFetchResult))completionHandler {
    NSLog(@"Update the tableview.");

    self.numberOfnewPosts = [self getRandomNumberBetween:0 to:4];
    NSLog(@"%d new fetched objects",self.numberOfnewPosts);

    for(int i = 0; i < self.numberOfnewPosts; i++){
        int addPost = [self getRandomNumberBetween:0 to:(int)([self.possibleTableData count]-1)];
        [self insertObject:[self.possibleTableData objectAtIndex:addPost]];
    }
    /*
     At the end of the fetch, invoke the completion handler.
     */
    completionHandler(UIBackgroundFetchResultNewData);
}
At this point, the code should be completed. Now, let's simulate a test and verify that everything is up and running!
3. Simulated Background Fetch
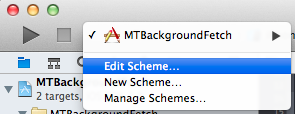
So, if you want to make sure if everything is configured, you need to edit your Schemes. Go to the Schemes list and click on the Manage Schemes option, as presented in the following figure:

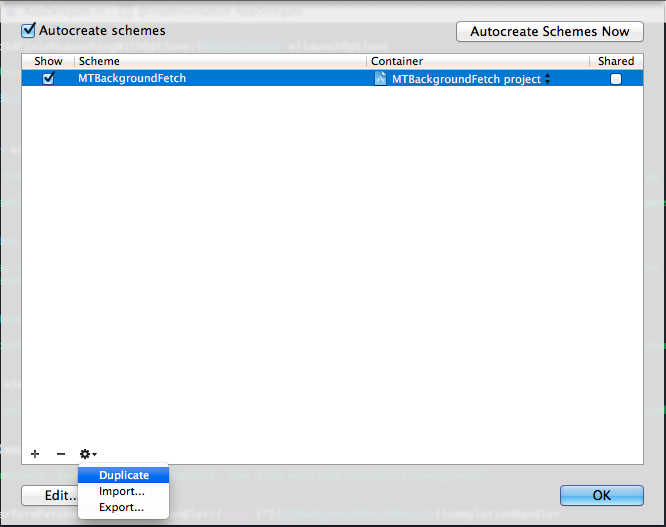
Under the Schemes management section you can duplicate the scheme of your application:

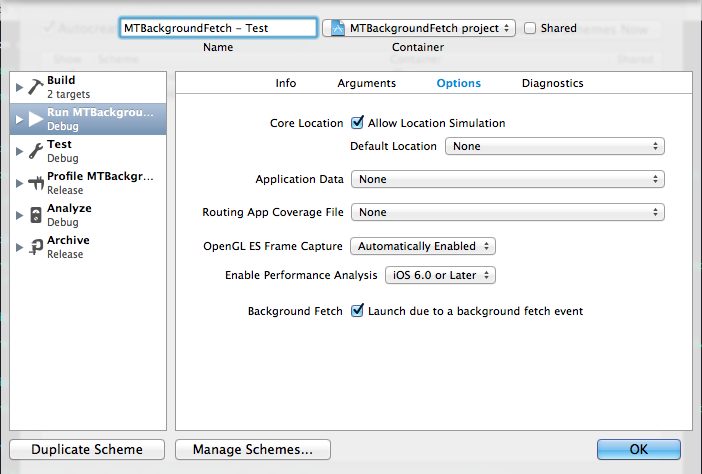
After duplicating the scheme a new window will be presented. You can change its name from the Options Tab. Check the Launch due to a background fetch event box. Now, just click Ok in all windows.

Next, run the app using the duplicated scheme.
Note that the app will not open in the foreground, but it should have already fetched some content. If you open the app and several recipes are already available, that means that you succeeded! To force a background fetch, you can also use Debug > Simulate Background Fetch. from the Xcode menu.
Conclusion
At the end of this tutorial, you should understand the background fetch mechanism and how to implement it in your own apps.
If you have any questions, please leave them in the comments section below!


Comments