Local Storage
The Internet plays an important role in mobile applications. Most Windows Phone applications available in the Store make use of the network connection offered by every device. However, relying only on the network connection can be a mistake; users can find themselves in situations where no connection is available. In addition, data plans are often limited, so the fewer network operations we do, the better the user experience is.
Windows Phone offers a special way to store local data called isolated storage. It works like a regular file system, so you can create folders and files as on a computer hard drive. The difference is that the storage is isolated—only your applications can use it. No other applications can access your storage, and users are not able to see it when they connect their phone to the computer. Moreover, as a security measure, the isolated storage is the only storage that the application can use. You’re not allowed to access the operating system folders or write data in the application’s folder.
Local storage is one of the features which offers duplicated APIs—the old Silverlight ones based on the IsolatedStorageFile class and the new Windows Runtime ones based on the LocalFolder class. As mentioned in the beginning of the series, we’re going to focus on the Windows Runtime APIs.
Working With Folders
The base class that identifies a folder in the local storage is called StorageFolder. Even the root of the storage (which can be accessed using the ApplicationData.Current.LocalStorage class that is part of the Windows.Storage namespace) is a StorageFolder object.
This class exposes different asynchronous methods to interact with the current folder, such as:
-
CreateFolderAsync()to create a new folder in the current path. -
GetFolderAsync()to get a reference to a subfolder of the current path. -
GetFoldersAsync()to get the list of folders available in the current path. -
DeleteAsync()to delete the current folder. -
RenameAsync()to rename a folder.
In the following sample, you can see how to create a folder in the local storage’s root:
private async void OnCreateFolderClicked(object sender, RoutedEventArgs e)
{
    await

    ApplicationData.Current.LocalFolder.CreateFolderAsync(“myFolder”);
}
Unfortunately, the APIs don’t have a method to check if a folder already exists. The simplest solution is to try to open the folder using the GetFolderAsync() method and intercept the FileNotFoundException error that is raised if the folder doesn’t exist, as shown in the following sample:
private async void OnOpenFileClicked(object sender, RoutedEventArgs e)
{
    StorageFolder folder;
    try
    {
        folder = await ApplicationData.Current.LocalFolder.GetFolderAsync(“myFolder”);
    }
    catch (FileNotFoundException exc)
    {
        folder = null;
    }

    if (folder == null)
    {
        MessageBox.Show(“The folder doesn’t exist”);
    }
}
Working With Files
Files, instead, are identified by the StorageFile class, which similarly offers methods to interact with files:
-
DeleteAsync()to delete a file. -
RenameAsync()to rename a file. -
CopyAsync()to copy a file from one location to another. -
MoveAsync()to move a file from one location to another.
The starting point to manipulate a file is the StorageFolder class we’ve previously discussed, since it offers methods to open an existing file (GetFileAsync()) or to create a new one in the current folder (CreateFileAsync()).
Let’s examine the two most common operations: writing content to a file and reading content from a file.
How to Create a File
As already mentioned, the first step to create a file is to use the CreateFile() method on a StorageFolder object. The following sample shows how to create a new file called file.txt in the local storage’s root:
private async void OnCreateFileClicked(object sender, RoutedEventArgs e)
{
    StorageFile file = await ApplicationData.Current.LocalFolder.CreateFileAsync(“file.txt”, CreationCollisionOption.ReplaceExisting);
}
You can also pass the optional parameter CreationCollisionOption to the method to define the behavior to use in case a file with the same name already exists. In the previous sample, the ReplaceExisting value is used to overwrite the existing file.
Now that you have a file reference thanks to the StorageFile object, you are able to work with it using the OpenAsync() method. This method returns the file stream, which you can use to write and read content.
The following sample shows how to write text inside the file:
private async void OnCreateFileClicked(object sender, RoutedEventArgs e)
{
    StorageFile file = await ApplicationData.Current.LocalFolder.CreateFileAsync(“file.txt”, CreationCollisionOption.ReplaceExisting);
    IRandomAccessStream randomAccessStream = await file.OpenAsync(FileAccessMode.ReadWrite);

    using (DataWriter writer = new DataWriter(randomAccessStream.GetOutputStreamAt(0)))
    {
        writer.WriteString(“Sample text”);
        await writer.StoreAsync();    }
}
The key is the DataWriter class, which is a Windows Runtime class that can be used to easily write data to a file. We simply have to create a new DataWriter object, passing as a parameter the output stream of the file we get using the GetOuputStreamAt() method on the stream returned by the OpenAsync() method.
The DataWriter class offers many methods to write different data types, like WriteDouble() for decimal numbers, WriteDateTime() for dates, and WriteBytes() for binary data. In the sample we write text using the WriteString() method, and then we call the StoreAsync() and FlushAsync() methods to finalize the writing operation.
Note: The using statement can be used with classes that support the IDisposable interface. They are typically objects that lock a resource until the operation is finished, like in the previous sample. Until the writing operation is finished, no other methods can access the file. With the using statement, we make sure that the lock is released when the operation is completed.
How to Read a File
The operation to read a file is not very different from the writing one. In this case, we also need to get the file stream using the OpenFile() method. The difference is that, instead of using the DataWriter class, we’re going to use the DataReader class, which does the opposite operation. Look at the following sample code:
private async void OnReadFileClicked(object sender, RoutedEventArgs e)
{
    StorageFile file = await ApplicationData.Current.LocalFolder.GetFileAsync("file.txt");
    IRandomAccessStream randomAccessStream = await file.OpenAsync(FileAccessMode.Read);

    using (DataReader reader = new DataReader(randomAccessStream.GetInputStreamAt(0)))
    {
        uint bytesLoaded = await reader.LoadAsync((uint) randomAccessStream.Size);
        string readString = reader.ReadString(bytesLoaded);
        MessageBox.Show(readString);
    }
}
In this case, instead of the CreateFileAsync() method, we use the GetFileAsync() method, which can be used to get a reference to an already existing file. Then, we start the reading procedure using the DataReader class, this time using the input stream that we get using the GetInputStreamAt() method.
Like the DataWriter class, DataReader also offers many methods to read different data types, like ReadDouble(), ReadDateTime(), and ReadBytes(). In this case, we read the text we’ve previously written by using the ReadString() method, which requires the size of the file as its parameter.
A Special Folder: InstalledLocation
The local storage is the only storage we can use to write our application’s data, but in some cases, we may need to include in our project some existing files that need to be processed by the application.
The Windows Runtime offers an API to provide access to the folder where the application is installed and where all the files that are part of your Visual Studio project are copied. It’s called Package.Current.InstalledLocation, and it’s part of the Windows.ApplicationModel namespace.
The InstalledLocation’s type is StorageFolder, like the folders in local storage, so you can use the same methods to work with files and folders. Keep in mind that you won’t be able to write data, but only read it.
In the following sample, we copy a file from the application’s folder to the local storage so that we gain write access.
private async void OnCopyFileClicked(object sender, RoutedEventArgs e)
{
    StorageFile file = await Package.Current.InstalledLocation.GetFileAsync("file.xml");
    await file.CopyAsync(ApplicationData.Current.LocalFolder);
}
Note: During development you may notice that you’ll be able to execute write operations in the application’s folder. Don’t count on it—during the certification process, the app is locked, so when the app is distributed on the Windows Phone Store, the write access is revoked and you’ll start getting exceptions.
Manage Settings
One common scenario in mobile development is the need to store settings. Many applications offer a Settings page where users can customize different options.
To allow developers to quickly accomplish this task, the SDK includes a class called IsolatedStorageSettings, which offers a dictionary called ApplicationSettings that you can use to store settings.
Note: The IsolatedStorageSettings class is part of the old storage APIs; the Windows Runtime offers a new API to manage settings but, unfortunately, it isn’t available in Windows Phone.
Using the ApplicationSettings property is very simple: its type is Dictionary<string, object> and it can be used to store any object.
In the following sample, you can see two event handlers: the first one saves an object in the settings, while the second one retrieves it.
private void OnSaveSettingsClicked(object sender, RoutedEventArgs e)
{
    IsolatedStorageSettings settings = IsolatedStorageSettings.ApplicationSettings;
    settings.Add("name", "Matteo");
    settings.Save();
}

private void OnReadSettingsClicked(object sender, RoutedEventArgs e)
{
    IsolatedStorageSettings settings = IsolatedStorageSettings.ApplicationSettings;
    if (settings.Contains("name"))
    {
        MessageBox.Show(settings["name"].ToString());
    }
}
The only thing to highlight is the Save() method, which you need to call every time you want to persist the changes you’ve made. Except for this, it works like a regular Dictionary collection.
Note: Under the hood, settings are stored in an XML file. The API automatically takes care of serializing and deserializing the object you save. We’ll talk more about serialization later in this article.
Debugging the Local Storage
A common requirement for a developer working with local storage is the ability to see which files and folders are actually stored. Since the storage is isolated, developers can’t simply connect the phone to a computer and explore it.
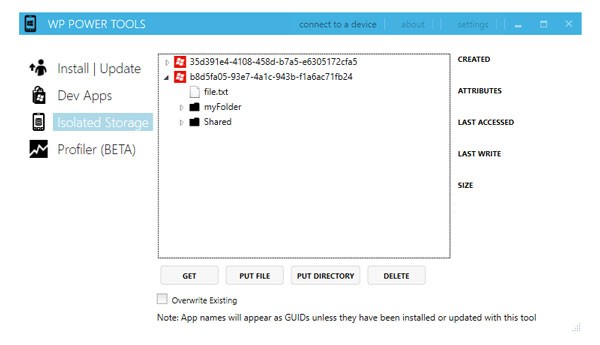
The best way to view an application’s local storage is by using a third-party tool available on CodePlex called Windows Phone Power Tools, which offers a visual interface for exploring an application’s local storage.
The tool is easy to use. After you’ve installed it, you’ll be able to connect to a device or to one of the available emulators. Then, in the Isolated Storage section, you’ll see a list of all the applications that have been side-loaded from Visual Studio. Each one will be identified by its application ID (which is a GUID). Like a regular file explorer, you can expand the tree structure and analyze the storage’s content. You’ll be able to save files from the device to your PC, copy files from your PC to the application storage, and even delete items.
Storing Techniques
In the previous section, we discussed the basic APIs available to store files and folders in your application. In this section, we’ll go deeper to see the best ways to store your application’s data, so that it can be maintained across different applications.
Serialization and Deserialization
Serialization is the simplest way to store an application’s data in the local storage. It’s the process that converts complex objects into plain text so that they can be stored in a text file, using XML or JSON as output. Deserialization is the opposite process; the plain text is converted back into objects so that they can be used by the application.
In a Windows Phone application that uses these techniques, serialization is typically applied every time the application’s data is changed (when a new item is added, edited, or removed) to minimize the risk of losing data if something happens, like an unexpected crash or a suspension. Deserialization, instead, is usually applied when the application starts for the first time.
Serialization is very simple to use, but its usage should be limited to applications that work with small amounts of data, since everything is kept in memory during the execution. Moreover, it best suits scenarios where the data to track is simple. If you have to deal with many relationships, databases are probably a better solution (we’ll talk more about this later in the article).
In the following samples, we’re going to use the same Person class we used earlier in this series.
public class Person
{
    public string Name { get; set; }
    public string Surname { get; set; }
}
We assume that you will have a collection of Person objects, which represents your local data:
List<Person> people = new List<Person>
                        {
                            new Person
                                {
                                    Name = "Matteo",
                                    Surname = "Pagani"
                                },
                            new Person
                                {
                                    Name = "John",
                                    Surname = "Doe"
                                }
                        };
Serialization
To serialize our application’s data we’re going to use the local storage APIs we learned about in the previous section. We’ll use the CreateFile() method again, as shown in the following sample:
private async void OnSerializeClicked(object sender, RoutedEventArgs e)
{
    DataContractSerializer serializer = new DataContractSerializer(typeof(List<Person>));

    StorageFile file = await ApplicationData.Current.LocalFolder.CreateFileAsync("people.xml");
    IRandomAccessStream randomAccessStream = await file.OpenAsync(FileAccessMode.ReadWrite);

    using (Stream stream = randomAccessStream.AsStreamForWrite())
    {
        serializer.WriteObject(stream, people);
        await stream.FlushAsync();
    }
}
The DataContractSerializer class (which is part of the System.Runtime.Serialization namespace) takes care of managing the serialization process. When we create a new instance, we need to specify which data type we’re going to serialize (in the previous sample, it’s List<Person>). Next, we create a new file in the local storage and get the stream needed to write the data. The serialization operation is made by calling the WriteObject() method of the DataContractSerializer class, which requires as parameters the stream location in which to write the data and the object to serialize. In this example, it’s the collection of Person objects we’ve previously defined.
If you take a look at the storage content using the Windows Phone Power Tools, you’ll find a people.xml file, which contains an XML representation of your data:
<ArrayOfPerson xmlns:i="http://www.w3.org/2001/XMLSchema-instance" xmlns="http://schemas.datacontract.org/2004/07/Storage.Classes">
  <Person>
    <Name>Matteo</Name>
    <Surname>Pagani</Surname>
  </Person>
  <Person>
    <Name>John</Name>
    <Surname>Doe</Surname>
  </Person>
</ArrayOfPerson>
Tip: The DataContractSerializer class uses XML as its output format. If you want to use JSON instead, you’ll have to use the DataContractJsonSerializer class, which works in the same way.
Deserialization
The deserialization process is very similar and involves, again, the storage APIs to read the file’s content and the DataContractSerializer class. The following sample shows how to deserialize the data we serialized in the previous section:
private async void OnDeserializeClicked(object sender, RoutedEventArgs e)
{
    StorageFile file = await ApplicationData.Current.LocalFolder.GetFileAsync("people.xml");
    DataContractSerializer serializer = new DataContractSerializer(typeof(List<Person>));

    IRandomAccessStream randomAccessStream = await file.OpenAsync(FileAccessMode.Read);

    using (Stream stream = randomAccessStream.AsStreamForRead())
    {
        List<Person> people = serializer.ReadObject(stream) as List<Person>;
    }
}
The only differences are:
- We get a stream to read by using the
AsStreamForRead()method. - We use the
ReadObject()method of theDataContractSerializerclass to deserialize the file’s content, which takes the file stream as its input parameter. It’s important to note that the method always returns a generic object, so you’ll always have to cast it to your real data type (in the sample, we cast it asList<Person>).
Using Databases: SQL CE
When you develop complex applications, you probably have to deal with complex data. Databases are a good solution to manage this scenario because they support relationships, and because the entire dataset is not kept in memory, only the needed items are.
SQL CE is the database solution that was introduced in Windows Phone 7.5. It’s a stand-alone database, which means that data is stored in a single file in the storage without needing a DBMS to manage all the operations.
Windows Phone uses SQL CE 3.5 (the latest release at this time is 4.0, but it is not supported) and doesn’t support SQL query execution. Every operation is made using LINQ to SQL, which is one of the first of Microsoft’s ORM solutions.
Note: ORM (Object-Relation Mapping) solutions are libraries that are able to automatically translate object operations (insert, edit, remove) into database operations. This way, you can keep working on your project using an object-oriented approach. ORM will take care of writing the required SQL queries to store your data in the database.
The approach used by SQL CE on Windows Phone is called code first. The database is created the first time the data is needed, according to the entities definition that you’re going to store in tables. Another solution is to include an already existing SQL CE file in your Visual Studio project. In this case, you’ll only be able to work with it in read-only mode.
How to Define the Database
The first step is to create the entities that you’ll need to store in your database. Each entity will be mapped to a specific table.
Entity definition is made using attributes, which are part of the System.Data.Linq.Mapping namespace. Each property is decorated with an attribute, which will be used to translate it into a column. In the following sample we adapt the familiar Person class to be stored in a table:
[Table]
public class Person
{
    [Column(IsPrimaryKey = true, CanBeNull = false, IsDbGenerated = true)]
    public string Id { get; set; }

    [Column]
    public string Name { get; set; }

    [Column]
    public string Surname { get; set; }
}
The entire entity is marked with the Table attribute, while every property is marked with the Column attribute. Attributes can be customized with some properties, like:
-
IsPrimaryKeyto apply to columns that are part of the primary key. -
IsDbGeneratedin case the column’s value needs to be automatically generated every time a new row is inserted (for example, an automatically incremented number). -
Nameif you want to assign to the column a different name than the property. -
DbTypeto customize the column’s type. By default, the column’s type is automatically set by the property’s type.
Working With the Database: The DataContext
DataContext is a special class that acts as an intermediary between the database and your application. It exposes all the methods needed to perform the most common operations, like insert, update, and delete.
The DataContext class contains the connection string’s definition (which is the path where the database is stored) and all the tables that are included in the database. In the following sample, you can see a DataContext definition that includes the Person table we’ve previously defined:
public class DatabaseContext: DataContext
{
    public static string ConnectionString = "Data source=isostore:/Persons.sdf";

    public DatabaseContext(string connectionString):base(connectionString)
    {

    }

    public Table<Person> Persons;
}
A separate class of your project inherits from the DataContext class. It will force you to implement a public constructor that supports a connection string as its input parameter. There are two connection string types, based on the following prefixes:
-
isostore:/means that the file is stored in the local storage. In the previous sample, the database’s file name isPersons.sdfand it’s stored in the storage’s root. -
appdata:/means that the file is stored in the Visual Studio project instead. In this case, you’re forced to set theFile Modeattribute toRead Only.
public static string ConnectionString = "Data source=appdata:/Persons.sdf; File Mode=Read Only";
Eventually, you can also encrypt the database by adding a Password attribute to the connection string:
public static string ConnectionString = "Data source=isostore:/Persons.sdf; Password='password'";
Creating the Database
As soon as the data is needed, you’ll need to create the database if it doesn’t exist yet. For this purpose, the DataContext class exposes two methods:
-
DatabaseExists()returns whether the database already exists. -
CreateDatabase()effectively creates the database in the storage.
In the following sample, you can see a typical database initialization that is executed every time the application starts:
private void OnCreateDatabaseClicked(object sender, RoutedEventArgs e)
{
    using (DatabaseContext db = new DatabaseContext(DatabaseContext.ConnectionString))
    {
        if (!db.DatabaseExists())
        {
            db.CreateDatabase();
        }
    }
}
Working With the Data
All the operations are made using the Table<T> object that we’ve declared in the DataContext definition. It supports standard LINQ operations, so you can query the data using methods like Where(), FirstOrDefault(), Select(), and OrderBy().
In the following sample, you can see how we retrieve all the Person objects in the table whose name is Matteo:
private void OnShowClicked(object sender, RoutedEventArgs e)
{
    using (DatabaseContext db = new DatabaseContext(DatabaseContext.ConnectionString))
    {
        List<Person> persons = db.Persons.Where(x => x.Name == "Matteo").ToList();
    }
}
The returned result can be used not only for display purposes, but also for editing. To update the item in the database, you can change the values of the returned object by calling the SubmitChanges() method exposed by the DataContext class.
To add new items to the table, the Table<T> class offers two methods: InsertOnSubmit() and InsertAllOnSubmit(). The first method can be used to insert a single object, while the second one adds multiple items in one operation (in fact, it accepts a collection as a parameter).
private void OnAddClicked(object sender, RoutedEventArgs e)
{
    using (DatabaseContext db = new DatabaseContext(DatabaseContext.ConnectionString))
    {
        Person person = new Person
        {
            Name = "Matteo",
            Surname = "Pagani"
        };
        db.Persons.InsertOnSubmit(person);
        db.SubmitChanges();
    }
}
Please note again the SubmitChanges() method: it’s important to call it every time you modify the table (by adding a new item or editing or deleting an already existing one), otherwise changes won’t be saved.
In a similar way, you can delete items by using the DeleteOnSubmit() and DeleteAllOnSubmit() methods. In the following sample, we delete all persons with the name Matteo:
private void OnDeleteClicked(object sender, RoutedEventArgs e)
{
    using (DatabaseContext db = new DatabaseContext(DatabaseContext.ConnectionString))
    {
        List<Person> persons = db.Persons.Where(x => x.Name == "Matteo").ToList();
        db.Persons.DeleteAllOnSubmit(persons);
        db.SubmitChanges();
    }
}
Relationships
In the previous sections, we’ve talked about data that is stored in a single table. Now it’s time to introduce relationships, which are a way to connect two or more tables. As an example, we’ll add a new Order entity to our database, which we’ll use to save the orders made by users stored in the Person table.
With LINQ to SQL we’ll be able to:
- Add a
Personproperty to theOrderentity that will store a reference to the user who made the order. - Add an
Orderscollection to thePersonentity that will contain all the orders made by the user.
This is accomplished by using a foreign key, which is a property declared in the Order entity that will hold the primary key value of the user who made the order.
Here is how the Order class looks:
[Table]
public class Order
{
    [Column(IsPrimaryKey = true)]
    public int OrderCode
    {
        get;
        set;
    }

    [Column]
    public double TotalPrice
    {
        get;
        set;
    }

    [Column]
    public string ShippingAddress
    {
        get;
        set;
    }

    [Column]
    public int PersonId
    {
        get;
        set;
    }

    private EntityRef<Person> _Person;

    [Association(Name = "PersonOrders",
        Storage = "_Person",
        ThisKey = "PersonId",
        OtherKey = "PersonId",
        IsForeignKey = true)]
    public Person Person
    {
        get
        {
            return this._Person.Entity;
        }
        set
        {
            Person previousValue = this._Person.Entity;
            if (((previousValue != value) || (this._Person.HasLoadedOrAssignedValue == false)))
            {
                if ((previousValue != null))
                {
                    this._Person.Entity = null;
                    previousValue.Orders.Remove(this);
                }
                this._Person.Entity = value;
                if ((value != null))
                {
                    value.Orders.Add(this);
                    this.PersonId = value.Id;
                }
                else
                {
                    this.PersonId = default(int);
                }
            }
        }
    }
}
There are two key properties in the class definition:
-
PersonIdis the foreign key, which simply holds the person’s ID. -
Personis a realPersonobject that, thanks to theAssociationattribute, is able to hold a reference to the user who made the order. The property’s setter contains some logic to manage whether you’re adding a new value or removing an already existing one.
Of course, we have to also change the Person class definition in order to manage the relationships:
[Table]
public class Person
{
    public Person()
    {
        _Orders = new EntitySet<Order>();
    }
    [Column(IsPrimaryKey = true, CanBeNull = false, IsDbGenerated = true)]
    public int Id { get; set; }

    [Column]
    public string Name { get; set; }

    [Column]
    public string Surname { get; set; }

    private EntitySet<Order> _Orders;

    [Association(Name = "PersonOrders",
    Storage = "_Orders",
    ThisKey = "PersonId",
    OtherKey = "PersonId",
    DeleteRule = "NO ACTION")]
    public EntitySet<Order> Orders
    {
        get
        {
            return this._Orders;
        }
        set
        {
            this._Orders.Assign(value);
        }
    }
}
Also in this class, we’ve defined a new property called Orders, whose type is EntitySet<T>, where T is the type of the other table involved in the relationship. Thanks to the Association attribute, we are be able to access all the orders made by a user simply by querying the Orders collection.
In the following samples, you can see two common operations in which a relationship is involved: creation and selection.
private void OnAddClicked(object sender, RoutedEventArgs e)
{
    using (DatabaseContext db = new DatabaseContext(DatabaseContext.ConnectionString))
    {
        Person person = new Person
        {
            Name = "Matteo",
            Surname = "Pagani",
        };

        Order order = new Order
        {
            TotalPrice = 55,
            ShippingAddress
                = "Fake Street, Milan",
            Person = person
        };

        db.Orders.InsertOnSubmit(order);
        db.SubmitChanges();
    }
}

private void OnQueryClicked(object sender, RoutedEventArgs e)
{
    using (DatabaseContext db = new DatabaseContext(DatabaseContext.ConnectionString))
    {
        Order result = db.Orders.FirstOrDefault(x => x.OrderCode == 1);
        MessageBox.Show(result.Person.Name);
    }
}
Since Person is a property of the Order class, it’s enough to create a new order and set the object that represents the user who made the order as a value of the Person property.
In the same way, when we get an order we are able to get the user’s details simply by querying the Person property. In the previous sample, we display the name of the user who made the order.
Updating the Schema
A common scenario when you’re planning to release an application update is that you’ve changed the database schema by adding a new table or new column, for example.
SQL CE in Windows Phone offers a specific class to satisfy this requirement, called DatabaseSchemaUpdater, which offers some methods to update an already existing database’s schema.
Note: The DatabaseSchemaUpdater’s purpose is just to update the schema of an already existing database. You still need to update your entities and DataContext definition to reflect the new changes.
The key property offered by the DatabaseSchemaUpdater class is DatabaseSchemaVersion, which is used to track the current schema’s version. It’s important to properly set it every time we apply an update because we’re going to use it when the database is created or updated to recognize whether we’re using the latest version.
After you’ve modified your entities or the DataContext definition in your project, you can use the following methods:
-
AddTable<T>()if you’ve added a new table (of typeT). -
AddColumn<T>()if you’ve added a new column to a table (of typeT). -
AddAssociation<T>()if you’ve added a new relationship to a table (of typeT).
The following sample code is executed when the application starts and needs to take care of the schema update process:
private void OnUpdateDatabaseClicked(object sender, RoutedEventArgs e)
{
    using (DatabaseContext db = new DatabaseContext(DatabaseContext.ConnectionString))
    {
        if (!db.DatabaseExists())
        {
            db.CreateDatabase();
            DatabaseSchemaUpdater updater = db.CreateDatabaseSchemaUpdater();
            updater.DatabaseSchemaVersion = 2;
            updater.Execute();
        }
        else
        {
            DatabaseSchemaUpdater updater = db.CreateDatabaseSchemaUpdater();
            if (updater.DatabaseSchemaVersion < 2)
            {
                updater.AddColumn<Person>("BirthDate");
                updater.DatabaseSchemaVersion = 2;
                updater.Execute();
            }
        }
    }
}
We’re assuming that the current database’s schema version is 2. In case the database doesn’t exist, we simply create it and, using the DatabaseSchemaUpdater class, we update the DatabaseSchemaVersion property. This way, the next time the data will be needed, the update operation won’t be executed since we’re already working with the latest version.
Instead, if the database already exists, we check the version number. If it’s an older version, we update the current schema. In the previous sample, we’ve added a new column to the Person table, called BirthDate (which is the parameter requested by the AddColumn<T>() method). Also in this case we need to remember to properly set the DatabaseSchemaVersion property to avoid further executions of the update operation.
In both cases, we need to apply the described changes by calling the Execute() method.
SQL Server Compact Toolbox: An Easier Way to Work With SQL CE
Erik Ej, a Microsoft MVP, has developed a powerful Visual Studio tool called SQL Server Compact Toolbox that can be very helpful for dealing with SQL CE and Windows Phone applications.
Two versions of the tool are available:
- As an extension that’s integrated into commercial versions of Visual Studio.
- As a stand-alone tool for Visual Studio Express since it does not support extensions.
The following are some of the features supported by the tool:
- Automatically create entities and a
DataContextclass starting from an already existing SQL CE database. - The generated
DataContextis able to copy a database from your Visual Studio project to your application’s local storage. This way, you can start with a prepopulated database and, at the same time, have write access. - The generated
DataContextsupports logging in the Visual Studio Output Window so you can see the SQL queries generated by LINQ to SQL.
Using Databases: SQLite
SQLite, from a conceptual point of view, is a similar solution to SQL CE: it’s a stand-alone database solution, where data is stored in a single file without a DBMS requirement.
The pros of using SQLite are:
- It offers better performance than SQL CE, especially with large amounts of data.
- It is open source and cross-platform; you’ll find a SQLite implementation for Windows 8, Android, iOS, web apps, etc.
SQLite support has been introduced only in Windows Phone 8 due to the new native code support feature (since the SQLite engine is written in native code), and it’s available as a Visual Studio extension that you can download from the Visual Studio website.
After you’ve installed it, you’ll find the SQLite for Windows Phone runtime available in the Add reference window, in the Windows Phone Extension section. Be careful; this runtime is just the SQLite engine, which is written in native code. If you need to use a SQLite database in a C# application, you’ll need a third-party library that is able to execute the appropriate native calls for you.
In actuality, there are two available SQLite libraries: sqlite-net and SQLite Wrapper for Windows Phone. Unfortunately, neither of them is as powerful and flexible as the LINQ to SQL library that is available for SQL CE.
Let’s take a brief look at them. We won’t dig too deeply. Since they’re in constant development, things can change very quickly.
Sqlite-net
Sqlite-net is a third-party library. The original version for Windows Store apps is developed by Frank A. Krueger, while the Windows Phone 8 port is developed by Peter Huene.
The Windows Phone version is available on GitHub. Its configuration procedure is a bit tricky and changes from time to time, so be sure to follow the directions provided by the developer on the project’s home page.
Sqlite-net offers a LINQ approach to use the database that is similar to the code-first one offered by LINQ to SQL with SQL CE.
For example, in sqlite-net, tables are mapped with your project’s entities. The difference is that, this time, attributes are not required since every property will be automatically translated into a column. Attributes are needed only if you need to customize the conversion process, as in the following sample:
public class Person
{
    [PrimaryKey, AutoIncrement]
    public int Id { get; set; }

    [MaxLength(50)]
    public string Name { get; set; }

    public string Surname { get; set; }
}
Surname doesn’t have any attribute, so it will be automatically converted into a varchar column. Instead, we set Id as a primary key with an auto increment value, while we specify that Name can have a maximum length of 50 characters.
All the basic operations with the database are accomplished using the SQLiteAsyncConnection class, which exposes asynchronous methods to create tables, query the data, delete items, etc. It requires as an input parameter the local storage path where the database will be saved.
As with SQL CE and LINQ to SQL, we need to create the database before using it. This is done by calling the CreateTableAsync<T>() method for every table we need to create, where T is the table’s type. In the following sample, we create a table to store the Person entity:
private async Task CreateDatabase()
{
    SQLiteAsyncConnection conn = new SQLiteAsyncConnection(Path.Combine(ApplicationData.Current.LocalFolder.Path, "people.db"), true);
    await conn.CreateTableAsync<Person>();
}
We don’t have a method to verify whether the table already exists since it’s not needed; if the table we’re creating already exists, the CreateTableAsync<T>() method simply won’t do anything.
In a similar way to LINQ to SQL, queries are performed using the Table<T> object. The only difference is that all the LINQ methods are asynchronous.
private async void OnReadDataClicked(object sender, RoutedEventArgs e)
{
    SQLiteAsyncConnection conn = new SQLiteAsyncConnection(Path.Combine(ApplicationData.Current.LocalFolder.Path, "people.db"), true);
    List<Person> person = await conn.Table<Person>().Where(x => x.Name == "Matteo").ToListAsync();
}
In the previous sample, we retrieve all the Person objects whose name is Matteo.
Insert, update, and delete operations are instead directly executed using the SQLiteAsyncConnection object, which offers the InsertAsync(), UpdateAsync(), and DeleteAsync() methods. It is not required to specify the object’s type; sqlite-net will automatically detect it and execute the operation on the proper table. In the following sample, you can see how a new record is added to a table:
private async void OnAddDataClicked(object sender, RoutedEventArgs e)
{
    SQLiteAsyncConnection conn = new SQLiteAsyncConnection(Path.Combine(ApplicationData.Current.LocalFolder.Path, "people.db"), true);

    Person person = new Person
    {
        Name = "Matteo",
        Surname = "Pagani"
    };

    await conn.InsertAsync(person);
}
Sqlite-net is the SQLite library that offers the easiest approach, but it has many limitations. For example, foreign keys are not supported, so it’s not possible to easily manage relationships.
SQLite Wrapper for Windows Phone
SQLite Wrapper for Windows Phone has been developed directly by Microsoft team members (notably Peter Torr and Andy Wigley) and offers a totally different approach than sqlite-net. It doesn’t support LINQ, just plain SQL query statements.
The advantage is that you have total control and freedom, since every SQL feature is supported: indexes, relationships, etc. The downside is that writing SQL queries for every operation takes more time, and it’s not as easy and intuitive as using LINQ.
To learn how to configure the wrapper in your project, follow the instructions posted on the CodePlex project page. You’ll have to download the project’s source code and add the correct wrapper version to your solution—there are two separate libraries, one for Windows Phone 8 and one for Windows Store apps.
The key class is called Database, which takes care of initializing the database and offers all the methods needed to perform the queries. As a parameter, you need to set the local storage path to save the database. If the path doesn’t exist, it will be automatically created. Then, you need to open the connection using the OpenAsync() method. Now you are ready to perform operations.
There are two ways to execute a query based on the value it returns.
If the query doesn’t return a value—for example, a table creation—you can use the ExecuteStatementAsync() method as shown in the following sample:
private async void OnCreateDatabaseClicked(object sender, RoutedEventArgs e)
{
    Database database = new Database(ApplicationData.Current.LocalFolder, “people.db”);

    await database.OpenAsync();

    string query = “CREATE TABLE PEOPLE “ +
                    “(Id INTEGER PRIMARY KEY AUTOINCREMENT NOT NULL,” +
                    “Name varchar(100), “ +
                    “Surname varchar(100))”;

    await database.ExecuteStatementAsync(query);
}
The previous method simply executes the query against the opened database. In the sample, we create a People table with two fields, Name and Surname.
The query, instead, can contain some dynamic parameters or return some values. In this case, we need to introduce a new class called Statement as demonstrated in the following sample:
private async void OnAddDataClicked(object sender, RoutedEventArgs e)
{
    Database database = new Database(ApplicationData.Current.LocalFolder, “people.db”);

    await database.OpenAsync();

    string query = “INSERT INTO PEOPLE (Name, Surname) VALUES (@name, @surname)”;
    Statement statement = await database.PrepareStatementAsync(query);
    statement.BindTextParameterWithName(“@name”, “Matteo”);
    statement.BindTextParameterWithName(“@surname”, “Pagani”);

    await statement.StepAsync();
}
The Statement class identifies a query, but it allows additional customization to be performed with it. In the sample, we use it to assign a dynamic value to the Name and Surname parameters. We set the placeholder using the @ prefix (@name and @surname), and then we assign them a value using the BindTextParameterWithName() method, passing the parameter’s name and the value.
BindTextParameterWithName() isn’t the only available method, but it’s specifically for string parameters. There are other methods based on the parameter’s type, such as BindIntParameterWithName() for numbers.
To execute the query, we use the StepAsync() method. Its purpose isn’t just to execute the query, but also to iterate the resulting rows.
In the following sample, we can see how this method can be used to manage the results of a SELECT query:
private async void OnGetDataClicked(object sender, RoutedEventArgs e)
{
    Database database = new Database(ApplicationData.Current.LocalFolder, “people.db”);

    await database.OpenAsync();

    string query = “SELECT * FROM PEOPLE”;
    Statement statement = await database.PrepareStatementAsync(query);

    while (await statement.StepAsync())
    {
        MessageBox.Show(statement.GetTextAt(0) + “ “ + statement.GetTextAt(1));
    }
}
The StepAsync() method is included inside a while statement. At every loop iteration, we’ll get the reference to the next row returned by the query, starting from the first one. After we’ve iterated all the rows, the application will quit the while loop.
When we have a row’s reference, we can access its values by using the column index and the Get() method. We have a Get() variant for every data type, like GetText(), GetInt(), etc.
Another way is to access the columns using the Columns collection with the column name as the index. In this case, you first have to call the EnableColumnsProperty() method, as shown in the following sample:
private async void OnGetSomeDataWithColumnsPropertyClicked(object sender, RoutedEventArgs e)
{
    Database database = new Database(ApplicationData.Current.LocalFolder, “people.db”);

    await database.OpenAsync();

    string query = “SELECT * FROM PEOPLE”;
    Statement statement = await database.PrepareStatementAsync(query);

    statement.EnableColumnsProperty();

    while (await statement.StepAsync())
    {
        MessageBox.Show(statement.Columns[“Name”] + “ “ + statement.Columns[“Surname”]);
    }
}
Keep in mind that this approach is slower than using the column’s index.
Conclusion
This article delivered more key concepts that every Windows Phone developer should be familiar with. Managing local data is important, and in this article we’ve discussed the following approaches:
- Correctly using files and folders in the isolated storage thanks to the Windows Runtime APIs.
- Easily managing our application’s settings by using the
IsolatedStorageSettingsclass. - Storing our application’s data using serialization and deserialization in simple app scenarios.
- In case of more complex applications, we’ve seen how we can better organize our data using databases. We analyzed two available solutions: SQL CE and SQLite. They both offer a stand-alone database platform. SQL CE is exclusive to Windows Phone, but it is more powerful and easier to use; SQLite is open source and cross-platform, but you have to rely on third-party libraries which aren’t as powerful as LINQ to SQL for SQL CE.
This tutorial represents a chapter from Windows Phone 8 Succinctly, a free eBook from the team at Syncfusion.

Comments