In the previous post, I talked about GitHub Pages and how to set it up on your GitHub repository. We used the site generator to get started and I mentioned that GitHub Pages also supports Jekyll.
In this post, I will talk about Jekyll and show you how to get it setup with your project. I have created an example project that you pull down and follow along with as well.
What is Jekyll?
What exactly is Jekyll? Here's their description on their site:
Jekyll is a simple, blog-aware, static site generator.
It is completely content driven and it also supports Markdown. It uses Liquid for its layouts so you have some reuse of things like your head, header, and footer. It will generate static pages based on your content and the layouts you specify.
It is also blog aware, so it could be a potential replacement for WordPress or another CMS.
Perhaps the most important thing to note is that, in Jekyll, permalinks, categories, pages, posts, and custom layouts are all first-class citizens.
You are also able to generate and view your site locally, as well.
Installation
Jekyll is based on Ruby, so the easiest way to install is using RubyGems. If you are on Mac or Linux, you can install Jekyll via the command line by running gem install jekyll. If you run into any issues during that install I would suggest checking out the installation guide.
If you are on Windows then there's a Windows-specific docs page that you will need to follow.
Configuration
The first thing that you will need to setup is the configuration file. You will want to add a _config.yml file to the root of your project. There are a number of configuration options you can add, I will use a subset of them for this example. Go ahead and add the following to your _config.yml file:
# Dependencies
markdown:         rdiscount
pygments:         true

# Permalinks
permalink:        pretty

# Server
destination:      _gh_pages
host:             0.0.0.0
port:             9001
baseurl:          /
encoding:         UTF-8
Now that we have our configuration file added, let's continue setting up the project structure.
Project Structure
There is a specific structure that you need to follow when creating a Jekyll-based site. It's important to follow the structure in order for your site to be generated correctly. Here's what it looks like,
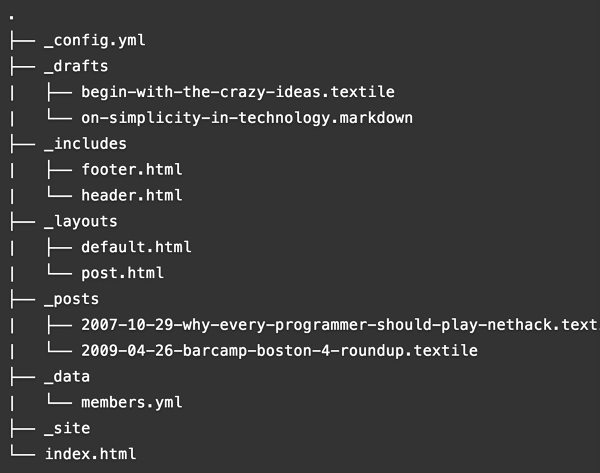
_layouts
This is where you are going to have your different layouts for your pages. You can think of these to be like WordPress page templates. You might want your default layout to have a sidebar and have another layout that doesn't have a sidebar. You will reference these layouts in your content based on the name of the file.
Go ahead and create a _layouts folder in the root of your project. Next let's say that you want to create the default layout. You will want to create a default.html inside the _layouts folder. You will then be able to reference the default layout in your different pages.
There are a couple of things that you will probably want to add to each of your layout files, the page title and content. If you want to have your page title show up, then you will want to add it to your layout by using the following syntax:
<h1>{{ page.title }}</h1>
You will also want to specify where you want the content of each page to be populated in that layout. To do so, you will need to use the following syntax:
{{ content }}
These are used in the default.html in the example project.
You will probably want to include some other things that will be reused in each page like the header, footer, navigation, and others. You will want to add these into your _includes folder.
_includes
The includes are going to be things that you will want to reuse on different pages like I mentioned above. You will want to add them in the _includes folder. Go ahead and create a _includes folder in the root of your project.
Let's say you want to have the document head as an include. You would first need to add a head.html file in the _includes folder. You would then add everything you need for the document head like the doctype, meta data, scripts, etc.
Next you will want to reference that head.html file in your default.html layout file. You will do this by using the following syntax:
{% include head.html %}
You can see this being used in the default.html in the example project.
You would do the same for anything else you want to reuse between pages like your header and footer. You can also create subfolders inside the _includes folder and reference them as well. I like doing this to organize the difference sections of each page if they have a lot of content.
Setting Up Your Pages
Now that we have a default layout, let's make our first page. Go ahead and create an index.html file in the root folder of your project. Don't worry, it won't override your theme's index.php file if you using this to document your WordPress theme.
The top of each file you will need to specify a few things about the page. This is what jekyll will reference when building each page. There are a number of things you are able to set, but I am going to focus on a few of them:
- layout - the layout your want this page to use
- title - the page title
- slug - the pretty permalink for the page
Here's an example to add to the top of your index.html file:
---
layout: default
title: Tuts+ GitHub Pages
slug: tuts-github-pages
---
Now that we have our page setup, all we have to do now is add our content. Simply add all of the HTML you want to show up in your page.
Building and Serving Your Pages
The building and serving of your pages is done through the command line. Go ahead and open up your command line tool of choice, type in jekyll serve and hit Enter. You should see the following output:

If you are seeing the correct output, then your pages are built and ready to be viewed. Now you can view your pages by going to http://localhost:9001, or whatever port your specified in your _config.yml file, in your browser of choice.
Conclusion
I have covered the basics on getting started with using Jekyll with your project. I walked through how to set up the configuration file and the project structure. I also talked about how you can build and serve your pages. If you want to see everything put together, then you can take a look at this example project.
In the next post, I will talk about how to serve your pages on GitHub Pages and distribute them in your WordPress theme or plugin.

Comments