Over the past few months HHVM has taken the PHP community by storm. Since WordPress 3.9 was released, HHVM is now 100% compatible with WordPress.
Unfortunately, HHVM is not quite ready for use in production in self-hosted environments. In my experience, HHVM crashes about once per day, which makes it not viable for a site where high availability is important. Recently, WP Engine has released project Mercury which seamlessly allows HHVM to gracefully fail by falling back to PHP 5.5 when it fails.
In this article, we're going to install HHVM on an Ubuntu server running the latest LTS release, 14.04. This can be accomplished either by using a visualization program like VirtualBox (free) with a downloaded Ubuntu ISO file, or by using a cloud hosting service. DigitalOcean offers cloud servers for $5 a month, which is what I’ll be using in this tutorial.
The first thing you should do is update all packages and dependencies:
$ sudo apt-get update && sudo apt-get upgrade
Install MySQL
Now you need to install MySQL, the database that powers WordPress.
$ sudo apt-get install mysql-server
You should set a root MySQL password for obvious security reasons. If you are extra security conscious you should also run $ mysql_secure_installation and follow the necessary steps to lock down your server.
Install Nginx
The next thing you need to do is set up a webserver. I prefer to use Nginx because it is lightweight, versatile, and easy to configure.
$ sudo apt-get install nginx
Install HHVM
Now install HHVM. It isn't as straightforward as installing other packages because it is not available on the Ubuntu repository. Instead we have to download it from HHVM itself, along with a few dependencies.
wget -O - http://dl.hhvm.com/conf/hhvm.gpg.key | sudo apt-key add -
echo deb http://dl.hhvm.com/ubuntu trusty main | sudo tee /etc/apt/sources.list.d/hhvm.list
sudo apt-get update
cd /tmp  && wget http://security.ubuntu.com/ubuntu/pool/main/libm/libmemcached/libmemcached10_1.0.8-1ubuntu2_amd64.de...
sudo dpkg -i libmemcached10_1.0.8-1ubuntu2_amd64.deb && rm libmemcached10_1.0.8-1ubuntu2_amd64.deb
sudo apt-get install -y libgnutls26
wget http://mirrors.kernel.org/ubuntu/pool/main/r/rtmpdump/librtmp0_2.4+20121230.gitdf6c518-1_amd64.deb && sudo dpkg -i librtmp0_2.4+20121230.gitdf6c518-1_amd64.deb && rm librtmp0_2.4+20121230.gitdf6c518-1_amd64.deb
sudo apt-get install hhvm
Now that we have installed HHVM, we need to run an install script that will install the HHVM module for Nginx.
sudo /usr/share/hhvm/install_fastcgi.sh
Now restart HHVM and Nginx.
sudo /etc/init.d/hhvm restart
sudo /etc/init.d/nginx restart
Set Up the Website
The next thing we need to do is set up a virtual host for our website. Typically you would create a new virtual host for each website on a server, but since we're testing (and for simplicity's sake) we're just going to overwrite the content of /etc/nginx/sites-available/default with a simple file below:
Note: you need root permissions to edit this file.
server {
  listen 80;
      server_name localhost; # or replace localhost with domain name
  	include hhvm.conf;

  	access_log   /var/log/nginx/access.log;
	error_log    /var/log/nginx/error.log;

	root /var/www;
	index index.php;

	location / {
		try_files $uri $uri/ /index.php?$args;
  	}
}
Now we can set up WordPress:
- Reload your updated nginx configuration:
$ sudo service nginx reload. - Now create a web root directory:
$ sudo mkdir /var/www. - Download WordPress:
$ sudo wgethttp://wordpress.org/latest.tar.gz/var/www/. - Extract WordPress:
$ sudo tar xvf /var/www/latest.tar.gz. - Move WordPress files to web root:
$ sudo mv /var/www/wordpress/* /var/www/. - Clean up:
$ sudo rm -rf /var/www/wordpress /var/www/latest.tar.gz. - Set permissions:
$ sudo chmod -R 775 /var/www. - Set groups:
$ sudo chown -R www-data.www-data /var/www.
Set Up the WordPress Database
Log in to MySQL $ mysql -u root -p. Now run the following commands:
CREATE DATABASE wordpress;
CREATE USER wordpress@localhost;
GRANT ALL PRIVILEGES ON wordpress.* to username@localhost IDENTIFIED BY 'password';
FLUSH PRIVILEGES;
quit
Now you can go to your server's IP address and follow the famous five-minute install.
Conclusion
Congratulations! You now have your very own WordPress site running on cutting edge technology. Here are my speeds running default WordPress using HHVM, following the instructions above:
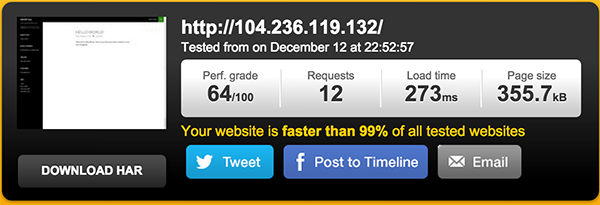
How fast is your site loading?

Comments