This is an extract from the Unit Testing Succinctly eBook, by Marc Clifton, kindly provided by Syncfusion.
A unit test is comprised of two things:
- A class representing the test fixture.
- Methods in the class representing the unit tests.
Visual Studio will automatically create a stub for a test project, which is where we will start.
Creating a Unit Test Project in Visual Studio
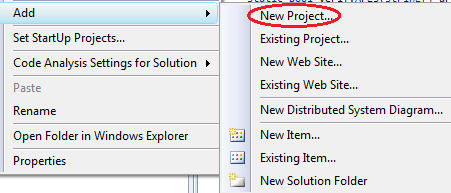
Unit tests are typically placed in a separate project (resulting in a distinct assembly) from your application code. In Visual Studio 2008 or 2012, you can create a unit test project by right-clicking on the solution and selecting Add followed by New Project from the pop-up menu:
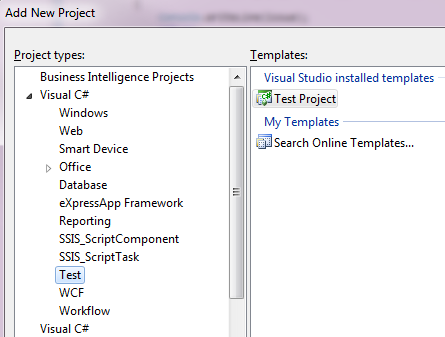
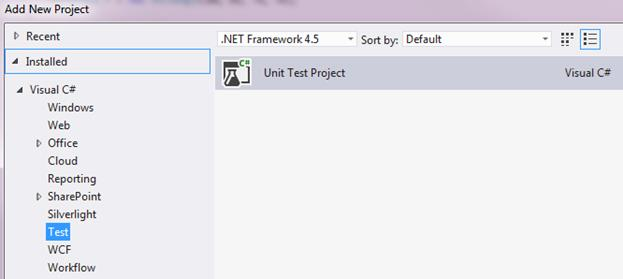
From the dialog box that appears, select a Test project:
Visual Studio 2008 will create a stub file, “UnitTest1.cs” (if you selected the C# language), with a variety of helpful comments in the stub. Visual Studio 2012 creates a much terser stub:
using System;
using Microsoft.VisualStudio.TestTools.UnitTesting;

namespace VS2012UnitTestProject1
{
  [TestClass]
  public class UnitTest1
  {
    [TestMethod]
    public void TestMethod1()
    {
    }
  }
}
For Visual Studio 2008 Users
Visual Studio 2008 will also create a TestContext class—this no longer exists in VS2012 and we will ignore it—use the previous stub from VS2012 instead.
Also, delete the “ManualTest1.mht” file, otherwise you will be prompted to select test results and enter test notes manually.
Test Fixtures
Notice that the class is decorated with the attribute TestClass. This defines the test fixture—a collection of test methods.
Test Methods
Notice that the method is decorated with the attribute TestMethod. This defines a method, which the test fixture will run.
The Assert Class
The assert class defines the following static methods that can be used to verify a method’s computation:
- AreEqual/AreNotEqual
- AreSame/AreNotSame
- IsTrue/IsFalse
- IsNull/IsNotNull
- IsInstanceOfType/IsNotInstanceOfType
Many of these assertions are overloaded and it is recommended that you review the full documentation that Microsoft provides.
Fundamentals of Making an Assertion
Note that the following examples use VS2008.
Assertions are the backbone of every test. There are a variety of assertions one can make regarding the results of a test. To begin with, we’ll write a simple assertion that states “one equals one,” in other words, a truism:
[TestClass]
public class UnitTest1
{
  [TestMethod]
  public void TestMethod1()
  {
    Assert.IsTrue(1 == 1);
  }
}
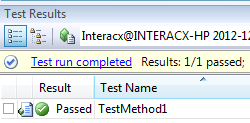
Run the test, which should result in “Passed”:
AreEqual/AreNotEqual
The AreEqual and AreNotEqual methods compare:
- objects
- doubles
- singles
- strings
- typed data
They take the form of comparing the expected (the first parameter) with the actual (the second parameter) value. With regard to single and double values, “within a certain accuracy” can be specified. Lastly, all the overloads have the option to display a message (optionally formatted) if the assertion fails.
With regard to object equality, this method compares whether the instances are identical:
public class AnObject
{
}

[TestMethod]
public void ObjectEqualityTest()
{
  AnObject object1 = new AnObject();
  AnObject object2 = new AnObject();

  Assert.AreNotEqual(object1, object2);
}
The preceding test passes, as object1 and object2 are not equal. However, if the class overrides the Equals method, then the equality is based on the comparison made by the Equals method implemented in the class. For example:
public class AnObject
{
  public int SomeValue { get; set; }

  public override bool Equals(object obj)
  {
    return SomeValue == ((AnObject)obj).SomeValue;
  }
}

[TestMethod]
public void ObjectEqualityTest()
{
  AnObject object1 = new AnObject() { SomeValue = 1 };
  AnObject object2 = new AnObject() { SomeValue = 1 } ;

  Assert.AreEqual(object1, object2);
}
AreSame/AreNotSame
These two methods verify that the instances are the same (or not). For example:
[TestMethod]
public void SamenessTest()
{
  AnObject object1 = new AnObject() { SomeValue = 1 };
  AnObject object2 = new AnObject() { SomeValue = 1 };

  Assert.AreNotSame(object1, object2);
}
Even though the class AnObject overrides the Equals operator, the preceding test passes because the instances of the two objects are not the same.
IsTrue/IsFalse
These two methods allow you to test the truth of a value comparison. From a readability perspective, the IsTrue and IsFalse methods are typically used for value comparisons, whereas AreEqual and AreSame are typically used to compare instances (objects).
For example:
[TestMethod]
public void IsTrueTest()
{
  AnObject object1 = new AnObject() { SomeValue = 1 };

  Assert.IsTrue(object1.SomeValue == 1);
}
This verifies that value of a property.
IsNull/IsNotNull
These two tests verify whether an object is null or not:
[TestMethod]
public void IsNullTest()
{
  AnObject object1 = null;

  Assert.IsNull(object1);
}
IsInstanceOfType/IsNotInstanceOfType
These two methods verify that an object is an instance of a specific type (or not). For example:
public class AnotherObject
{
}

[TestMethod]
public void TypeOfTest()
{
  AnObject object1 = new AnObject();

  Assert.IsNotInstanceOfType(object1, typeof(AnotherObject));
}
Inconclusive
The Assert.Inconclusive method can be used to specify that either the test or the functionality behind the test has not yet been implemented and therefore the test is inconclusive.
What Happens When An Assertion Fails?
With regard to Visual Studio unit testing, when an assertion fails, the Assert method throws an AssertFailedException. This exception should never be handled by your test code.
Other Assertion Classes
There are two other assertion classes:
- CollectionAssert
- StringAssert
As their names imply, these assertions operate on collections and strings, respectively.
Collection Assertions
These methods are implemented in the Microsoft.VisualStudio.TestTools.UnitTesting.CollectionAssert class. Note that the collection parameter in these methods expects the collection to implement ICollection (contrast this with NUnit, which expects IEnumerable).
AllItemsAreInstanceOfType
This assertion verifies that objects in a collection are of the same type, which includes derived types of the expected type, as illustrated here:
public class A { }
public class B : A { }

[TestClass]
public class CollectionTests
{
  [TestMethod]
  public void InstancesOfTypeTest()
  {
    List points = new List() { new Point(1, 2), new Point(3, 4) };
    List<object> items = new List<object>() { new B(), new A() };

    CollectionAssert.AllItemsAreInstancesOfType(points, typeof(Point));
    CollectionAssert.AllItemsAreInstancesOfType(items, typeof(A));
  }
}
AllItemsAreNotNull
This assertion verifies that objects in the collection are not null.
AllItemsAreUnique
This test ensures that objects in a collection are unique. If comparing structures:
[TestMethod]
public void AreUniqueTest()
{
  List points = new List() { new Point(1, 2), new Point(1, 2) };
  CollectionAssert.AllItemsAreUnique(points);
}
the structures are compared by value, not by instance—the preceding test fails. However, even if the class overrides the Equals method:
public class AnObject
{
  public int SomeValue { get; set; }

  public override bool Equals(object obj)
  {
    return SomeValue == ((AnObject)obj).SomeValue;
  }
}
this test passes:
[TestMethod]
public void AreUniqueObjectsTest()
{
  List<object> items = new List<object>()
  {
    new AnObject() { SomeValue = 1 },
    new AnObject() { SomeValue = 1 }
  };

  CollectionAssert.AllItemsAreUnique(items);
}
AreEqual/AreNotEqual
These tests assert that two collections are equal. The methods include overloads that allow you to provide a comparator method. If an object overrides the Equals method, that method will be used to determine equality. For example:
[TestMethod]
public void AreEqualTest()
{
List<object> itemList1 = new List<object>()
  {
    new AnObject() { SomeValue = 1 },
    new AnObject() { SomeValue = 2 }
  };

  List<object> itemList2 = new List<object>()
  {
    new AnObject() { SomeValue = 1 },
    new AnObject() { SomeValue = 2 }
  };

  CollectionAssert.AreEqual(itemList1, itemList2);
}
These two collections are equal because the class AnObject overrides the Equals method (see previous example).
Note that to pass the assertion, the lists must be of the same length and are considered not equal if the lists are identical except in a different order. Compare this with the AreEquivalent assertion described next.
AreEquivalent/AreNotEquivalent
This assertion compares two lists and considers lists of equal items to be equivalent regardless of order. Unfortunately, there appears to be a bug in the implementation, as this test fails:
[TestMethod]
public void AreEqualTest()
{
List<object> itemList1 = new List<object>()
  {
    new AnObject() { SomeValue = 1 },
    new AnObject() { SomeValue = 2 }
  };
  List<object> itemList2 = new List<object>()
  {
    new AnObject() { SomeValue = 2 },
    new AnObject() { SomeValue = 1 }
  };

  CollectionAssert.AreEquivalent(itemList1, itemList2);
}

with the error message:
CollectionAssert.AreEquivalent failed. The expected collection contains 1 occurrence(s) of . The actual collection contains 0 occurrence(s).
Whereas NUnit’s implementation of this assertion passes:
Contains/DoesNotContain
This assertion verifies that an object is contained in a collection:
[TestMethod]
public void ContainsTest()
{
  List<object> itemList = new List<object>()
  {
    new AnObject() { SomeValue = 1 },
    new AnObject() { SomeValue = 2 }
  };

  CollectionAssert.Contains(itemList, new AnObject() { SomeValue = 1 });
}
using the Equals method (if overridden) to perform the equality test.
IsSubsetOf/IsNotSubsetOf
This assertion verifies that the first parameter (the subset) is contained in the second parameter’s collection (the superset).
[TestMethod]
public void SubsetTest()
{
  string subset = "abc";
  string superset = "1d2c3b4a";

  CollectionAssert.IsSubsetOf(subset.ToCharArray(), superset.ToCharArray());
}
Note that the subset test does not test for order or sequence—it simply tests whether the items in the subset list are contained in the superset.
String Assertions
These methods are implemented in the Microsoft.VisualStudio.TestTools.UnitTesting.StringAssert class:
- Contains
- Matches/DoesNotMatch
- StartsWith/EndsWith
These are discussed next.
Contains
The Contains method asserts that the subset (note that this is the second parameter) is contained in the string (the first parameter). For example, this test passes:
[TestClass]
public class StringTests
{
  [TestMethod]
  public void ContainsTest()
  {
    string subset = "abc";
    string superset = "123abc456";

    StringAssert.Contains(superset, subset);
  }
}
Matches/DoesNotMatch
This method asserts that the string (the first parameter) matches the regex pattern provided in the second parameter.
StartsWith/EndsWith
This method asserts that the string (the first parameter) either starts with or ends with another string (the second parameter).
Exceptions
Exceptions can be tested without writing try-catch blocks around the test method. For example, while you could write this:
[TestMethod]
public void CatchingExceptionsTest()
{
  try
  {
    Divide(5, 0);
  }
  catch (ArgumentOutOfRangeException)
  {
    // Silently accept the exception as valid.
  }
}
It is much more readable to use the ExpectedException attribute on the test method:
[TestMethod]
[ExpectedException(typeof(ArgumentOutOfRangeException))]
public void BadParameterTest()
{
  Divide(5, 0);
}
Other Useful Attributes
There are some additional attributes that are useful for running a suite of tests as well as individual tests that improve the reusability and readability of the unit test code base.
Setup/Teardown
Visual Studio’s unit test engine provides four additional method attributes:
- ClassInitialize
- ClassCleanup
- TestInitialize
- TestCleanup
These attributes precede and follow the execution of all tests within the fixture (class), as well as before and after each test in the fixture.
Note that the methods decorated with this attribute must be static.
ClassInitialize
If a method is decorated with this attribute, the code in the method is executed prior to running all tests in the fixture. Note that this method requires a TestContext parameter.
This method is useful to allocate resources or instantiate classes that all the tests in the fixture rely on. An important consideration with resources and objects created during the fixture initialization is that these resources and objects should be considered read-only. It is not advisable for tests to change the state of resources and objects on which other tests depend. This includes connections to services such as database and web services whose connection might be put into an invalid state as the result of an error in a test, thus invalidating all of the other tests. Furthermore, the order in which tests run is not guaranteed. Altering the state of a resource and object created in the fixture initialization may result in side effects, depending on the order in which tests are run.
ClassCleanup
A method decorated with this attribute is responsible for de-allocating resources, closing connections, etc., that were created during class initialization. This method will always execute after running the tests within the fixture, regardless of the success or failure of the tests themselves.
TestInitialize
Similar to the ClassInitialize attribute, a method decorated with this attribute will be executed for each test prior to running the test. One of the purposes of this attribute is to ensure that resources or objects allocated by the ClassInitialize code are initialized to a known state before running each test.
TestCleanup
Complementing the TestInitialize attribute, methods decorated with TestCleanup will be executed at the completion of each test.
Setup and Teardown Flow
The following code demonstrates the flow of fixture and test setup and teardown with relation to the actual tests:
[TestClass]
public class SetupTeardownFlow
{
  [ClassInitialize]
  public static void SetupFixture(TestContext context)
  {
    Debug.WriteLine("Fixture Setup.");
  }

  [ClassCleanup]
  public static void TeardownFixture()
  {
    Debug.WriteLine("Fixture Teardown.");
  }

  [TestInitialize]
  public void SetupTest()
  {
    Debug.WriteLine("Test Setup.");
  }

  [TestCleanup]
  public void TeardownTest()
  {
    Debug.WriteLine("Test Teardown.");
  }

  [TestMethod]
  public void TestA()
  {
    Debug.WriteLine("Test A.");
  }

  [TestMethod]
  public void TestB()
  {
    Debug.WriteLine("Test B.");
  }
}
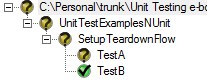
Running this fixture results in the following debug output trace:
Fixture Setup.
Test Setup.
Test A.
Test Teardown.
Test Setup.
Test B.
Test Teardown.
Fixture Teardown.
As is illustrated in the previous example, the fixture is initialized—then for each test, the test setup and teardown code executes, followed by the fixture teardown at the end.
Less Frequently Used Attributes
The following section describes less commonly used attributes.
AssemblyInitialize/AssemblyCleanup
Methods decorated with this attribute must be static and are executed when the assembly is loaded. This begs the question—what if the assembly has more than one test fixture?
[TestClass]
public class Fixture1
{
  [AssemblyInitialize]
  public static void AssemblyInit(TestContext context)
  {
    // ... some operation
  }
}

[TestClass]
public class Fixture2
{
  [AssemblyInitialize]
  public static void AssemblyInit(TestContext context)
  {
    // ... some operation
  }
}
If you try this, the test engine fails to run any unit tests, reporting:
“UTA013: UnitTestExamplesVS2008.Fixture2: Cannot define more than one method with the AssemblyInitialize attribute inside an assembly.”
Therefore, only one AssemblyInitialize and one AssemblyCleanup method can exist for an assembly, regardless of the number of test fixtures in that assembly. It is therefore recommended that no actual tests are put into the class that defines these methods:
[TestClass]
public class AssemblyFixture
{
  [AssemblyInitialize]
  public static void AssemblySetup(TestContext context)
  {
    Debug.WriteLine("Assembly Initialize.");
  }

  [AssemblyCleanup]
  public static void AssemblyTeardown()
  {
    Debug.WriteLine("Assembly Cleanup.");
  }
}
resulting in the following execution sequence:
Assembly Initialize.
Fixture Setup.
Test Setup.
Test A.
Test Teardown.
Test Setup.
Test B.
Test Teardown.
Fixture Teardown.
Assembly Cleanup.
Note the additional assembly initialize and cleanup calls.
Ignore
This method can decorate specific methods or entire fixtures.
Ignore a Test Method
If this attribute decorates a test method:
[TestMethod, Ignore]
public void TestA()
{
  Debug.WriteLine("Test A.");
}
the test will not run. Unfortunately, the Visual Studio Test Result pane does not indicate that there are tests currently ignored:
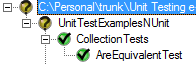
Compare this with NUnit, which clearly shows ignored tests:
The NUnit display marks the entire test tree as “unknown” when one or more test methods are marked as “Ignore.”
Ignore a Test Fixture
An entire fixture’s methods can be ignored by using the Ignore attribute at the class level:
[TestClass, Ignore]
public class SetupTeardownFlow
{
... etc ...
Clearing the Test Cache
If you add the Ignore attribute to a method, you may notice that Visual Studio still runs the test. It is necessary to clear the test cache for Visual Studio to pick up the change. One way to do this is to clean the solution and rebuild it.
Owner
Used for reporting purposes, this attribute describes the person responsible for the unit test method.
DeploymentItem
If the unit tests are being run in a separate deployment folder, this attribute can be used to specify files that a test class or test method requires in order to run. You can specify files or folders to copy to the deployment folder and optionally specify the target path relative to the deployment folder.
Description
Used for reporting, this attribute provides a description of the test method. Oddly, this attribute is available only on test methods and is not available on test classes.
HostType
For test methods, this attribute is used to specify the host that the unit test will run in.
Priority
This attribute is not used by the test engine, but could be used, via reflection, by your own test code. The usefulness of this attribute is questionable.
WorkItem
If you are using Team Foundation Server (TFS), you can use this attribute on a test method to specify the work item ID assigned by TFS to the specific unit test.
CssIteration/CssProjectStructure
These two attributes are used in relationship with TeamBuild and TestManagementService and allow you to specify a project iteration to which the test method corresponds.
Parameterized Testing with the DataSource Attribute
Microsoft’s unit test engine supports CSV, XML, or database data sources for parameterized testing. This is not exactly true parameterized testing (see how NUnit implements parameterized testing) because the parameters are not passed to the unit test method but must be extracted from the data source and passed to the method under test. However, the ability to load test data into a DataTable from a variety of sources is helpful for driving test automation.
CSV Data Source
A comma-separated-value text file can be used for a data source:
Numerator, Denominator, ExpectedResult
10, 5, 2
20,5, 4
33, 3, 11
and used in a test method:
[TestClass]
public class DataSourceExamples
{
  public TestContext TestContext { get; set; }

  [TestMethod]
  [DataSource("Microsoft.VisualStudio.TestTools.DataSource.CSV", "C:\\temp\\csvData.txt", "csvData#txt",
     DataAccessMethod.Sequential)]
  public void CsvDataSourceTest()
  {
     int n = Convert.ToInt32(TestContext.DataRow["Numerator"]);
     int d = Convert.ToInt32(TestContext.DataRow["Denominator"]);
     int r = Convert.ToInt32(TestContext.DataRow["ExpectedResult"]);

     Debug.WriteLine("n = " + n + " , d = " + d + " , r = " + r);
  }
}
It results in the following output:
n = 10 , d = 5 , r = 2
n = 20 , d = 5 , r = 4
n = 33 , d = 3 , r = 11
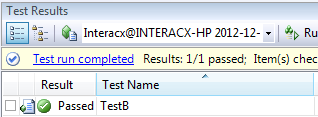
Note that the test result window does not show the parameter runs (contrast this to NUnit):

However, there are obvious advantages to not displaying each test combination, especially for large datasets.
XML Data Source
Given an XML file such as:
<Data>
    <Row Numerator = "10" Denominator = "5" ExpectedResult = "2"/>
    <Row Numerator = "20" Denominator = "5" ExpectedResult = "4"/>
    <Row Numerator = "33" Denominator = "3" ExpectedResult = "11"/>
</Data>
an example of using an XML data source for a unit test is:
[TestMethod]
[DataSource("Microsoft.VisualStudio.TestTools.DataSource.XML", "C:\\temp\\xmlData.xml",
     "Row", DataAccessMethod.Sequential)]
  public void XmlDataSourceTest()
  {
    int n = Convert.ToInt32(TestContext.DataRow["Numerator"]);
    int d = Convert.ToInt32(TestContext.DataRow["Denominator"]);
    int r = Convert.ToInt32(TestContext.DataRow["ExpectedResult"]);

    Debug.WriteLine("n = " + n + " , d = " + d + " , r = " + r);
}
Note that other than the data source attribute parameters, the test code is the same.
Database Data Source
A database table can also be used as the data source. Given a table such as:
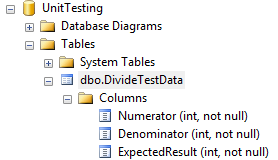
and data:
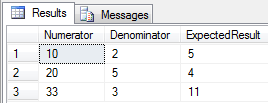
An example test method using this data looks like:
[TestMethod]
[DataSource("System.Data.SqlClient", "Data Source=INTERACX-HP;Initial Catalog=UnitTesting;Integrated Security=True", "DivideTestData", DataAccessMethod.Sequential)]
  public void XmlDataSourceTest()
  {
    int n = Convert.ToInt32(TestContext.DataRow["Numerator"]);
    int d = Convert.ToInt32(TestContext.DataRow["Denominator"]);
    int r = Convert.ToInt32(TestContext.DataRow["ExpectedResult"]);

    Debug.WriteLine("n = " + n + " , d = " + d + " , r = " + r);
}
Again, observe that the test method code itself is the same—the only thing we’ve done here is change the DataSource definition.
TestProperty Attribute
The MSDN documentation for this attribute illustrates declaring a TestProperty name-value pair and then, using reflection, acquiring the name and value. This seems to be an obtuse way of creating parameterized tests.
Furthermore, the code, described on Craig Andera’s blog, to use the TestProperty attribute to parameterize the test initialization process does not affect the TestContext.Properties collection on Visual Studio 2008 or Visual Studio 2012.

Comments